yug
Apprentice Shielder
 alleged "chainsaw luthier"
Posts: 36
Likes: 0
|
Post by yug on May 14, 2011 18:01:23 GMT -5
While the P.C. Woody is setting up on the 12-string, I'm looking at the next little project.
I bought an old Silvertone acoustic at a yard sale a few years back. As best I can ascertain, it was made in '64. Some idiot sanded all the finish off the top and then left it to rot in a mini-storage where it was bought by the guy that was having the yard sale and then bought by...me!
It has holes for bridge screws but not for bridge pins. That should help with bridge placement down the road. I think I'll use that style of bridge when I get to that point. But the cracks that were present when I bought it have multiplied. So, I'm thinking it needs a new top.
I plan to use the existing braces on some new tonewood.
So, how do I begin taking the old top off. I need to remove binding,which I would like to save and re-use.Maybe not? I'm planning on using the old top as a template for the new. This is all a little above my pay-grade but I'm willing to tackle it as long as I go slow and proceed with caution.
Any thoughts or recommendations?
|
|
|
|
Post by cynical1 on May 14, 2011 21:58:11 GMT -5
While the P.C. Woody is setting up on the 12-string, I'm looking at the next little project. As an aside, that can take 3-4 days. Starting to sand too early...well, you can tell right away if it's not set... On to the thread. My, you are the adventurous one... Replacing the top on an acoustic, and expecting good results is an expensive proposition. The clamps alone will probably cost more then you paid for the guitar...unless you've got a bunch of bar or spool clamps laying around... Here's an example of what's involved in clamping your new top: 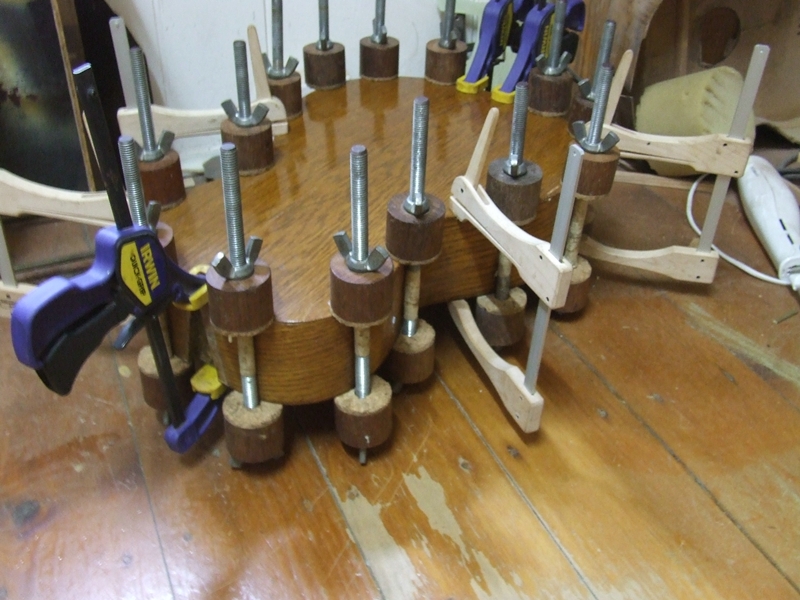 You can save a few coins by making your own spool clamps from 1-1/4" or 1-1/2" dowel rods, some heavy felt, two washers, two wing nuts and some threaded rod...but for the number you'll need that's still going to add up. And if you do make your own, don't forget the electrical tape (some people use masking tape, but excess glue sticks to masking tape) on the threaded rod where it will come in contact with the wood sides of the guitar. Those are two words that can spell firewood for most guitars... Rot can be merely on the surface and sanded away...or it could be deeper, thereby making it tough to recover. Cracking needs to be evaluated carefully. This may indicate that the body was waterlogged and dried out too fast. The combination of the two would indicate some pictures and further investigation are wise and prudent before the sawdust begins to fly...and you may want to check for mold on the inside as well... Keep in mind that those conditions will also effect the neck, bracing, back and sides of this guitar as well. Braces? Does it have bad teeth, too? I would reserve judgement on reusing the bracing until you get the top off. They may be shot as well. Tonewood is a seriously overused term. If it were me, and I were looking for wood for a top on a Silvertone, I'd limit my options to Grade A, or more realistically, "seconds" grade spruce. LMI has about the best quality for the money. I've used them for years and never got burned. Here's a link to the Engelmann Spruce tops. Those will get you in and out for under $20.00. They carry about everything you'd need for this project, so feel free to surf around. What kind of access to tools do you have? It also depends on whether you want to keep the top...which you do... A steady heat source, a single edged razor blade, or a box cutter blade and a stiff scraper will do the job...slowly and tediously, but they'll work. There are specialty tools for this, but again, they'll eclipse the cost of the guitar in seconds... And I wouldn't order anything for this guitar until the top was off. You already know the heart is bad on the patient...no sense spending money until you find out if the rest of the patient is salvageable. I'd 86 the idea of reusing the binding. Honestly, for what it costs for new binding it's not even worth the trouble trying to save the old stuff. This isn't a 1930's Martin, after all... You might be able to pull it off. The fact that the top shows rot and cracks might make all the care in the world academic once you put some heat and pressure on it. Unless this is a unique body style, a tracing made before you start surgery on very stiff heavy poster/layout board will suffice. At least you're doing this on a guitar that isn't very expensive. There is a serious learning curve to doing what you're about to undertake. Most repair shops would advise you to just buy another guitar due to the expense of the tools and the amount of time involved to do it right. But, as you say, go slow and careful and you might be able to pull it off. If not, then it may still have a life as a beer can holder... Yeah, go buy a guitar that isn't cracked or rotted...   Good luck. Happy Trails Cynical One |
|
|
|
Post by lpf3 on May 14, 2011 22:50:15 GMT -5
All that work is makin' me hungry; and we haven't removed the neck yet. That would be the only way to get the top out from under the fingerboard and then put on the new top, trim it to size, and bind it. Then you're lookin' at a neck reset. You'll need to steam the glue holding the fingerboard to the top and the neck joint- something like this would be a must have and probably one of these, although you could probably make your own. This could be a fun project, (I actually have one wackier than this in the back of my mind) so if you don't mind spending some time and money you might enjoy it. Keep in mind unless you're a great luthier you shouldn't have high any expectations- just do it for fun.  lpf3 |
|
|
|
Post by cynical1 on May 15, 2011 0:50:00 GMT -5
lpf3, as always, brings up a very salient point on the neck removal.
If you can get some pictures up that would go a long way in helping you pull this off.
I'd really like to see how bad the top is and how well the bridge is still mounted.
Before we get too involved here, what kind of shape is the neck in? If there's a warp or twist then returning it to a playable condition may be impractical...unless you want the only $1000.00 Silvertone in existence...
There are ways to fix a crack. Rot, if it's not too bad, can be fixed with some wood hardener.
If the guitar is a plywood veneer, and the plys have separated, save your money and use the guitar as a wall ornament.
Need more data...
HTC1
|
|
yug
Apprentice Shielder
alleged "chainsaw luthier"
Posts: 36
Likes: 0
|
Post by yug on May 16, 2011 19:56:02 GMT -5
Oh, you guys,
When I said rot, I should have been more specific. Guitars in Denver do not do well when the finish is removed. The finish was removed before I got the box. It languished in a mini-storage for God only knows how long. There are myriad spider cracks in the top. There was one huge gouge in the top that I tried to fix with sawdust mixed with hide glue. Not pretty.
Kinda figured the binding was an R and R. Binding is relatively cheap(at Stew-Mac, anyway). There are a couple spots on the neck that have fallen by the way(gone before I got it)and need replacing so if I'm gonna buy some I mioght as well get enuff to do the whole thing.
I wouldn't mind owning a $1000.00 Silvertone. If I have to pull off the neck I can get the neck routed for a truss rod. Currently, the neck lacks that little bit of modern technology.
Like I said, this project has been rolling around for a few years. I've talked to a couple of luthiers that told me to use it for kindling. But, dammit, it's a '64 Silvertone. The Silvertones. the Kay's, the Kalamazoo's, those were guitars I could only look at and dream about.
I will try to figure out how to post pics to this site so you can see what I'm trying to do. There must be some 14 yr old kid in the neighborhood that can help.
I think this might be fun, if not educational.
Thanks,
yug...
|
|
|
|
Post by cynical1 on May 16, 2011 21:16:48 GMT -5
Well, alrighty then Mr. Packer, if you're determined to go...I guess I better help you pack the meat tenderizer... But first I'm really gonna need to see some pictures of the guitar. What you describe on the top may very well be endemic to the rest of the guitar. And saving the neck may be a task better served by a new neck. If the body wood has been subjected to stressful conditions, so has the neck. Again...pictures... And you just might... You mean the professionals...what do they know... If you want to preserve it for posterity, consider the option of cosmetically cleaning it up and use it for a wall hanging. For the amount of work, time and money you're going to put into this guitar, you might be better served building a new one from an LMI kit. It will be playable, cheaper and as much of a learning experience as repairing the Silvertone. I have faith in you. Well, it will be educational. Fun...hmmm... Happy Trails Cynical One |
|
|
|
Post by sumgai on May 17, 2011 12:25:50 GMT -5
yug, How to post images to this forum: guitarnuts2.proboards.com/index.cgi?action=display&board=forum&thread=2841&page=1#36035As for c1's minor (for him anyways) rant, ignore it. After all, he's a professional Cynic, so it goes with the territory. However, if you should ever get a hankering to engage the services of a financial advisor, I'm sure I could free up some time for you..... j/k! Seriously, if it cranks your turner, then go for it! It's about the fastest way I can envision to earn your Nutz Merit Badge. ;D sumgai |
|
yug
Apprentice Shielder
alleged "chainsaw luthier"
Posts: 36
Likes: 0
|
Post by yug on Jun 22, 2011 20:01:42 GMT -5
here are the pix of the Silvertone. Hope these go thru. I now have another project, an old Harmony Master with serious damage to the back. But it looks fixable...
yug...
|
|
|
|
Post by cynical1 on Jun 22, 2011 20:37:08 GMT -5
...pictures? You might want to check sumgai's link on posting images...cause I don't see a thing...  HTC1 EDIT: Check your PM's |
|
yug
Apprentice Shielder
alleged "chainsaw luthier"
Posts: 36
Likes: 0
|
Post by yug on Jun 23, 2011 20:09:30 GMT -5
|
|
yug
Apprentice Shielder
alleged "chainsaw luthier"
Posts: 36
Likes: 0
|
Post by yug on Jun 23, 2011 20:12:13 GMT -5
Okay, yeah for me!!! Thanks for doing everything but pushing the dang buttons for me. So, Here are the pics of the silvertone. I will be following with the pics of the Harmony. Thanks everyone,
yug...
|
|
|
|
Post by cynical1 on Jun 23, 2011 22:25:34 GMT -5
Pictures...good...
Well, it sure looks cracked. And I assume the white stuff is the residue from the mold you mentioned earlier.
You mentioned routing the neck for a truss rod. This may, or may not be an option. This really depends on the type and integrity of the heel to body joint. You can buy truss rods short enough, but you want to actually route the channel with an arc to it. You get that far and I'll explain it.
Replacing the neck outright would be your most effective option. I know, I always go on about older guitars and how the wood has stabilized, but you haven't given us a lot of details on the bow, backbow, twist, warp, tenon condition... At the very least you'll be removing the fingerboard, leveling any warps or bowing, then installing a new fingerboard. At least the headstock pattern would be original...
Be prepared to invest in some tools...or be prepared to build workable facsimiles.
When you do get the neck and top off you may discover issues with the existing bracing. It could have separated...separated and fallen out, failed or just be insufficient to the stability of the guitar. We will all find this out once the top is off.
I hope that you only have to replace the top. The cheap alternative is to razor a v shape in the cracks and fill with thin wedges of wood glued into those V's to return some measure of stability to the soundboard. Granted, this is a more traditional repair for the sides, but it would save you the trouble of removing the neck and top.
The mold can be removed with a 10:1 solution of bleach and water. A stiff toothbrush can be used to work it out. This will alter the color of the wood and raise the grain potentially.
These methods pretty much eliminate the use of a clear finish after the fact, but a dark stain or wood dye, with a satin poly finish reduced and wiped will hide most of those sins.
I'm really not trying to rain on your parade. I've seen how emotional people get over their instruments...and how much they spend to repair them. I just hate to see you go into this project with any expectations that this is going to be a quality playable instrument when you're done. Let be honest here, you are proposing spending a lot of time and treasure on repairing what was..let's face it...a cheap guitar in 1964.
By the time you replace all the potentially bad components and parts, buy the tools and supplies, you may wind up with newey's grandfather's axe... To explain, as I recall the story, his grandfather was proud of the fact that he had owned this ax for decades. Even though the handle and the head had been replaced on numerous occasions, he maintained it was the same axe. If you want a 1964 Silvertone, you honestly need to evaluate how much will be left at the end from the original.
If it's going to be more new then old, you would better serve your time and money by building a new acoustic from plans that have proven themselves to produce quality instruments.
But hey, if you really have your heart set on this, what do you want to know first?
Happy Trails
Cynical One
|
|
yug
Apprentice Shielder
alleged "chainsaw luthier"
Posts: 36
Likes: 0
|
Post by yug on Jun 24, 2011 19:53:20 GMT -5
Okay, let's get a few things straight here. That white crap is some filler I made from sawdust and hide glue. The discolorations are hide glue that I tried to force into the cracks. The neck, back and sides are still covered with the original stain and lacquer. The previous idiot owner sanded all the finish off the face of the guitar. Why? Who knows? I like this guitar because a friend had a similar guitar that was made for Montgomery Ward, reasonably similar vintage. I always liked that guitar. I had the opportunity to buy this one so I did.
The neck joint could use a bit of work. If I apply pressure to the headstock I can see daylight between the heel and the body. Probably need to remove and reset. This could really turn into a money pit.
That being said, I only paid $10 for the guitar. That makes the Silvertone eminently qualified as a learning vehicle. If I am careful and diligent I should have a decent old guitar at the end of the project. And if I f#*! up, who really cares? At least I will have learned something not to do that could help me in the long run.
I don't think I'm ready to install a truss rod from scratch so I don't think I'll go there. Let me just get this guitar to a point where I can hang some strings on it and I'll be happy.
yug...
|
|
|
|
Post by cynical1 on Jun 24, 2011 21:22:46 GMT -5
OK, straight is. The first thing you're going to need to do is get the neck off. lpf3 pointed to some nice tools and I can't add any more to that one. I checked the tutorials for the tools he linked to, and I can't really add much to them, either. If the joint is already loose that'll make the job easier. The neck is the most important part on any guitar. You're going to need to get that right before you bother with the body. It's also likely to be the most expensive part of the guitar to repair. Depending on the condition of the neck once it's off the guitar you may have an easy job, or it may get involved. Truss rods are not mandatory in acoustics, but they're a handy thing to have. If you get the neck straight and true then just put nylon strings on it and you're good to go for years. I don't know what the radius is on a Silver tone acoustic, but most acoustics are flat or have a relatively flat radius to them. First tool on the list is a quality metal straight edge, either 18" or 24". You'll use this to check the bow and potential warp. If you've got a lot of meat on the finger board you may be able to fix any minor bowing or warpage with a radius sanding block. You'll need to pull the frets for this first, but they probably need to go anyway. There are dedicated fret pulling tools, but I use a farriers nippers. These also have the dual use advantage of cutting the fretwire ends flush with the fingerboard prior to filing them smooth. Let us know when you get to the frets and we can help you fro there. Worst case is you'll need to pull the fingerboard and do your corrections on the neck itself. If the fingerboard comes off cleanly enough you may be able to reuse it, but figure on replacing it. gfxbss put up a good reference article on pulling a fretboard. You can check it out here. Luthier's Mercantile sells pre-radiused slotted fingerboard, so that'll make your life easier. While you're at Stew-Mac, a fretting saw would be a good item to pickup. Their fretwire is good, but LMI sells the same thing for less. The nut probably needs to go too. More then likely it's plastic, so for $10.00 you can get yourself a Tusq nut. Depending on what environmental conditions this guitar sat in, the neck tenon may need to be repaired. With luck it'll come apart clean and you'll just need to chisel it cleaner to refit the neck later. Even if you have to do a little rework, repairing the tenon is not that difficult...time consuming, but far from impossible. I suggest doing the neck first, because that's going to be most involved then the body, and in the end will have a greater determining factor on playability. And since it has to come off in order to remove the top...why not get the worst part out of the way first. Rather then write out 10,000 words on a step by step for the whole project, would you mind taking it in stages? I ask for two reason. First, I don't know what you're going to find along the way and if we address each issue in turn you won't have to do things twice...and secondly, my fingers might not hold up... So, tackle the neck first, let us know what you find and we'll go from there. Feel free to shout out with any questions, concerns or WTF did he say moments. Happy Trails Cynical One |
|
yug
Apprentice Shielder
alleged "chainsaw luthier"
Posts: 36
Likes: 0
|
Post by yug on Jun 25, 2011 21:49:52 GMT -5
Not sure myfingers are up to this. But, I'm willing to try.
While we're on the subject of tenon joints, I have another project with similarities. The tenon is loose and wobbly. So we will deal with tenons and solve two problems at once.
I'll get back to the post after I remove the neck on the Silvertone. I've already removed the neck on the Harmony.
Talk to you soon!
yug...
|
|
yug
Apprentice Shielder
alleged "chainsaw luthier"
Posts: 36
Likes: 0
|
Post by yug on Jul 6, 2011 18:43:21 GMT -5
Oh Geat and Cynical One,
A quick question about removing the neck. As this guitar is fairly old and I don't know the entire history of it( I bought it from a guy that makes a living buying storage units and re-selling at garage sales) it did live for a number of years in Colorado. The lack of humidity and more than a little heat have already caused problems with as evidenced by the cracks in the unfinished top.
So, what precautions should I take when removing the 14th fret, drilling a very small hole and introducing steam to the neck joint. I don't really want the rest of the guitar to fall apart from exposure to the steam. Not saying it will, but I like to have a fair idea of what the consequences could be.
yug...
|
|
|
|
Post by cynical1 on Jul 6, 2011 21:07:21 GMT -5
I wish I had a hard and fast answer for you, but there are many variables in the undertaking you currently find yourself in. But I'll do my best to get you close...
This is challenging trying to write out what you need to do in a post like this...kind of like putting both hands in your pockets and trying to describe a spiral staircase to someone who has never seen one before...but here goes...
First off, the "remove the 15th (or 14th) fret and drill a hole to introduce steam" to loosen the joint is largely a Martin thing. They are fairly consistent on this reference point. On other guitars, maybe it's the spot to hit the dovetail...and maybe it's not...
My guess is all the frets will have to go, and possibly the fingerboard. You might want to pull the 14th, 15th and 16 fret and drill a small hole. Going under the assumption that the top is scrap anyway, it's not going to create any problems for you by doing this.
And these are very small holes anyway... And I pull my frets with an old pair of farrier's nippers. There are tools designed for this purpose, but I use the nippers because I already have them lying around.
And you may wind up taking some of the wood with you when you pull the frets. If they were previously glued in taking a soldering iron and heating the fret may minimize the tearing, but sometimes it just happens depending on the type of fret used and the type of wood the fret was pounded or pressed into.
Getting back to the neck...the whole purpose of the steam, as you have probably already read, is to cause the glue (this technique is designed for hide glues) to become viscous and allow you to slide the neck out of the dovetail joint.
Hide glues get hard and crystallize with age. They do this. The fact that you are in a very dry climate, and the guitar was not kept in the most idea conditions could work for or against you on this.
As I recall, from the 2 years I lived in Colorado, the altitude had as much of an effect on things as the dryness of the climate. The fact that the wood has dried out may work for you when you try to steam the neck off the body. On the other hand, too much steam may cause the dovetail to swell up and seize on you.
Removing a neck from an acoustic guitar is one of the trickier things you can attempt. Even with years of experience it can go South on you, so don't beat yourself up if it doesn't pop out like it did in the pictures...
Something else you might want to have a look at before you start firing up the espresso maker, is check to see if the neck joint is reinforced, or held to with pins or screws from inside the body.
I know, it's rare, but a small mirror and a small flashlight and 30 seconds looking may save you hours of WTF moments...
Since you're replacing the top, as a last resort, you can just cut away the top around the neck joint to gain better access to the dovetail.
You have other advantages working for you. You are not worried about preserving any of the finish, you live in a dry enough climate that the overall saturation of the wood will not take weeks to overcome, and it's not a $10,000.00 Martin.
Is the neck seated tightly, or is there some play in the joint? The more play the easier the job. And God forbid anyone used an epoxy at any point back down the road...
As far as what method is best to introduce the steam...I've seen steam irons used, espresso makers with a hose, tea kettles brought to a boil and the relief valve on a pressure cooker... I thought the espresso maker trick was the easiest to use. The worst part of that method is having to keep refilling the espresso maker and waiting for it to make steam again...
And if you've got a nice espresso maker, the wife may find this next part a bit less then desirable...but if you make a trip to the local farm or ag supply store, buy the biggest hypodermic needles you can find, buy your tubing so you can wedge the shank end of the needle into the hose and toss a small hose clamp on this little affair, you can then direct the smallest blast of steam into the tiniest area possible. Make sure you clamp the other end of the hose to the end of the espresso pipe or it will come flying off...trust me... Back when you could find metal basketball inflation needles those worked, but now all you can find is plastic ones...and they don't work and play well with live steam...
You can wrap rags around the end you're holding to protect your fingers, use a pair of pliers or wear gloves. I drilled a dowel rod out and pushed the hose through the hole, but whatever works...
Finally, be very careful in the application of force while trying to extricate said neck. It's not common, but the wood in the dovetail may have split and too much force may cause it to break in ways you hadn't intended. the odds of the entire guitar falling apart will depend on the structural integrity it has in its current state. The steam will create the most potential damage around the dovetail, but should have little effect on the rest of the guitar...unless you're doing this in a sauna...
This is going to be hard to explain without a picture, but most shops will have a jig or fixture for forcing the neck out of the body. Basically, it is comprised of a series of board that are carriage bolted and wing nutted to allow for mounting it to any type of acoustic guitar. It will stay on the guitar by compression on the top and bottom of the body. There is then a threaded rod, or threaded clamp end that is positioned at the heel of the neck. As the steam is applied you gradually screw in the threaded rod against the heel.
Stop if you hear creaking or cracking and apply more steam. The neck can come flying out, so be prepared for that. I wish I had a picture of one of these things...it'd make it much clearer on assembling one...
Once you get the neck out you may find that after a couple of weeks it just doesn't fit together again the same. This is not uncommon. You will probably want to rework the dovetail prior to reassembly anyway, but we'll cross that bridge when we come to it.
Hope some of this helps. Let me know if I missed something.
Happy Trails
Cynical One
|
|
yug
Apprentice Shielder
alleged "chainsaw luthier"
Posts: 36
Likes: 0
|
Post by yug on Jul 8, 2011 18:42:42 GMT -5
Okay, so some of this I already knew and some I just intuited. The guitar lived for several years in Colorado and now lives in Oklahoma, the land of the damp and the home of the heat. It now resides in a climate controlled environment.
I was planning on stealing my Mom's pressure cooker for building steam but she got rid it of some years ago. Guess I'll go to the thrift store and find another.
I intend to save the neck and frets if at all possible, however the wood is old and that certainly raises the spectre of splintering, disintegrating wood. I really hope to avoid this by taking great care. But I am known to have a short attention span. Slow and steady gets it done!
I will try and rig up some sort of clamp and pressure system as I get this under way. I'm guessing that older American guitars probably used hide glue( I know I would).
I will check for screws and pins in the neck block. I have looked around with a lighted mirror and didn't see any thing like that, but, you never know.
I'll post again when I've made a bit of heady.
Thanks for every thing,
yug...
|
|
|
|
Post by cynical1 on Jul 8, 2011 19:59:58 GMT -5
I was planning on stealing my Mom's pressure cooker for building steam but she got rid it of some years ago. Guess I'll go to the thrift store and find another. If you've got to buy anything, buy a cheap espresso maker. It really is a better tool for the job. By all means, try and save the wood if possible. I would rethink the idea of saving the frets. Once you pull one or two you'll never get that fret to seat again properly. Just pull them all and be done with it. More then likely they've seen their better day as well... Slow and steady is exactly what gets it done. Rushing here can lead to some very interesting firewood. I did find s few pictures to give you a better idea of what I was talking about: 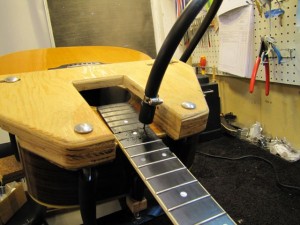 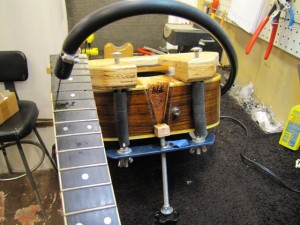 That fixture is close to what we used, and any variation on the theme will get the job done. I doubt you'll find any, but I've been burned by previous fixes on instruments and only mention it in passing. Good luck and good hunting... Happy Trails Cynical One |
|
yug
Apprentice Shielder
alleged "chainsaw luthier"
Posts: 36
Likes: 0
|
Post by yug on Jul 21, 2011 20:30:20 GMT -5
Cynical 1,
I have assembled all the gear. I have removed the 14th fret. That was a bit of a disaster. You warned that the fretboard might be crumbly. You were correct. Like a stale saltine. So, the fretboard has got to go. But we'll get back to that later.
For now, I have the espresso machine, the neck clamp/jig, the hose with a basketball needle clamped to one end and the other end of the hose clamped to the espresso machine. Just need to drill a hole and start steaming.
Any thing else I should know. I'm attempting to trod on unfamiliar ground here.
Slow and easy does it
yug...
|
|
|
|
Post by cynical1 on Jul 21, 2011 21:11:04 GMT -5
yug -
Well, you might want to yank the 15th fret, too. It may be overkill, but it may be just where the dovetail is on that guitar. The fretboard is going anyway, so you've got nothing to lose.
The whole premise behind the holes in the fingerboard, for those of you that just joined us, is to allow the steam to hit a glue seam in the dovetail to soften the glue for neck removal. The more holes the better the odds you'll hit a glue seam.
I would guess that the dry climate and less then ideal conditions this guitar has been kept in will make the job easier as the wood has probably already started to shrink at the glue seams anyway. The crumbling fingerboard is a good indicator of this.
Work the steam with a light pressure...you're not sand blasting...you want enough pressure for the stream to react with the glue, but not so much that the wood begins to swell from the excessive moisture.
Keep a firm, but steady pressure on the jig at the heel of the neck. Not to the point where you hear it creak and crack, but enough so you'll notice the neck moving once the glue begins to soften.
Keep working the steam and the jig slowly. I wish I could give you an exact time and turn method, but it varies from guitar to guitar. Once you see it moving, hit the holes one more time with the steam and start turning the jig tighter. I have seen them pop right off, and I've seen them swell to the point where you have to put it away for a week or two before you can try again.
Also, wear safety glasses and have a good pair of gloves handy. The hose can pop off, the basketball needle can pop out...remember, it's all fun until someone loses an eye...
Finally, your desire in all of this is to leave as much of the original dovetail intact as possible. Even if you are super careful in this process the joint still may have deteriorated to the point where you'll have to rebuild it later. We'll cross that bridge when we come to it.
Resist the temptation to do any more then lightly scrape any softened glue away from the joint once it finally does separate.
Put the body and the neck up in a dry place for at least a week before you start noodling with it. As old and unstable as that wood is you want to have a good idea of what you're working with before you move on to the next step.
Feel free to remove the fingerboard, though... It's toast anyway. This will give the dovetail and the neck a chance to thoroughly dry out before you think if shaping the neck for a new fingerboard.
Oh yeah, get the cats out of the room... We had a cat that used to haunt one of the shops I was in and he hated the espresso maker. He'd jump up on the bench and swat at it the hose...that can be distracting...and can scare the Hell out of you if you don't see it coming...
I can't think of anything else at the moment. We've covered about all we can in a text based environment... You know enough to attempt this job. And don't feel like you screwed it up if it goes terribly awry. As old and questionable as this guitar is there are no guarantees... If you brought it to me I'd make you sign a release before I did anything...
Good luck. We're all pulling for you...
Happy Trails
Cynical One
|
|
|
|
Post by newey on Jul 21, 2011 21:34:42 GMT -5
Absolutely.
Vaya con Dios, amigo!
|
|
yug
Apprentice Shielder
alleged "chainsaw luthier"
Posts: 36
Likes: 0
|
Post by yug on Jul 22, 2011 20:08:06 GMT -5
In the past, I have waited and scraped only dried glue from the dove-tail. It's just easier that way.
Thank God, no cats... several small and medium sized dogs... no real advantage. The dogs hate hissy, squeally noises, too...
Not concerned with a time line. I have the weekend for this. Slow and easy does the trick.
Will do on the 15th fret as well. Might add the 13th just to add suspenders to the belt. The 14th is in line with the neck joint and it might not hurt to inject steam from different angles to aid in the softening of the joint.
One last question. Should I try to remove the fretboard before I remove the neck? Seems as if I need to loosen the fretboard from the top so maybe I should remove the fretboard while I'm at it. Yes?
|
|
|
|
Post by cynical1 on Jul 22, 2011 20:52:21 GMT -5
One last question. Should I try to remove the fretboard before I remove the neck? Seems as if I need to loosen the fretboard from the top so maybe I should remove the fretboard while I'm at it. Yes? If it were me I'd wait until the neck came off before I hit the fingerboard. The only thing you want to separate the fingerboard from is the top of the body. If you have a fret slotting saw, or a very fine flatsaw, and you feel froggy, you might want to cut the fingerboard away at the body line and remove it that way. Might give you another angle to loosen the joint from, but it's not really necessary. First, you want as much wood there as possible when you start to turn the screw on the jig. Second, as you put the needle into the hole the raw steam will just blast over a piece you're going to remove anyway, versus it hitting the neck wood you're hoping to salvage. I'd want to avoid getting any more water on the neck then necessary to remove it from the body. Finally, if the whole neck shatters you'll have saved the time and trouble of removing the fingerboard. Not to cast aspersions, but this is a possibility with a guitar in the condition yours is in. And it's just easier removing the fingerboard once it's off of the body. You have more angles to work from and less bulk to get in your way. Hope that answers your question. Fire away if you have anymore. Happy Trails Cynical One |
|
yug
Apprentice Shielder
alleged "chainsaw luthier"
Posts: 36
Likes: 0
|
Post by yug on Jul 24, 2011 9:07:48 GMT -5
Well, that went quickly. About 20 mins. total. I worked the fretboard loose from the top with a warm putty knife before steaming the neck joint. The joint really didn't need a lot pressure from the jig, maybe a couple of 1/4 turns and the neck sort of seemed to jump from the notch.
I did scrape away a good amount of the soft, gooey glue until it started to re-harden.
I was also pleased to discover a steel C-channel under the fretboard. No truss rod and no openings for access but the tricky work was already done by the factory. I'll know more once I get the fretboard off. I'm plannig to use the warm putty knife to work the fretboard off the neck.
Thanks for the suggestions and for sharing the knowledge,
yug...
|
|
|
|
Post by cynical1 on Jul 24, 2011 11:30:10 GMT -5
Man, I am so glad that went well. Now I can uncross my fingers... Well, that's a big obstacle out of your way. You still have a lot more fun stuff ahead, but at least the project isn't DOA. This is a time when the dry Colorado climate worked to your advantage. Getting as much of that old glue off while it's soft will save you time later. Hide glue does come off pretty well once it crystallizes, just be careful not to take too much wood off of the dovetail while removing the old glue. Either a small wood carving chisel or sandpaper on a small block of wood will do the job. The more I thought about it, you might want to leave the old fingerboard attached to act as a guide in cleaning up and possibly repairing the dovetail joint. As the wood dries and the old glue is removed you may find it has shrunk to the point where some additional buildup may be needed to return the neck to its proper height so the fingerboard lays flat on the top of the body. I don't know what the dimensions of the C-Channel route are, but if it's intact your quickest option may be to just reuse it. And truss rod routes are normally cut on a long radius which you probably don't have in your case. The jig for a truss rod route looks like this: 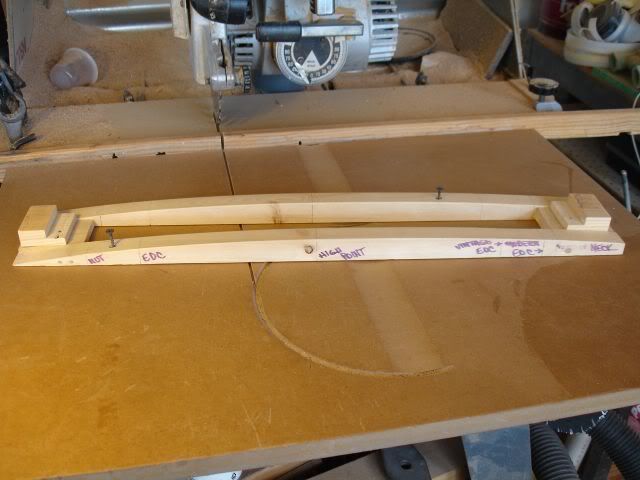 I've seen carbon fiber rods used in place of truss rods and old steel channels. Might be a quicker option then refitting for a traditional truss rod if the steel channel in there now is not reusable. And gfxbss did a nice reference article on How to Remove a Fretboard. Again, based on the aforementioned climate conditions, the fingerboard probably won't be much of a fight either. Well, you've earned a week off while the neck and body dry out. Use the time wisely and rack up some expenses buying the next wave of repair parts and tools... Put a bookmark in this link: Have you settled on the replacement top and fingerboard wood? Happy Trails Cynical One |
|
yug
Apprentice Shielder
alleged "chainsaw luthier"
Posts: 36
Likes: 0
|
Post by yug on Jul 24, 2011 17:24:50 GMT -5
I 've given some thought to the top and fingerboard wood. No decision as of yet. I've investigated StewMac and LMII. LMII seems to have better prices.
As to the truss rod and channel, I've no idea about that. The neck appears to have NO rod, only a C-channel running down the center of the neck, just below(and covered by) the fingerboard. I'm hoping to leave the channel in place as the basis for adding a rod. I don't even know if that's feasible.
The neck came off very cleanly with no loss of wood in the entire joint. I'm really hoping that any necessary build-up will prove to be minimal.
I did notice something about the overall finish of the guitar. The outer layers of laquer have become crazes with a myriad of tiny cracks. Can this be fixed by light sanding and a few coats of fresh laquer?
Thanks again, I'm taking the week to work on other projects,
yug...
|
|
|
|
Post by cynical1 on Jul 24, 2011 21:28:10 GMT -5
I've dealt with Stew-Mac and LMII for years. I've never had a problem with either one of them.
I will say the LMII tends to favor the professional luthier in their stock, tools and wood selections. Their pre-radiused and slotted fingerboards are the shiznitz....and when they mark a grade on a piece of wood you can be confident that what they quote is what they sell. And last time I sent a question off to them they were quick to answer back.
Stew-Mac does tend to get expensive, but they do have tools and items you just can't find anywhere else.
And if the neck shaves and sands out straight, and you stick to lighter gauge or nylon strings, you may not need to go with a truss rod. If the steel channel is not rusted, which is unlikely in Colorado, then popping it out to shave\sand the neck to true it up for a new fingerboard, then popping it back in may be all you need to worry about. I looked for the carbon fiber rods and LMII carries them, so that's an option as well.
If you just want to stiffen the neck I saw "Pultruded Carbon Rods", which are just CF tubes. According to the description, you route and drop the 1/4" rods on either side of the truss rod. Do they make a difference...beats me, never used them, but thought they were a slick idea...
I don't have a truss rod jig anymore to give you dimensions, but I'm sure some Google time may pay off for you. Unless you discover a serious twist, bow, or back bow you can't flatten prior to putting the new fingerboard on, a truss rod on an acoustic is not a necessity. Martin made them for years with no neck reinforcement at all. At least your Silvertone had a steel channel...
And as long as the wood is all intact, shrinkage is about the only thing you'll need to worry about in the dovetail. That's why you want this guitar to thoroughly dry out prior to performing any analysis or evaluations.
Finally, cracks in the lacquer...cracks and crazing in lacquer is as common as idiots in Congress. Like it or not it just happens. Extreme temperatures, temperature fluctuations, humidity, lack of humidity, sun spots...you name it and lacquer will crack and craze.
Now, as for fixing it... Theoretically, lacquer will melt into the previous coats, no matter how long the lacquer has been in place. It will not, however, do anything but point out all the dirt and contaminants that have gotten trapped in those cracks as it does melt into the previous coat...
You've got two realistic options. First, try and sand the old lacquer with a 320 grit dry, then 400 grit wet or dry sandpaper. This will take care of any of the high spots and give you a reasonably flat substrate to shoot more lacquer. You will want to wipe the body down several time with a lint free cloth and denatured alcohol. With any luck this will remove all of the dirt and contaminants from the body so they don't stand out once you shoot the new lacquer. A quick wipe with a blue tack rag and cross your fingers.
Reduce or thin the lacquer 30% to 50% to allow it to fill the cracks and melt into the old lacquer better. It will dry lightening fast, so shoot light coats to avoid runs. Probably 8-15 coats of reduced lacquer should give you enough to re-sand and polish back to a respectable gloss. If the cracks are deep it may take more to level it out. If the cracks are clean from any debris you can use some Crazy glue to level out the cracks and reshoot a few more coats.
The downside of this method is that it will probably not fill 100%. It'll be better then it was, but you may still have some residual cracks visible after you shoot the reduced lacquer. Another potential issue with this method is that if the lacquer has lifted from the wood the recoats will generally not improve the re-adherence and it is possible that your finish may chip off even with the fresh lacquer applied.
The other option is to strip all of the lacquer off the guitar and start fresh. Lacquer does strip fairly easily and is nowhere near the agony of stripping urethane of catalyst polyesters.
Honestly, with the massive amount of work you're doing on this guitar, stripping the old lacquer is nothing big. There are several commercial strippers out there that'll do the trick. Kleen-
Strip KS-3 Premium Stripper works, and you can even take acetone, a plastic scraper and a 3M pad and have at it.
If it were me, I'd strip it. Why go through all the repairs and improvements just to let the only thing the rest of the world sees looking like Hell?
Well, enjoy the slight respite. I'm looking forward to the the next episode of "Silvertone - Back from the Dead..."
Happy Trails
Cynical One
|
|
yug
Apprentice Shielder
alleged "chainsaw luthier"
Posts: 36
Likes: 0
|
Post by yug on Jul 29, 2011 17:14:20 GMT -5
So, the week of drying is nearly at an end. I've inspected the neck joint(more than once) and it appears to need only minimal clean-up. I removed most of the old glue while it was still soft. I have not removed the fingerboard as I may need it a bit later. The sanding and re-finish can wait a bit as well.
So, where do I go from here?
yug...
|
|
|
|
Post by cynical1 on Jul 29, 2011 17:54:50 GMT -5
Well, let's review what needs to be done, as I understand it...correct me if I miss something...
The original intent was to replace the top. The other little things that have cropped up just happen and are part of the process... Let take a look at those...in the order I would do them:
Strip lacquer.
Remove old top binding and pull the old top.
Check bracing and internal structures. Replace or repair as needed.
Install new top.
Once the top is in place then install new binding.
Pull old fingerboard.
Replace with new fingerboard.
Install frets and nut
Check neck fit with new top and fingerboard - repair and\or modify dovetail as necessary.
Re-glue neck to body.
Sand like a demon with 320 and 400 grit dry sandpaper to make sure the body and neck that will receive a finish are as smooth as possible.
Re-install bridge. Be very careful with alignment at this point, but if you took good measurements before you tore it apart you should be fine here.
Apply any wood stains or dyes.
Apply hard finish.
Wait 30 days.
Sand and polish your butt off.
Re-string and perform set-up.
Enjoy the most expensive Silvertone in the World.
Granted, that a gross over-simplification of the tasks at hand, but that's the order I'd attack them in. Each individual area will have certain details and challenges that might present themselves, but if you take a systematic approach to the re-build you can research and prepare accordingly.
I think I've mentioned this before, but let's beat the dead horse again... Much of guitar building and repair is in the jigs and fixtures. Until the Internet wandered along, much of this knowledge was tucked away in the recesses of a select few. Now, with some persistent Google time, you can find out what to build and how to build it.
We've talked about tools a bit off line, so I think you've got a good idea what to spend the kid's college money on.
The one thing I would strongly recommend to you is to have the fingerboard pre-radiused and slotted to your scale. It's generally a $25.00-$35.00 adder from the supplier and will save you hundreds in tooling costs. This will limit, to some extent, what wood you use for a fingerboard, as extremely hard woods can not be machine tooled as they tend to chip, but I don't think you were going to use African ebony, tree of life or snakewood...so you should be cool. Check out the granadillo...very pretty, very underrated...and very reasonable.
Hope this helps. Ask again if I missed something.
Happy Trails
Cynical One
|
|


 lpf3
lpf3


