|
|
Post by cynical1 on Dec 9, 2014 10:09:35 GMT -5
Why are you guys against, gluing, plugging, re-drilling ? It's you're guitar, man. You can paint it pink and call it Mary and that's cool with me. Let me offer this up. When cutting slots on a fingerboard the nut is the origin point of all measurements. IE: nut to 1st fret, nut to 2nd fret, nut to 3rd fret...etc... Measuring from fret line to fret line, with a margin of error of .2mm per fret you can be as far as 4.8mm off by the 24th fret. There's a reason for this, and it's accuracy in maintaining scale. Nobody's perfect, but some systems are better than others. Preserving the scale length is the Holy Grail when determining where the neck sits. Using the base of the neck heel as your point of origin, which has no baring on scale length, should be avoided. I agree with you that something is seriously wanky with your neck. My only concern is that in trying to accommodate the neck pickup fit against the neck heel, the scale length changes, potentially throwing the intonation out the window. I have a feeling this is going to be somewhat anti-climactic... HTC1 |
|
Deleted
Deleted Member
Posts: 0
Likes:
|
Post by Deleted on Dec 9, 2014 10:20:56 GMT -5
Hi again Cyn! Preserving the scale length is the Holy Grail when determining where the neck sits. Using the base of the neck heel as your point of origin, which has no baring on scale length, should be avoided. Agreed, the scale length is preserved now, and there is much more than 1mm on both sides on the saddles to move the neck back and forth to at least 2mm. The reason I didn't measure from the saddle was exactly this, to eliminate the (correct) scale parameter out, and to expose the differences between mine and the other guy's guitar. My only concern is that in trying to accommodate the neck pickup fit against the neck heel, the scale length changes, potentially throwing the intonation out the window. Man I would never do that not even to my worst enemy (who at the moment is Thomann  ) I have a feeling this is going to be somewhat anti-climactic... A Thomann lady replied just a while ago about my estimation of the fix, and where did I get a quote. I told them I would need 150 EUR to fix this. Was this realistic ? or over-inlfated ?  |
|
|
|
Post by newey on Dec 9, 2014 11:00:20 GMT -5
If you are of a mind to plug and redrill the neck, the use of the inserts sounds like the way to go. I've never used these myself, but the experiences of others have been good with these and the idea makes sense.
|
|
Deleted
Deleted Member
Posts: 0
Likes:
|
Post by Deleted on Dec 9, 2014 11:09:45 GMT -5
If you are of a mind to plug and redrill the neck, the use of the inserts sounds like the way to go. I've never used these myself, but the experiences of others have been good with these and the idea makes sense. I know, I just would need a lot of time to do it right, and I should wait till the summer, when family goes for vacations. I will fall in depression till then Problem is that trimming the neck's heel end and re-drilling are kind of mutually exclusive. If I would want to re-drill, the neck should need all the heel to have max contact. Maybe I should just wait. |
|
|
|
Post by cynical1 on Dec 9, 2014 14:38:33 GMT -5
As long as you can scare up access to a drill press and router table with a fence life is good.
HTC1
|
|
Deleted
Deleted Member
Posts: 0
Likes:
|
Post by Deleted on Dec 10, 2014 6:17:15 GMT -5
Cyn1 the man had the correct intuition. (about shaving) By comparing the two guitars again and again and again, and lots of posts over the jemsite forum, it seems that my 24th fret to "25th" fret, is slightly larger, and this is pronounced most probably by what happens under the neck into the cavity rather than external measurements. Also as SG said, tape measurement sucks, when i placed the tape under the strings I got very similar figures as with the other guitar. Friend's @jemsite  vs Mine  Shaving a little bit (from the base up) and forget it is the answer. Thanks a lot. The best thing I did about it IS NOT BUTCHER THE ALREADY EXISTING MOUNTING! The guitar is lovely expect a vid soon! I hope Thomann is not watching, I would like their guilt feelings to prolong! |
|
Deleted
Deleted Member
Posts: 0
Likes:
|
Post by Deleted on Dec 10, 2014 16:21:05 GMT -5
Another chapter came to its inevitable end! 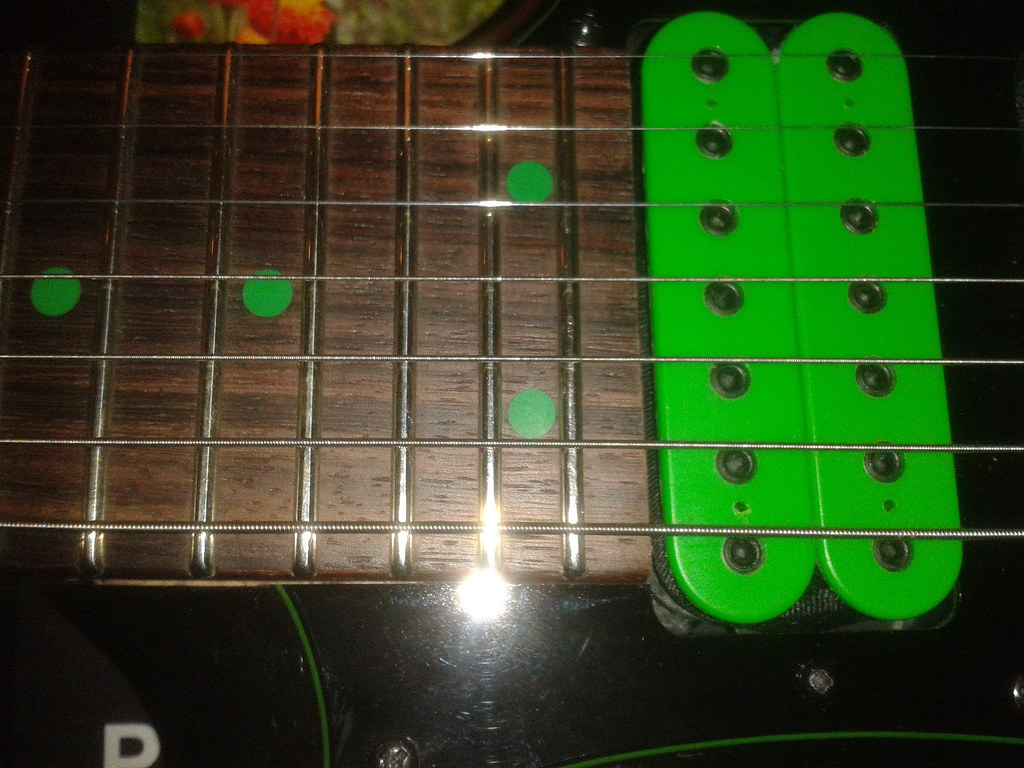  |
|
|
|
Post by cynical1 on Dec 10, 2014 18:30:43 GMT -5
Yeah, that whole "repent in leisure" thing really sucks.
Glad it was something simple.
HTC1
|
|
|
|
Post by newey on Dec 10, 2014 19:04:47 GMT -5
Glad it worked out, GD! Hopefully, all this back and forth between us and the GEM site was, in the end, helpful in zeroing in on the problem. We'll expect clips of some flashy 7-stringed licks soon- now that you can finally start playing the thing . . .  |
|
Deleted
Deleted Member
Posts: 0
Likes:
|
Post by Deleted on Dec 11, 2014 2:24:45 GMT -5
thanx ppl!
thing with the 7-string is that it feels like a different instrument which looks like a guitar, but drives you out of the known paths of the 6-string. So chances of doing smth different increase, imho.
|
|
|
|
Post by cynical1 on Dec 11, 2014 12:46:26 GMT -5
I had a similar experience when I wandered past the 4 string bass to a 5 and 6 string bass. You get used to having that extra string and it feels weird when you go back to a guitar without it.
HTC1
|
|
Deleted
Deleted Member
Posts: 0
Likes:
|
Post by Deleted on Dec 15, 2014 2:07:32 GMT -5
Hello,
I noticed something related to relief with my UV70p, I get smaller values in high E than low B (1st and 7th strings). E.g. When the Low B is at 0.05mm (fretted both 1st and 24th fret and measured on the 10th fret), then high E is almost touching the 10th fret. When I set the low B to 0.10mm high E is somewhere the 0.05 figure.
Also I noticed that between high B and low E (2nd and 6th strings) the difference is not so dramatic, it is almost the same clearance.
Now I have setup the guitar at silly low, the playability is unparalleled with whatever I have owned and played (even my Carvin DC135), but I get slight buzz on 1st fret on G, louder buzz on 1st fret high B and even louder buzz on 1st fret high E. (On the Carvin it is even worse tho). In fact I have to pick gently on 1st fret high E. (I know that some buzz on 1st fret 1st string is the price we pay for zero relief and very low action)
In my other Ibanez ARZ800 it is quite the opposite, more relief (also about 0.05mm difference) on high E than low E.
I was just wondering if this difference in relief between the outer strings is between the accepted tolerance. Does it imply some kind of twist ? Or maybe it was intentional?
|
|
|
|
Post by cynical1 on Dec 15, 2014 13:52:21 GMT -5
Refresh my memory...this is an Edge trem, right? If so, as I recall, all you've only got is the two pivot posts for adjustment right?
Well, ultra low action does require a few additional steps, and a certain degree of compromise. Ibanez says the 7-string tremelos are the same thing as the 6 string models. Do they look the same to you?
The easiest way is to raise the action until the buzz goes away. Gonna need to do a little digging into Ibanez trem setups.
I'm guessing using a smaller profile fret on the higher end of the neck is a non-starter, right?
HTC1
|
|
Deleted
Deleted Member
Posts: 0
Likes:
|
Post by Deleted on Dec 15, 2014 14:28:59 GMT -5
Yes Cyn1, this is edge zero ii-7 trem. But the nut and the bridge are out of the equation, since I fret on 24th fret (by thumb) and on 1st fret (by capo). I'd like to ask, is 0.05mm (.002 ") difference between the outer strings considered between nominal tolerance limits?
|
|
|
|
Post by cynical1 on Dec 16, 2014 0:58:54 GMT -5
I'd call them acceptable.
HTC1
|
|
Deleted
Deleted Member
Posts: 0
Likes:
|
Post by Deleted on Dec 16, 2014 2:55:02 GMT -5
I'd call them acceptable. HTC1 thanx |
|
|
|
Post by cynical1 on Dec 16, 2014 12:20:29 GMT -5
Just in case I appeared too dismissive in my last reply, let me say that going for insanely low action is an art and science all onto itself. As you probably already know, your playing style needs to change to accommodate this low action as well...and there's a few paragraphs defining that.
We could de-rail this thread for even more paragraphs with all the alchemy required to get that string as close to it's designated fret as physically possible. Part of the reason for the mystique, IMHO, is that most players can't adjust to the low action, so builders and techs play dumb to avoid doing multiple setups because the customer can't make the adjustment to the less aggressive style and softer touch required.
That being said, when do we get some sound clips from this beast? And if there's a video in the works, I expect to see smoke coming off those fingers.
Happy Trails
Cynical One
|
|
Deleted
Deleted Member
Posts: 0
Likes:
|
Post by Deleted on Dec 16, 2014 12:34:32 GMT -5
Hey Cyn1, I must find 10 mins alone in order to do that!
|
|
Deleted
Deleted Member
Posts: 0
Likes:
|
Post by Deleted on Dec 19, 2014 3:28:18 GMT -5
fast demo!
|
|
|
|
Post by cynical1 on Dec 19, 2014 14:51:33 GMT -5
Well, I didn't see the flames, but I believe I smelled the smoke. Damn, man, I'd say you adjusted to that guitar pretty quick.
I noticed the clean tone lasted all of about 36 seconds. It seemed to stay happy with all the cranking on the trem. I can see where a bad neck attachment would be a big deal for you in your playing.
Nice demo. Thanks for posting this.
HTC1
|
|
|
|
Post by newey on Dec 19, 2014 17:46:03 GMT -5
Yes, a nice demo indeed. But, the burning question we all need to know the answer to is this: If you play with the lights turned off, do those pickup covers glow in the dark?  |
|
Deleted
Deleted Member
Posts: 0
Likes:
|
Post by Deleted on Dec 20, 2014 0:18:27 GMT -5
newey haha, I guess not! @cyn1, it seems that it has reached a certain state of stability that I am more than willing to leave it just right there and keep away the alen keys. The good thing is that this guitar can cover many sounds, clean, dire straits type, strat tones, heavy tones and shred tones. The only thing I can't do is mimick Les Paul tones. So I think with just two guitars the whole spectrum can be covered. I can rest the old guitars to retirement!
|
|
Deleted
Deleted Member
Posts: 0
Likes:
|
Post by Deleted on Dec 26, 2014 7:33:39 GMT -5
Friends, Cyn1, happy xmas and good afternoon.
I disassembled the thing today, I wrote down all screw dimensions. (of course the screws heads stripped even more, i tightened them even less and now the guitar is more unstable than ever). Also what I found : the depth inside each of the 4 holes in the neck is 20mm. But this is exactly the depth of the neck from back of the heel to the fretboard. Which means that maybe this is the reason why I cannot tighten this no matter how hard I try and how much i strip the screws heads. So I can think of two solutions :
1) less drastic, enhance the neck holes with some sawdust, wood glue, and then go by 2-5mm *shorter* screws e.g. 40mm for the longer ones, and 35mm for the shorter ones.
2) more drastic, follow the initial advice by Cyn1, and go straight for the stainless steel insert kit.
As a side note, the heel pocket indeed has those stops, that we were talking about. It is just that the neck has a peculiar heel.
|
|
Deleted
Deleted Member
Posts: 0
Likes:
|
Post by Deleted on Dec 26, 2014 12:28:49 GMT -5
Went on and tried the sawdust + wood glue solution : 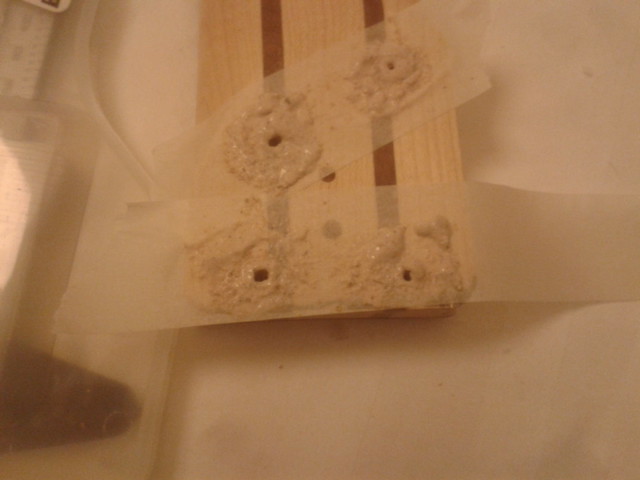 i'll wait till tomorrow till it settles down and I am gonna go for same dimension screws (in steel If i find or the toughest metal I'll find) only a tad shorter : 43mm for the long ones, 38mm for the short ones, so that they dont reach the fretboard and refuse to tighten the neck (or even worse go through it!!) lets see... 8O In the meantime some more photos while the guitar is open : The stops seem to be there :  From above : 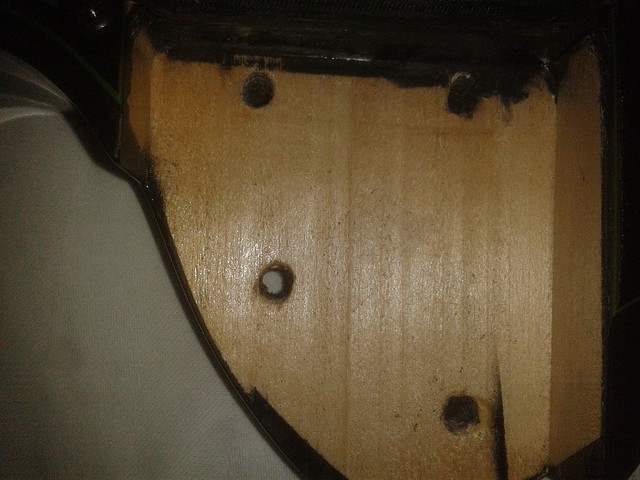 Dont you think the front (towards bridge side) screws are *too* close to the neck heel's edge? |
|
|
|
Post by sumgai on Dec 26, 2014 13:55:39 GMT -5
gd, Yes, the location of those holes will make the neck itself highly susceptible to breaking out the end of the heel... unless the heel itself is recessed such that there is at least 1.5 times the hole diameter of wood remaining above the recess, between the edge of the hole and the end of the neck. It would appear from your photos that if the neck heel is not recessed (i.e. it's straight from fretboard to bottom), then you have an issue just waiting to bite you on the butt. My recommendation would be to plug 'em up, and move them further into the pocket, at least 1.5 times the hole diameter away from the former holes. And since you're doing this, you might as will go for sonosonny's method of installing inserts. As it happens, you need not do all 4 holes at the same time, you can use all four current screw locations to hold the neck where it should be. Drill pilot holes for the two new screw locations through both body and neck, as deep as appropriate. Remove all screws and the neck, bore out the pilots holes as appropriate, and install the inserts. Now finish the insert installation process on the remaining two "good" screw holes, and the neck should be more stable than ever. Plug and finish off the two unused holes, and you're home free! HTH sumgai |
|
|
|
Post by cynical1 on Dec 26, 2014 14:59:12 GMT -5
I really only use the glue\sawdust, or small wood shaved strip piece for pickguard screws, or the small screw for a tuner screw. SG hit it about right, you really need to plug and re-drill the holes in the neck to relocate the correct hole diameter, or go with the inserts.
And those screw locations do look pretty close to the edge of the neck heel. Relocating those holes will also require rework of the guitar body, from what I see on the pictures. With the recessed holes and screw ferrules, that's gonna be a nasty job to do...not to mention a re-finish.
There doesn't strike me as an easy way to do this, and Ibanez really should shoulder some responsibility for either a bad design, or terrible implementation of there actual design.
You might even consider the possibility of dropping a 5th screw in there, just to take some of the stress off the two holes close to the edge of the neck heel. A drill, Forstener bit and another ferrule and you're good to go.
HTC1
|
|
|
|
Post by sumgai on Dec 26, 2014 15:35:20 GMT -5
Reading c1's reply above, I concur - it'd be easier, and more pleasing to the eye, to simply add one (or two) screws to the current setup. In that way, you don't have to do any re-finish work, you'd simply explain to viewers that you needed a total of 5 (or 6) screws for stability, and leave it at that.
But don't center that/those screw/s, put it/them closer to the 'trouble' spots, off-setting them by about 2x hole diameter, give or take a millimeter.
Oh, and that glue/sawdust trick.... that made me shiver with anticipation that there will be a new "repent in leisure" post coming soon! Not even with two-part epoxy would I try this trick, where stress can exceed a couple of hundred psi (or Newtons, if you must). Save that one for low-load screws, like c1 said.
HTH
sumgai
|
|
Deleted
Deleted Member
Posts: 0
Likes:
|
Post by Deleted on Dec 26, 2014 15:47:18 GMT -5
People thanx! SG, accidentally or not, I think the x 1.5 times figure is covered. This heel used to protrude into the neck. I sanded it in order for the the neck pup slant to be reliefed and to get the the neck pup straight. *But* as if some biblic divine vision came into my sleep and said : DO NOT SAND NO MORE, just take this situation as very good with the neck pup and stop sanding. The result, as can be seen from the 1st pic is that there is a lot of wood on the bottom of the heel, where the screw will bite, or where the insert will go. Cyn1, you see it yourself that relocating the holes are above my skills. We are not talking about strat hole here, but for some exotic curvy Ibanez creation. I really like the inserts idea. But I dont think the clearance to the edge of the neck is satisfied for the two front screws.: here : www.ebay.co.uk/itm/331029419124 talks about total (1/4 + 1/8)" from the center of the hole to the edge, which is 9.5mm. In my front screws I can barely reach 8.5 - 9. However, the biggest force is applied to the two rear screws (towards headstock). The two ones towards the neck side, act as "stabilizers" on the "vertical" axis. So I might consider the two inserts on the two rear screws for maximal strength + another two , one which is shown in the lower central part, just above the two front screws and a 6th one shown in the upper part is not deep. And IMHO this 6th one near the other two upper (rear/headstock) part inserts would give the biggest help. |
|
Deleted
Deleted Member
Posts: 0
Likes:
|
Post by Deleted on Dec 27, 2014 0:36:15 GMT -5
Reading c1's reply above, I concur - it'd be easier, and more pleasing to the eye, to simply add one (or two) screws to the current setup. In that way, you don't have to do any re-finish work, you'd simply explain to viewers that you needed a total of 5 (or 6) screws for stability, and leave it at that. But don't center that/those screw/s, put it/them closer to the 'trouble' spots, off-setting them by about 2x hole diameter, give or take a millimeter. Oh, and that glue/sawdust trick.... that made me shiver with anticipation that there will be a new "repent in leisure" post coming soon! Not even with two-part epoxy would I try this trick, where stress can exceed a couple of hundred psi (or Newtons, if you must). Save that one for low-load screws, like c1 said. HTH sumgai Thanx a lot SG. The only thing of concern is those titanium rods that are built inside the neck. I guess using the pre-shaped additional holes in the center would avoid hitting any titanium rod or stripe. As far as the sawdust and wood glue, it does not make any worse than it already is, there is nothing more to break there. Besides by some tests I did it seems so much better than before. If it works it might give this guitar some more months of life in this current state, (or forever if i never do trem pull ups again). The problem is trem pull ups. The amount of force is beyond what this guitar (or most bolt ons) could handle. |
|
Deleted
Deleted Member
Posts: 0
Likes:
|
Post by Deleted on Dec 27, 2014 14:36:04 GMT -5
Hello again! It seems the new holes are much stronger. Provided that Erlewine suggests super glue : www.stewmac.com/How-To/Online_Resources/Building_Instruments/Quick_fix_for_a_loose_bolt-on_neck.html , my solution IMO is better. And thing is necks holes were not even stripped!. They didn't seem stripped at all. I could not turn the screw driver any more, so the initial threads were ok. The problem most probably was the ultra long length of the screws. They were literally touching the fretboard. And not being able to penetrate it, as no hole was there drilled, the screw just refused to turn, but also refused to fasten the neck to the body. I managed to stripped the heads of the screws, but not the wood itself. As a result of the new screws: 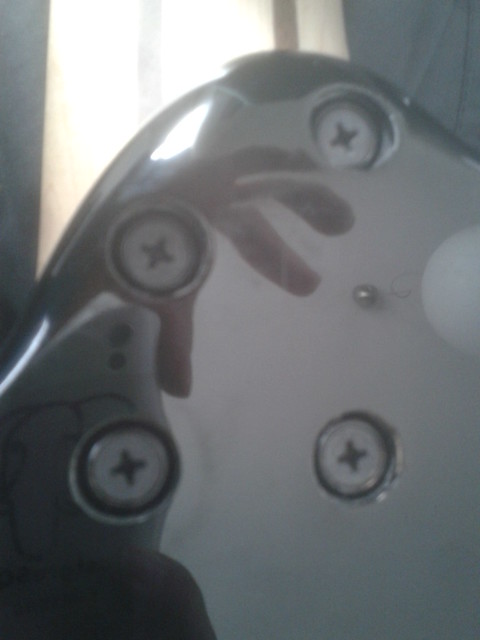 Now the guitar is very stable. The old screws were 45.5mm length the long ones and 40.5mm the short ones, with internal diameter 3.6mm and external 5.1mm. Now I just used a metric version wood screws with external diameter 4.9mm, internal 3.1mm and length 40mm. The bite seems much better with them. I was able to align the neck to the guitar body and have it tight. Also i broke "easily" a nut bolt.... grrrrr..... thank god I have so many chinese and schaller locking nuts hanging around the house, so i grabbed the first bolt i found, painted it black, and screwed it on the nut. I know the warranty went off for the Nth time, where N a positive integer. Anyway the result was good. I managed to crank the action height at 0.05mm relief, 1.2mm height at 24th fret low B and 1mm for high E. *without buzz*!!! (ok except 1st fret high E a little bit). This is my lowest all time record on any guitar! Anyways, I went downtown today and found some 8mm (ext diam) inserts, 1.2mm long, with M4 internal threads. I took 2 of them for practising. It is this : 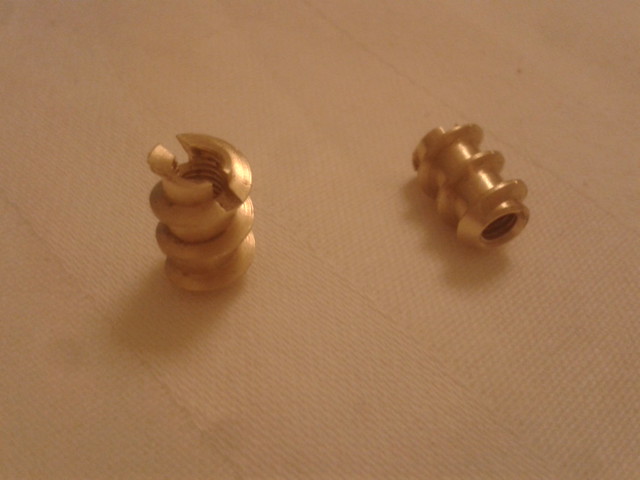 I may start experiment with those on scrap wood. I cannot imagine how to tap them inside the wood in a nice manner. If it proves strong in the end, I might go for it. Also I had another thought : I am sure my biggest problem (if it is going to appear again), is the miniature neck stops : 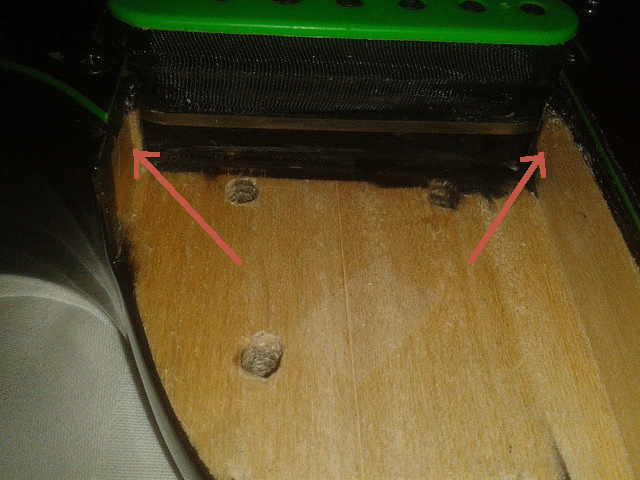 If I manage to fortify them with extra layers of strong veneer, that would be cool. If I manage to make this stay in place without the screws, under trem pull up string force , where the 45 Kgr of force applied may easily go up to 90+, that would be awesome. Then combined with the insert trick for the top two (left/headstock side) of the screws, that would be super strong! Well, that's all for the moment! |
|


 )
)


