|
|
Post by genmce on Sept 12, 2015 8:39:57 GMT -5
www.dimarzio.com/sites/default/files/diagrams/hsh5w1v1ppt_nb.pdfI picked up a $50 Yamaha Hsh guitar and was trying the scheme above. 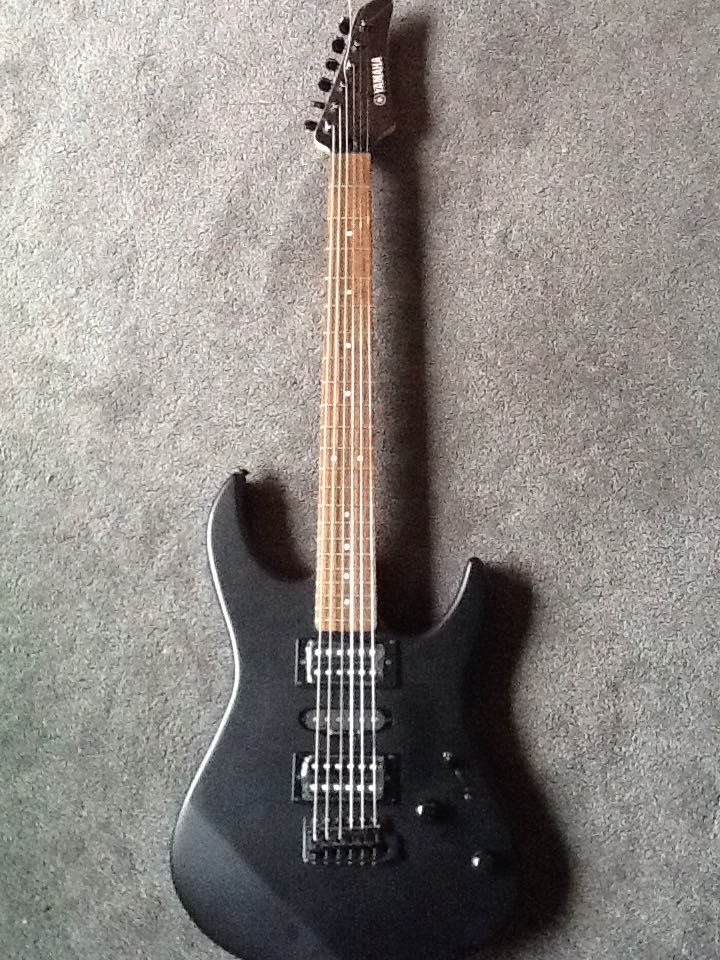 Works fine when pp is down, however when pulled it does not give me stated pickup combos. I get neck and bridge all the time. I think there is a prob with the design or my wiring, at the tone pp, can someone take a quick look at the diagram above, please? Or at the 5 way. When pulled, the n or bridge appears to always be feeding back to the 5way... therefore the N and B are active all the time when pp up
|
|
|
|
Post by newey on Sept 12, 2015 21:30:33 GMT -5
The diagram looks fine. When you say that the N and B are on at all times with the P/P up, please verify exactly which coils are operating in each switch position, by using the "tap test". Check for a stray strand of wire between 2 lugs of the five-way.
|
|
|
|
Post by genmce on Sept 13, 2015 7:13:27 GMT -5
Newey - yeah pull off test - good call. Continuity tests on 5way all ok - no stray wire strand connections Posted pic for better viewing. 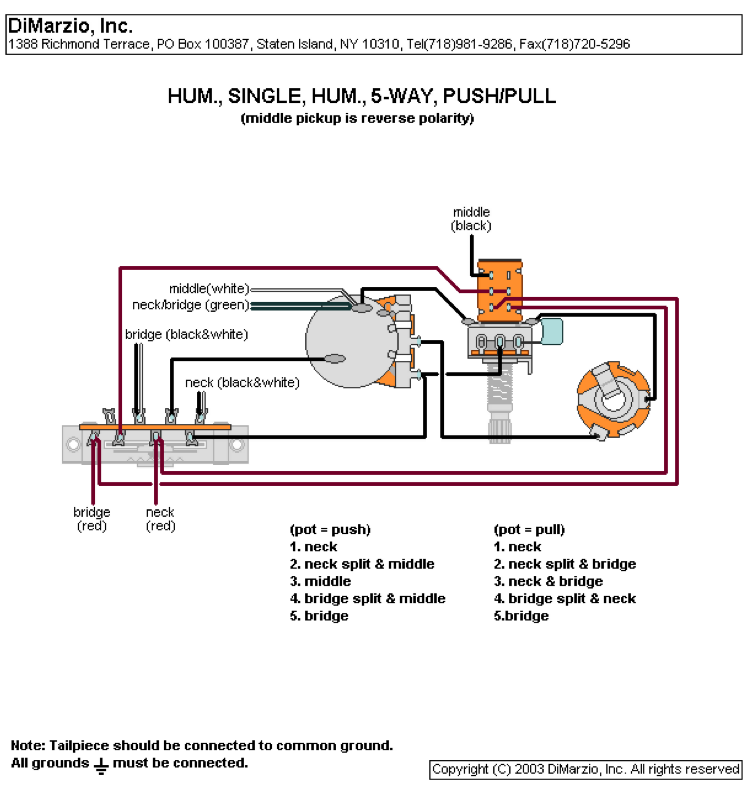 My results are as follows. Push Pull up - 5 way position (import 5 way) - diagram shows neck as position 1 (not normal convention right?) neck should be 5. I have stayed with diagram's numbering. 5 Bridge Pickup = both coils active Middle Pickup = not active Neck Pickup = both coils active 4 Bridge = inside coil active (this is desired coil cut) Middle = Not active Neck = Both active 3 Bridge = Both Active Middle = Not active Neck = Both active 2 Bridge = Both coils active Middle = Not active Neck = Inside coil active 1 Bridge = both coils active Middle = Nothing Neck = both *Not what is stated in diagram. For reference push pull down 5 B = hb(both coils, M = not active, N = not active 4 B = split inside, M = active, N = Not active 3 M = only 2 M + N(auto split inside) 1 N Hb(both coils) Autosplit is working as it should both pp states. 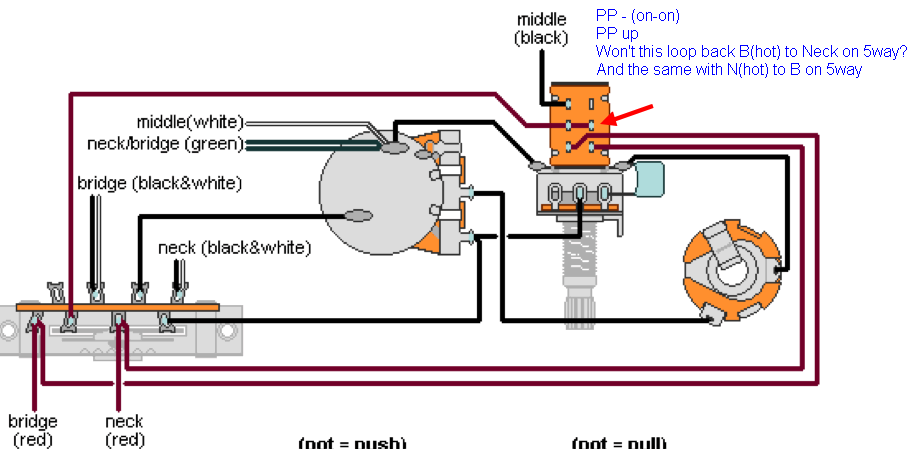 When I take a standard on-on pp and jump across the middle lugs [as in diagram] (in up position) and test for continuity It make a circle - which is bad. The results of this are: The lead from Bridge side of the pp in at bottom lug > up to middle lug then over > to other middle lug and back down > the neck side bottom lug of the pp and out back to the 5 way switch. 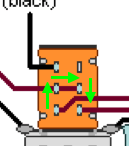 This happens for Neck side of the switch as well, in reverse. The diagram does not give me listed options for pp up. What it does give me makes sense based on the diagram and what the pp is capable of. I don't see how they can get those options from the pp up? Am I looking at this wrong? |
|
|
|
Post by newey on Sept 13, 2015 18:05:59 GMT -5
The lugs of your 5-way can be numbered like this, per the diagram:
C 1 3 5
1 3 5 C
But if yours is an import style, it's 1-3-5-C-C-1-3-5
(I've used the 1-3-5 numbering instead of 1-2-3 so as to correspond with your switch positions. And, you're right, the neck is conventionally at position #5, not #1)
The P/P switch connects both the B and N "hot" leads to lug #3 on the bottom pole of the switch. The top pole of the switch is used only to cut the coils of the HBs in positions 2 and 4.
In position #3, with the P/P up, you should get N + B, which you do. And in #2 and #4, you should get each HB with the coil split, which you do. So, positions 1 and 5 are the problems, you should not be getting both HBs at those positions. Lug #3, where the P/P connects, isn't connected to output in positions 1 and 5,only in positions 2,3 and 4.
I don't have any good or easy explanation for why you are getting these results. Two things to check (and, these aren't really very logical as causes, but I'm grasping at straws here): First, if this is an import style switch, check that the two common lugs are not connected together. Sometimes, on the import style switches, there is a tiny wire between the poles. Some of these import switches are internally connected as well. You can simply check for continuity between the common lugs- there shouldn't be any, that is, they should show infinite resistance.
Second, check that you have correctly transposed the wiring from the regular switch show in the diagram to your switch.
|
|
|
|
Post by genmce on Sept 13, 2015 23:34:55 GMT -5
The lugs of your 5-way can be numbered like this, per the diagram: C 1 3 5 1 3 5 C But if yours is an import style, it's 1-3-5-C-C-1-3-5 Yup - and no connection between CC Yup, but the pp also connects the 5way position 1 to position 5 and 5 to 1 on the bottom side of the 5way, which does explain my results. But it does/will/should - see my arrows on last drawing - the pp is effectively splitting the N B hots to lug 3, and 1,5. Thanks for looking, I think it is a mistake, I'd like to find a fix but I can't figure out how, with just one pp, to achieve the diagram's results. |
|
|
|
Post by JohnH on Sept 14, 2015 2:54:14 GMT -5
Hi genmce
When you are right, you are right. And I think you are right. When that switch is pulled, N and B get joined together at the hip can cant get seperated.
I see DiMarzio 'reserve all rights' on that diagram, and I'd like to politely suggest that they are welcome to them.
Lets think of something better with that switch. Presumably N+B is the key extra sound to achieve?
|
|
|
|
Post by JohnH on Sept 14, 2015 5:01:11 GMT -5
Two thoughts about what you could do with those parts and the HSH pickups: First thought: Pushed in, you could have standard N, B+M, M, M+N, N, all with no splitting Pulled out you could have N, Nsplit+B, Nsplit+Bsplit, N+Bsplit, B Second thought is, you could do this HSS scheme: Strat SSM2N would need to be wired just one way, but in view of all the series combos that can happen in this scheme, you could either just use one coil of N, or have it hard wired as local parallel for a snappy but humcancelling neck sound - which you can then add M or a B coil in series or parallel with to buld it back up to humbucker volume. |
|
|
|
Post by genmce on Sept 14, 2015 5:43:23 GMT -5
Hi genmce When you are right, you are right. And I think you are right. When that switch is pulled, N and B get joined together at the hip can cant get seperated. I see DiMarzio 'reserve all rights' on that diagram, and I'd like to politely suggest that they are welcome to them. Lets think of something better with that switch. Presumably N+B is the key extra sound to achieve? Thank you. I probably should email them and tell them to take it down or revise it. Yeah N+B was the desired sound. |
|
|
|
Post by genmce on Sept 14, 2015 5:52:02 GMT -5
Two thoughts about what you could do with those parts and the HSH pickups: First thought: Pushed in, you could have standard N, B+M, M, M+N, N, all with no splitting Pulled out you could have N, Nsplit+B, Nsplit+Bsplit, N+Bsplit, B Second thought is, you could do this HSS scheme: Strat SSM2N would need to be wired just one way, but in view of all the series combos that can happen in this scheme, you could either just use one coil of N, or have it hard wired as local parallel for a snappy but humcancelling neck sound - which you can then add M or a B coil in series or parallel with to buld it back up to humbucker volume. Yes - this sounds good to me, I will look closer at this option, however my guitar only has two pots. No more holes. Not sure there is enough room for another pot... I was able to make the tone, A250k pp no load. I do have another no load A250k pp volume pot... |
|
|
|
Post by newey on Sept 14, 2015 6:00:48 GMT -5
JohnH, I missed that! Shows how you can look and look at a diagram and not "see" it.
I don't see a fix with this switching, you'd need to use the other pole of the 5-way which would cost you the splits at 2 and 4. Unless, as JohnH suggested, you accept N(split) + B(split) at the center position
|
|
|
|
Post by JohnH on Sept 14, 2015 7:01:13 GMT -5
Two thoughts about what you could do with those parts and the HSH pickups: First thought: Pushed in, you could have standard N, B+M, M, M+N, N, all with no splitting Pulled out you could have N, Nsplit+B, Nsplit+Bsplit, N+Bsplit, B Second thought is, you could do this HSS scheme: Strat SSM2N would need to be wired just one way, but in view of all the series combos that can happen in this scheme, you could either just use one coil of N, or have it hard wired as local parallel for a snappy but humcancelling neck sound - which you can then add M or a B coil in series or parallel with to buld it back up to humbucker volume. Yes - this sounds good to me, I will look closer at this option, however my guitar only has two pots. No more holes. Not sure there is enough room for another pot... I was able to make the tone, A250k pp no load. I do have another no load A250k pp volume pot... Hi genmce. just t clarify, thoughts 1 and 2 were two different schemes. The first one is just based on switching (would need to sketch it up), with a simple volume and tone control. The second SSM2, you could do without a tone control, mine is no-load and generally at max). It does need the other pot to do the blending and I used a no load there, but actually that is not vital - a normal pot would be fine. |
|
|
|
Post by genmce on Sept 14, 2015 8:23:20 GMT -5
Sorry to not be specific. The SSM2 seems like a good solution, I have to have a tone pot though. I just have to, it's like a synth without a filter freq ... just can't handle not being able to shave a bit as needed.
I'll have to drill a new hole and add the tone pot.
Eh - $50 guitar - that I will probably donate to the music club I'm sponsoring here at my school. I want to add plenty of flexibility for kids to explore.
|
|
|
|
Post by genmce on Sept 25, 2015 19:17:03 GMT -5
Went with ssm2 with additions
- Vol pp pot = neck single/hb
- Phase switch for Middle on tone pot,
- Changed the order of the pots vol - tone - series fader
so far so good.
EDIT
Observations - not on sound but on working on this guitar.
This guitar has been a total B**ch!
I thought I would love working on guitar with access from the back...
I have been working on guitars with pickguards under strings - like strats and the danelectro.
Comments on this Yamaha.
- The cavity is so small - I can't get my fingers in there.
- Couldn't mount the pots in guitar to solder... need the alligator clip arm to hold pots while I soldered.
- Burned my finger - I never do that, anymore... no room to work.
- The import 5 way - In my first wiring of this guitar I was able to translate connections on the fly from standard 5 way.
However when I tried to do the SSM2 - I just could not keep track of it. It made my head swim and my eyes glaze over. I had to pencil it out.
- I finished it this morning - and I have not had a chance to spend time with it.
- I honestly never want to see the inside of this guitar again.
- It will probably live at school for students to abuse.
Ugh - what a relief to finish!
|
|
|
|
Post by newey on Sept 26, 2015 7:09:59 GMT -5
As ol' Bill Clinton used to say, "I feel your pain"
For the future, don't solder in the cavity. Make a template out of cardboard, with appropriate holes for the pots, etc, so that you can "right size" your wires. Then wire up a complete harness that will drop into the cavity. This way, you only have the pickup leads and the string ground to solder inside the cavity. If the leads are long enough from the pickups, often even those can be soldered to your completed harness outside of the cavity, with the harness lying on the back of the guitar (put something solder-proof underneath your work to protect the guitar).
When I first did a guitar without a pickguard (the infanous "flyin' pumpkin"), I did the same as you, tried to do it all inside the cavity. Burned a finger on each hand in the process.
|
|
|
|
Post by genmce on Sept 27, 2015 9:09:55 GMT -5
As ol' Bill Clinton used to say, "I feel your pain" For the future, don't solder in the cavity. Make a template out of cardboard, with appropriate holes for the pots, etc, so that you can "right size" your wires. Then wire up a complete harness that will drop into the cavity. This way, you only have the pickup leads and the string ground to solder inside the cavity. If the leads are long enough from the pickups, often even those can be soldered to your completed harness outside of the cavity, with the harness lying on the back of the guitar (put something solder-proof underneath your work to protect the guitar). When I first did a guitar without a pickguard (the infanous "flyin' pumpkin"), I did the same as you, tried to do it all inside the cavity. Burned a finger on each hand in the process. I like that cardboard template, wish I knew that last week! |
|
jbales
Meter Reader 1st Class

Posts: 95 
Likes: 0
|
Post by jbales on Sept 27, 2015 12:59:31 GMT -5
I saw the problem with this diagram right away. I can't believe Dimarzio didn't, considering the experience they have.
|
|


