|
|
Post by genmce on Dec 19, 2015 22:32:23 GMT -5
Hey all, I have an epi eb3, I believe. I got in trade for fixing some wiring on a bc rich warlock. She came with a cracked neck. I have attempted a fix, that seems to be working, however, I have a first fret buzz on all strings. If I putting light pressure on the headstock with my thumb while fretting the buzz goes away. This bass is destined for my high school audio production class. It's looks really nice except the crack. Any advice on a fix appreciated on getting rid of the buzz as well as filling in the gap that remains. 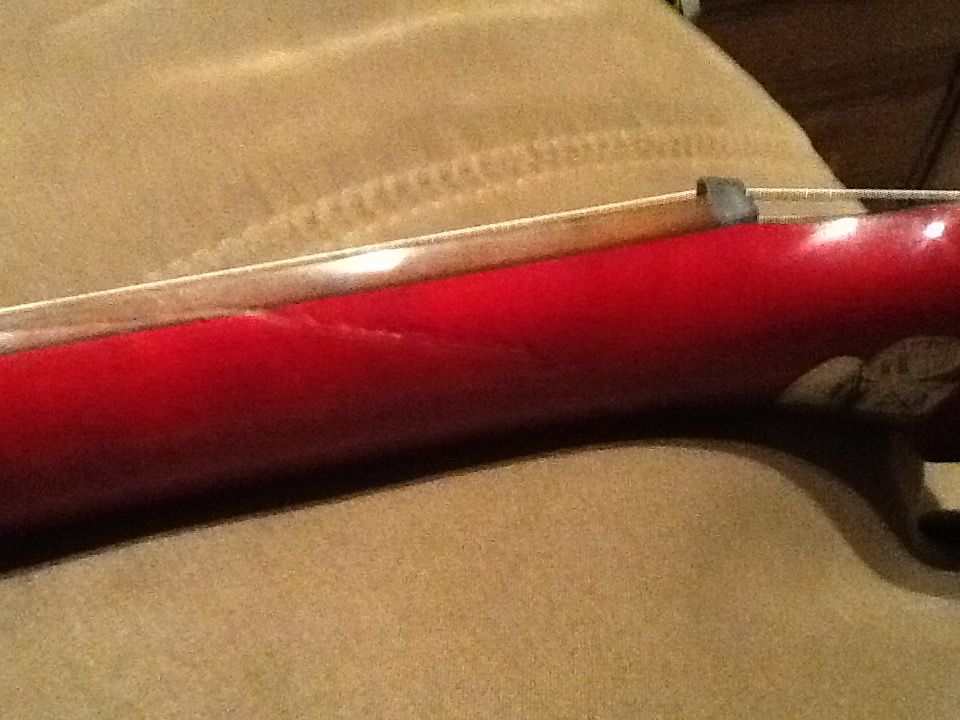 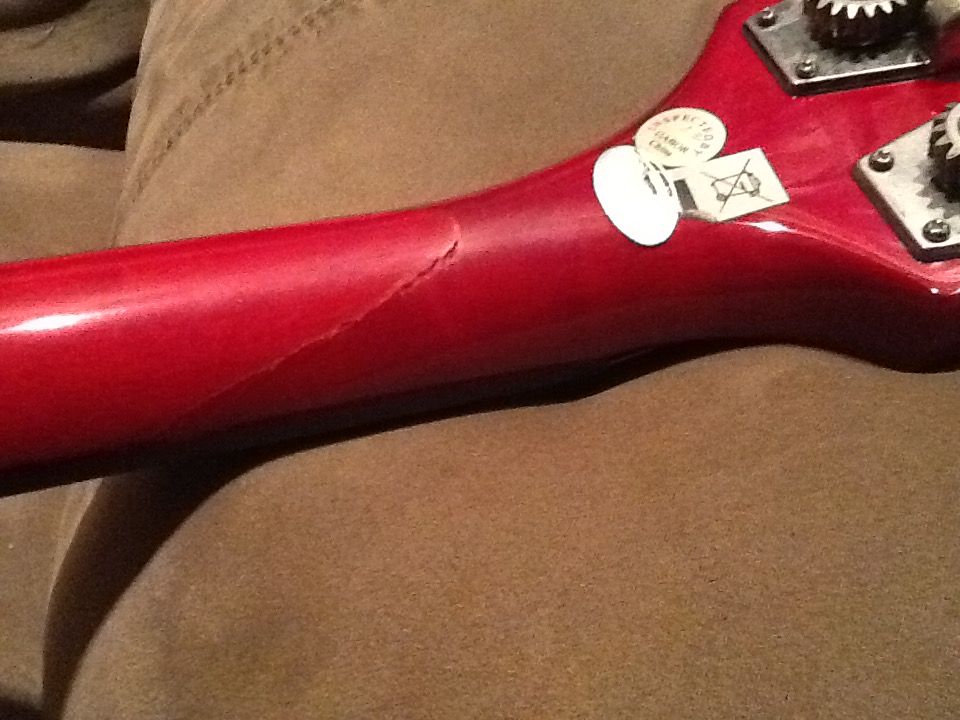 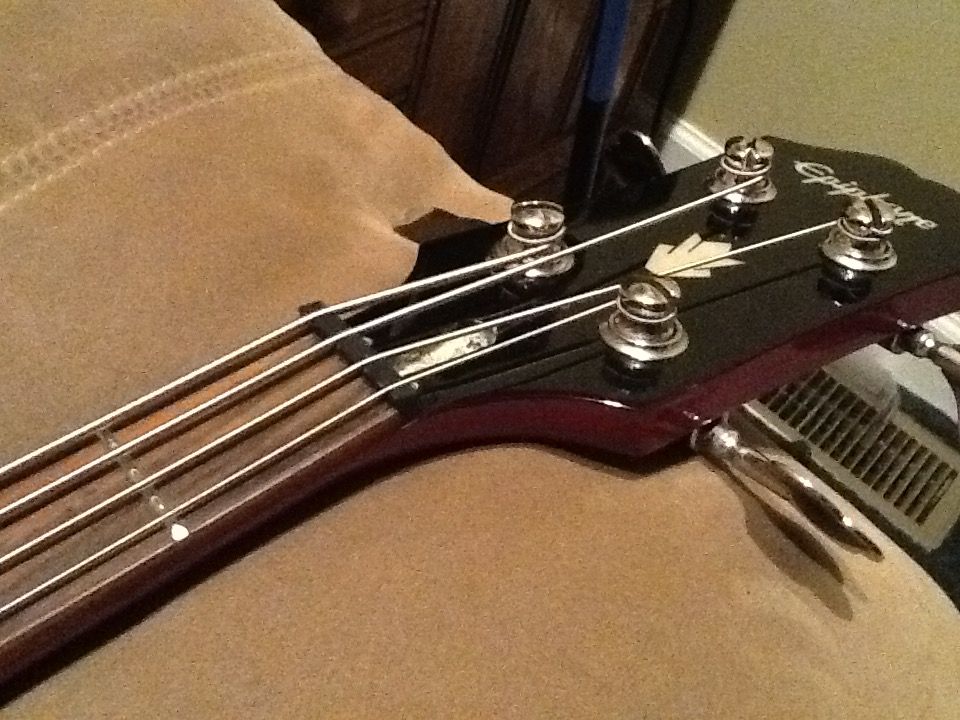 |
|
Deleted
Deleted Member
Posts: 0
Likes:
|
Post by Deleted on Dec 19, 2015 23:51:18 GMT -5
I'll only tell you what seems wrong and what seems hopeful. The fact that you attempted a wrong fix sucks. But the fact that the attempted fix didn't work sounds better than if it did. Moving the headstock and having the buzz go away gives hope that the joinery is not too hard to undo. Which brings us to the question: how did you manage to do the fix? What kind of glue? And What arrangement in order to join the woods together? What do you mean "gap"? Did you remove wood by any chance? Did you file or sand inside the crack?
Pls give this info, and then wait for Cyn1 to join.
|
|
|
|
Post by cynical1 on Dec 20, 2015 2:42:15 GMT -5
Yeah, that's a signature Gibson scarf joint break. Seen it many times...lean the guitar against an amp, grab a beer...it slides or gets bumped over...crack...
Without having seen it before you glued it, it's hard to offer too much insight. Most of these are usually pretty clean and the two halves typically join together well. Slacking the truss rod is always good, or taking the nut off the rod is better before gluing. Clamping these repairs firmly and checking alignment before and during final tightening is critical.
It sounds a lot like a misalignment, but it could have been warped before it broke. But that's a long shot. I can't say for certain, but it appears there's a misalignment of the fingerboard and nut on the G side above the crack.
If you sight down the neck while it's strung and in tune, what do you see? (IE: a twist, a bow or ski jump at the glued joint) Placing a 12"-18" parallel to the strings and moving sequentially across the 4 strings, sighting where the relive occurs, do you notice anything different as you move across? If you take a credit card and walk it up the neck from the nut, do you see high or low frets anywhere? Is there a thick glue joint anywhere along the fingerboard at the repair?
Happy Trails -
Cynical One
|
|
|
|
Post by genmce on Dec 20, 2015 7:16:28 GMT -5
I'll only tell you what seems wrong and what seems hopeful. The fact that you attempted a wrong fix sucks. But the fact that the attempted fix didn't work sounds better than if it did. Moving the headstock and having the buzz go away gives hope that the joinery is not too hard to undo. Which brings us to the question: how did you manage to do the fix? What kind of glue? And What arrangement in order to join the woods together? What do you mean "gap"? Did you remove wood by any chance? Did you file or sand inside the crack? Pls give this info, and then wait for Cyn1 to join. Yeah - always the problem - did it wrong. Not sure why I did not post here first... can't change that part now. Repair procedure - - remove strings - slacked truss rod - did not sand - did not remove wood - it was not a complete break, it was a crack, with minimal space to access. - injected tightbond II with syringe. - clamped with one clamp with a piece of wood up against space on fretboard so I would not push on frets. - left for 24+ hours. The neck only moves slightly, when I push with my thumb. I don't believe it is moving much at this glue joint. |
|
|
|
Post by genmce on Dec 20, 2015 7:52:22 GMT -5
Yeah, that's a signature Gibson scarf joint break. Seen it many times...lean the guitar against an amp, grab a beer...it slides or gets bumped over...crack... Without having seen it before you glued it, it's hard to offer too much insight. Most of these are usually pretty clean and the two halves typically join together well. Slacking the truss rod is always good, or taking the nut off the rod is better before gluing. Clamping these repairs firmly and checking alignment before and during final tightening is critical. It sounds a lot like a misalignment, but it could have been warped before it broke. But that's a long shot. I can't say for certain, but it appears there's a misalignment of the fingerboard and nut on the G side above the crack. If you sight down the neck while it's strung and in tune, what do you see? (IE: a twist, a bow or ski jump at the glued joint) Placing a 12"-18" parallel to the strings and moving sequentially across the 4 strings, sighting where the relive occurs, do you notice anything different as you move across? If you take a credit card and walk it up the neck from the nut, do you see high or low frets anywhere? Is there a thick glue joint anywhere along the fingerboard at the repair? Happy Trails - Cynical One I believe I have not been clear. To clarify the problem - The bass plays fine in all positions - except when fretted at the first fret - then buzz on all 4 strings. I believe my original description sounded much worse, apologies to all. Hopefully, my issue is clear now. Nut is slightly short of the edge of the fretboard on the g side however, it is also a bite short of the e side. In other words the nut is a bit small. Looking down frets from the headstock - looks ok in terms of twist or bump The Nut looks high on the E side. See below images for fret rocker test.  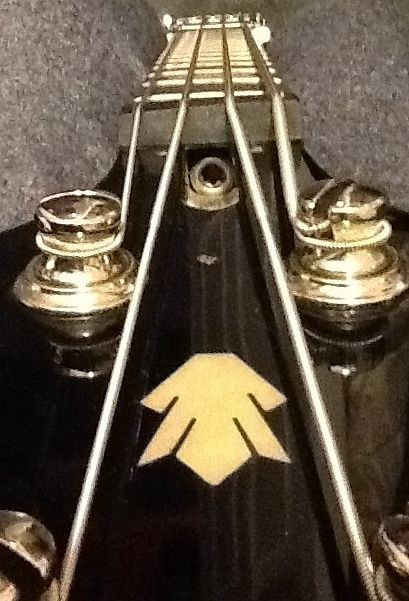 Credit cart won't span 3 frets Using 6" metal ruler 3 fret span test results - across 1-2-3 - rocks over 2nd fret (E string has similar rocking to g string rocking) - across 2-3-4 - no rocking (E string to g - no rocking) - across 3-4-5 - no rocking - minimal rocking on few other frets - however - have no buzz any other place on the bass. This tells me first fret is low, right? I did not own this bass pre-crack, I have no idea there was a buzz before the crack occurred. I will say the that previous owner did no have saddles, and had the strings laying on the humbucker, using it as a saddle! There is slight ridge at the crack - I can feel a little with my thumb when I play it, it is not terrible, but it know it's there. Those look like sharp edges - but they are not. I can live with it that - but not with the buzz when I fret at first fret. 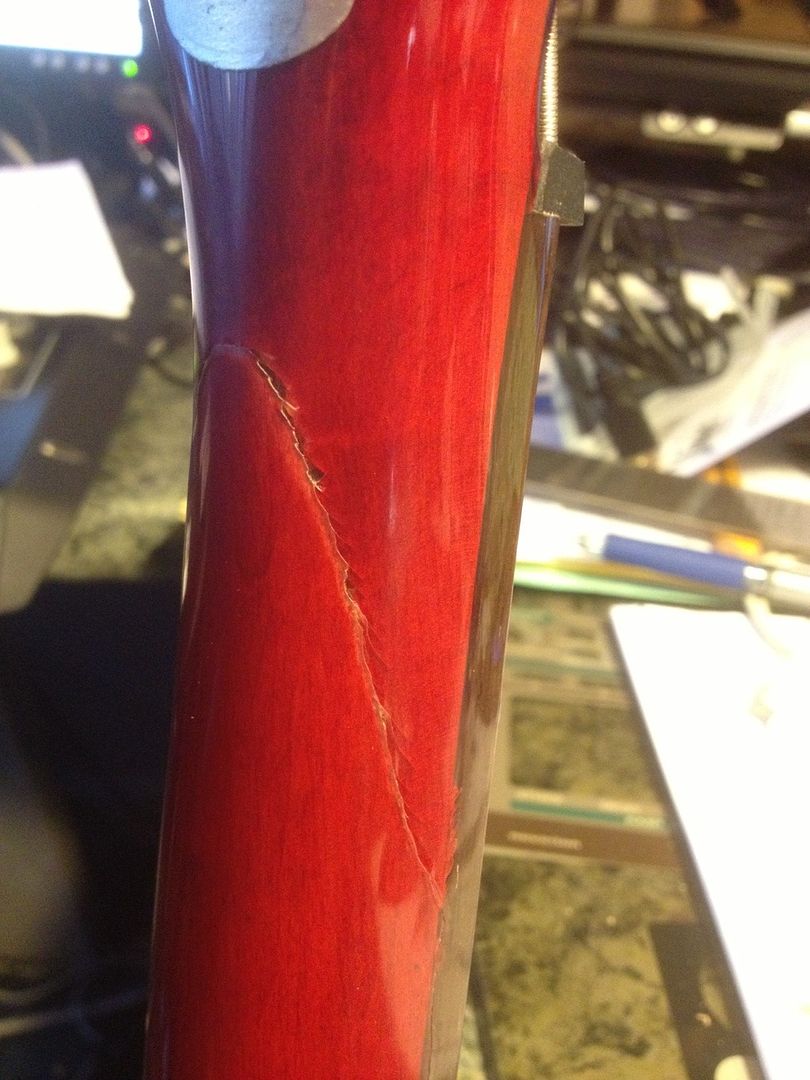 |
|
Deleted
Deleted Member
Posts: 0
Likes:
|
Post by Deleted on Dec 20, 2015 11:47:19 GMT -5
Seems a little twisted, at least to my eyes. Given the previous owner was such a bad maintainer, it could very well be that the twist was there before the crack. Anyway, it should not move by pushing with your thumb. Why don't you try this experiment : tune the strings 1 full tone up. What do you see? Has the neck come to better alignment due to higher tension? Loosen your strings and truss rod, can you still move it by your thumb?
ooopss a thought ..... are you sure you have not just cranked your truss rod all the way? The usual symptom of over tightening is buzz on low frets.
|
|
|
|
Post by cynical1 on Dec 20, 2015 12:59:09 GMT -5
Well, there's an easy fix for that one. Lower the 2nd fret. Probably not much either. That's interesting, as I doubt whoever owned this previously swapped it out on a broken neck. I mean, what's the resale on a used Epiphone bass nut? I just tweaked my nephews Epiphone guitar, and the very first thing to go on that was the nut. His was a hollow plastic nut, probably made from used Action figure toys. I didn't check the fit before I pulled it, but I don't recall it being wildly short. For $10.00 replacing the nut isn't a bad idea. That's good. I didn't expect anything bad, but since I can't see it I figured I'd better ask. Yeah, that works best on guitar scales...CRS... If you look at the 2nd fret, does it appear to be completely seated in the fingerboard, or does it look like it walked out after the crack occurred? Sometimes it's that simple...whatever force cracked the joint may have slightly popped the fret. Sometimes just tapping or pressing them back in does the trick. So, it looks to me like the 2nd fret is too high. Honestly, with an Epiphone, high or low frets are common whether the neck is broken or not. Going back to my nephew's Epiphone, the fretboard needed a leveling, recrown and polish over the whole neck. Probably not something you need or want to for a lesson instrument. If it were me, I'd fret the second fret, then take feeler gauges and measure right in front of the third fret. Whatever that gap is in front of the third fret is what you need in front of the second fret when fretting the first fret. I'm guessing there's some air in front of the second fret, as the strings are probably laying on it when the first fret is fretted. I'm guessing that the difference is not much, so you probably wouldn't have much to take off the second fret. If you have any questions on doing this feel free to ask. Yeah, these cracks, while common on scarf joint necks, can be a lot of work to make clean again. I understand this is not a heirloom piece, but as a student instrument you want to make it as comfortable and playable as possible. So, with that criteria in mind, here's what I'd do. If you don't have any of this stuff, you really should make your way over to Satellite City and pickup a small bottle of this stuff: HST-4T Special T thick CA glue It has a multitude of uses around the shop and does not react with or lift lacquer as many other brands can do...but I digress... First, make sure all the loose flaky pieces of the finish are knocked off. Take some dry 320 grit sand paper wrapped around a small piece of wood and gently sand around the crack to level it out. Tape around the repair area over the fingerboard and anywhere else you don't want to be sanding this stuff off when it dries. This stuff is thick, so you can easily direct and fill this stuff into the crack. Be as clean as you can with this stuff, as whatever you apply you'll have to sand later. If you feel more comfortable doing it in multiple applications, that's fine. You're going to want to be a little high on the crack anyway. Give it a few days to dry. Then take your small piece of wood wrapped in dry 320 grit paper and work it down. The catalyst finish on these things is tough, so don't worry too much about sanding through it. (If you've ever stripped one of these things with just sandpaper, you know what I mean) Once you're happy with the feel, tape off the neck again leaving about 3" either side of the crack open. Make sure the area is clean and tacked clean before applying any finish. Take some gloss poly and mix it 50\50 with mineral spirits. You won't need much. Wipe, don't brush, a few coats, allowing the recommended drying time on the can. Apply the finish as sparingly as you can. All you want to do cover the area you've sanded, with a couple inches of overlap, as thinly as possible. Allow it to dry overnight. Light sand between coats. 3-5 coats of thinned poly is probably all you'll need, or want to put on. Allow about 2 weeks, or until you can't smell the poly, to let it completely dry and cure. The rest is just plain old fashioned sanding. Take some wet or dry 400 grit and slowly work the new finish into the old one so it feels smooth. The 50\50 poly will level very thin, so you shouldn't have to work too hard or too long. The 400 grit cuts pretty fast on thinned poly, so go slow and keep wiping and checking your work as you go. Once it feels good, take 800, then 1500 and finally 2000 grit wet or dry and do the whole playing area on the back of the neck. Once it all feels smooth, take some rubbing compound, then polishing compound and shine it back up. Not glamorous, but the playability will be smooth again all the way up and down. It might not be cosmetically perfect, but for a student instrument it's perfect. They can buy pretty once they know how to play. Let me know if I glossed over anything, or need to elaborate where I might have left something out... Happy Trails Cynical One |
|
|
|
Post by genmce on Dec 21, 2015 11:38:57 GMT -5
Greek dude -
Truss rod loosen helped. Buzz went away.
However relief is large. Should be between .3 and .5 mm - epi is at about 1mm at 8th fret.
Action at 12th e is about 9/64" and g is 8/64.
A bit high for my taste.
Cyn - thanks for detailed instructions on filling.
I filed and crowned 2nd fret. Above is best setup I can get.
Will try again at truss and action this afternoon.
It plays, at least.
|
|
|
|
Post by cynical1 on Dec 22, 2015 0:33:27 GMT -5
Yeah, that's a tad high, but not the worst I've ever seen on a student instrument.
[TEOGIB]
If I recall, this was not a full crack, so all you could do was syringe glue into the crack and hope enough got in there to hold. Odds are, unless it does a header, the repair should hold. HOWEVER, if it didn't, and the truss rod generates that magical bit of too much force...the crack could rear its ugly head again. And then again...maybe not...
[/TEOGIB]
The crack you had in this bass is actually worse than a full amputation. You can't really assess the fate of the truss rod, fingerboard and scarf joint because you can't see it. If you used a good wood glue, heated it and syringed it in to where the glue came out all around the visible crack you should probably be fine. If not, it's anybody's guess really, but you work with what they give you.
Before you start working too hard on the truss rod, leave the bass on a stand tuned to pitch for a few days. Keep tuning in and plucking a few string, but for the most part just let it sit. Watch the crack. If it doesn't move, try a 1/4 turn, if you have it, and let it sit another few days. Keep watching the crack, and the relief. If you get some improvement after a couple of tries then that's fine. Call it a day and make some kid think he's Jack Casady.
Worse case is you make a shim to compensate for the action. I would recommend a full neck pocket shim. There really is a difference. Making a simple vice jig is easy and cheap. All you need is a belt sander.
Once the joint appears stable, fill it and smooth it and you're good to go.
HTC1
|
|
Deleted
Deleted Member
Posts: 0
Likes:
|
Post by Deleted on Dec 22, 2015 1:15:31 GMT -5
Cyn, since its a set-in, a neck pocket shim would require ungluing/regluing the neck, I believe this is beyond the OP's current possibilities.
Couldn't be that the wood compressed in the crack, hence the back bow after the wood glue cure?
Now, after Genmce does like Cyn suggests testing the mid term stability of the system, and if after some truss rods adjustments it returns to the initial situation (with only 1st fret buzzing), then how about replacing just the 1st fret?
|
|
|
|
Post by cynical1 on Dec 22, 2015 11:20:38 GMT -5
The first fret isn't the problem. Actually, the frets were probably not an issue until the crack. After the repair the 2nd fret wound up higher than the 1st fret, hence the buzz when fretting the 1st fret. As I recall, Epiphone is not famous for set necks. You have to buy a Gibson to get that feature. Every one of the Epi EBs all had a bolt on neck, which is a blessing ion this case. By raising the saddles before working out the shim thickness, working out the thickness of the shim to accommodate the new height should bring the action down and keep it consistent down the whole neck. The formula works like this, per a well written explanation from nateclark on The Gear Page: (XZ)/W=shim thickness at the end of the neck pocket W= distance from the fret directly above the neck/body joint to the saddles. X= length of neck pocket. Z= desired change in neck angle as measured at the saddles. This can seem a bit daunting when first encountered, so for example: W= 10.187" (16th fret to D string saddle) X= 2.875" (length of neck pocket) Z= .109" (Multiply this number by 2 to see in the action at the 12th fret, then add a tad extra for your saddle adjustment wiggle room) 2.875 times .109 = .313375 .313375 divided by 10.187 =.031" or 31/1000 of an inch Here's the link if you want to read the whole thread: linkThis is how I did the shim for my nephews Epiphone when I pulled the wrap fixed tailpiece for one with adjustable saddles. Had about 3/32" in height I had to compensate for. Worked like a charm. Anyways, that it for me...way too much thinking before work... HTC1 |
|
|
|
Post by genmce on Dec 23, 2015 5:18:34 GMT -5
Alas set neck on this puppy.
However, that info above is priceless. Shims I have done in a the past, were always trial and error.
|
|
Deleted
Deleted Member
Posts: 0
Likes:
|
Post by Deleted on Dec 23, 2015 6:18:36 GMT -5
Use your 6" metal ruler with the truss rod set so as to have a perfectly straight neck from the higher frets up to the 3rd fret. Move your ruler across all frets up to the 3rd. Now move carefully to the 2nd fret. Do you feel the ruler stopping at the 2nd fret? Or abnormally bumping? If yes then your problem is 2nd fret (Cyn's suggestion is right) and you can safely sand/file/crown this fret (2nd) down.
|
|
|
|
Post by cynical1 on Dec 23, 2015 11:07:18 GMT -5
Well, didn't expect a set neck. I stand corrected.
Yeah, lowering the 2nd fret will probably fix most of the issue. Be careful not to take too much off or the third fret will become too high. The feeler gauge step first should keep you from taking too much off, though.
Full pocket shims. I admit, over the years I'm just as guilty as everyone else of using narrow shims and micro-tilts to lower string action. It wasn't until a few years ago when I noticed my old Peavey bass was developing the "ski jump" on the upper frets that I began to study the problem in more depth. Over time, that air gap between the screws allows enough room for the neck to actually bend to fill it. Those #8 screws are stronger than they looked...
I built a little jig to make full pocket shims that works great in a vice or clamped to the bench. All you need is a belt sander. I'll have to get a picture...if we ever get any sun out here again...
You're probably never going to get the action "on the floor", but you should be able to make it playable for a student.
HTC1
|
|
Deleted
Deleted Member
Posts: 0
Likes:
|
Post by Deleted on Jan 6, 2016 1:43:09 GMT -5
So genmce, what happened?
|
|
|
|
Post by genmce on May 5, 2016 5:11:25 GMT -5
Sorry for the delay.
While the bass is playable, with bad action and relief, it is not how I had hoped it would end up.
It is in the studio at school and kids sometimes play it... however the fret buzz on the 2nd fret returns with the change in humidity... not ideal. I have to adjust relief to loose the buzz, when it shows.
While this experiment did not cost me anything, it is a pity I did not "do it right" the first time.
Lesson learned - I will seek advice before I pull out the glue next time.
|
|
|
|
Post by cynical1 on May 5, 2016 14:40:50 GMT -5
Hey, sometimes the patient just dies. Don't let it bother you.
One bright side to all of this is that you can experiment on this bass with little fear of making it worse.
If you ever wanted to fix a scarf joint beak, maybe install a new truss rod, fit a new nut and level a fretboard you now have your chance.
If this were my bass, and I wasn't deeply invested in it, I'd break the scarf joint completely. Might even lift the fingerboard and put in a new truss rod. The advantage to all of this is that when the fingerboard is refitted, you will have planed the neck gluing surface flat first thereby taking care of any possible misalignments caused by the new glue joint. (Which is what I think part of your problem is at the 2nd fret) With a new heavier truss rod in place you can be certain the neck is as flat as it gets before you fit a new nut and do your setup.
Granted, none of this is quick to accomplish, but in order to learn, sometimes you have to break it to understand the best way to fix it. Make sense?
As I've said before, I think what you're doing is highly commendable. Giving kids the best instrument practicable is the best way to help them stick with it. Don't give up or beat yourself up on this bass. Keep it up and one day you may see one of your kids make it in the business.
Happy Trails
Cynical One
|
|
Deleted
Deleted Member
Posts: 0
Likes:
|
Post by Deleted on May 11, 2016 8:16:08 GMT -5
Hmm now that Cyn gave the reasoning behind the 2nd fret theory, why don't you just sand down this specific fret and see if the buzz goes away? If this turns into the 2nd buzzing as well, then you'll have to replace both 1st and 2nd.
|
|
|
|
Post by genmce on May 12, 2016 6:06:24 GMT -5
Hmm now that Cyn gave the reasoning behind the 2nd fret theory, why don't you just sand down this specific fret and see if the buzz goes away? If this turns into the 2nd buzzing as well, then you'll have to replace both 1st and 2nd. Yeah - I filed the 2nd fret, it was good (well not good - but playable) then the weather changed and things were not so good. Truss rod adjustment to add relief helps but relief is still excessive for play ability. |
|
Deleted
Deleted Member
Posts: 0
Likes:
|
Post by Deleted on May 12, 2016 6:45:14 GMT -5
Fine tuning is an art by itself.
|
|
|
|
Post by cynical1 on May 12, 2016 16:32:35 GMT -5
I moved from Chicago to Oregon a few years ago, so the whole "seasonal" setup routine is a granted now.
I haven't seen this bass in person, so all of this is merely supposition, but a crack at the scarf joint can screw with all kinds of things. I'm guessing the truss rod became a shadow of its former glory, so relying on it to "make things right" is probably more than its capable of doing. If the neck is misaligned after the break the truss rod may just be accentuating the problem. It's sort of like only putting half the lug nuts on a wheel. Sure, it looks fine just sitting there...but drive it a while and add all the additional stress that comes with it...and the wheel comes off.
The only way you're going to fix the misalignment is to get under the hood and evaluate what you have to work with. OK, taking the fingerboard off is a pain, but you have the advantage of time since no one plays it now anyway. Truss rods are cheap, so while you're in there dropping in a new one is easy.
The biggest hassle is removing the glue already in the break seam. With the fingerboard off you'll have a pretty good idea where to go next.
Ain't this stuff fun?
Happy Trails
Cynical One
|
|
|
|
Post by blademaster2 on May 30, 2016 10:05:09 GMT -5
With such sensitivity to humidity it does seem odd. My first thought was that the truss rod was perhaps too tight before the crack occurred and this stress cause the glue joint to fracture on an impact (properly done glue joints are usually stronger than the surrounding wood).
Was the truss rod loosened up before any of the regluing was done? It should have been totally backed off. If the glue filled the crack and cause a larger gap there, then I can see how it might cause the 1st fret buzz.
My instinct, assuming the glue job was strong enough to function correctly, is to get the correct profile using the truss rod, possibly replace the string nut (if the head is now too far back, this will need to be higher than the original however you did not see open string buzzing so maybe not) and then (preferably) replace the first fret with a higher one and then flat file the entire neck. If replacing the 1st fret is not desirable then maybe a simple flat file job on all of the fingerboard will bring it all in line.
|
|
|
|
Post by genmce on May 30, 2016 10:58:40 GMT -5
Yeah - Cyn - I doubt highly that I will try to remove the fretboard.
However, could defiantly do whatever with it now.
blade - yes - loosened truss all the way before gluing, at least I did THAT correctly.
New nut, perhaps. I honestly have not had much time to even think about it.
Next school year, 16/17 I have two sections of Audio Production! Much thought and prep going to that now.
The bass is not going anywhere at this point. I'll see if I have a student REALLY interested in bringing it back to better function, otherwise it will just kick around the studio.
Also - this bass is VERY head stock heavy, without careful attention, it will take a dive to the floor. When the kids handle it I see it drop toward the floor with every single one of them. I suspect this is what happened originally, but I will never know.
|
|
|
|
Post by cynical1 on May 30, 2016 16:21:39 GMT -5
Yeah - Cyn - I doubt highly that I will try to remove the fretboard. However, could defiantly do whatever with it now. Yeah, I can certainly understand that. Putting $300.00-$400.00 worth of work into a $50.00 bass is a sign of insanity...which reminds me, I gotta take my meds... Not a bad idea. You might look around for a Luthier's school in the area. I know the one in Chicago used to take terminal cases and use them as an instructional aid. Granted, this was back in the 70's, but a truss rod\fingerboard replacement cost was significantly lower than a trained tech, Same theory as getting a cheap haircut at a Barber's College...while they may not be fully trained, their work was normally very respectable. If your school has 501c3 or similar non-profit status, you might be able to wrangle a deal out of a luthier or repair shop for the tax write off. I did this a couple of times for guys who played in churches. While I have no ecumenical affiliations, once I got the church's 501c3 Deduction sheet I could write whatever I wanted in there for the cost of the repair which I could then take off of my taxes. For example, for your bass, if I still had the shop, I'd charge you for the nut and the frets. The rest I'd write off. So, for about $20.00 you'd wind up with a $400.00 repair and I'd have a $380.00 tax write-off. SGs were famous for this and your bass is really just an SG with heavier tuners. There are a few easy fixes for that which might improve the situation. First, try a wide suede or suede like strap. More grab helps keep the strap in place so the instrument doesn't dive. If that doesn't work, you can move the strap button from behind the body to the top horn. This changes the center of balance and might be all you'll need to do. The final cheap and dirty fix is a bag of BBs. Load up a plastic Baggie with BBs, stuff it in a sock and place it in the control cavity. The BBs will naturally find their place in the cavity so you can get the cover back on. This works surprisingly well for an old school fix...and when the guitar begins to cut out you'll know it's time for a new bag... Happy Trails - Cynical One |
|
|
|
Post by blademaster2 on May 31, 2016 7:50:48 GMT -5
Ha - I like cyn1's BB suggestion.
My first guitar had a too-heavy neck and I ended up carving a mould out of wood with the same but smaller outline as the electronics cover plate, and pouring melted lead into it. The solid lead slab was then woodscrewed to the cover plate (it was thin enough to not contact the wiring) and it balanced the guitar perfectly. It was more work than the BBs, but introduced no risk of shorting out or damaging the electronics.
|
|
|
|
Post by cynical1 on May 31, 2016 11:11:06 GMT -5
Ha - I like cyn1's BB suggestion. My first guitar had a too-heavy neck and I ended up carving a mould out of wood with the same but smaller outline as the electronics cover plate, and pouring melted lead into it. The solid lead slab was then woodscrewed to the cover plate (it was thin enough to not contact the wiring) and it balanced the guitar perfectly. It was more work than the BBs, but introduced no risk of shorting out or damaging the electronics. This fix won't work for most Nutz here, as there's no room left in the cavity to squeeze any BBs into... The BB trick is was originally buckshot the first time I saw anyone use it. I've seen all kinds of stuff over the years. I even found three old metal cast Army men figures shoved into a control cavity once. My ancient Peavey Foundation was a nose diver from day one. When I pulled the OEM bridge for a Schaller bridge I Forstnered 2 holes under the bridge mount and buried about a 1/2 dozen thick 1" brass spacer washers under it. Once the bridge was mounted most of the problem went away. A wider leather strap did the rest. The problem was obvious, really. Take a poplar body and mount a maple neck on it with old school heavy tuners...instant neck diver. I would have dumped it in the beginning, but I love poplar on basses and those Peavey Super Ferrite bass pickups are one of the best kept secrets out there. All the big boys seem to be moving away from the harder more expensive woods and heavier brass castings on bridges...but they still tack a maple neck to a basswood body and wonder why it nose doves. This is nothing more than a design flaw quietly overlooked for the sake of the bottom line...but don't get me started... Happy Trails Cynical One |
|
Deleted
Deleted Member
Posts: 0
Likes:
|
Post by Deleted on May 31, 2016 14:40:09 GMT -5
ha ha, brass is better for tone and 70's correct  . Lead is toxic keep this away from your living space. Gibson designs give awesome tone but terrible ergonomics. Fender designs give OK tone but better ergonomics. |
|
|
|
Post by blademaster2 on May 31, 2016 16:35:30 GMT -5
All good points - the lead was quick and easy (and it never sees light of day now that it is inside the cavity). Iron or brass plate, cut to the same outline, would probably also work but requires more tools than I had available as a teen.
From the cavities I have seen (Les Pauls, SGs, Ibanez and similar), there is often a reasonably good distance between the cover and the pots/switches for this approach to work. I usually see less available volume to the sides of the electronics rather than above them, but I have perhaps not seen enough of them to have a good generalization. A Strat would be trickier for this, I agree.
|
|
edvard
Meter Reader 1st Class

Posts: 51 
Likes: 0
|
Post by edvard on Jun 1, 2016 0:57:24 GMT -5
I saw a neat trick for balancing a guitar once: attach both ends of the shoulder strap to the button on the top horn. Granted, it's not as stable, and you'd probably want a washer or something on top of that to keep both ends stay put, but it works.
For weight distribution, I have always loved the Peavey Patriot bass; jazz neck, super ferrite pickups (totally agree with you on that one, Cynical), and no nose-dive because that top horn stretches aaaaaaaall the way up to the 12th fret. I imagine the thinner profile of the jazz neck contributes to better weight distribution, but how much I'm not sure. I've had two, and been forced to sell both. I see they're still reasonably priced at the hock shops and eBay, so there's hope yet, and the next one I get ain't goin' nowhere...
|
|


 . Lead is toxic keep this away from your living space. Gibson designs give awesome tone but terrible ergonomics. Fender designs give OK tone but better ergonomics.
