Deleted
Deleted Member
Posts: 0
Likes:
|
Post by Deleted on Dec 8, 2017 2:12:20 GMT -5
Ok, to cut the long story short, I screwed up once again with a new all maple neck a guy sold me.
Now instead pf nitro/poly/solvent-based-acrylic i thought to go the water based acrylic route. There is nice feel to it and also according to my experiments gets lots tougher than solvent-based-acrylic, and gets sanded better. + it is not harmful to humans.
The season is not right for this kind of things, but I guess in the spring/summer I'll do it.
|
|
|
|
Post by newey on Dec 8, 2017 6:49:26 GMT -5
Well, keep us up to date on this. But why is the thread titled "headstock decal"?
BTW, I just finished giving the neck on my latest project (the kit) the Cyn1 treatment and the finish feels fast, as advertised. Of course, no actual playing yet as the guitar isn't finished, but it looks and feels great.
|
|
Deleted
Deleted Member
Posts: 0
Likes:
|
Post by Deleted on Dec 8, 2017 7:23:26 GMT -5
Well, keep us up to date on this. But why is the thread titled "headstock decal"? BTW, I just finished giving the neck on my latest project (the kit) the Cyn1 treatment and the finish feels fast, as advertised. Of course, no actual playing yet as the guitar isn't finished, but it looks and feels great. This was about installing a decal, that's how it started , but since I have removed the original finish a couple of times, this has become a finish job as well. So I gotta install a better decal in place and also do some passable finishing job. I know Cyn1 loves enamel POLY , I wanna avoid solvents in all this, they stink, I wanna avoid poly/nitro/solvent-based/acrylic (all of them smell like poison - hey *are* poisonous). Post some pics of your project man! I gotta re-read Cyn1's bible ehmmmm i mean instructions. The deal here is , you guys in the USA have access to lots of room/space. I got no space / time to work, so its gotta be fast and dirty... ehhmmm I mean clean  |
|
|
|
Post by cynical1 on Dec 9, 2017 0:14:37 GMT -5
Bible?
Actually, poly is nowhere near as obnoxious as lacquer in the VOC lexicon. Sure, it has a smell, but it can be controlled and contained.
I'd love to post pictures here, but between Idiotshack and Botophucket all my online photo archives are lost to the ether. Besides, the rainy season has descended upon the PNW and not much is gonna get done for 5-6 months. I have a few, but I have the same problem you do. No space to work in.
A trick I used years a go when space was at a premium, was to take a length of heating duct, about 18" x 9" x 4', cap the ends with some plywood, screws and silicone sealer, cut a door and hinge it with a cheap latch and seal it with some masking tape. All available at the hardware store or home improvement black hole of your choice for cheap. Just screw a hook into the top of the box, loop a coat hanger through the top peghole and hang it there to dry. Close the door and most of the dust in the room never sees the wet finish. I'd stick the box in the bathroom, turn on the fan, close the door and in the morning the neck was dry. No house pets were harmed during the execution of this operation.
As I've stated here on numerous occasions, mixing poly with mineral spirits 50/50 make a very thin and fast drying finish and only takes about 5 minutes to apply when wiped on.
And newey, glad you like the little trick with the satin poly on the back. Remember, 0000 steel wool is the best for smoothing it out after about 15-20 days. The Golden Rule is if you can put your nose up to the finish and not smell anything then you can sand and polish with no worries. Until then, patience.
Happy Trails
C1
|
|
Deleted
Deleted Member
Posts: 0
Likes:
|
Post by Deleted on Dec 9, 2017 1:16:10 GMT -5
Cyn1 ,
(so water-based is out of the question : they suck for guitars)
i experimented yesterday with thinning acrylic varnish spray with naphtha (yes I improvised a little) and it worked very good, superb ease and fast drying as you say. Does the trick with the ultra fine steel wool also works in order to achieve a mat finish on the headstock?
The neck is done with solvent-based acrylic lacquer, not poly , not nitro. Would it be OK to put Poly (or nitro) on the headstock? Or should I keep it acrylic? This spray I got, when completely dried gets hard. Its just the decal and the headstock actually.
The test about putting your nose is (well will be!!) so useful!
BUT, ALSO , the neck has some anomalies on the back.... This new luthier who made it (dont ask me why didn't I go to the my-go-go man, the guy who rescued the Ibanez : because I am an idiot) thought it might look vintage.... Anyways, if I sand down the back of the neck, some of the Acrylic solven based lacquer will go, so what do I do? Remove all acrylic with naphtha and then sanding and re-do it all with poly?
This seems more reasonable and I can do the hanging thing from some hole in the headstock trick.....
But this will have to wait till the summer when family goes for vacations.... Ooopssss.. my wife got a job, so this not gonna happen.... hmm... I might hang it in some tree we have in a little garden? (I mean in spring time not now)?? Or am I asking for trouble?
I would prefer keeping it compatible and acrylic solvent-based, and doing the minimal interventions.
ok I made a mess , so the priorities are :
1) passable decal + headstock
2) smoothing out back of the neck
3) back/rest of the headstock (optionally)
and the questions are whether I keep this acrylic....
|
|
|
|
Post by cynical1 on Dec 9, 2017 2:19:01 GMT -5
Cyn1 , (so water-based is out of the question : they suck for guitars) For bodies I can see why people would use it. It's gonna lift the grain, but maple is usually pretty fine grained... Still, if it were my neck, I'm putting the finish on to keep out water...call me old (yeah, SG, I'm officially 60 now) but I wouldn't use it on a neck. YMMV OK, a little clarification is required on varnish. It comes in all kinds of flavors. Polyurethane is a varnish. Varnishes are typically all harder than lacquer, and depending on the particular flavor of varnish, it can be sanded and polished to a pretty nice shine. Poly actually never really gets as shiny as lacquer since it so damn tough. You may like the acrylic varnish finish better than poly for a shine. Again, to keep on with varnishes, there are a few cardinal rules on lacquer and varnish. Varnishes will stick to the top of the coat underneath them. Lacquer will melt down into the coat below it. Therefore, putting lacquer over varnish has been known to lift the finish right off. Unless you're going for that 100 year old player piano look, you're probably not going to like the result. But, you can normally put a varnish over lacquer and have no problem with the finish lifting on you. [DISCLAIMER] ALWAYS test your new finish on the old finish in an out of view spot and see what it does. Act in haste... [\DISCLAIMER] That's what I'm here for. Typically it's 15-20 days for varnishes (yeah, poly, too...) and 25-30 days for lacquer. YMMV OK, as stated above, lacquer lifts varnishes, varnishes cover lacquer. (Yeah, I know it depends on the cure, age and stability, blah, blah, blah...but the aforementioned is a safe rule of thumb to follow to keep life simple) You could wipe a few coats of thin shellac over the whole neck and coat it with whatever you wanted to. It all comes down to how much work you want to put in. Sometimes the project seems like more fun before you start than it does 4 weeks into it... Here's my thoughts. The acrylic varnish you have is going to be tough. As tough as poly? Probably not, but it beats the Hell out of oil and will be much tougher than lacquer on the neck. And learn from someone who learned the hard way, completely sanding a neck, including the refret and new nut, is a lot more work than reducing your acrylic lacquer and wiping it on the neck once you're finished sanding. About 6 coats of wiped varnish will be more than enough to last you until your fingers stop working. Yes. That's your best route. Keep it simple and stupid. Any varnish will sand and polish out easier than poly. 1.) Fair plan. I had good results with an ink jet printer waterslide decal. Made a bunch of them. Get the right stuff, including the coating you sponge on right after you print them. Nothing lifts them. 2.) Enjoy 3.) You'll get a feel for how far to go. Well, I hope you do... Once the neck feels right on the back, just clean it up with some 360 or 400 grit DRY sandpaper. With varnishes you need to rough up your existing coat before you apply the next coat or you might run into adhesion problems. Yeah, acrylic varnish. Satin for the back, clear for the finger board, if maple, and whatever floats your boat for the headstock. Happy Trails - Cynical One |
|
Deleted
Deleted Member
Posts: 0
Likes:
|
Post by Deleted on Dec 9, 2017 3:46:26 GMT -5
thanx!
I guess I must remove string tress, machine heads, etc? right?
one more thing, shall I use spray or wipe on clothe ?
|
|
|
|
Post by cynical1 on Dec 9, 2017 4:11:40 GMT -5
Yeah, tuners, string trees\bars...ideally the nut, too.
HTC1
|
|
Deleted
Deleted Member
Posts: 0
Likes:
|
Post by Deleted on Dec 9, 2017 4:50:24 GMT -5
Yeah, tuners, string trees\bars...ideally the nut, too. HTC1 thanx, spray or wiping on (wipe on maple with cloth)? I have spray. |
|
Deleted
Deleted Member
Posts: 0
Likes:
|
Post by Deleted on Dec 9, 2017 8:07:15 GMT -5
|
|
Deleted
Deleted Member
Posts: 0
Likes:
|
Post by Deleted on Dec 9, 2017 11:11:07 GMT -5
here are the current photos... yesterday I experimented a little bit on smoothing out using naphtha on top of the solvent based acrylic varnish. Cyn, I now know what you mean about adhesion , more on this later : Here are the pics as is now :  2017-12-09_05-27-14 2017-12-09_05-27-14 by panixgr, on Flickr ^^^ this is the worse it can look 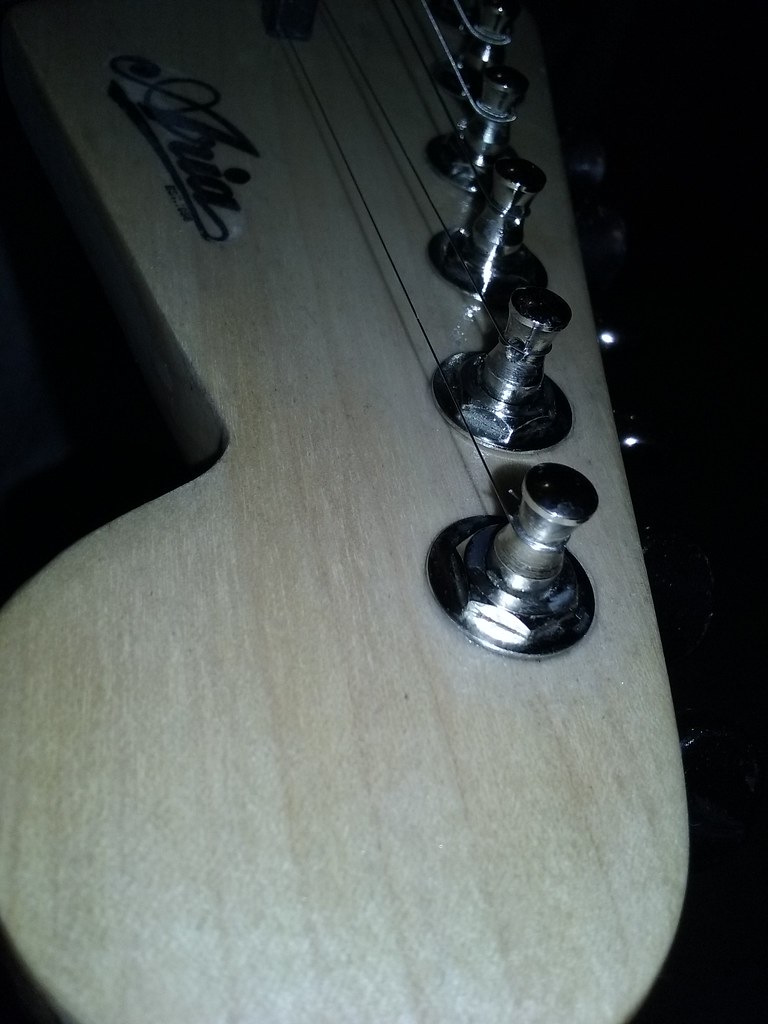 20171209_172530 20171209_172530 by panixgr, on Flickr 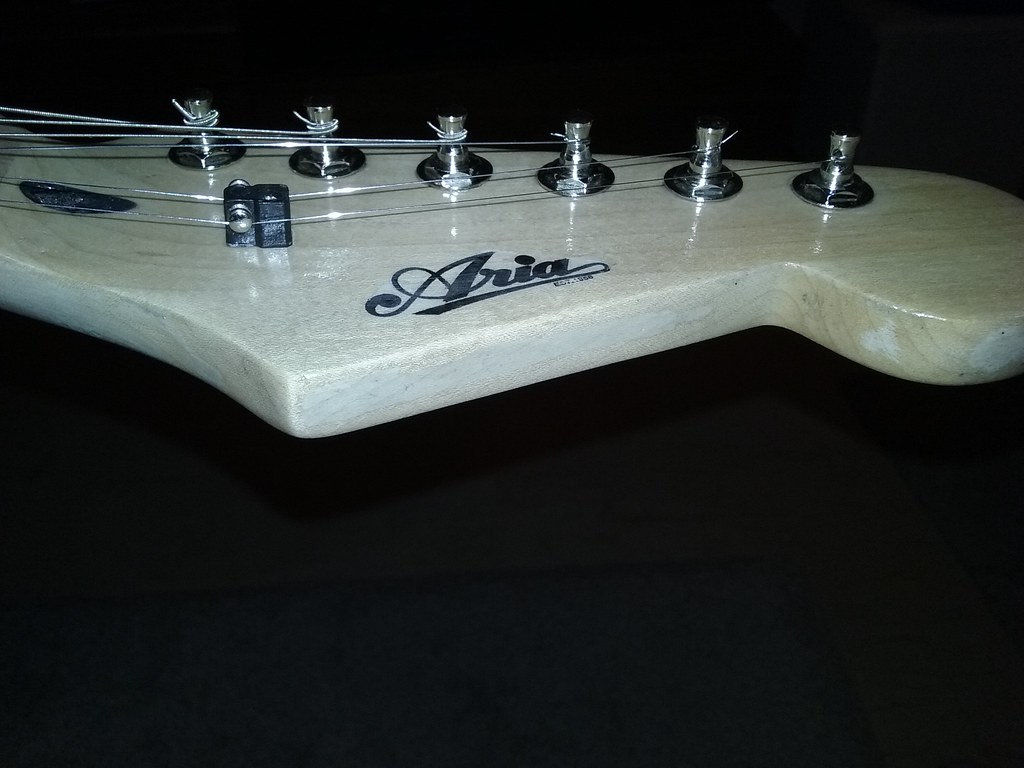 20171209_172518 20171209_172518 by panixgr, on Flickr  20171209_172507 20171209_172507 by panixgr, on Flickr  20171209_172452 20171209_172452 by panixgr, on Flickr 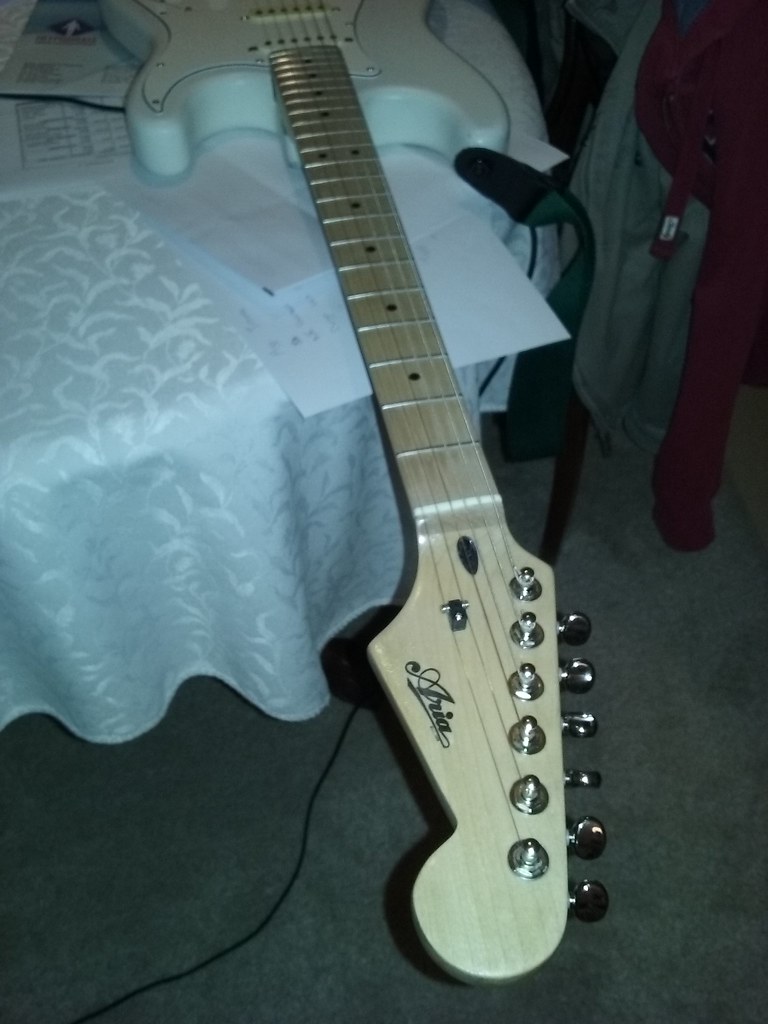 20171209_172440 20171209_172440 by panixgr, on Flickr So...... I need to replace the decal with a better one. I am using a technique I saw on the net and really loved it. Of course I will try the official laser decals, but this one can get pretty passable if not perfect. Here is the tecnhnique : maybe with some PVA to fit the decal and some more mat-ish tape. Anyways, in order for the decal to sit tight there must be no air underneath. So in other words maple has to be fine sanded to 2000 or there must be some smooth varnish to serve the same base for the decal. *BUT* on the other hand we need the wood/current layer to be rough for the next layers of spray right? But if I sand the decal with 300-400 I risk destroying it... What should I do? *BUT* if I am to remove the existing decal I'll have to sand it either way. So the question is : - should I sand it all the way down to bare wood, or just try to thin it out first by the use of naphtha ? and if I am done with sanding, lets say with grit 100-200 then how do I prepare for the decal to sit firmly without getting air??? In short I see a contradiction : - I need rough surface for the next coats to have adhesion - I need smooth surface for the decal Also I saw naphtha can provide adhesion..... so what do you suggest?? it is the truth that I messed up with various experimentations, but I am determined to do it right. Even buy proper decal laser paper. |
|
Deleted
Deleted Member
Posts: 0
Likes:
|
Post by Deleted on Dec 9, 2017 14:37:57 GMT -5
I am kind of alarmed , touched the back of the neck with some naphtha to clear some dirt and there was NO stickiness at all.... WTF??? does the neck have clear coat or not??? 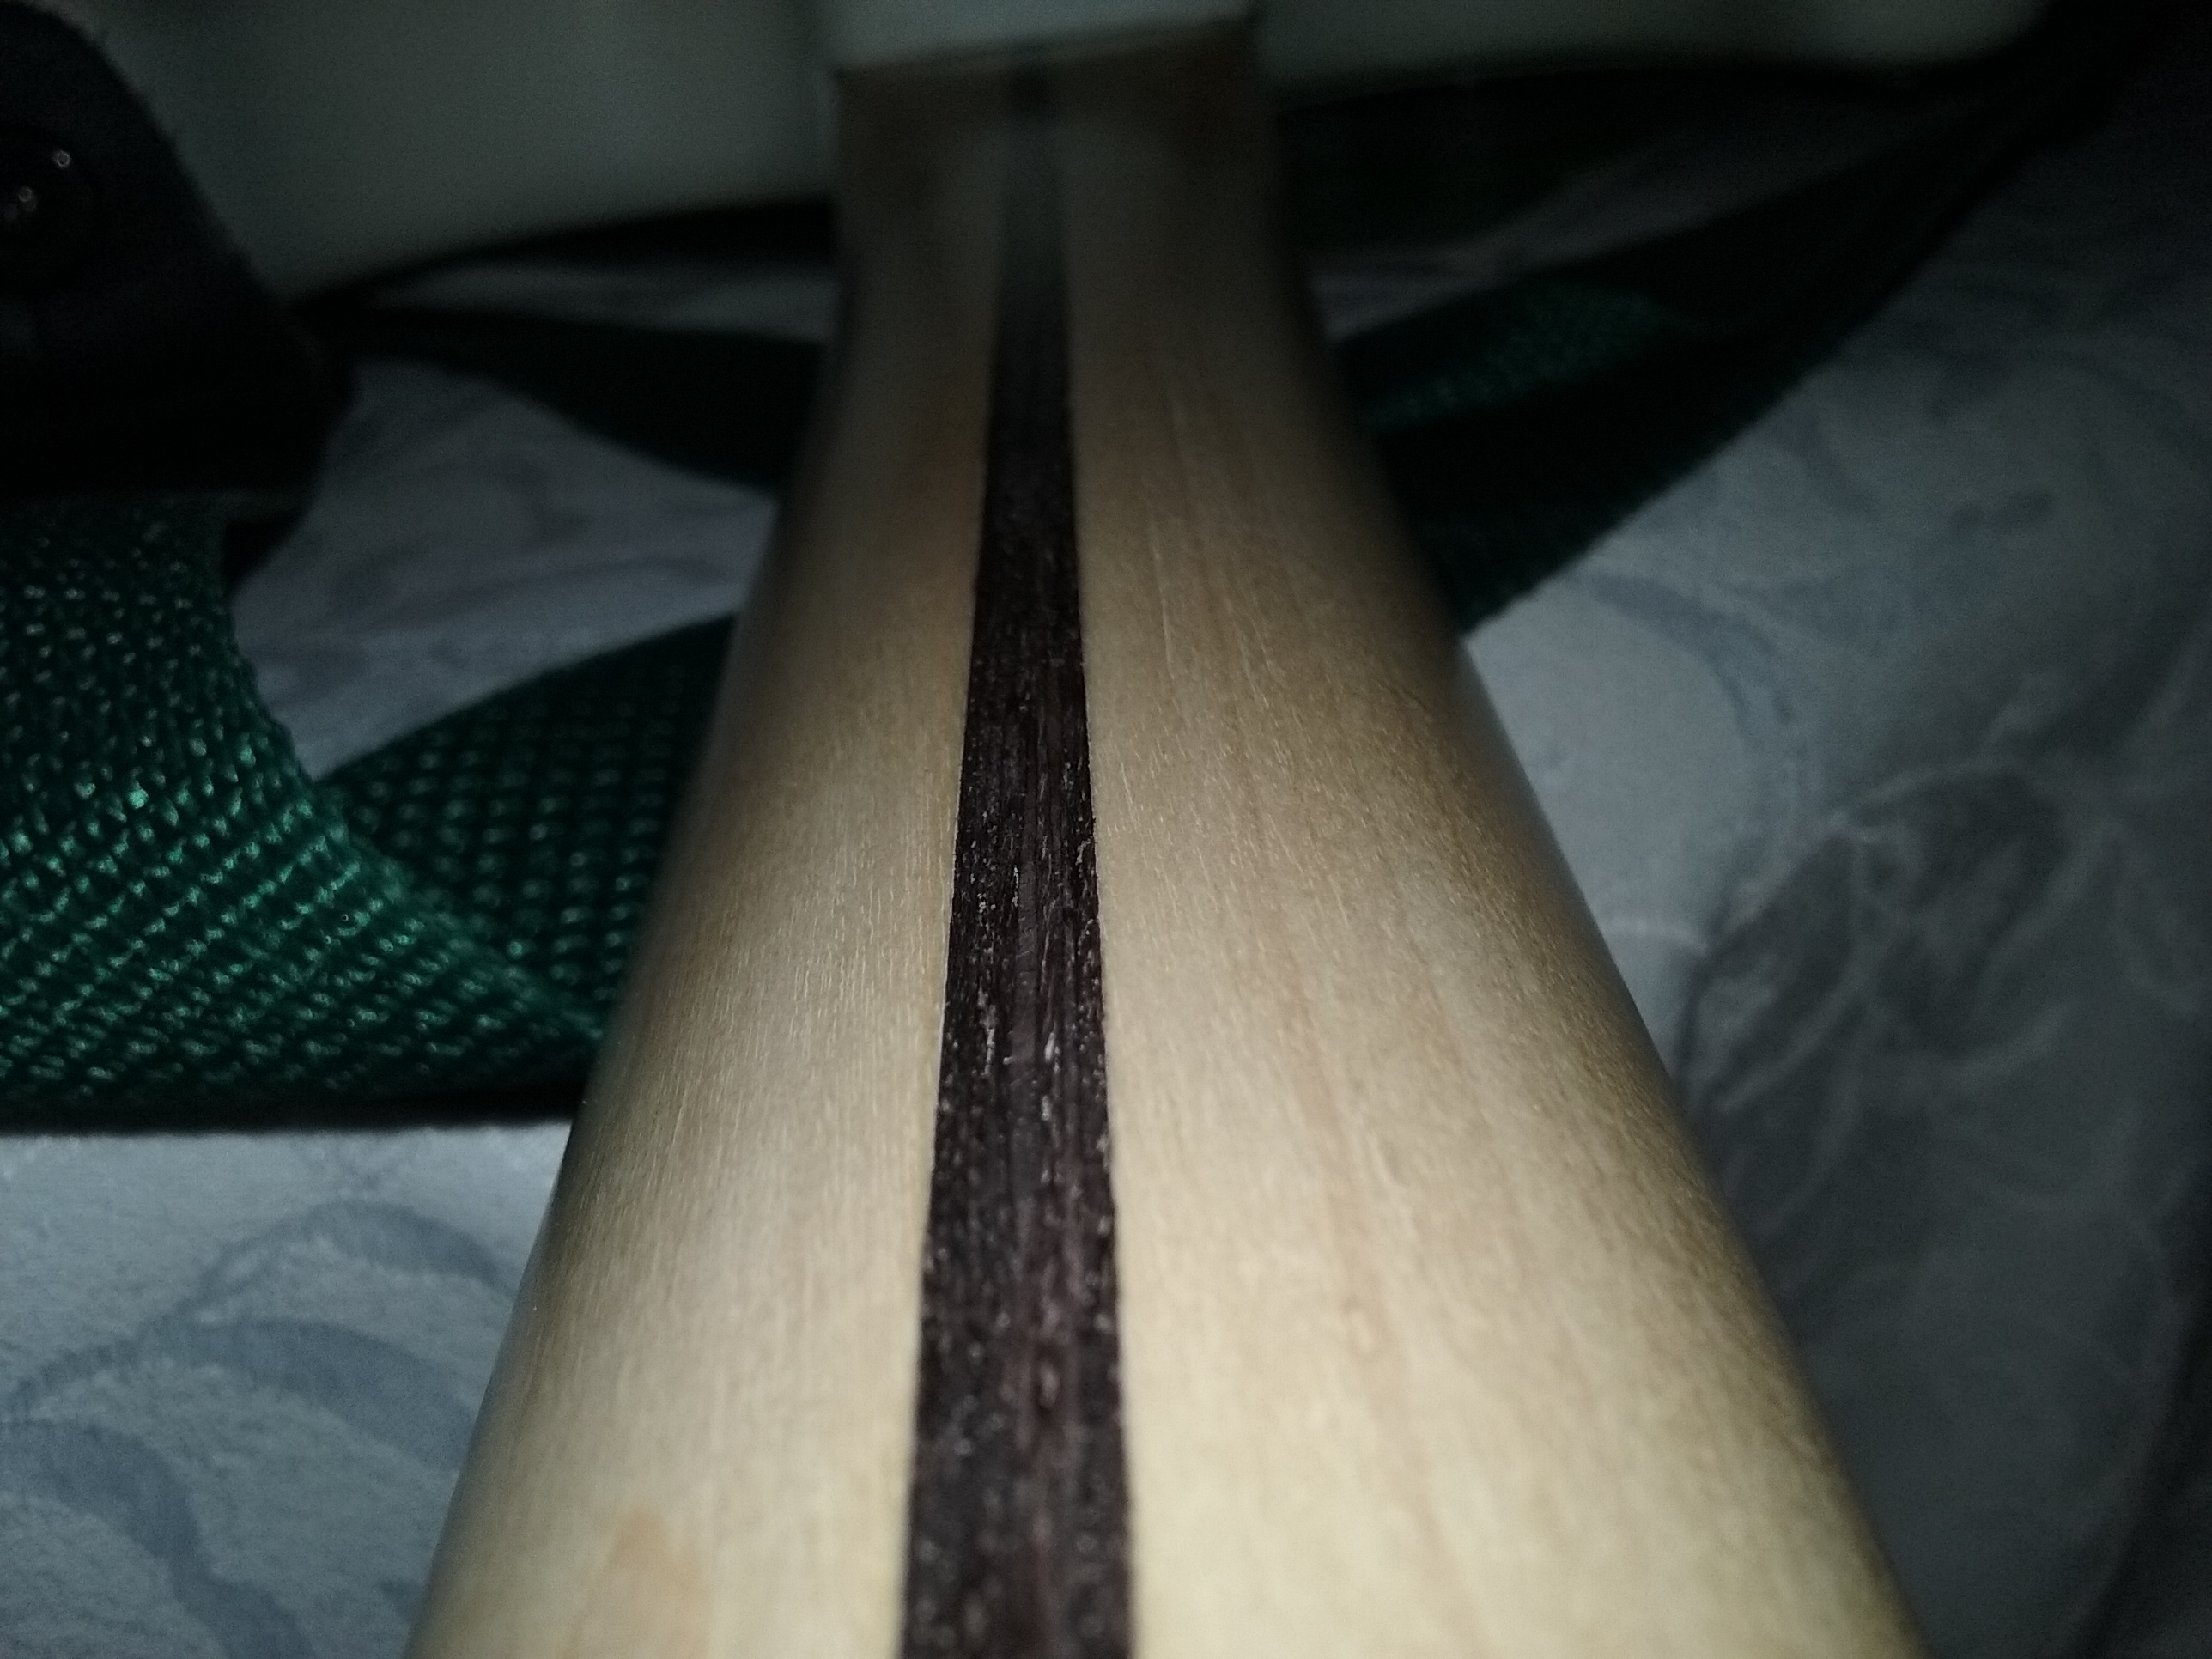 20171209_213308 20171209_213308 by panixgr, on Flickr 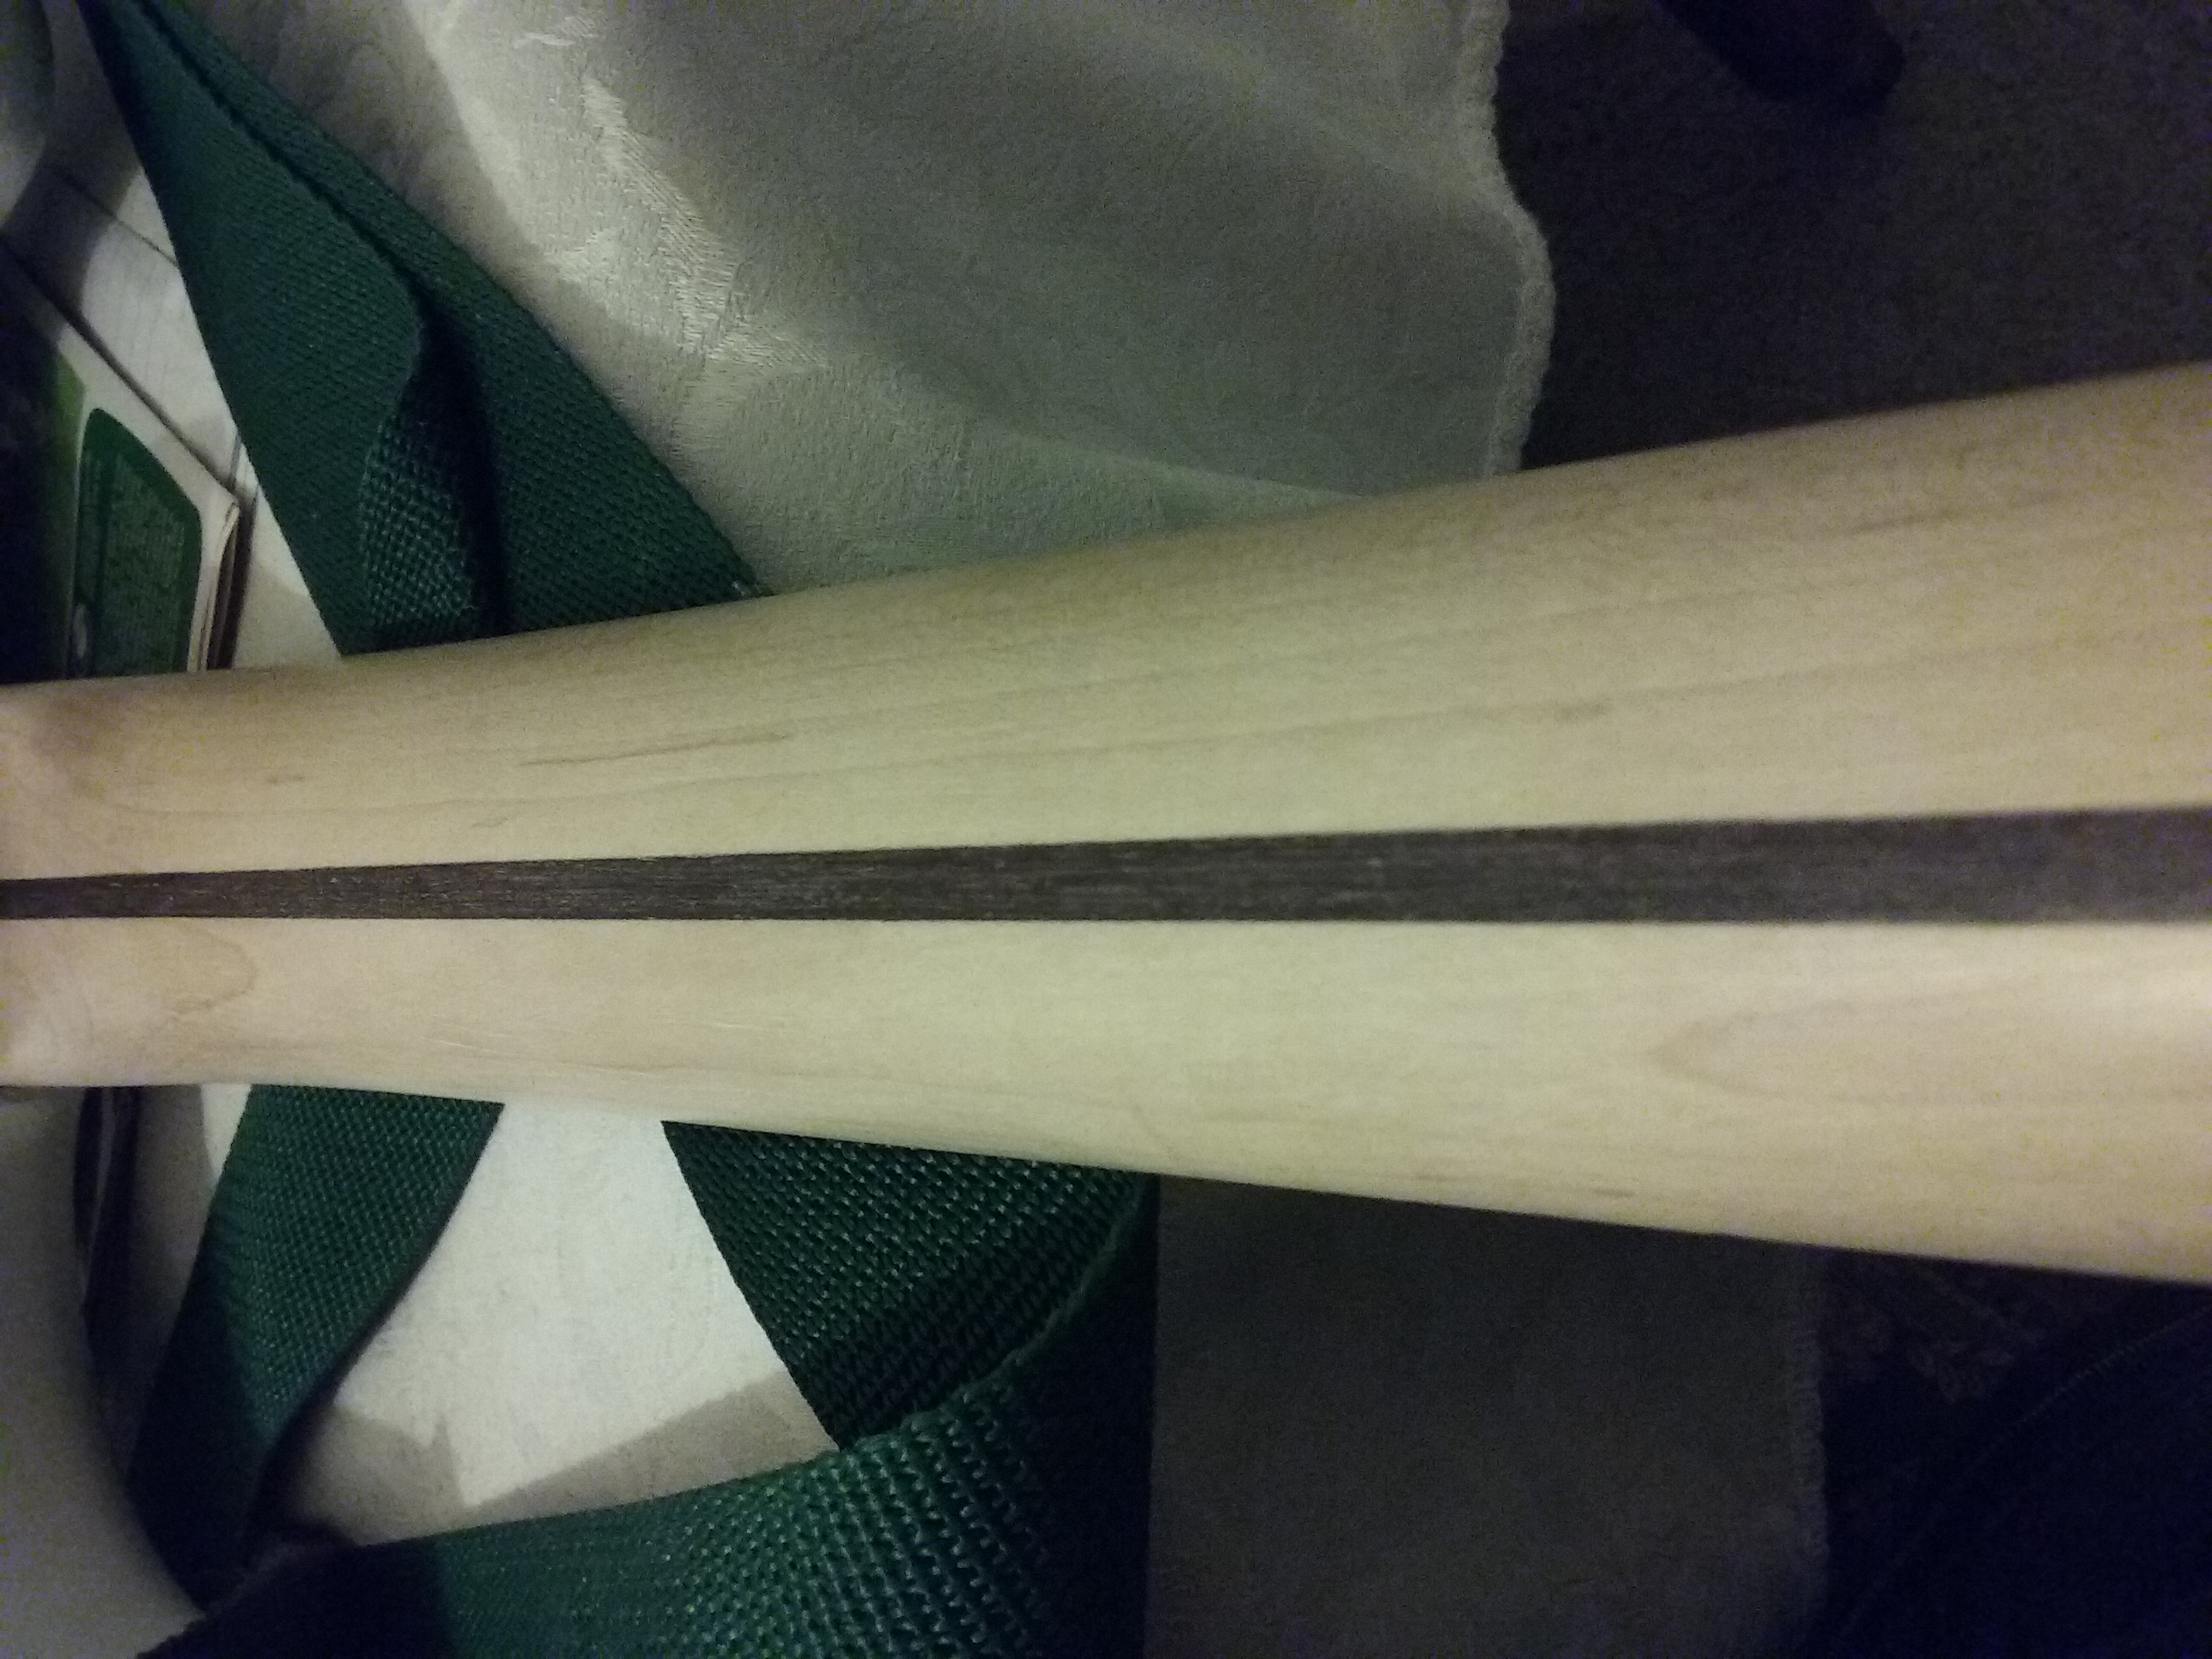 20171209_213238 20171209_213238 by panixgr, on Flickr |
|
Deleted
Deleted Member
Posts: 0
Likes:
|
Post by Deleted on Dec 9, 2017 14:41:22 GMT -5
I gotta make up my mind if this thing has any clear coat or not.... if not I am going the POLY route, I got a friend from Makedonia who will send me some 2K poly....
|
|
|
|
Post by cynical1 on Dec 9, 2017 20:01:25 GMT -5
As far as spraying versus wiping, it depends on how well you can spray a finish. I'm not trying to be any more of a smartass than usual, but if you have the clean space, ventilation and can leave whatever you spray alone overnight without moving it...and you can spray a finish without runs, sags, overspray or orange peel...then I would recommend spraying it. If not, then I strongly suggest wiping the finish on.
Why? Because you can create a lot more work for yourself by spraying a bad series of coats that you're going to spend time sanding back to smooth before the final coats. When you wipe a finish you'll typically thin it. I have found that a 50\50 split with varnish\poly and mineral spirits works the best. Maybe it because I've done it for so long that I've finally have the process down. Either way, the thinner finish levels better and dries faster, thereby limiting the amount of crap the can land on the wet finish as it dries.
Well, that was a unique way to make a headstock decal. While it is a step up from a Sharpie, I would suggest you do a little research on either inkjet or laserjet waterslide decal sheets. I did mine on a Lexmark inkjet at 4800dpi (enhanced) and they came out great. The paper was from Italy, so I'm guessing you can lay your hands on it as easy as I did.
Not knowing what the solvent is in your varnish I can't advise on what to thin it with. Naptha is an option, but mineral spirits are normally easier on the nose. Some acrylics can be thinned with water, which would be fine once the first coat is on since you can't raise the grain then.
As far as blending the decal into the headstock...man, there's the right way...and every other way... You want real waterslide decal paper because it's very thin. This is critical, as the ONLY way to flush a decal is by building up and sanding down a bunch of coats on the decal. My best guess is around 15-20 coats sanded carefully before you can begin to apply the final 3 coats. YMMV Anything less, or if you use too thick a substrate, you'll have a bump or rise in the finish following whatever line you cut the decal on.
There is no other way to have it look flush with the final polished finish. I know it sucks to do, having done it God knows how many times, but once it's done it looks as professional as the big guys.
Yes. There are special squeegees for this purpose, but anything firm and pliable with a soft edge will work. You can also mix a bit of soap in the water you float the decal in. This allows you a little last minute adjustment time without tearing the wet fragile decal.
I would never recommend trying to get a decal to stick and stay on bare wood. You want a finish underneath it. I typically put down 3-4 coats, sand down with 400 grit wet or dry, then apply the decal. Let it sit for a few days, then hit it with 3-4 coats of finish. Lightly...did I say lightly?...sand with 600-800 grit wet of dry, or 0000 steel wool. All you're looking to do is knock off the dust and rough up the finish. Be careful not to leave sanding marks behind, as the next coat can sometimes lock them into the finished product.
Repeat this process until you can turn the headstock to the side and not see the decal rising up as you catch the light.
Remember to use a tack rag and wipe the surface between coats.
I started taping off everything on the neck but the face of the headstock to do this. That way, if it does run, you just pull the tape and only have to sand the edge of the headstock before you put the final coats on. Anything that saves you from yourself...
You're gonna have to explain that one.
Buy the right paper and supplies to do it right. That way you'll never have to do it again.
Happy Trails
Cynical One
|
|
|
|
Post by newey on Dec 9, 2017 22:30:44 GMT -5
Gospel.  Another tip for using the waterslide paper- cut the finished decal out from the sheet using a scalpel or razor knife. Don't use a scissors; it will fold the edge of the decal a bit as the cut is made, and the edge won't lie quite as flat. (I learned this the hard way.) I haven't seen the stuff Cyn mentioned, to overcoat the decal after printing. I just sprayed the entire sheet of decals with the same clear acrylic I'm using on the headstock. I made up three sheets of decals 10 years ago and still have most of them left! |
|
Deleted
Deleted Member
Posts: 0
Likes:
|
Post by Deleted on Dec 10, 2017 3:49:58 GMT -5
thanx a lot, everything noted.
by naphtha providing adhesion, I mean that solvent-based acrylic clear varnish some times does not bond to the wood. Needs sanding. But a some roughing up and some naphtha-varnish mix will stick hard to wood. I did clean the back of the headstock yester night with naphtha and it turned very smooth and nice. But if there was varinsh in place it stick like hell... super adhesion.
BUT the good news is that I explained to this other tech who did this all my problems written in email, and he responded answering all my questions, and told me to forget about fixing anything myself and bringing the guitar back to him. He spoke very very reasonably, I and fully appreciate this.
So, I am ordering the laser decal, and print one two sheets of this and then handing it all to the tech. He seemed to know his thing.....
I better go back to setting up floyds and playing some dire straits and leave enamels, lacquers, varnishes, nitro/poly/acrylic/naphthas aside...... Its too much for me.
Cyn1, Its the second time I give up with paints/finishes.
I don't know if its gonna be a 3rd one, but I will copy paste and KEEP all your instructions, just in case.... In my village I own a house with lots of space outside . THEN i will paint!!! You will be around 80 at the time, and me around 70, if ai manage to retire, that is.... WELL!!! lets all try to keep healthy till then!!!! (And I full heartedly wish so!)
|
|


