|
|
Post by unreg on Oct 14, 2022 17:48:41 GMT -5
Hi all.  A Schaller Floyd Rose arrived today from ChrisK’s old Warmoth recommendation. It is supposed to replace my current Licensed Under Floyd Rose Patients bridge thingy bc its low E string saddle screw is now stripped. That saddle can’t be loosened with an Allen wrench anymore… so intonation can’t currently be set. My guitar is an ESP LTD M-155. It works extremely well now, after MUCH of nutz help, except that strings can’t be correctly changed. Clearly, I’ve NEVER installed a Floyd Rose. But people like frets have, so I am hoping to learn if this will be a somewhat easy or difficult task. I could take it to a luthier, but I’d rather personally install it, if that seems reasonable. p.s. I’m under the impression that a Schaller Floyd Rose IS the correct size for my guitar. |
|
|
|
Post by frets on Oct 14, 2022 20:14:33 GMT -5
Unreg,
As long as the routing matches you should be okay.
Here is a tutorial.
There are several others on YouTube. Just go slow and protect your finish. I use blue painter tape and tape the entire area cutting out the tape on the rout.
|
|
|
|
Post by cynical1 on Oct 15, 2022 7:50:29 GMT -5
According to ESP and Floyd Rose this should be a direct placement. I've always found that type of statement to be mostly true...
Theoretically, the only difference between the OFR\Schaller and the LFR should be the composition of the material used. The LFR iterations I've seen have had plastic and zinc components versus the hardened steel in the OFR\Schaller versions. The footprint should be identical. I've never seen the ESP version of a LFR before, so if it was me, I'd pull the one you have on the guitar, then put it next to the Schaller and make sure everything lines up...base plate, fine tuner standoff...you know, all the stuff that'll make themselves glaringly apparent once you try and use the thing...
For your purposes, starting the video around 29 minutes will show you all you probably need to know. Pay no attention to the part where he routes a Rose cavity freehand with a full size plunge router...unless you're short on firewood... Show the wood you care and use a template, if necessary.
HTC1
|
|
|
|
Post by unreg on Oct 15, 2022 17:26:18 GMT -5
frets, thank you so much for the video! Got some blue painters tape. The routing doesn't match bc the Schaller is a different shape from my ESP's LFR: my ESP's LFR 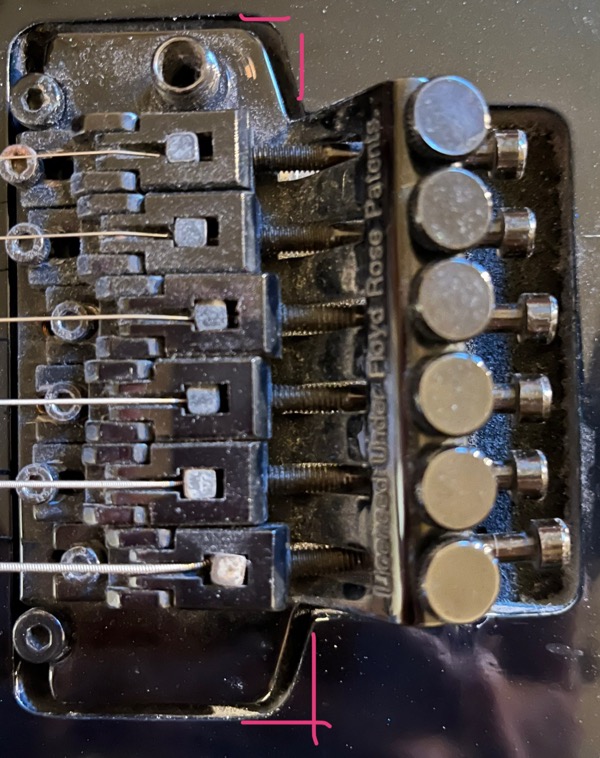 Schaller (... it's blurry sorry) 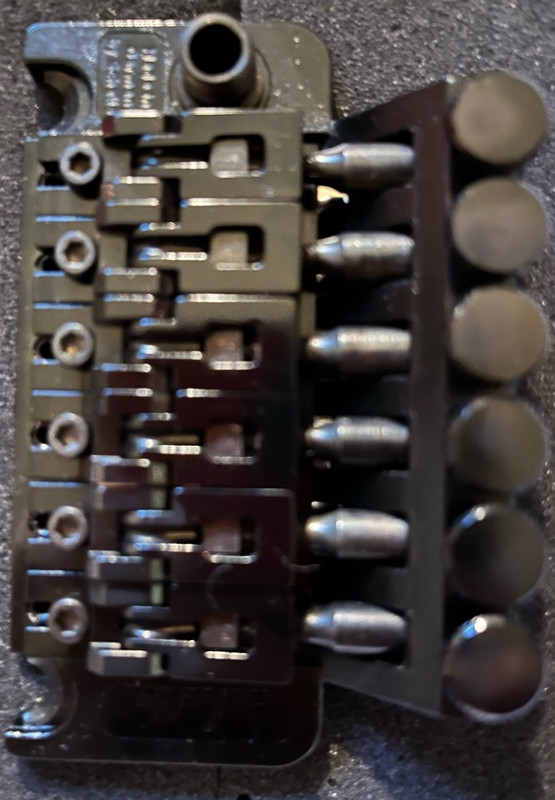 I marked the first pic with marks where the routing should be done... about an 8th of an inch. So, now I need a router of some sort... will watch your video again... and maybe I should use cynical1's template? Or, maybe I should contact a luthier. [EDIT]Or, maybe I can just use sandpaper, like when I enlarged the pot shaft holes during pot replacement, bc there’s not really much wood to remove. [/EDIT] According to ESP and Floyd Rose this should be a direct placement. I've always found that type of statement to be mostly true... Theoretically, the only difference between the OFR\Schaller and the LFR should be the composition of the material used. The LFR iterations I've seen have had plastic and zinc components versus the hardened steel in the OFR\Schaller versions. The footprint should be identical. I've never seen the ESP version of a LFR before, so if it was me, I'd pull the one you have on the guitar, then put it next to the Schaller and make sure everything lines up...base plate, fine tuner standoff...you know, all the stuff that'll make themselves glaringly apparent once you try and use the thing... For your purposes, starting the video around 29 minutes will show you all you probably need to know. Pay no attention to the part where he routes a Rose cavity freehand with a full size plunge router...unless you're short on firewood... Show the wood you care and use a template, if necessary. HTC1 Well that statement is not really mostly true... maybe it would fit, but there wouldn't be any extra space around the Schaller. Its base plate is about an 8th of an inch wider; but each have the exact same distance between the center of the support cylinders. (Sorry, it's been a day since I watched frets' entire video and the correct lingo is lost now.) Each of those distances are 2 & 7/8ths inch. I believe the OFR is a bigger device with that distance longer... but that's just what I've read... no real experience. Ooh, I guess those support cylinders are hardened steel and should replace the current zinc ESPs? That process didn't seem to hard while watching the video; have to watch it again.
|
|
|
|
Post by cynical1 on Oct 16, 2022 7:57:27 GMT -5
It looks like ESP chamfered the trailing edge of the baseplate into the fine tuners and Schaller did a radius, like the OFRs. There is a nice disclaimer on the FR website that backs that up: "There are dozens of "licensed" tremolo systems on the market, each with their own dimensions, specs, and materials. It should be noted that many of these may require additional modifications to the body cavity to allow for the patented Floyd Rose base plate shape and size. If you are unsure, please check out the routing diagrams available on the Technical Documents page."
Seems like old Floyd said, "Pay us our licensing fee, put our name on it and you can use the X number of things we have a patent on and we won't sue you blue. BTW, we don't care how you implement them, either..." SD Curlee did the same thing with Hondo...bit I digress...
How do they match up elsewhere on the two bridges? Is that the only difference, or are there more...like thickness of the base plate, overall clearances and centers on the pivot bolts? If those are all good it comes down to how comfortable you are making the changes to the body to accommodate the new bridge...and what tools you have at your disposal. For me, if all I had was that little radius to remove, a 1/4" chisel would be my preferred tool...cheap and dirty. Finish up with some sandpaper wrapped on a dowel rod to clean up the radius. As Frets noted earlier, cover the area under surgery with some blue masking tape. (It is less tacky than cheap masking tape, so it comes off easier without leaving all the gunk...or lifting finishes..) I don't recall what the suggested clearances are for a FR base plate, but as long as you make the keep the same clearances from your old one to the new on you should be good.
That may not be the only rework. You may need to notch, or recess your existing cavity to allow full functionality. On the bright side, you only need to do this on the top. The routing on the back should be fine. If you find that after mounting the new bridge it seem limited or binds during operation...then you're in the re-route club. From what I recall, the OFR template works for the Schaller FR equally as good. Don't hold me to that...feel free to do a little research...as I'm beginning to show signs of early onset CRS... If you find yourself in the routing club, use a template. Using a router without a template is like riding a horse sitting backwards...you just never really know where it's going to wind up... Measure twice and cut once...you know... Take the blue masking tape thing a step further by adding some non-corrugated cardboard to the top of the body...anywhere the router and template may go... And don't feel like you have to grab the largest plunge router you can find. A small laminate trimmer with a top bushing bearing does the same job...and it's smaller and lighter. Just watch collet size when purchasing.
Another trick that works with router or chisel is to razor knife the line of demarcation between what stays and what is removed. Trace it in the tape, or with a template, whatever, just try and cut down through the finish to the wood while tracing it out with the knife. Make a couple of light passes to get there if necessary...finish thickness varies and you don't want to chip it. This helps eliminate chips in the finish that could occur during surgery. Another trick...nail polish. Find a color that matches or contrasts best with your remaining finish and just paint it on the bare wood. It's lacquer...it dries quick and levels OK. Add a bit of lacquer thinner to it an it levels pretty nice. This takes care of the visual of any exposed wood post surgery...and protects to wood from moisture and debris....and it eliminates that nasty re-spray of the body after the surgery.
And yes, use the new posts that came with the Schaller.
Fun, ain't it?
HTC1
|
|
|
|
Post by unreg on Oct 16, 2022 16:06:48 GMT -5
cynical1, thank you tons!  The thickness of the base plate might be different too? And it also is probably the same? Base plate thickness on Schaller sides is 3/16ths of an inch; on Schaller front (underneath saddles) is 1/8th of an inch. Its base plate top is flat; the saddle area is just recessed 1/16th of an inch. Base plate thickness on my entire ESP LFR is 1/8th of an inch. So, the Schaller is just taller above the base plate? Are the pivot bolts the same thing as the posts? If so, then yes, the distance between the centers of the pivot bolts are exactly the same on both bridges. Both distances are 2 and 7/8th inches. I believe the overall clearances of the Schaller are more forgiving than my ESP LFR. I haven’t removed the ESP LFR yet. But, I’ll borrow a 1/4” chisel from my uncle when he returns from France. I now also plan to take advantage of your razor knife tip! This is exciting and yes, it will be fun to try this installation! I hope to skip membership in the re-route club.
|
|
|
|
Post by cynical1 on Oct 16, 2022 21:22:08 GMT -5
Base plate thickness on Schaller sides is 3/16ths of an inch; on Schaller front (underneath saddles) is 1/8th of an inch. Its base plate top is flat; the saddle area is just recessed 1/16th of an inch. Base plate thickness on my entire ESP LFR is 1/8th of an inch. So, the Schaller is just taller above the base plate? Possibly. This may also mean the saddles will be higher...possibly requiring a neck shim. Not uncommon....and I have a good formula for figuring them out. It's posted on the forum somewhere...just not entirely sure where... Found it: guitarnuts2.proboards.com/post/79231/thread Yes That makes it nicer. It's more work if it wasn't. Well, that's where the rubber hits the road, isn't it. You can find a nice detail drawing for the Schaller here...just scroll down the page a bit. The problem you have is that you have none of this for the LFR trem you have. Until you can put these two next to each other you're not going to know what comes next. Swapping trem systems is one of the biggest pain in the azeno jobs there are. I'd rather do necks. Be patient. Expect surprises and use the right tools. If any of this begins to pass the point you're not comfortable, by all means seek out a professional. As do we all. Be aware, this is an advanced level retrofit. Certain tools and templates may be required to achieve a satisfactory installation. If you pull this off then you have the pilkoj to try anything. Just keep telling yourself, they pay people $50.00 a week to build these things overseas...how hard can it be...  HTC1
|
|
|
|
Post by cynical1 on Oct 19, 2022 14:57:37 GMT -5
Just an aside, but have you thought about a Heli-Coil in the stripped hole? We had a member here a few years ago with the same issue and that's how he solved it.
Probably easier than installing a new bridge... HTC1 |
|
|
|
Post by unreg on Oct 19, 2022 16:32:51 GMT -5
Just an aside, but have you thought about a Heli-Coil in the stripped hole? We had a member here a few years ago with the same issue and that's how he solved it.
Heli-Coils are designed to repair a thread in a blind or through hole to allow you to gain some purchase with the bolt threads. They tend to do their job very well, but only once as a rule. They tend to deteriorate or lose their effectiveness after the first torque down. Low E string’s saddle’s threads aren’t stripped, rather the top of the screw, where the hex wrench enters, that is stripped. So, that screw can’t be loosened, and new intonation can’t be obtained. Since the Schaller is already here, it will be installed. The guitar is still currently playable; my uncle is still on vacation; it will be some time, but I feel the Schaller installation will be possible with all of your advice you’ve given, cynical1. EDIT: And, like you advised, if the LFR’s removal uncovers a situation beneath that feels too rough for me, I’ll surely find a luthier. |
|
|
|
Post by b4nj0 on Oct 19, 2022 17:56:23 GMT -5
Apologies in advance if I'm off target, or even unwelcome in the context of the thread development because I'm trying to second guess this from the images and text. I take it that the hexagonal recess in the tiny Allen cap head screw is rounded off and not the horizontal intonation adjusting screw? I've never had much luck with stud extractors, especially in such a small size, but that is an option. That being the case and going by the OFR image, after removing the adjacent saddle(s) you ought to be able to get sufficient purchase with a self grip wrench (AKA "Mole" grips or similar) to remove it, but failing that you could still drill off the screw head with an appropriate HSS twist drill? You'd need a drill bit just a fuzz larger than the thread diameter- not one as big as the cap head. The object is to separate the head from the thread. Maybe then you could lift the saddle off the remaining stud and said stud might then be removed with the same self grip wrench and a new screw procured. Maybe one of the screws from the new bridge might fit. Bottom line- I'd try first and retain the option of total bridge replacement as your fall back solution. $0.02 of course, and as per my caveat- my bad if I have misunderstood.
でつ e&oe ...
|
|
|
|
Post by unreg on Oct 19, 2022 23:27:52 GMT -5
hi b4nj0 I take it that the hexagonal recess in the tiny Allen cap head screw is rounded off and not the horizontal intonation adjusting screw? hmm… you are kind of, I think, right. The hexagonal recess in the tiny Allen cap head screw IS rounded off. (That’s the vertical screw that locks down the intonation adjusting saddle.) At least, that’s how I’ve been setting intonation, I think. It’s been a short while, but I do believe the horizontal screw is just loosened to allow a string to be changed. You get a new string, cut off the ring at the end, insert its other non-snipped end into that space that opens up when the horizontal, also Allen tipped, screw is loosened, and then tighten that horizontal screw. Then the other end of the new string is fed to one of the tuners. Finally the saddle is adjusted by loosening that stripped screw-head to set intonation. I've never had much luck with stud extractors, especially in such a small size, but that is an option. That being the case and going by the OFR image, after removing the adjacent saddle(s) you ought to be able to get sufficient purchase with a self grip wrench (AKA "Mole" grips or similar) to remove it, but failing that you could still drill off the screw head with an appropriate HSS twist drill? You'd need a drill bit just a fuzz larger than the thread diameter- not one as big as the cap head. The object is to separate the head from the thread. Maybe then you could lift the saddle off the remaining stud and said stud might then be removed with the same self grip wrench and a new screw procured. Maybe one of the screws from the new bridge might fit. Bottom line- I'd try first and retain the option of total bridge replacement as your fall back solution. $0.02 of course, and as per my caveat- my bad if I have misunderstood. でつ e&oe ...Thank you sir, that also seems possible from your explanation, but I don’t have a drill of any kind or a pair of “Mole” grips right now. I went ahead and bought a new hardened steel Floyd Rose bc I thought that if one of my current Allen heads’ hexagonal recesses can become round, then what’s to stop another one from following suit? It would be a blessing to just install the entire Schaller, imo. That’s my current plan anyways. And yes, one of the Schaller saddle screws might fit, but from what I read ESP doesn’t make their Floyd Rose parts anymore; so just buying an appropriate tiny Allen head screw was impossible. Plus, the Shaller screws are made from hardened steel. Hardened steel threads, sliding into whatever material my LFR is made from, would easily eat a bigger hole into that obviously weaker material, right? |
|
|
|
Post by b4nj0 on Oct 20, 2022 2:47:20 GMT -5
Did you mean you don't have a suitable size of drill bit? I have reservations regarding the possibility of routing when you drop the big one that you don't possess a drill let alone "Mole" / Vise Grips.
Good point though; if they are hardened steel it would (start to) become difficult to drill, but there again, if they are hardened rounding off seems less likely. You have companies like McMaster Carr over there? They carry enormous inventories of fasteners, certainly a better selection than over here.
Anyway, I get the impression that you've kind of committed to total replacement and I sort of don't blame you. Cyn1 has way more experience in this arena than myself, so I defer to him!
でつ e&oe ...
|
|
|
|
Post by unreg on Oct 20, 2022 10:42:08 GMT -5
Did you mean you don't have a suitable size of drill bit? I have reservations regarding the possibility of routing when you drop the big one that you don't possess a drill let alone "Mole" / Vise Grips. Me too; I don’t have current plans to route; going to use a chisel. Good point though; if they are hardened steel it would (start to) become difficult to drill, but there again, if they are hardened rounding off seems less likely. a.)the Floyd Rose I’m replacing ISN’T made of hardened steel b.)my new Shallar Floyd Rose IS made of hardened steel. That’s supposed to be a kind note. |
|
|
|
Post by pyrroz on Oct 20, 2022 12:28:25 GMT -5
hi if the screw is stripped find a way to remove it (pliers?) dont replace the whole thing for a screw.
|
|
|
|
Post by cynical1 on Oct 20, 2022 12:42:02 GMT -5
There is nothing cast in stone that dictates you can't do this with hand tools...Stradivarius did pretty good on violins... Two tools you may want to investigate. 1.) Small spokeshave:
2.) Finger\violin plane:
eBay, Amazon and even Walmart probably have them on their website. The higher end stuff does take and keep and edge better than the cheap ones...so either a woodworking site, StewMac or Luthier Merchantile International would be a good place to start looking. HTC1 |
|
|
|
Post by cynical1 on Oct 20, 2022 12:43:46 GMT -5
Good to see you again, pyrroz.
|
|
|
|
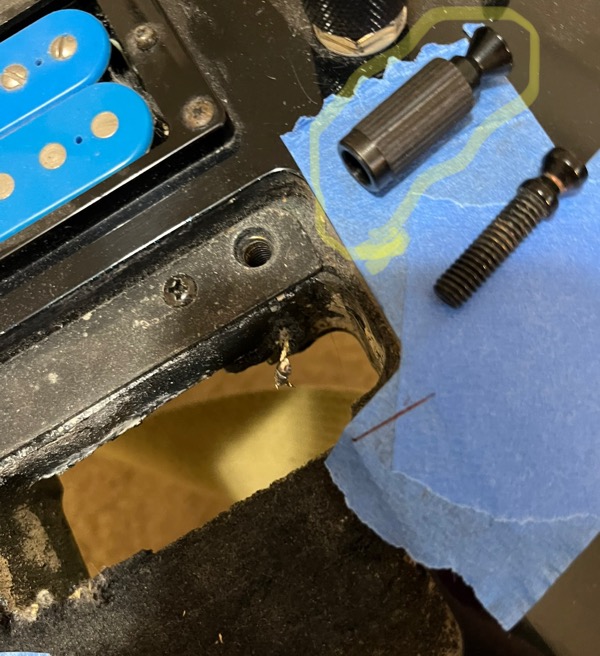
Post by unreg on Nov 12, 2022 16:25:21 GMT -5
hi again! My Licensed under Floyd Rose patents (LFR) is a bit bigger than the Schaller... so I probably won't gain membership in that club, cynical1! the current LFR posts:
Schaller on left. LFR on right:
the posts of LFR are threaded and smaller... a Schaller post is circled in yellow:
My uncle went to visit friends today, so he said to call him tomorrow. I loosened the truss rod a bit, so the neck should be fine without strings for a day, right?
The Schaller's posts are a bit thicker than the threaded LFR posts. My guitar's post holes are lined with metal threads; those metal threads would be zinc right? My uncle let me borrow the 1/4th inch chisel. But, he recommended me drill the corners away, bc using the flat chisel would be rough on the rounded parts. I've fully marked the painter's tape; guess I can use a knife now to separate the top coat so that it doesn't crack while being drilled tomorrow. Also, any tips on the drilling bigger holes for the Schaller posts, inside the holes lined with metal threads? There is enough wood there to eliminate the possibility of it splitting right? Does that wood need to be reinforced like the wood in frets' video (the video she posted above in this thread)? |
|
|
|
Post by unreg on Nov 12, 2022 20:22:28 GMT -5
And yes, use the new posts that came with the Schaller.
Fun, ain't it?
HTC1
Since these LFR posts are screwed into a metal threaded hole, would it still be wrong to just use those LFR posts? There are pics in my post above; I haven’t a clue about if it would be terrible to drill larger post-holes. And, I’d have to make a larger hole in that small slab of material screwed on top of the hole surface. That material doesn’t feel like metal, so maybe drilling through it would be easy? |
|
|
|
Post by cynical1 on Nov 13, 2022 9:35:27 GMT -5
...the current LFR posts: Schaller on left. LFR on right: the posts of LFR are threaded and smaller... a Schaller post is circled in yellow: The Schaller post is still in its bushing. The post for the LFR is not. The knurled outer portion of the Schaller bushing is there to make sure the bushing gains a firmer purchase in the wood. It also makes it a pain in the azeno to get back out again. See below for a picture: 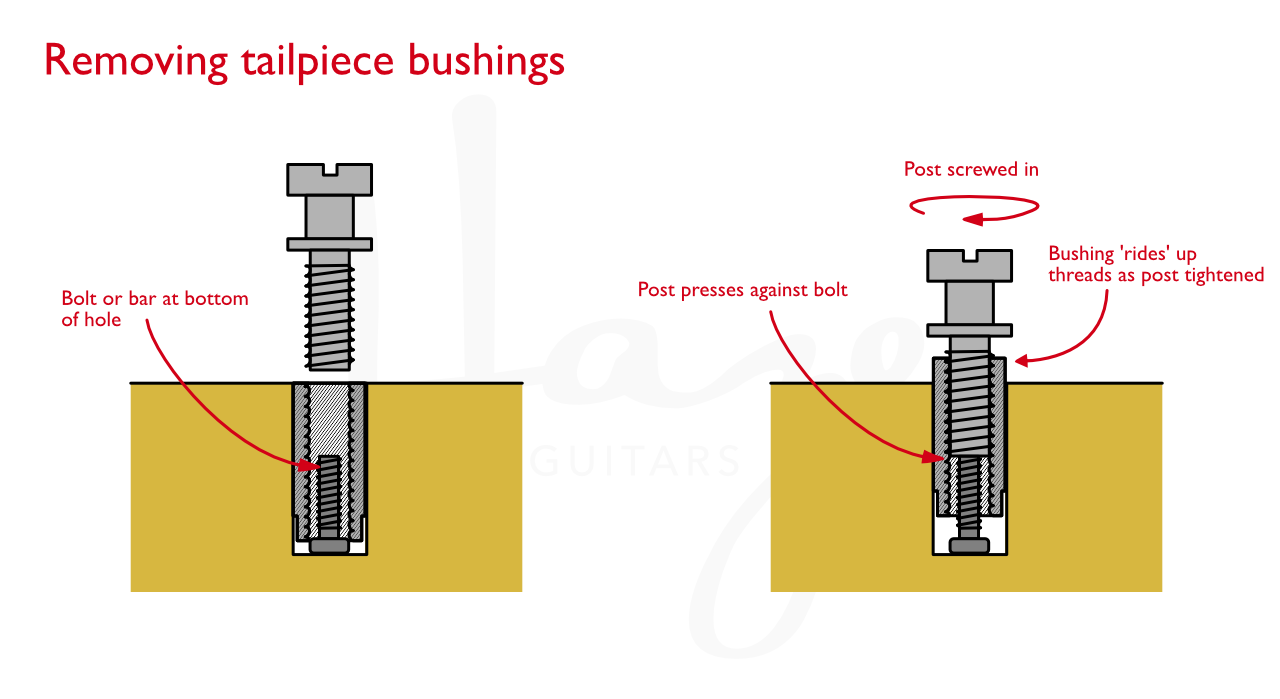 While there are some tools you can use to get the bushings out, this graphic shows you a good cheat on how to remove the bushings, as well as detail the assembly. I don't recall the size I used, as it just has to freely fall to the bottom of the bushing hole, but a socket head cap screw worked the best for this task. They look like this:  The decision to remove the old bushings for the new ones is entirely your choice. I would wager whatever hair I have left that the Schaller bushings are hardened steel and the LFR bushings are not...possibly zinc, but that's not a certainty. Is this critical? Maybe. Is it recommended you pull the old LFR bushings to install the Schallers? Yes. Is it a requirement? No. Let me elaborate on the "maybe" part. Hardened steel is exactly what is says it is...it's been heat treated, quenched, then annealed. This is so they can take decades of abuse and adjustments...order not specific... With the potentially softer bushings combined with the hardened threaded posts you could run into the bushing stripping out prematurely...while the threaded post will be just fine. There's also the potential of fretting corrosion (not related to frets on a neck) due to dissimilar materials being in contact with each other, but I digress... This is not cast in stone, though. If the threaded posts from your Schaller kit are the same thread pitch and size as the LFR bushings then you could just swap the screws. This is the cheap and dirty way to do it...and you will probably be fine with that arrangement for the rest of the instrument's life...and likely your life, too. If the Schaller threaded posts have any slop when threaded into the existing LFR bushings...or they are obviously a larger size or different thread pitch, then the LFR bushings have to be pulled and the new Schaller bushings installed. You're probably not going to like this next part... If the LFR bushings need to go, you'll need to drill, plug and redrill the bushing holes. The bushings stays in the body because of the compression of the wood around the knurls. The Schaller bushings are probably close enough in size to the LFR bushings that they won't have enough wood to press into with the existing holes from the LFR bushings unless you plug and redrill the existing holes...but I can't say that with any certainty as I don't have the two side by side. If you do find you need to drill anything on this job, it really requires a drill press with a zero degree level adjustable table. I have no other reliable solution that will give you a predicable outcome. You could try it with a hand held drill, but if you get the angle off by as little as a few degrees you have screwed the pooch. Don't ask me how I know this... The Internet is full of cheats to this process. Use them at your own risk, as most generally only produce very pretty firewood. This is not really a requirement on most guitars built in the past 30 years for a short term removal. Does it hurt? Not really. Does it help? Not really. The Schaller bridge should come with a recommended hole size for their bushings. It will be a metric size. You will need that exact size drill bit. No SWAG here.. See above before you start making sawdust. And just to beat a dead horse once more, DRILL PRESS! You can try and drill the holes by hand. You can put a golf ball in a slightly larger round hole with just one shot from 150 yards away, too. It all comes down to the odds in the end... I have watched a few Guns and Guitars videos. His finished instruments look serviceable. The methods used in his videos can be a bit too "guerrilla" for my taste...and potentially hazardous to the instrument and novice wood butchers...like using a plunge router freehand with no template. You see him having to address this issue later in his own video. My point is, don't use this one video as a definitive reference on how to perform this task. Watch as many as you can find. Once your eyes begin to bleed you're ready to start making sawdust. To answer your question directly, it depends... It comes down to intonation and keeping it intact after the bridge swap. Assuming the spacing of the posts is identical on the Schaller and LFR, put some masking tape on the body next to when the bridge rest into the posts. Put the LFR into the posts and mark a line for where the B-string saddle sits when properly intonated at scale length on the tape. This may seem a little half-assed, but adjust the B-string saddle on the Schaller to the same position as the LFR in relation to where the bridgeplate makes contact with the post to the saddle location. Now slide the Schaller onto the posts and make a mark on the tape where the B-string saddle sits. If it's the same for both you should be fine with just a drill, plug and redrill. If the Schaller mark is significantly behind the LFR mark, you'll need to drill, plug the old hole, then redrill at the new location to the size hole Schaller recommends. If the Schaller mark is significantly ahead of the LFR mark then it could get involved and require some reinforcing of the wood to keep it from splitting later when pressing in the new bushings. That last sentence is vague on purpose. If you have enough saddle adjustment you may be able to work around the location and not have to move the bushing location. None of this work is particularly difficult, but it does require access to tools and tooling you may not have readily laying around. Without having the guitar and bridges in front of me I could easily send you down the wrong path and cause you more misery in the end. Like I said in the beginning, this is one of the crappiest jobs a tech does. I know it's a bit late now for this, but I used to recommend folks just buy a guitar with the trem system they want already installed. Swapping every other part on an electric guitar is typically an easier task to perform than a trem swap. That said, we're here if you need us. HTC1 |
|
|
|
Post by thetragichero on Nov 13, 2022 10:01:11 GMT -5
personally i prefer hardwood dowels to pine if you've gotta plug and redrill. i also prefer forstner bits for that size hole (and yes, for the love of all that is holy use a drill press)
|
|
|
|
Post by cynical1 on Nov 13, 2022 12:06:42 GMT -5
personally i prefer hardwood dowels to pine if you've gotta plug and redrill. i also prefer forstner bits for that size hole (and yes, for the love of all that is holy use a drill press) I was trying not to be to verbose in the last post...and left out the gory details... Was that an academic concern? Yeah, there's potentially a lot more involved in this than we've covered...not a given, but certainly a consideration for your planning. If you want the upgrade to be an upgrade, versus a "...use a dremel tool until it fits..." type of upgrade, your learning curve is likely to get steeper. This is something you can do. Any fear or trepidation you may have likely comes from a lack of knowledge on the subject. Why would you intrinsically know how do do this? Once you have a more complete understanding of how this all works together it becomes less intimidating. At that point you have to ask yourself if the investment in time, tools and materials is worth it to you...or worth it for a particular guitar. I say this, as it can take about as much money to buy the tools for a job like this as it does to buy an entry level guitar with an OFR already installed...then gut the wiring and do whatever you want in there. Read everything you can from genuine luthier sites. This craft is abnormally generous with their knowledge and share quite a bit online. Most even have how-to videos. I never liked Floyd Rose-esque bridges as they can be a misery to install or refit. It's not impossible, but the quality and accuracy of your finished upgrade will be directly reflected by your investment in knowledge, tooling and time spent for all. Enjoy. HTC1 |
|
|
|
Post by unreg on Nov 13, 2022 16:46:02 GMT -5
Thank you so much for your replies cynical1 and thetragichero! If it's the same for both you should be fine with just a drill, plug and redrill. If the Schaller mark is significantly behind the LFR mark, you'll need to drill, plug the old hole, then redrill at the new location to the size hole Schaller recommends. If the Schaller mark is significantly ahead of the LFR mark then it could get involved and require some reinforcing of the wood to keep it from splitting later when pressing in the new bushings. The Schaller’s b-string saddle is maybe a 1/32nd of an inch ahead, closer to the neck, of the LFR’s. But, I haven’t removed that small amount of wood in the corners yet, so the Schaller was marked while it was at an angle. The Schaller’s saddles are in the exact same place, specifically I mean exact in relation to string placement on the neck, as my LFR saddles. The width-between-threads is much larger on the LFR’s post screws. So the bushings will need to be replaced. Though, that covering screwed over the LFR bushings must be glued. I tried lifting/prying it off with a flathead screwdriver, after removing the two screws, but that just made a depression in the corner wood to be removed. Is there some way to reduce the strength of that old glue? Was hoping the old LFR bushings were slightly smaller in diameter than my Schaller’s, so it would be easy to place the Schaller bushings into the same holes. But, currently I’m lost as how to remove that glued covering; can’t see the size of my LFR bushings. |
|
|
|
Post by unreg on Nov 13, 2022 20:17:42 GMT -5
Did you mean you don't have a suitable size of drill bit? I have reservations regarding the possibility of routing when you drop the big one that you don't possess a drill let alone "Mole" / Vise Grips. Me too; I don’t have current plans to route; going to use a chisel. Actually, it’s all done now… except for the bushings. My uncle let me use a dremel, and that was super easy! So, the Schaller fits nicely now. Also, I held my guitar in place while my uncle used a large pry-tool-thingy and hammer, and he safely removed that metal covering the bushings. Now each LFR bushing is out of its hole about an 8th of an inch. I need to go get a socket head cap screw tomorrow. —- cynical1 and thetragichero, the LFR bushings are a bit smaller in diameter compared to Schaller’s bushings, like I was hoping for! Does that mean I can just insert the Schaller bushings in the same holes after LFR bushing removal? |
|
|
|
Post by cynical1 on Nov 14, 2022 6:55:49 GMT -5
Bushing removal is a simple process. It will certainly take you longer to find the right size screw to use than it will getting both of them out. This was the best angle I could find on a video, but it's easy to follow:
Before you do all this, you might want to check that the posts are on 74mm centers. (Schaller calls out 74.3mm, but your eye isn't going to see that.) This is a standard, and I would suppose ESP would maintain that spec in their version...but I've been wrong before... Measure twice, cut once...
Probably not. I used to have a nice little chart that gave you pretty accurate drill sizes based on the bushings you were trying to press into different woods...it died in the Flood of '08, but this video should give you an idea:
The size will vary slightly depending on the wood you're pressing it into. I'd bet dollars to donuts that your ESP is basswood...which is very close to poplar. This means your hole size has a bit more of a "slop factor" on the hole size. Even so, you can't exactly swag it and beat it with a hammer...or stuff veneer and glue into the hole...and expect a usable result.
Until you get the old bushings out it's just a guess on redrilling the holes...but I'd say you're probably going to have to re-drill them.
Do you have access to a decent pair of dial or digital calipers? Would make the rest of this job much more predictable...
HTC1
|
|
|
|
Post by thetragichero on Nov 14, 2022 10:36:43 GMT -5
digital calipers can be purchased fairly cheaply at harbor freight. my dad gave me a set from there after he got a pricier set
|
|
|
|
Post by unreg on Nov 14, 2022 22:41:57 GMT -5
Thank you cynical1 and thetragichero! I just got a decent pair of calipers from Harbor Freight. Before you do all this, you might want to check that the posts are on 74mm centers. (Schaller calls out 74.3mm, but your eye isn't going to see that.) This is a standard, and I would suppose ESP would maintain that spec in their version...but I've been wrong before... Measure twice, cut once... I’m unsure what you mean by “on 74mm centers”. Just measured a Schaller post; it’s 23.69mm long. At least, that’s what I remember. Maybe I’m reading wrong/or improperly measuring. |
|
|
|
Post by cynical1 on Nov 14, 2022 23:14:21 GMT -5
... I’m unsure what you mean by “on 74mm centers”... If you look at the drawing below:  You can see where 74.3mm is called out on the drawing as the center lines for the post holes. Easiest way to check this is to put the LFR baseplate back to back with the OFR baseplate. If they match up on these centers the rest of the modifications should be less severe. Feel free to use this drawing to verify other critical points of reference between the LFR and OFR. HTC1 |
|
|
|
Post by unreg on Nov 15, 2022 22:38:27 GMT -5
While there are some tools you can use to get the bushings out, this graphic shows you a good cheat on how to remove the bushings, as well as detail the assembly. I don't recall the size I used, as it just has to freely fall to the bottom of the bushing hole, but a socket head cap screw worked the best for this task. They look like this: Thankfully, I reread this part before buying my socket head cap screw bc I was embarrassingly uti that each guitar shipped with an inverted screw placed at the bottom of each hole, I didn’t attempt to find a socket head cap screw that screws into my LFR; I tried to buy the smallest screw available at Home Depot. Well, I ended up with a M3 socket head cap screw; sadly, that screw’s head matched the LFR post bottom exactly, so it refuses to drop down into the hole. But, my uncle told me about a place nearby that only sells nuts and screws; they have professional equipment to shape whatever screw you need; an awesome place! Going to visit tomorrow; just need one M2 socket head cap screw. I’m sure they have a bunch of those just ready for purchasing. I’d rather go there than wait till Friday for Home Depot to ship me a set of M2 socket head cap screws. |
|
|
|
Post by unreg on Nov 16, 2022 18:14:10 GMT -5
I’d rather go there than wait till Friday for Home Depot to ship me a set of M2 socket head cap screws. Now I wait till Monday to receive my set of 10 14mm M2 socket head cap screws from Home Depot. Sadly, after a phone call, The Nut Place sells M3 size as their smallest socket head cap screw. Ooh well. Will wait excitedly for Monday! |
|
|
|
Post by b4nj0 on Nov 17, 2022 5:34:26 GMT -5
Just check how deep the hole in the timber is. In the absense of a depth gauge, and anticipating that the probe on a caliper might be too wide, use a pin punch or something similar to gauge the depth. The hole in the timber may have been counterbored to within the skin of its teeth and that is not a happy place to exert such force.
I have used a short length of 1/4" thick mild steel flat bar with a suitable hole in the middle for the bolt. This I supported upon two corks from wine bottles, one at each end, but any non marring support would do and perhaps be more stable. There's a remote chance that the bush could be blind too- worth establishing before torqueing down on the bolt, but since that would prevent the air from exiting upon insertion it's pretty unlikely. Cyn1's approach follows the KISS tech and has much to commend itself in most instances.
Finally, I'm a strong advocate of pressing the replacement bushes in rather than hammering. It's surprising how much we apply a glancing blow with a hammer, and that can make the bush dig into one side of the hole. An ordinary drill press (called a pillar drill over here!) is acceptable even though it wasn't designed for such abuse.
でつ e&oe ...
|
|