|
|
Post by cynical1 on Nov 17, 2022 11:14:00 GMT -5
Just check how deep the hole in the timber is. In the absense of a depth gauge, and anticipating that the probe on a caliper might be too wide, use a pin punch or something similar to gauge the depth. The hole in the timber may have been counterbored to within the skin of its teeth and that is not a happy place to exert such force. You can use anything that'll fit in the hole snuggly, but will come out later. You can use a hardwood dowel pin, provided it doesn't spread into the threads. A piece of round steel...yeah, all that works. I just use the socket head screws because they're thicker at the head and the head is deep enough that it doesn't fall sideways and gouge the threads or body when you start screwing in the trem post. I sprayed one some glow in the dark color so I wouldn't toss it or lose it in the clutter....on the oft chance I actually needed the damn thing... One thing I forgot to mention, take a razor knife and cut any paint\glue\whatever from around the top of the bushing before you start to work it out. Sometimes the finish is stronger than the wood... There's usually at least a half inch of wood under the bottom of the post hole. Even in basswood, which I'm guessing is what this guitar is made of, you're gonna have to really torque it hard to punch it out the other side. Even though, good point on listening for the wood fiber to scream "...you're doing it wrong..." Yeah, I don't recall ever seeing one of those bushings with a blind hole. Anything is possible... Even if it doesn't work, it leaves a smaller mess to clean up later... Good point. I used to have a small press I picked up at an auction. When that drowned I just started using a drill press again. The drill press worked better for pressing frets as the table supported a drill vice to hold the neck jig. Slap the fretting caul into the chuck, mount the drill vice, drop in the jig with the neck...once you zero it in it goes real quick...but I digress... IMHO, unless you press a lot of bushings or frets, the drill press is a great little hack for this purpose. I wouldn't make a hobby of it... In unreg's case, after pressing two bushings he'll probably never abuse a drill press again. HTC1 |
|
|
|
Post by unreg on Nov 21, 2022 18:24:14 GMT -5
This got more complex…  I dropped my M2 screw in AND attempted to take a bushing out, but the bushing never came out; and I thankfully stopped turning after a while of no bushing movement. The tip of the screw is still in the center of the bushing hole, but it’s been screwed in backwards… the bushing never moved, so the screw just got deeper into the wood. The entire time I was checking the body of my guitar; it’s just fine; no breaks or screw head protrusions. I dropped another screw in the hole and it’s not deep enough to thread the LFR post. Now, a screw removal needs to take place. I noticed that M2.5 screws are sold, so should I place an order for those? Even if I somehow successfully remove that screw, wouldn’t an M2.5 screw just protrude into that M2 hole? Does all this mean that my LFR’s bushings somehow DON’T slide out? Or is the wood just too soft? I feel lost… help? EDIT: b4nj0, what does the bushing hole being blind mean?  FINAL-EDIT: I looked again; the tip of the screw is to the side of the hole, so I guess the screw went into the wood diagonally. So, maybe, after screw removal, would a size M2.5 of those screws work? |
|
|
|
Post by unreg on Nov 21, 2022 19:20:54 GMT -5
EDIT: b4nj0, what does the bushing hole being blind mean? Hmmm… does that mean the hole isn’t flat at the bottom? Cause, the hole probably wasn’t flat at the bottom; the screw tip was always to the side of the hole; it never was centered. I even shook the guitar, while the hole was facing the floor, and the loose screw never fell out. Maybe the hole not being flat has to do with my guitar being made on a low quality out-of-USA assembly line? p.s. one of those screws did fall out of the other bushing hole EDIT: cynical1, yes, the wood was screaming at me, “You’re doing it wrong!” but, I kept thinking the bushing might have been coming out. I’ve learned. |
|
|
|
Post by cynical1 on Nov 22, 2022 6:47:57 GMT -5
EDIT: b4nj0, what does the bushing hole being blind mean? Hmmm… does that mean the hole isn’t flat at the bottom? Cause, the hole probably wasn’t flat at the bottom; the screw tip was always to the side of the hole; it never was centered. See image: 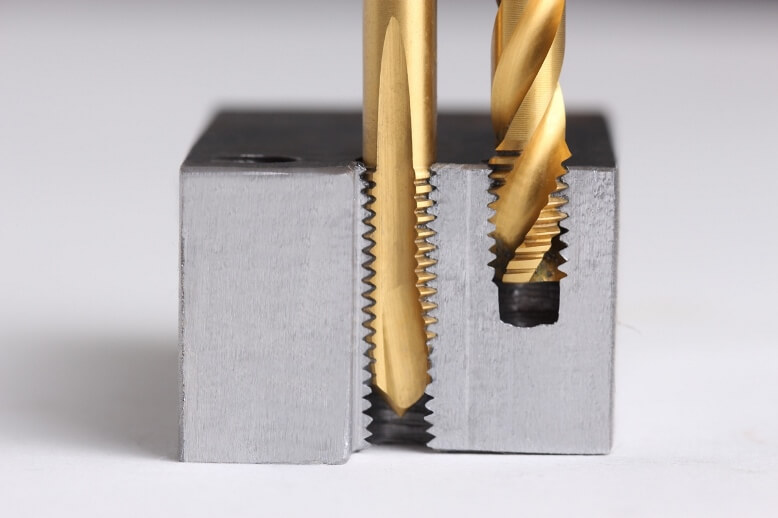 Through hole on the left, blind hole on the right. In this picture there appears to be a plate screwed to the body over the post bushings. 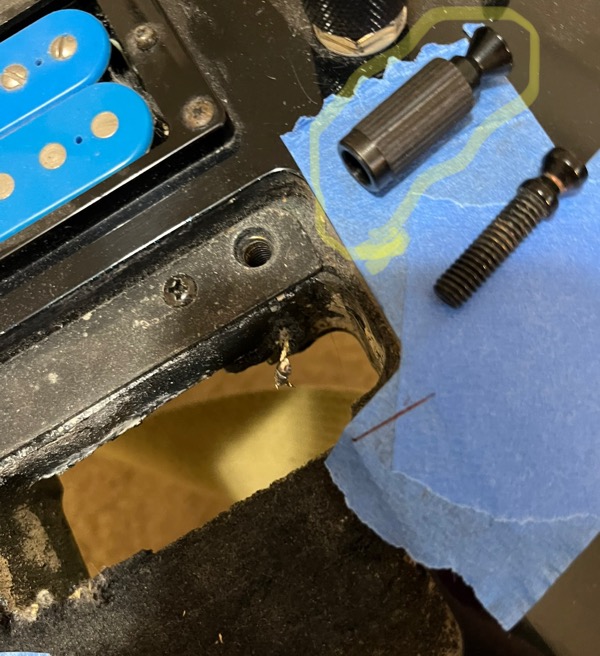 Is that plate still there? If not, what does it look like when the plate is removed? If the finish puddled around the that can make it harder to remove the bushings. You can try a razor knife to remove a small amount of material around the top of the bushings to get it back to the wood. If they glued those bushings in...I hear Guitar Center has some killer Black Friday deals.... Mike Tyson put it best, "Everyone has a plan 'till they get punched in the mouth." Can you put up a picture of what you're looking at now on this guitar? HTC1 |
|
|
|
Post by unreg on Nov 22, 2022 13:12:13 GMT -5
Yes, that plate has been removed. I’ll post a pic in a bit, when I get home.
|
|
|
|
Post by unreg on Nov 22, 2022 15:33:16 GMT -5
See image: Through hole on the left, blind hole on the right. blind hole… as in… we’ll, what makes the hole on the right blind? EDIT: ooh, the bottom isn’t the same size as the screw? FINAL-EDIT: Ooh, the bottom of the hole on the right is blind bc it’s not threaded, right? |
|
|
|
Post by unreg on Nov 22, 2022 16:13:11 GMT -5
cynical1, I did try a razor blade around the bearing, but it seems like I just cut the metal bc it goes out a little bit from the top part. I could try to cut the wood around that metal part... didn't notice the large metal part last night. "Large metal part" bc that photo is taken at 5x zoom. Need to remove that inverted screw... it's not screwed into anything so perhaps it will be easy to remove with the correct tool. So, also, I'll ask my uncle if he knows of a good tool to use for that inverted screw removal. Sorry, I know my phone has a flash, but the flash isn't working right now and I haven't figured out how to re-enable it yet. That's why the photo is taken at an angle... didn't want to block overhead light.
|
|
|
|
Post by cynical1 on Nov 22, 2022 16:55:45 GMT -5
...blind hole… as in… we’ll, what makes the hole on the right blind? EDIT: ooh, the bottom isn’t the same size as the screw? FINAL-EDIT: Ooh, the bottom of the hole on the right is blind bc it’s not threaded, right? If you took both of the gold taps out and looked through the silver block, you could see through the one on the left, but not the right one, You would be "blind" looking through the right hole. HTC1 |
|
|
|
Post by b4nj0 on Nov 22, 2022 16:57:56 GMT -5
It's "blind" because if you hold it up and look along the threaded hole, you can't see right through.
Oops, doubled!
でつ e&oe ...
|
|
|
|
Post by cynical1 on Nov 22, 2022 17:27:53 GMT -5
cynical1, I did try a razor blade around the bearing, but it seems like I just cut the metal bc it goes out a little bit from the top part. I could try to cut the wood around that metal part... didn't notice the large metal part last night. "Large metal part" bc that photo is taken at 5x zoom. If it were me, I'd grab a razor knife and a few blades and clean everything away from the tops of those bushings. You only need to go down until you see wood. No more than a 1/16" outside of where the metal begins. If it looks like some epoxy or glue has been used to secure these bushings, you have a few options...not that I'm saying ESP would do something like that, but unless you bought this guitar new, you don't know either... IF THE BUSHINGS ARE GLUED: 1.) Dig it out with a knife, chisel or gouge. You'll need to lock the body down for this. Go slow and remove as little material as you can. At some point the bushing will loosen up and you can get it out with your fingers before you burst out the other side. I've had to do this on Les Pauls...be grateful you have a basswood body. Once both are out you'll need to drill and plug the holes. Choose a size that readily matches the hardwood dowel selection at your local lumber yard. DRILLING THESE HOLES REQUIRES A DRILL PRESS. 2.) Hole saw. I have a hole saw kit...of course, it would be more helpful if I remembered who made it, but it has the ability to screw a hole saw onto the collett without using a drill bit. Select a size hole saw that has a larger I.D. that the O.D. of your bushing. Be advised, this leaves a big hole...but it is quick. Once you've gone down to the base of the bushing, just take a small hammer and a chisel to tap it loose. You may have to clean up the bottom of the hole before you plug the hole as mentioned above. THIS PROCESS REQUIRES A DRILL PRESS. 3.) Take it to a tech, who will likely charge you more than the guitar is worth to install it. THIS PROCESS DOES NOT REQUIRE A DRILL PRESS. 3.) Fix the issue with the LFR and live with that bridge on this guitar. Save the OFR for another guitar, or sell it to recover your costs. THIS PROCESS MAY, OR MAY NOT REQUIRE A DRILL PRESS. DEPENDS ON THAT THE BRIDGE NEEDS DONE TO IT... Tweezers, needle nose pliers or a strong magnet....or any combination of the aforementioned. HTC1 |
|
|
|
Post by cynical1 on Nov 22, 2022 17:29:22 GMT -5
...Oops, doubled! でつ e&oe ...I ninja'd someone? |
|
|
|
Post by unreg on Nov 22, 2022 18:21:39 GMT -5
Thank you cynical1 and b4nj0!  I will try the coating removal tonight. Ok, yes, both bushing holes are blind. My guitar was bought new… way back in 1999. So hopefully the bushings aren’t glued. My uncle advised me to push the screw until either: a.) it stops moving bc then the bushing would come out and I’d have more room to remove the screw Or b.) it comes out the other side bc then it can be easily removed and the hole can be filled with epoxy But, I’m going to try your needle nose pliers/magnet idea… thank you again cynical1! EDIT: “the other side” is non coated wood underneath the springs cover. But, I doubt that would happen bc it is a LOT of wood to travel through. |
|
|
|
Post by unreg on Nov 23, 2022 0:44:23 GMT -5
after coating removal...
The bottom dremel part of this picture looks like a mistake... but, that just the blue tape attached to nothing; that makes it look like a mistake. It's actually a nice and flat/vertical line there:
(After a quick search of IOS 16's manual... my camera has a flash now. ) I haven't tried the needle nose pliers yet... currently, my thin ones may not even be able to fit in that small bushing hole...
|
|
|
|
Post by cynical1 on Nov 23, 2022 3:15:06 GMT -5
For a hand held Dremel tool job it looks fine. Clean, in fact, from the picture. Nice use of the tape. Dont forget to put some nail polish on the bare wood once you have the OFR fitted and comfortable. Black is always a safe bet. And buy the cheap stuff...it has more lacquer in it. That was exactly what I was talking about on removing anything grabbing or restricting the bushings from coming out. You can see the knurling from the top of the bushing. Typically, with nothing binding it in place the bushings should come out without too much of an argument. Once you get the screw out, you may want to look for a Knob & Bushing Puller tool. They look like this: 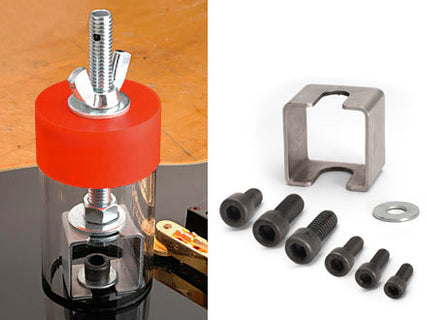 They go for around $20.00 on eBay, $70.00 on StewMac. You can DIY a tool, if you feel so inclined. If that doesn't get it to come out, try talking about their mother... It doesn't look like there is any glue in there. Is that a correct observation? HTC1 |
|
|
|
Post by unreg on Nov 27, 2022 9:11:28 GMT -5
Thank you cynical1! Yes, the bushings aren’t surrounded by glue, I think at least. Just looks like metal touching wood; no hardened glue. Sigh, I still haven’t removed that screw. Will try a tweezers today… the borrowed needle nose pliers weren’t small enough. The DIY bushing removal video is exciting! All I have to do is do some math to see how long a screw I need… and also, that includes the height of the short PVC pipe. That really seems possible, but time hasn’t been taken to do that math. Will do that later today. Happy end of Thanksgiving weekend! But, Thanksgiving is a US holiday. EDIT: Thank you for saying my handheld dremel tool Job looks fine! Honestly, that lower corner was the very 1st dremel use for me; I pressed too hard and the dremel made a depression on that wood, so I kept dremeling and the straight line ended up being parallel to the other side. It, the parallel, should look ok, I hope. |
|
|
|
Post by unreg on Nov 27, 2022 15:24:45 GMT -5
My tweezers enter the bushing hole nicely, but they have to be kind of pressed together to enter. Then, they aren’t opened wide enough to grab the screw end. I tried finding a magnet… Is this magnet good enough (is has a bit over 3 pounds pull force; and it’s a good size for the bushing hole): www.apexmagnets.com/magnets/1-8-x-1-2-cylinders-neodymium-magnetcynical1, did you have another magnet idea/tool in mind? Just wondering. If the magnet idea isn’t good, maybe I could remove the bushing first, after math and obtaining the simple materials, to allow more room for the screw removal. |
|
|
|
Post by sumgai on Nov 27, 2022 16:33:33 GMT -5
Once again the oddball has to enter the fray..... unreg, simply find a dowel (or other wooden object) that is no more than half the diameter of the opening. And it has to be long enough to reach the screw while you're holding it, too. Now dab some epoxy on the end of it, and place the still wet end down the hole and hit the protruding end of the bolt. Let the epoxy harden overnight. Pull it out the next morning. If you get epoxy on the sides of the bushing, and it hardens overnight, then simply break off the dowel, run a rattail file down the interior surface to clean it up, and start over. I can recall doing this less than half-a-dozen times in my career, but as usual, after a short learning curve, I was always successful. (Said learning curve consisting of failures, of course.  ) Oh, wait..... Did I mention that patience is a virtue? You've messed with this for how long now, so another night isn't gonna kill ya.  HTH sumgai |
|
|
|
Post by unreg on Nov 27, 2022 22:05:34 GMT -5
sumgai: Thank you so much! That idea seems very possible! I’m going to try your wisdom! Thank you for sharing!
|
|
|
|
Post by b4nj0 on Nov 28, 2022 5:17:07 GMT -5
It went in because it's physically smaller than the thread in the bushing. It won't come out because it's at a jaunty angle and likely it has dug into the wood sideways by the previously applied bolt pressure. If the adhesive on a dowel takes then the little varmint will not pass back out through the bushing without getting jammed due to the dog leg configuration of the bonded dowel and screw "assembly". As SG says- no harm done, snap, file, rinse and repeat.
Me, I'd make a puller of some description. You could use a short length of flat bar steel stock, about 6" long with a clearance hole for the T-O-M bolt in the middle but anything rigid would do. I referred to that approach in my first post. Actually, when I did this on a Firebird and a Gordon Smith Gypsy 1, I used a home made (at work!) "drilling block" which is aluminium 0.75" x 1.50" x 8.00" which has lots of hardened steel drilling bushes of various sizes pressed through it. I just used the 3/8" clearance bush therein. This ludicrously simple contraption allows 90° "normal to the surface" hole drilling that gets indiscernably close to drill press accuracy with only a pistol drill, and can be used most anywhere which you cannot always say about a pillar drill, but I digress. This I supported at each end with appropriate lengths of non-marring stand-offs, wine corks in my case. You just pass the T-O-M bolt through the 3/8" clearance hole you made in the middle, support the ends as described and tighten the bolt. This process may need the end supports augmenting at some point when or if the bolt "bottoms out". Once the bushing is extracted, the little fastener you put in there should fall out, perhaps with a modicum of persuasion if it is or was jammed.
You can buy a fancy doo-hickey to achieve the same result, probably from StewMac and no doubt elsewhere too if you want, but at the end of the day, it is only a supported hole.
でつ e&oe ...
|
|
|
|
Post by unreg on Nov 28, 2022 18:09:30 GMT -5
Ah so b4nj0, you are recommending I remove the bushing first? It seems you are. I have to find a T-O-M bolt for that… will try to do that today; was going to buy epoxy. What does T-O-M mean? I guess I’ll use pvc pipe just like the video. You make tons of sense… the bolt screw may not come out the small opening bc it’s tilted. But, with your method, you can just increase the support cork height if the T-O-M screw bolt bottoms out. I don’t want to drive that inverted screw further in. |
|
|
|
Post by unreg on Nov 28, 2022 20:34:48 GMT -5
But, with your method, you can just increase the support cork height if the T-O-M screw bolt bottoms out. I don’t want to drive that inverted screw further in. I don’t really understand the removal process in the bushing containing the stuck inverted screw. Honestly, a bolt won’t do much good bc the screw tip blocks the bolt from entering the bushing. I guess the screw needs to be removed first… I’ll try epoxy; hopefully that will work. That screw is NOT tilted extremely much… no where near horizontal. It’s pointed LESS THAN 5° from vertical. Not much room to pull it out though. The radius of the bushing’s center/hole is an 8th of an inch… so I need a 1/8th inch dowel… that’s ONLY IF dowels are measured with diameter… otherwise I need a 1/16 inch dowel. EDIT: or maybe I could use a really thin pencil… no, the lead would leave little room for the wood to meet epoxy. |
|
|
|
Post by b4nj0 on Nov 29, 2022 4:20:42 GMT -5
If you feel that you can get the tiny bolt out succesfully then I say go for, but you'll then be back where you started trying to remove the threaded bushes. T-O-M is an acronym for "Tune-o-matic" as in the eponymous bridge or the tailpiece / wrapover that all mount on bolts in bushings. I was using the bolt /bushing analogy because the same arrangement applies so far as removing a pressed in bush. Assuming that you recognised T-O-M was an error on my part. I was referring to one of the bolts that you have that screw into the bushings. In the example of a FR installation, the hole in a "bar" only needs just to clear the bolt whatever diameter that may be so the bolt can turn. Cork from a bottle was my "solution", but you can use anything suitable that won't mark the finish on the instrument. Also, make cetain to use a tool that fits the bolt as well as possible because you don't want to spoil the visual appearance of it.
でつ e&oe ...
|
|
|
|
Post by cynical1 on Nov 29, 2022 7:52:26 GMT -5
OK, if your post has a 7mm O.D., you'll only need a minimum of 5.6mm, or around 7/32" (80% of O.D.) of your removal screw to screw into the bushing to ensure you don't strip a thread and gain enough thread purchase to lift the bushing from the body.
If your stuck screw allows enough room for this, when you remove the bushing, the old screw just falls out.
A piece of PVC pipe, a piece of threaded rod sized to fit in your bushing, a flatwasher or two and a wingnut. Using threaded rod means you don't have to mess with different screw lengths. Screw the threaded rod (or a long bolt you cut the head off of) into the bushing as far as it goes until it hits the stuck screw. If you got at least 80% of the diameter of the screw into the bushing, drop the PVC pipe over the screw, slide the washer on, thread the wingnut on and begin to turn slowly. Finger pressure is typically always sufficient to pull the bushing. Once you feel the bushing slide out, turn until you feel no resistance. Then take the wingnut off, pull the PVC pipe and take the bushing out the rest of the way with your fingers.
That's all you need to get this bushing out.
HTC1
|
|
|
|
Post by unreg on Nov 29, 2022 16:02:17 GMT -5
Sigh, my last post (above in this thread) is totally wrong. I measured the bushing without good light; so, like b4nj0 says, the bushing has a hole of 3/16”. I totally forgot the smaller hole; I just measured between the bushing’s edges. Last night, I acquired a 3/16” dowel rod bc that’s the smallest my Home Depot had. It didn’t fit into my bushing’s hole; then the smaller hole was apparent to me. I sanded the end of that rod to 1/8”, but I actually needed 3/32”. So, that already thin dowel would need to be sanded a 1/32” smaller (so that its diameter would be 1/2 the size of my bushing’s hole). But, now I can return my unopened epoxy; I’m going to follow your advice cynical1! I don’t even have the saw tool to possibly remove a small epoxied dowel. Just need to obtain a long appropriately threaded bolt or rod; then cut the head off, if it’s a bolt, and use a wing nut! Thank you so much cynical1 (and b4nj0 too)! I really enjoy your note that the rod/bolt just needs to enter a distance = to 80% of the bolt/rod’s diameter, to avoid thread stripping! Thank you so much! (If I need more distance, I’ll just screw/push my inverted screw a tad deeper; but, I think the screw is already deep enough, it sank pretty far; I’ll measure correctly and do this. ) |
|
|
|
Post by unreg on Nov 29, 2022 18:51:31 GMT -5
Just returned from The Nut Place. They took my post and said that they don’t know what size threads it has. The guy thought it was an M6, but it wobbled a bit in the M6 nut he tried. He let me try that too and I felt it seemed exactly the same type of wobble I have always experienced during inserting and removing my post. So, my guitar may have M6 bushings. He advised me to visit a luthier to learn more about the thread size. He also said I could bring my guitar in and they could check the bushings for me. I guess this is the benefit of working on a guitar assembled on a Korean assembly line. It will be Thursday before I can visit The Nut Place again. Peace. EDIT: Oooh, I also asked if they could just measure my post’s threads and make an appropriate threaded rod; he said sure they could and that it would cost around $200 and that it would be around a 2 week wait since they are flooded with work and since I’d just be ordering 1. So I’m NOT doing that. On the phone, they told me that generally threaded rods of the a certain thread size (I don’t remember) and diameter of 3/16” cost <$2 each (I don’t remember the exact price). That’s obviously only if they don’t have to create the threaded rod. |
|
|
|
Post by cynical1 on Nov 29, 2022 20:40:08 GMT -5
My guess is it's an M7 bolt. I don't know the thread pitch, though. It's either 1 or .75. Get both, they can't be that expensive.
Any respectable hardware store should have a diameter and pitch gauge.
HTC1
|
|
|
|
Post by unreg on Dec 1, 2022 18:51:11 GMT -5
Thank you cynical1. Took my guitar to The Nut Place. Dwane tried an M7 bolt, but quit bc it was too big; it never descended into my bushing. He brought 2 long M6 bolts to try (they say 8.8 and JH on the head). They enter successfully but stop after entering, by hand turning, 100% of the bolt’s tip’s diameter. (Figured that out by threading a nut exactly 0.2285 inches onto the bolt’s end. Dwane also brought me some M6 nuts; he said to thread the nut higher than my cut and then remove the nut after severing the bolt’s head. That way the threads will be repaired on the severed end. [EDIT]But, the head end of the bolt won’t matter.[/EDIT]) Using my caliper, that diameter is .2285 inches. However, the bushing’s top has .0888 inch non-threaded distance (.0888 is approx bc I can’t actually measure that distance; maybe I could mark a toothpick and measure that). .2285 - .0888 = .1397 inches (actual entrance into the bushing’s threads) and that’s < .2285 * 0.80 = .1828 inches (that’s 80% of bolt tip diameter) so, these bolts fail to make it 80%, of the bolt’s tip’s diameter, into the threaded part on my bushings? He also tried the next smallest bolt they carry, a non-metric one, and that also failed to descend into the bushing. tldr: I need to visit a guitar repair shop to find the correct bolt? I do really appreciate all of y’all’s help/advice! |
|
|
|
Post by unreg on Dec 1, 2022 19:05:46 GMT -5
Ooh, and maybe I should visit a hardware store and obtain the measurements there?
|
|
|
|
Post by cynical1 on Dec 2, 2022 4:55:16 GMT -5
Can't tell you which post it was, but somewhere I recall you mentioned the posts from the ESP Floyd Rose were different from the posts on the Schaller Floyd Rose. I remember wondering if that was going to come back and bite you in the @ss later.
At this point, it might be quicker and easier to take the body to a guitar shop and does repairs and just have them pull the two bushings. You have enough misery waiting for you on this project...no sense in spending any more time on these bushings. They can probably do it while you wait...and might do it on the house if you bought something.
HTC1
|
|
|
|
Post by unreg on Dec 2, 2022 19:13:10 GMT -5
Can't tell you which post it was, but somewhere I recall you mentioned the posts from the ESP Floyd Rose were different from the posts on the Schaller Floyd Rose. I remember wondering if that was going to come back and bite you in the @ss later. At this point, it might be quicker and easier to take the body to a guitar shop and does repairs and just have them pull the two bushings. You have enough misery waiting for you on this project...no sense in spending any more time on these bushings. They can probably do it while you wait...and might do it on the house if you bought something. HTC1 The following image is somewhat pointless, but thought it would be nice to include here:
^(Schaller on left; LFR post on right) Yes, they ARE quite different.
Will research guitar shops tomorrow. |
|


 )
)
