|
|
Post by pyrroz on Nov 24, 2022 7:37:56 GMT -5
Hello! Good to be back!
I got this new project, a new maple fretboard / white strat. I have the neck and since the previous guitar it was on, it has holes.
Now I got this body :
which is not drilled.
I am planning on doing a beveled/contoured heel for better access. So my neck plate is :
So my problem is if I should plug the existing mounting neck holes and start from scratch ! Or should I somehow and reuse the existing neck holes. (the neck is not pictured). If I go with the existing holes, I am puzzled on how the heck to align the whole thing!
Any strategy I should use cynical1 ? I mean this time I'll hear ya!!! I swear! |
|
|
|
Post by reTrEaD on Nov 24, 2022 8:38:08 GMT -5
Whether to use some of the existing neck holes, depends on how they line up with the neck plate. Should be easy enough to lay the neck plate on the heel of the neck and see how well three of the existing holes on the neck line up with the heel plate.
Another thing to consider is the angle of the bevel you plan to add. If it means the neck plate will deviate severely from perpendicular, you probably shouldn't use any of the existing holes in the neck. Else the heads of the screws won't fit well in the countersunk holes in the neck plate.
|
|
|
|
Post by pyrroz on Nov 24, 2022 9:13:20 GMT -5
Hey thanks for posting! Whether to use some of the existing neck holes, depends on how they line up with the neck plate. Should be easy enough to lay the neck plate on the heel of the neck and see how well three of the existing holes on the neck line up with the heel plate. right, but then again how do I calculate the offset, I mean lets imagine the neck holes align perfectly with the heel plate, still, how do I know that there is no gap between the end of the heel and the heel pocket, so that the guitar retains proper geometry? What : I mean : how close or far from the top of the rectangle on the back of the neck heel should I drill? Another thing to consider is the angle of the bevel you plan to add. If it means the neck plate will deviate severely from perpendicular, you probably shouldn't use any of the existing holes in the neck. Else the heads of the screws won't fit well in the countersunk holes in the neck plate. It will be perpendicular, like this :  |
|
|
|
Post by reTrEaD on Nov 24, 2022 9:54:34 GMT -5
What : I mean : how close or far from the top of the rectangle on the back of the neck heel should I drill? Yeah, that's the tricky bit. You can make a template out of card stock with the location of the hole centers, based on the neck plate. When you place the neck into the recess on the body, you can either tape the location on the neck where it's exposed or scribe a line. That will tell you where the end of the template needs to be cut. When you lay the template on the back of the body, that edge of the template needs to be in line with the end of the body. Since the back edge of the body is rolled over slightly, your template needs to overhang so it's aligned properly with the body edge. Worth noting: The two screws at the top of the neck plate will be doing most of the work. |
|
|
|
Post by pyrroz on Nov 24, 2022 10:18:32 GMT -5
Yeah, that's the tricky bit. You can make a template out of card stock with the location of the hole centers, based on the neck plate. When you place the neck into the recess on the body, you can either tape the location on the neck where it's exposed or scribe a line. That will tell you where the end of the template needs to be cut. When you lay the template on the back of the body, that edge of the template needs to be in line with the end of the body. Since the back edge of the body is rolled over slightly, your template needs to overhang so it's aligned properly with the body edge. Thank you, it's a matter of precise measurement, once I put a little thought into this I'll understand your suggestions. If only I had a non contoured neck plate  I'll use it upside down in the beginning to properly fix the outer hole first. Then, when everything is fine I'll make the contour. Worth noting: The two screws at the top of the neck plate will be doing most of the work. Yep, in the case of neck pockets like the strat this is exactly the case. In the "free"/open design of the ibanez AANJ where the neck protrudes into the body... the ... basswood body, the joint must be much much stronger. |
|
|
|
Post by pyrroz on Nov 24, 2022 13:12:14 GMT -5
The wholes do not match between old neck holes and new plate. So plug, redrill....
|
|
|
|
Post by cynical1 on Nov 24, 2022 13:21:27 GMT -5
Looks like you found the can of worms again... As long as you asked, let me get you started. As long as the body has no existing holes to deal with you have less rework there. The existing holes in the neck will probably not be reused as they are...or you may only wind up only drilling one hole... Their location is only an issue if the new hole turns out to be within 1/8" (3mm) of the old hole...and you're just using screws. This may lead to drilling, plugging and redrilling your holes. As long as you have a clean slate on the body, why not use threaded inserts on the old neck. Like these:  You can get them here...and they're in Germany, so that should make it easy for you pick them up: NectiteYou install them like this: I'm going to use those words again....DRILL PRESS. This is not a freehand operation. I have to run out in a few for the Holiday here in the US, but I need to find you a few good links on making a quick template for hole locations. This job is a breeze with a drill press. It's the 7-string Ibanez if you freehand it... Something else I'm going to have to leave for now is the likelihood of having to shim the neck pocket. There is a formula for this, but the neck has to be mounted to body to make it work. This may seem like a stupid question, but is the neck you're using the same 25.5" scale as a Strat? Don't ask me why I know this is important... Also, is the profile of the neck the same as the neck pocket? How is the fit on the old neck and new body? Is there side play? I'll be back. HTC1 |
|
|
|
Post by b4nj0 on Nov 24, 2022 15:26:02 GMT -5
I had this issue when I put together a T-style. I had bought a ready finished gold sparkle Tele body which had no pilot holes at all, and I went for a Warmoth neck, but Warmoth wanted a twenty bucks upcharge to leave out the pilot holes in the neck which I felt was a very raw deal. What I did first was to try the new Warmoth neck in my other Tele and it was unsurprisingly spot on, alignment and holes too. Next up I "made" this: 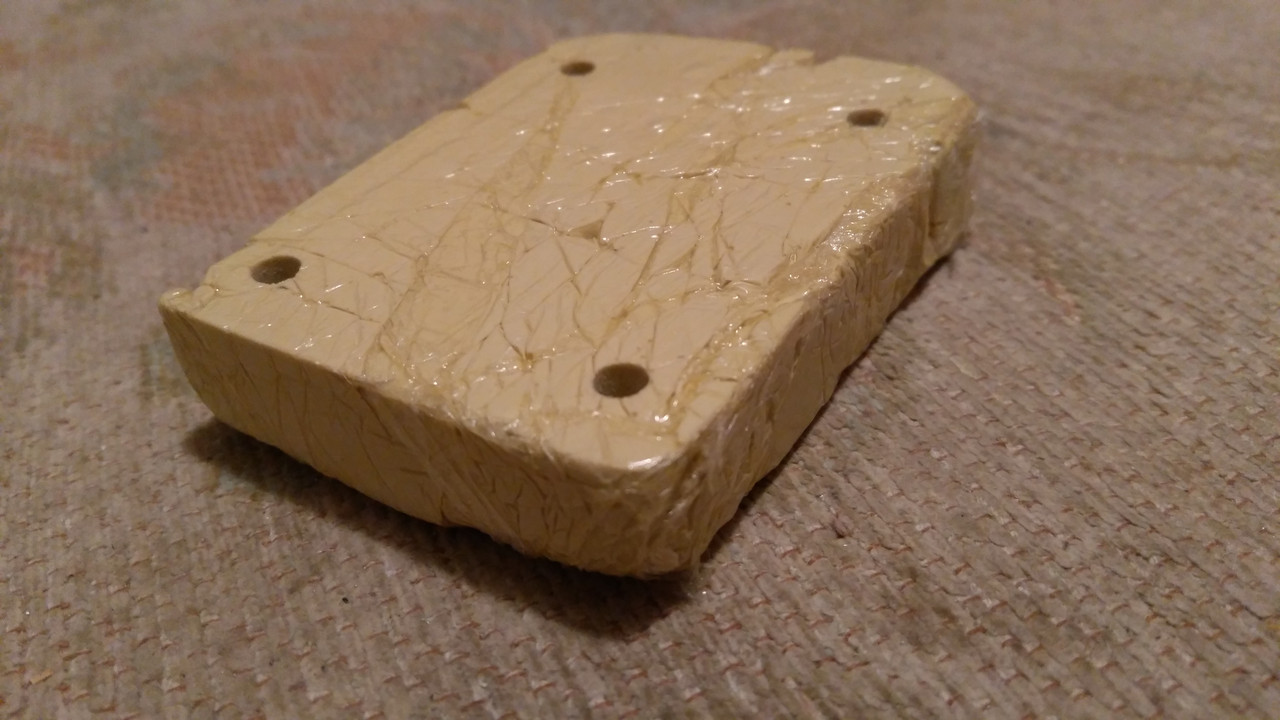 That is so-called "Balloon Filler" (or Micro Balloon Filler) or as it said on the tin "Structural Void Filler". I imagine any filler would do provided it goes off hard and can be drilled thereafter. We used to use that stuff as a filler for the open edges of Nomex cored laminate boards. (Aircraft galley structures). I lined the existing known to be "good" Tele neck rout with "Cling Film" that is used to seal food from the atmosphere or for storage in a 'fridge etc. Then I mixed up the two part filler and packed out the neck pocket. Once the filler had cured into a solid block, I drilled through the old body holes and down through the filler block. I then removed it complete with the Cling Film and put it into the new body and proceeded to drill back through the filler block into the neck pocket. Perhaps I got lucky, but it worked perfectly and I was able to thumb my nose at Warmoth with a warm fuzzy feeling. I realise that the first problem with this approach is the necessity to have access to another example to work from. I used a clamp to hold the block down firm whilst drilling, and I always clamp a bolt on neck when first threading in the new screws. No drill presses were harmed during this exercised. Disclaimer- I realise that there must be additional work for Warmoth to open the CNC program and comment out the appropriate lines, but at around $400 or whatever it was, I still felt short changed. でつ e&oe ... |
|
|
|
Post by sumgai on Nov 24, 2022 20:50:18 GMT -5
Errr, the tried-and-true method of doing a blind template.... Put a dowel in each hole, nice and snug. Have it stick out no more than 2mm. Test that the neck can fit into the pocket correctly, with the dowels in place.... if need be, shorten them a bit. Now paint the dowel heads with something wet, such as real paint, or a magic marker that stays wet for a moment, whatever you have to hand. Immediately fit the neck in place, making sure the dowels don't rub around in the pocket. Remove the neck. Presto!, you now have marks for your pilot holes. Enjoy. 
OTOH, as pyrroz notes, the intended plate already does not line up with the current set of holes, so yes, it's plug-and-redrill time. At this point, you round off the corner first, using the plate for reference to ensure that it doesn't hang out in mid-air. Mark the holes with the plate in place, drill, put the neck in, drill further, and you're back in business. BTW, for those of the woodworking bent, a 1/2" (12mm) roundover bit in your router makes this job a snap. A panel trimmer (a small router) also works,but a Dremel tool, or similar sized unit, doesn't have the moxie to spin that heavy bit smoothly. The one time I tried it, the bit chewed up the wood and left several non-trivial scars. Time, materials and effort to repair it, and some solid color paint to hide it. Trust me when I say, use your big-boys tool for jobs on expensive things like guitar bodies. I concur, the best thing you can do for both tone and sustain is install inserts. There are several designs, so pick and choose at will. I did a quick search, and found this little gem: Installing neck inserts and machine screwsHTH sumgai |
|
|
|
Post by pyrroz on Nov 25, 2022 1:48:22 GMT -5
Looks like you found the can of worms again... As long as you asked, let me get you started. As long as the body has no existing holes to deal with you have less rework there. The existing holes in the neck will probably not be reused as they are...or you may only wind up only drilling one hole... Their location is only an issue if the new hole turns out to be within 1/8" (3mm) of the old hole...and you're just using screws. This may lead to drilling, plugging and redrilling your holes. As long as you have a clean slate on the body, why not use threaded inserts on the old neck. Like these: You can get them here...and they're in Germany, so that should make it easy for you pick them up: NectiteYou install them like this: I'm going to use those words again....DRILL PRESS. This is not a freehand operation. I have to run out in a few for the Holiday here in the US, but I need to find you a few good links on making a quick template for hole locations. This job is a breeze with a drill press. It's the 7-string Ibanez if you freehand it... Something else I'm going to have to leave for now is the likelihood of having to shim the neck pocket. There is a formula for this, but the neck has to be mounted to body to make it work. This may seem like a stupid question, but is the neck you're using the same 25.5" scale as a Strat? Don't ask me why I know this is important... Also, is the profile of the neck the same as the neck pocket? How is the fit on the old neck and new body? Is there side play? I'll be back. HTC1
Hello @cylical1 ! the old neck sits in the new pocket super nice. I tried with pickguard, even nicer, all clearances, fit, its like perfect! I am kinda of ... in a hurry cause we are having a live show on 10th of December (we play well greek Rock songs) , and I'd like to show up with my all new white strat, but ... as you said.... I am 53 now, if I dont learn to be patient now then maybe forget about it... The old neck is standard 25.5" all measured and checked, it was used in the older incarnation of the aria strat, which became maple fretboard and white, then went back to original rosewood and sunburst again (original!! the new color was rubish, so it went off easily, the original was Japanese poly 1983' style). The Ibanez is doing great, but I dont play it much, it is perfect, but with greek rock with lots of fingerstyle I get confused with the 7-string (yes, still)
I have the inserts from a previous purchase, two kinds of them, I may go into that direction if I find problems with sustain or whatsoever. The old Aria strat has great sustain with the original holes.
|
|
|
|
Post by pyrroz on Nov 25, 2022 2:08:46 GMT -5
Nice idea b4nj0 ! Errr, the tried-and-true method of doing a blind template.... Put a dowel in each hole, nice and snug. Have it stick out no more than 2mm. Test that the neck can fit into the pocket correctly, with the dowels in place.... if need be, shorten them a bit. Now paint the dowel heads with something wet, such as real paint, or a magic marker that stays wet for a moment, whatever you have to hand. Immediately fit the neck in place, making sure the dowels don't rub around in the pocket. Remove the neck. Presto!, you now have marks for your pilot holes. Enjoy. Nice idea SG. Worth a try! Pls read further why I think so, or not! OTOH, as pyrroz notes, the intended plate already does not line up with the current set of holes, so yes, it's plug-and-redrill time. I am wondering the -off area is about 1 or 2 mm, couldn't I just get away with leaving the same hole spacing just enlarging the one or two plate holes? But in case I go with the plug/redrill route .. At this point, you round off the corner first, using the plate for reference to ensure that it doesn't hang out in mid-air. Mark the holes with the plate in place, drill, put the neck in, drill further, and you're back in business. So, I need the plate not to be way up towards the direction of the headstock, so it does not hang out and cause roughness to the fretting hand (hey this is supposed to be an "ergonomical" guitar with the contoured plate), but at the same time not far from headstock meaning, being a contoured design most of the stress / tension will be on the sole upper screw, so it hold its task. Maybe this is minor, but anyway, how much clearance do you think it must have from the top of the rectangular back of the heel? regarding drill press, I got one since my Cyn1 era! I gotta clean it from the spider web ... but is a kid drill press nothing pro. |
|
|
|
Post by pyrroz on Nov 25, 2022 3:03:53 GMT -5
I'll use this guide, I think :
question : is balsa wood good for dowels/plugs?
cynical1 : the 3mm overlap is surely there, I mean, worst case, in the least overlapping pairs (plate against neck holes), at overlap portion is more than half a whole. less than 3mm I guess, I'll check again.
So, I think, could I get away with just enlarging the plate holes a little bit? without plug/redrill the neck?
|
|
|
|
Post by thetragichero on Nov 25, 2022 5:51:21 GMT -5
question : is balsa wood good for dowels/plugs? i can't tell if this is a joke while balsa wood is a hardwood it is by no means a hard wood. you want something similar to the maple your neck is made out of. in my neck of the woods oak dowels are fairly easily and cheaply obtainable |
|
|
|
Post by pyrroz on Nov 25, 2022 6:00:09 GMT -5
question : is balsa wood good for dowels/plugs? i can't tell if this is a joke while balsa wood is a hardwood it is by no means a hard wood. you want something similar to the maple your neck is made out of. in my neck of the woods oak dowels are fairly easily and cheaply obtainable
ok, thanks, never came across this term/word, I just found a store next by with those dowels but they supply arts stuff mostly, so yeah, not for guitar neck, I am trying my next bet. I want 5mm dia dowels. Update : it seems they got their site wrong, those are not balsa, I got 5mm and 6mm plugs from beech tree which is our local greek hardwood. I touched some balsa they had in there ... this is like paper ...
|
|
|
|
Post by cynical1 on Nov 25, 2022 9:24:05 GMT -5
When have I heard this before...hmmmm... This job takes me about an hour or two, depending on motivation level...and what I've been smoking...so if you have 2 weeks until your show, then you are not in a hurry.
I have preached this since it was first preached to me: If you haven't got time to do it right, when are you gonna have time to do it twice?
This job requires a few tools, of which most you already have. The most important one is patience. If you channeled that passion into precision you would become a force to be reckoned with, Greek.
That said, watch this video. It's sort of long, but it tells you everything you'll ever need to know on this project.
Now, watch it a couple more times. One hour of education beats 8 hours of rework.
This is encouraging. Sometimes you have to compensate (read as cheat) to get two builder's parts to play well together. This just made the job exponentially easier for you.
Most builders who make Strat type guitars hold to the traditional build specs...but that is just an assumption. Just to humor an old man, put the neck into the guitar body, toss a clamp on it an measure from the front of the nut to the B-string saddle. That should be within a few rodent hairs of 25.5", or 648mm. If it's more or less than 2mm-3mm come back with that measurement. If it's within parameters, you're good.
Yeah, since I retired I've been messing with learning slide guitar...I can play with my fingers on a bass...but that tighter spacing on a guitar makes me feel like Rainman sometimes...
Watch Tosin Abasi. He's moved to fingerstyle on an 8-string. If it doesn't help your playing, at least you can feel worse about it watching him...
It's not really an issue where the holes are, but how secure and solid the connection is from neck to body. Threaded inserts and machine screws are just going to grab and hold tighter than wood screws into maple.
You are drilling just as many holes with or without the inserts. Years down the road you won't remember the time you spent to make a better instrument...but you will appreciate the time you took to create a more solid instrument.
I always liked Aria. They are a great platform for upgrades...if you can find them anymore...
The reason for plugging is to prevent the new hole from walking into the old hole when tightening the screws. Your screw relies on 360 degrees of contact. If a portion of that 360 degrees goes missing, then the grab of the screw diminishes accordingly. If your old holes are more than 3/16", or 5mm from your new ones you probably don't need to plug the old holes. Any closer and it's an "Act in haste, repent in leisure" scenario.
I wasn't going to bring it up...but, CARVIN LOCKING NUT PROJECT. Take your time, do it right, do it once.
In a word, no. Your wood screws have a countersink, typically, and it needs every bit of what's on that plate to grab onto. You make that area smaller, your screw has less to hold onto...worst case scenario...it walks through your plate...
To be honest, this is not a precise location. CNC machines will always locate precisely...provided they're set up right...but you are not a machine. You are going to eyeball this thing. The location of this plate is the last thing you will do that doesn't relate exactly to a fixed reference. You are creating this reference point.
Put some blue (light tack) masking tape across the body where you're going to mount your neck plate. Put some double stick tape on your masking tape, lightly place the neck plate on the doublestick tape, just lay it over the tape so you can adjust the position. Look at the image of the Fender neck plate and get the location as close to that as you can with your eyeballs. It won't hold the neck plate until you push down. Once you like the alignment, push down.
Take a pencil and trace the outside of the plate and the holes onto your tape. If you have a drill bit the SIZE OF THE HOLE in your neckplate, you can use that as a center locator for your hole centers when drilling. Make your mark in the tape only. (If it's right, you'll hit that spot on the tape with a center punch so your drill finds the right spot when the time comes.) Remove the neckplate and verify you have not located one outside of the neck pocket region. Probably not an issue, but better to check before making sawdust.
If anything looks off, pull the tape and repeat. If it looks good, you're done with this part.
As long as you get 90 degrees off horizon consistently you're good. It's probably going to like the body wood more than the neck wood. Nothing moves at Greekspeed on this step. Go slower when drilling, pull the head to clear sawdust a few times...and go slow...did I mention that...go slow?
Beech, birch, maple, oak...as I recall the tech who worked on your Ibanez used rosewood. All are fine. Remember that choosing a drill bit size is dependent on the type of wood you are drilling. Softwood gets smaller holes, hardwood need to be a hair or two larger. It's all about the threads gaining purchase in the wood. (Best argument for inserts...but I digress...)
I think that covers everything so far. If I missed something, or gave a vague description of anything, feel free to shout it out.
HTC1
|
|
|
|
Post by pyrroz on Nov 25, 2022 10:53:18 GMT -5
thanx cynical1 I have to read again and again. Will let you know once I understand what I didn't understand! |
|
|
|
Post by pyrroz on Nov 25, 2022 12:50:32 GMT -5
some photos with two different plates, the one with the imperfection has wider holes and seems to sit better.
IMO I'll just transfer the holes spacing over the neck, I wanna test the sound of the new guitar first Sir!!
|
|
|
|
Post by cynical1 on Nov 25, 2022 13:45:42 GMT -5
I've got to run out and take care of an injured horse right now. Don't make any sawdust until I get back
HTC1
|
|
|
|
Post by pyrroz on Nov 25, 2022 15:00:51 GMT -5
I've got to run out and take care of an injured horse right now. Don't make any sawdust until I get back HTC1 oooppsss too late, I saw this late, pffff sorry again, and again in a state of mania , I cannot help it
scale is spot on, alignment with neck edges as well.
pheeewww i got away with minor loses...
|
|
|
|
Post by cynical1 on Nov 25, 2022 22:07:31 GMT -5
Yeah, can't say I didn't see that one coming...  Traditionally, you locate and drill the body holes, then clamp the neck into the neck pocket...with both of the E strings in place to verify alignment...center, then mark your holes on the neck with a drill bit through your freshly drilled body holes...and finally drill the neck holes from your mark into the neck... ...or not... You did save me quite a bit of typing, though...so there's that... I bet you gave your poor mother fits...  HTC1 |
|
|
|
Post by gckelloch on Nov 25, 2022 23:42:08 GMT -5
The only two bolt-ons I did, I drilled the neck holes at a slight upward angle through the neck pocket holes with the neck clamped on with masking tape around the bit to make sure I didn't drill too deep. Worked fine, but needed a drink after. |
|
|
|
Post by pyrroz on Nov 26, 2022 10:02:00 GMT -5
plus easy access to 22th fret : disclaimer, the various contoured plates and their spacing created non optimal joint, hence this new ... style.
PS
zero drill bit used, all by eye and prayers  |
|
|
|
Post by cynical1 on Nov 26, 2022 12:11:24 GMT -5
I see one problem already. On the top view, there appears to be a gap between the neck and the body on the top, longhorn side. Is that real, or a shadow? Nothing is irreparable here, regardless of where the holes currently are. But that one is important.
I never asked this, but how much play is there with this neck pocket? Does the neck stay in the pocket without screws?
HTC1
|
|
|
|
Post by pyrroz on Nov 27, 2022 10:28:10 GMT -5
I see one problem already. On the top view, there appears to be a gap between the neck and the body on the top, longhorn side. Is that real, or a shadow? Nothing is irreparable here, regardless of where the holes currently are. But that one is important. I never asked this, but how much play is there with this neck pocket? Does the neck stay in the pocket without screws? HTC1 you are right, there is gap, I did it like an idiot, but why is this so important?.
there is some play, since ehhm I enlarged the clearance body holes to 5.5mm ... for better fit.
BUT HEY : a) I dont own a work bench. I have to do all work in the living room/bedroom.
b) my wife despite being from a country where -10C is ok for winter, puts the AC on (heating) all day, so this is impossible for me to work under these conditions c) my time is limited. I see this as a therapy and I got like only the weekend d) it took me the whole weekend to do this... which included , making space for the stereo jack (no space internally originally ), mods, adjustments to the pickguard, final soldering, test thorougly all electronics, convince my self is I like or is it placebo, compare noise/sound/tone/sustain to other guitars ... lotsa work Sir!
Here is the end result :
sustain to the roof, playability : top (could be better but...)
this project costed 60 EUR + old neck, pickups....
I say it is a darn good guitar ... my next work-horse guitar.
|
|
|
|
Post by pyrroz on Nov 27, 2022 12:08:54 GMT -5
some early notes : The SD livewires metal bridge pup was an untamable monster while in its original guitar the Kramer 210. In this new strat, it is equally loud, but at the same time : TIGHT!!! yep!! playable... not what it used to be in the Kramer. I can even do fingerstyle.. no problem.. I like it better ...
the guitar is lightweight, has sustain, playability. The other strat (the Aria) is great as well, but it has 21 frets only, and looks dull!
|
|
|
|
Post by pyrroz on Nov 27, 2022 16:09:19 GMT -5
You are right about the gap...
heres the deal : I have buzz on 19th and 20th fret, and I think the reason is a "tounge" that was developed because of the shim I put in there to bring the action reasonably down. Now, I believe in the same logic, that the reason for needing a shim was the inadequate matching/positioning between pocket and heel. Something in the process of fixating the neck didn't seem right. Too much effort.. some hard to explain effects.. All these : scream : potential problem.
Smth tells me I gotta redo the whole thing.... From scratch....
I can get away with some fret sanding or heightening but .... is this normal...
as a project it was some old parts (neck, pickups, bridge, etc) with some new pots, cap, pickguard and a new body,the new parts worth some 80 EUR, totally.
|
|
|
|
Post by cynical1 on Nov 27, 2022 16:40:05 GMT -5
I leaving for a day to take care of my horse...in about 15 minutes, actually... He's 22 years old and I don't want to take any chances...so...I'll be back Monday night after the vet comes out. I have my tongue in my cheek when I say this, but....don't make any sawdust until I get back. The are questions I have that will determine what you do next.
None of this is unfixable...at this point...
HTC1
|
|
|
|
Post by gckelloch on Nov 27, 2022 20:12:23 GMT -5
It's questionable whether a tight neck pocket improves sustain or not. Damping is a complex thing. FI, having the neck jammed against the pocket top may increase damping, although jamming the neck against the back of the pocket while tightening the screws seems to improve sustain. It depends on perhaps unpredictable things. I've also found that I get a really solid joint and better sustain by scoring and chiseling out the wood in the center of the pocket (just deep enough so it won't touch the back of the neck) leaving ~1cm around the pocket edges for support. I have also inserted a thin Lexan piece, but I don't think it's required. The idea is: surface area damping is decreased, while coupling force near the screws is increased. I have gotten improved sustain on the guitars I've done it to, and the neck does not shift sideways even if I bang it pretty hard with my palm. I guess it's because there is no longer body wood pushing against the neck heel center to reduce the coupling force around the pocket edges.
I think the case here is you have a US spec body and an Import spec neck. I had the same issue with a neck and body. I think the Import necks are a tad thinner at the heel, as are the Import bridge saddles. I say, "if it ain't broke...".
As for the fret buzz, it's not difficult to sand in some fall away. Just need an 8" sanding bar, painter's tape, a permanent marker, crowning file and some polishing pads. It worked for me on my Baritone build. There's a video showing how. At 8:00 here:
|
|
|
|
Post by pyrroz on Nov 28, 2022 0:33:12 GMT -5
I leaving for a day to take care of my horse...in about 15 minutes, actually... He's 22 years old and I don't want to take any chances...so...I'll be back Monday night after the vet comes out. I have my tongue in my cheek when I say this, but.... don't make any sawdust until I get back. The are questions I have that will determine what you do next. None of this is unfixable...at this point... HTC1 Hello,
I didn't notice the buzz at first, maybe, I didnt play there, or it was not developed yet.
In any case, lets assume it was a proof of concept till now. And I gotta say, the guitar sings. So, I unscrewed everything, and leaving the wood take some breaths. I am working today, + and I am so tired of working on this guitar that even if I had time I would not touch it.
I think of making a "workbench" out in the balcony which works only when its not cold or rains or wind blows. This leaving room style is so so off.
No saw dust, I saw the danger, the problem, in its essense, and now I will take my time. A second defeat would only prove I am stupid as hell.
Good luck with your horse!
PS One addition. before unscrewing all screws, I tested releasing only the top left screw (near the supposed "contour") (the one that initially while assembling had given me abnormal behavior or hints something was forced, not right). After releasing that I immediately tested and the buzz was corrected on fret 19, but not on fret 20. So my theory must be somewhat close.
|
|
|
|
Post by pyrroz on Nov 28, 2022 0:42:07 GMT -5
It's questionable whether a tight neck pocket improves sustain or not. Damping is a complex thing. FI, having the neck jammed against the pocket top may increase damping, although jamming the neck against the back of the pocket while tightening the screws seems to improve sustain. It depends on perhaps unpredictable things. I've also found that I get a really solid joint and better sustain by scoring and chiseling out the wood in the center of the pocket (just deep enough so it won't touch the back of the neck) leaving ~1cm around the pocket edges for support. I have also inserted a thin Lexan piece, but I don't think it's required. The idea is: surface area damping is decreased, while coupling force near the screws is increased. I have gotten improved sustain on the guitars I've done it to, and the neck does not shift sideways even if I bang it pretty hard with my palm. I guess it's because there is no longer body wood pushing against the neck heel center to reduce the coupling force around the pocket edges. I think the case here is you have a US spec body and an Import spec neck. I had the same issue with a neck and body. I think the Import necks are a tad thinner at the heel, as are the Import bridge saddles. I say, "if it ain't broke...". As for the fret buzz, it's not difficult to sand in some fall away. Just need an 8" sanding bar, painter's tape, a permanent marker, crowning file and some polishing pads. It worked for me on my Baritone build. There's a video showing how. At 8:00 here:
yep sustain is a wierd one... But IMHO it depends on the maturity, dryness and strength of the neck, provided no other dumping occurs. Easy to bring sustain back when its lost, hard to bring it upfront when it is not really there.
The body is as chinese as it gets, 30EUR from aliexpress, thin coated, I reallly dont know what wood, how many pieces (seems to be three). The neck seems asian as well.
I got the sanding block, and can make various radiuses, I used to be good at that back in the time. But the issue is that I dont remember this neck to have those buzzing issues while in its previous guitar. If it had I would have sanded in a heartbeat. So I am pretty sure this is new. And is related to the poor fitting process that I (didn't) follow.
Lets be a little specific, teh guitar played great and by increasing the action a little bit, it would be a nice guitar to play anything. But, having the action quite high for my standards and still have some buzzing, sounds so so so darn off.
|
|


 I'll use it upside down in the beginning to properly fix the outer hole first. Then, when everything is fine I'll make the contour.


