|
|
Post by pyrroz on Nov 28, 2022 15:02:19 GMT -5
I used the some small sandpaper piece to guide the correct alignment.
(yup I managed to get a usable image link from google drive Geeezoz!! )
some observations again :
before disassembly I just screwed the right-side screws only. I removed the shim. Shim did no good. It should not be needed. The guitar managed to breathe. Less buzzing all over. A little less buzzing on the 20th fret. Better sound. So the neck's geometry must be retained, in no way to be violated or forced....
Hey Captain, The clearance holes on the body are 5.5mm the holes in the neck I guess around 3.3mm inner thread, around 4.8 total diameter. My gut feeling says i put 5.5 dowels in the body and 5mm in the neck, and let it a couple pf days to cure.
UPD : Hey Cyn1, should I remove the pickguard during drilling? Should I plug dowels to the 4 holes in the body and the 4 holes in the neck? or wait your comments?
|
|
|
|
Post by cynical1 on Nov 29, 2022 7:15:42 GMT -5
Without starting anything, a tight neck pocket fit is one of the things, in my 30 years of building these things, that certainly improves sustain. If you can't pickup the guitar, with the neck in the pocket, without the screws...well, you did something wrong...failed to plan...or just good enough is good enough. (Yamaha's can do this on the cheap lines) If this is an instrument you choose to keep for some time, this may be more of an issue. If you're gonna dump it on eBay tomorrow, it's no problem at all. That said, Greek's issues here are likely due to taking components from different builders and making one guitar out of them. Aria always made a respectable instrument, but I doubt anyone at Aria designed their necks to do what Greek is doing with it. Nothing is insurmountable here. It just typically requires more planning up front. Couple questions I should have asked you first: 1.) What is the width of the heel on your neck. Typically, Fender builds them to 2-3/16"(56 mm) wide and 3"(76 mm) long. 2.) What is the width of the neck pocket? Typically, Fender builds them to 2-3/16"(56 mm) wide and 3"(76 mm) long. (This should tell you something.)3.) Is the profile of the neck pocket and the neck heel identical? 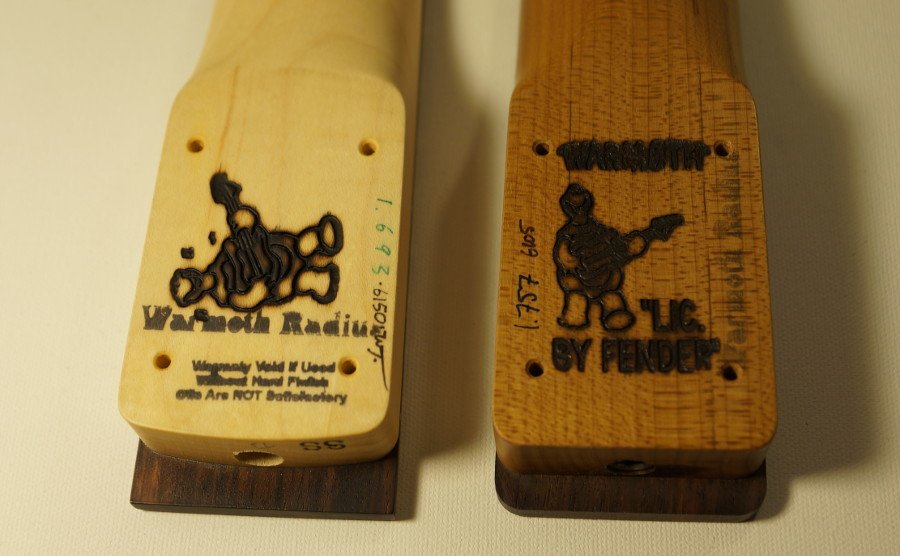 Note the radius on the neck on the left and the flat heel on the right neck. 3.) When you have the guitar setup to remove all string buzz, what is the string height on the low and high E strings on the 12th fret? 4.) Finally, neck bow. Probably not an issue, but as long as you have the ruler out... You want to capo the first fret and while holding your finger on the last fret on the neck (19th, 20th, 21st...whatever) slide a feeler gauge between the high E string and the 8th fret. Repeat the process for the low E string. What are your measurements? These questions are to help me get an idea what you're looking at on the other side of the world. Neck shimming. I would bet you all the hair I have left, along with all of my horses, that you need a full pocket neck shim. I would also guess your string buzzing may be a symptom of a bad neck angle. I'm not even going to argue the merits of any other type of shimming except full pocket...as there are no merits to argue... It's not a complicated process, but it needs to be accurate...so lets fix the other stuff first... I know you've got a show coming up. It sounds like everything but the mechanics on this guitar are ready. Sadly, it's all those annoying little attributes that effect your playing... Right now, you have to ask yourself: 1.) Do I have the time to prep this guitar for the show? 2.) Do I know what I have to do prep this guitar? 3.) Do I have access to the tools and material to prep this guitar? 4.) How long and steep is my learning curve? I should ask you if the guitar is at a level where you feel comfortable playing a show on it? If you do, play the show, make mental notes on what you see or feel on this guitar during the show and we'll meet up afterwards. If you don't feel the guitar is ready for prime time, put it down and find a different guitar for the show. Anything we try in haste always holds the potential to increase our problems and workload in the end.  If you don't have time to do it right, when are you going to have time to do it twice? If you don't have time to do it right, when are you going to have time to do it twice? Ever since my guitar workshop went under water for 6 weeks back in 2008, I've done the guerrilla workshop thing off and on. As far as a bench, a standard guitar case is about 1000mm-1100mm. You workbench doesn't need to be that much wider than that. Depth could be as little as 500mm. Larger is always better...but sturdy and stable is always best. Something to protect the finish is probably important to you, so anything from carpet, to towels works in a pinch. They make mats for this purpose, but in your case, I don't think you'll use them enough to justify the expense. Long and short of this is, there isn't anything you can't fix on this guitar, as it stands now, with a minimal amount of tools. Accuracy and attention to detail is very important when mounting neck to body. I'm gonna hold you to this, Greek. You lack knowledge. That's all. I started out swapping parts on trade-ins to make playable instruments in a music store while I was in high school...which is creeping up on 50 years ago. Don't think for a moment that salvageable instruments didn't pay a price for my lack of knowledge in the beginning. I made some kick-@ss wall hangings back in the day... When you get a chance to grab the measurements listed above, shoot them back to me. I may have still more questions, but remember, I can't see what you see. Something that might jump out to me may be something you've never considered to be an issue. I'll keep a light on for you. HTC1 PS: Mani, the horse, will be fine. He's a 22 year old Paso Fino I've had since before he was weaned. He just had a moment where he thought he was a 2 year old again...now he's just healing like a 22 year old. asmith will remember him...he's the horse that ran right past him at the gate. Thanks for asking. |
|
|
|
Post by cynical1 on Nov 29, 2022 8:41:10 GMT -5
As far as the workbench is concerned...check estate sales and online market places for a good used one. Somewhere, someone is ditching their ex's workbench for cheap. Look around. Probably be cheaper than building or buying new...and likely better...certainly quicker...
A Jeweler's workbench, provided it's wide enough, is a great guitar workbench...you can sit down... They can be hard to find, and expensive when new, but worth it if you can find a going out of business sale where they're selling the fixtures cheap. Some can also double as furniture...so maybe Mrs. Greek will let you bring it inside...
HTC1
|
|
|
|
Post by pyrroz on Nov 29, 2022 13:31:03 GMT -5
Without starting anything, a tight neck pocket fit is one of the things, in my 30 years of building these things, that certainly improves sustain. If you can't pickup the guitar, with the neck in the pocket, without the screws...well, you did something wrong...failed to plan...or just good enough is good enough. (Yamaha's can do this on the cheap lines) If this is an instrument you choose to keep for some time, this may be more of an issue. If you're gonna dump it on eBay tomorrow, it's no problem at all. That said, Greek's issues here are likely due to taking components from different builders and making one guitar out of them. Aria always made a respectable instrument, but I doubt anyone at Aria designed their necks to do what Greek is doing with it. Nothing is insurmountable here. It just typically requires more planning up front. Couple questions I should have asked you first: 1.) What is the width of the heel on your neck. Typically, Fender builds them to 2-3/16"(56 mm) wide and 3"(76 mm) long. 2.) What is the width of the neck pocket? Typically, Fender builds them to 2-3/16"(56 mm) wide and 3"(76 mm) long. (This should tell you something.)3.) Is the profile of the neck pocket and the neck heel identical? Note the radius on the neck on the left and the flat heel on the right neck. 3.) When you have the guitar setup to remove all string buzz, what is the string height on the low and high E strings on the 12th fret? 4.) Finally, neck bow. Probably not an issue, but as long as you have the ruler out... You want to capo the first fret and while holding your finger on the last fret on the neck (19th, 20th, 21st...whatever) slide a feeler gauge between the high E string and the 8th fret. Repeat the process for the low E string. What are your measurements? These questions are to help me get an idea what you're looking at on the other side of the world. Neck shimming. I would bet you all the hair I have left, along with all of my horses, that you need a full pocket neck shim. I would also guess your string buzzing may be a symptom of a bad neck angle. I'm not even going to argue the merits of any other type of shimming except full pocket...as there are no merits to argue... It's not a complicated process, but it needs to be accurate...so lets fix the other stuff first... I know you've got a show coming up. It sounds like everything but the mechanics on this guitar are ready. Sadly, it's all those annoying little attributes that effect your playing... Right now, you have to ask yourself: 1.) Do I have the time to prep this guitar for the show? 2.) Do I know what I have to do prep this guitar? 3.) Do I have access to the tools and material to prep this guitar? 4.) How long and steep is my learning curve? I should ask you if the guitar is at a level where you feel comfortable playing a show on it? If you do, play the show, make mental notes on what you see or feel on this guitar during the show and we'll meet up afterwards. If you don't feel the guitar is ready for prime time, put it down and find a different guitar for the show. Anything we try in haste always holds the potential to increase our problems and workload in the end. If you don't have time to do it right, when are you going to have time to do it twice? Ever since my guitar workshop went under water for 6 weeks back in 2008, I've done the guerrilla workshop thing off and on. As far as a bench, a standard guitar case is about 1000mm-1100mm. You workbench doesn't need to be that much wider than that. Depth could be as little as 500mm. Larger is always better...but sturdy and stable is always best. Something to protect the finish is probably important to you, so anything from carpet, to towels works in a pinch. They make mats for this purpose, but in your case, I don't think you'll use them enough to justify the expense. Long and short of this is, there isn't anything you can't fix on this guitar, as it stands now, with a minimal amount of tools. Accuracy and attention to detail is very important when mounting neck to body. I'm gonna hold you to this, Greek. You lack knowledge. That's all. I started out swapping parts on trade-ins to make playable instruments in a music store while I was in high school...which is creeping up on 50 years ago. Don't think for a moment that salvageable instruments didn't pay a price for my lack of knowledge in the beginning. I made some kick-@ss wall hangings back in the day... When you get a chance to grab the measurements listed above, shoot them back to me. I may have still more questions, but remember, I can't see what you see. Something that might jump out to me may be something you've never considered to be an issue. I'll keep a light on for you. HTC1 PS: Mani, the horse, will be fine. He's a 22 year old Paso Fino I've had since before he was weaned. He just had a moment where he thought he was a 2 year old again...now he's just healing like a 22 year old. asmith will remember him...he's the horse that ran right past him at the gate. Thanks for asking.
Hello cynical1 , the Aria label on this one is just a fake decal, I dont know the origin of this neck. It seems nice, and has double action truss rod. I guess it came from the far east as well. It came from a local luthier, when I had tried to convert the old Aria sunburst rosewood fretboard into white / maple fretboard, in an attempt to NOT own too many guitars. Then I started banging my head to the wall, for letting this happen and convert the Aria back to stock (semi-stock) state in a matter of hours... so so happy I didn't damage the Aria. So I scrapped all "white" paint into the original sunburst poly, and also swapped in the original rosewood fb neck. All good.
But then the white/maple thought came back again, hence this project. In a moment of mania, I ordered two necks from aliexpress, one white/cream/aged with floyd and this arctic white you see in the pics. Just a little background on the story! Now, my wife is having english language class, she is trying to learn english for like 20 years, without success, this means I am alone to drink beer and enjoy the honor replying to CYN1!! pls wait !!
1) neck heel : width : 56.25 mm, length : (very roughly 78mm of the rect shape since its hard to define and measure this length)
2) neck pocket : width : 56.4 mm, length : 77mm 3) No the profile as you'll see on the pics is not identical, the neck pocket has a curve, the neck heel not so much :
3) usually I measure on the last fret (21,22,24) but I agree lets use the traditional method. On my good strat (Aria) , setup the action on the 12th fret is : high E : 0.7mm, low E: 1mm 4) relief. Usually I try to put in some relief for better hard strumming, but in this particular case (Aria strat), right now, this happens to have zero relief. Most of the time it is a compromise, relief, action, the player wants maximal playablity and zero buzz or tolerable buzz. In other guitars I have some slight relief, up to 0.1mm. On some guitars the low E tends to have higher relief, in others the opposite. Just checked the Carvin, it must have smth to do with the cold weather, all reliefs have gone lower. Checking now the 7-string Ibanez, 0.1mm 8th fret @7th string , 0.05mm 8th fret 1st string
About the show, IMHO I defintely have the time, knowledge and tools. I lack space and tranquility. I mean close to the apocalypse of defeat the wife asking if I have called this or that is a deal breaker.
I had one idea and I want your general view before we go into details and implementation :
IMHO, drilling the body holes, it is imperative the use of drill press. Regarding the neck holes why not make it as tight and use the body holes as a guide? Using tape in order not to widen the body holes.
Here is the clamp as I think of it :
Ok I know this is the next phase, but I gotta think in advance  |
|
|
|
Post by cynical1 on Nov 29, 2022 20:36:08 GMT -5
1) neck heel : width : 56.25 mm, length : (very roughly 78mm of the rect shape since its hard to define and measure this length)
2) neck pocket : width : 56.4 mm, length : 77mm So, the heel is .15mm narrower than the neck pocket. That's not too terribly bad. Do you still have that hardwood veneer left from the Gotoh locking nut project? Might want to glue a strip on the shorthorn side of the neck pocket...then slowly sand it back until the neck fits tight... That's a potential issue. from the picture. The neck seems to be a modified Tele style, probably an import standard shape...where the body is more of a Strat style heel. From the pictures, it looks like the neck pocket has a dip in it. Is that me, or is it there?. I'm not sure how you oriented the neck when you fit it in the pocket. If you force the neck against the longhorn side of the pocket, and walk it into the pocket until the heel of the neck stops at the body, what does that do to alignment and scale length? Rather than sandpaper, can you use a veneer strip to center the neck, or is it too tight? That's kinda low...friggin' metal guys... You said "good Strat"...is that measurement the same on the white Strat in question? That's pretty flat. Fender typically recommends .2mm-.25mm depending in neck radius. This is going to make the neck angle even more critical. You neck will move with the seasons. Happens twice a year to most folks. I wouldn't argue that a quiet distraction-free workspace makes a difference. The hardest part about moving forward is the variance of components. Measure twice, measure again and cut once. That was where I was hoping to take this in the beginning. The fact that you already have holes in the body and neck leads me to believe you're going to have to plug all of the holes before drilling new ones. Not what you wanted to hear, I'm sure, but trying to drill around existing holes is likely to be more of a headache than drilling and plugging them. The beech wood plugs would be perfect. There will be some cleanup after gluing them in, but I didn't get the impression you were deeply concerned about the appearance of this guitar at the moment. Once you have your holes located for your mounting plate in the body, that's exactly how you can drill the holes in the neck. Mark your drill bit with some tape...those holes on the fingerboard side can be so annoying... Before you do this we need to find the correct position for the neck in the neck pocket. Once you have that...and four freshly plugged holes...refer to this post for what to do: Reply #6As I said before, the holes in the body for the plate dictate where the holes go in the neck. Watch the video and shout out if something is vague. 1.) Plug all your holes, neck and body. Clean up accordingly. 2.) Determine where the neck needs to be in the neck pocket in order to preserve alignment and scale length. (THIS IS THE MOST IMPORTANT OF THE 5)3.) Locate and drill your neck plate holes in the body. 4.) Clamp your neck in that centered position, yet to be determined, as you show with your clamp, and drill your neck holes. 5.) Cross your fingers and screw it together. Steps #1 and #2 will take most of your time. #3, #4 and #5...provided #1 and #2 are correct and verified twice, should take about an hour. Once the neck is mounted and strung up, we can check the neck angle. Ain't this fun? HTC1 |
|
|
|
Post by pyrroz on Nov 30, 2022 0:58:41 GMT -5
So, the heel is .15mm narrower than the neck pocket. That's not too terribly bad. Do you still have that hardwood veneer left from the Gotoh locking nut project? Might want to glue a strip on the shorthorn side of the neck pocket...then slowly sand it back until the neck fits tight... hmm I gotta look, what happened to this one. Yep its there, its funny how you know my inventory better than me!   still not "grab the guitar by the neck"-level tight. That's a potential issue. from the picture. The neck seems to be a modified Tele style, probably an import standard shape...where the body is more of a Strat style heel. From the pictures, it looks like the neck pocket has a dip in it. Is that me, or is it there?. Scale is spot on! No problems with that. I was ultra lucky with this body and this neck, I bet probably because they are both chinese, same factory?! No dip, this just the grain that creates this visual effect. I'm not sure how you oriented the neck when you fit it in the pocket. If you force the neck against the longhorn side of the pocket, and walk it into the pocket until the heel of the neck stops at the body, what does that do to alignment and scale length? Rather than sandpaper, can you use a veneer strip to center the neck, or is it too tight? If it is tight against the longhorn side, and till it stops at the body, alignment is perfect (almost with a little play) and scale is right as well. The hardwood veneer from the Carvin Gotoh project is 0.55mm still it will not hold the neck in place, in order to grab it. Somehow I feel there has to be some play both for corrections potentially and also in order to for the wood to be more free, I dunno if there is any logic in that. That's kinda low...friggin' metal guys... You said "good Strat"...is that measurement the same on the white Strat in question? That's pretty flat. Fender typically recommends .2mm-.25mm depending in neck radius. This is going to make the neck angle even more critical. You neck will move with the seasons. Happens twice a year to most folks. That was where I was hoping to take this in the beginning. The fact that you already have holes in the body and neck leads me to believe you're going to have to plug all of the holes before drilling new ones. Not what you wanted to hear, I'm sure, but trying to drill around existing holes is likely to be more of a headache than drilling and plugging them. The beech wood plugs would be perfect. There will be some cleanup after gluing them in, but I didn't get the impression you were deeply concerned about the appearance of this guitar at the moment. Once you have your holes located for your mounting plate in the body, that's exactly how you can drill the holes in the neck. Mark your drill bit with some tape...those holes on the fingerboard side can be so annoying... Before you do this we need to find the correct position for the neck in the neck pocket. Once you have that...and four freshly plugged holes...refer to this post for what to do: Reply #6As I said before, the holes in the body for the plate dictate where the holes go in the neck. Watch the video and shout out if something is vague. 1.) Plug all your holes, neck and body. Clean up accordingly. 2.) Determine where the neck needs to be in the neck pocket in order to preserve alignment and scale length. (THIS IS THE MOST IMPORTANT OF THE 5)3.) Locate and drill your neck plate holes in the body. 4.) Clamp your neck in that centered position, yet to be determined, as you show with your clamp, and drill your neck holes. 5.) Cross your fingers and screw it together. Steps #1 and #2 will take most of your time. #3, #4 and #5...provided #1 and #2 are correct and verified twice, should take about an hour. Once the neck is mounted and strung up, we can check the neck angle. Ain't this fun? HTC1 The white strat when it was assembled, it had higher action than that, a tad higher and buzzing more. Something felt like violated, like abnormal. Relief was also a tad more. As far as the appearance is concerned, if you notice I haven't done anything extremely ugly yet! I care about the appearance, heck the protective film is still on the pickguard! Please lets concentrate on the dowels. I re-write my question : |
|
|
|
Post by cynical1 on Nov 30, 2022 1:48:44 GMT -5
For the dowels, take the outside diameter of your dowel pin and drill that size into the wood. For example, if it's 9mm dowel pin, drill a 9mm hole. The pin should have grooves and the glue will act like a lubricant. Lightly tap the pin in and wait for the glue to dry. Put some masking tape on the neck pocket side when tapping them it. Helps keep the glue from running all over the neck pocket. Keep the dowels just short of the neck pocket when tapping in from the back. Put your finger over the hole from the other side and when you feel the pin touching your finger, stop. No sense trimming both sides of the pin.
I'd try and use the smallest diameter pins I could find, and still fill the holes on the neck. Maple is a PITA to drill and the smaller pins will be quicker to chisel and sand down.
If you can press the neck against the longhorn side and have alignment, then that is your reference point. If one piece of veneer isn't enough, use two. Sand until it's snug, without forcing it. Because you're expanding from the shorthorn side, it probably won't hold the neck if you pick it up, but it should feel snug. It's isn't glamorous, but it is effective. Once you have it, just lightly glue and clamp the veneer to the shorthorn side of the neck pocket. It'll probably need some finish sanding after the glue, but once you've got it you're done.
One more thing. Once you have all your holes located and drilled, leave the tape on with your tracing of the plate. Use that to help you reference the neck plate for your ergonomic relief. Get it sanded smooth and if you're pressed for time, throw some white nail polish on the wood. If it's thick, put it in hot water for a few minutes. Cheap, dirty, and no one knows but you.
Oh yeah, one more thing...once the neck is attached, after everything we've talked about has been done, if you find a gap at the base of the neck pocket because of the different contours, you can also use the veneer strips to fill those gaps. Not pressing, just another one of those little details...
I'll let you go. You have holes to plug.
HTC1
|
|
|
|
Post by pyrroz on Nov 30, 2022 2:26:22 GMT -5
One more thing. Once you have all your holes located and drilled, leave the tape on with your tracing of the plate. Use that to help you reference the neck plate for your ergonomic relief. Get it sanded smooth and if you're pressed for time, throw some white nail polish on the wood. If it's thick, put it in hot water for a few minutes. Cheap, dirty, and no one knows but you. Thanks Cyn1. After plugging, the new holes location will be a little more of a concern. Mimicking the fender pattern is OK by eye, but I would like a confirmation in order to not fall too on the outside and cause problems. But one thing at a time. Plugging first. I gotta find the time!
hmm talking about veneer, here at work the italian coffee machine (nespresso) has those sticks : they must at about 2mm thick and they seem pretty strong wood. Could I just use three of them glued alongside to create greater tightness? and maybe put a little on the other side (like the carvin-gotoh left over veneer) to create max tightness?
|
|
|
|
Post by cynical1 on Nov 30, 2022 10:41:10 GMT -5
Stop! Put the stir stick down...and step away from the stir stick...slowly! Hardwood, Greek, hardwood. Those are softwood. They will compress...this is not what you want to use... I can see what you're going to get for Christmas...  I don't know if they sell it in Greece, but for this purpose I always loved the rolled edging veneer. Looks like this: 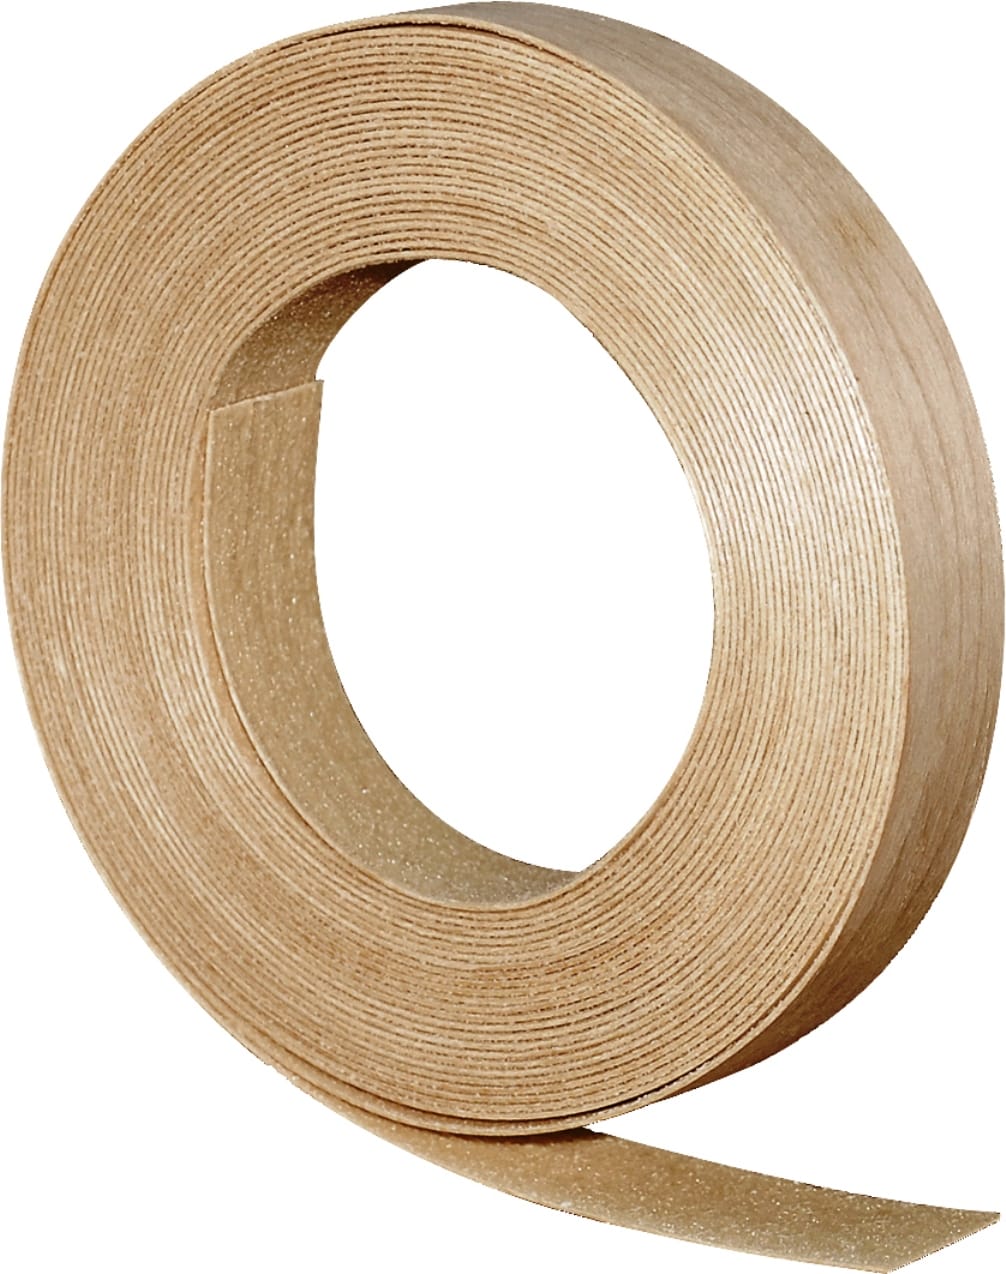 It is designed to be applied with an iron...so it comes with glue on the back. I understand where you may be tempted to try and iron it in place. Don't. And don't ask me why I know it doesn't work, either... You can let it soak in either acetone, denatured alcohol...or rubbing alcohol (91% isopropyl alcohol) in a pinch. After a few minutes you should be able to peel the glue off and have only a thin piece of veneer. Wipe it and dry it between some paper towels and a brick or two. They dry razor flat. I like these strips because they're dimensionally stable, you end up with less waste and it's relatively easy to cut into the size you want with a razor knife as the grain typically all goes the same way. I don't know where these places are in relation to where you are, or if they even carry this type of veneer, but here's three places to start looking: KALLIGAS DIMITRIOS TIMBER Ilia Poulopoulou 49, Athina 118 51, Greece +30 21 0345 0750 Venieris Wood Αγίας Ζώνης 86, Αθήνα, T.K.: 11364 Τηλ./Fax: 210.86.76.773 info@venieris-wood.gr
ATHENS WOOD 2100109388 Ναυτικού 22-24 (Πρώην Πάστρας) Τ.Κ. 10447 Αθήνα Τηλ. 210-0109388, Κιν.6940312718 www.athenswood.gr/If these places don't carry it they should know who does. If you have enough of the Gotoh veneer left, then disregard this accordingly. Gluing the veneer in the neck pocket presents an issue of clamping. Take a piece of metal or wood about 6mm-8mm thick and wider than the height of the neck pocket and slightly longer than the area you're clamping. Take some plastic from a soda bottle or milk carton (if they use plastic in milk cartons in Greece) and cut it to cover your piece of wood that contacts the veneer\glue. If you use metal, skip the plastic part. You just want to use something the wood glue won't stick to. I have a use for your stir sticks. After you LIGHTLY glue up your veneer strips to the desired thickness, and LIGHTLY glue this to the side of the neck pocket, take your piece of wood or metal and lay it next to the veneer. It should lay on it's side in the neck pocket and cover the veneer strip completely and extend a few millimeters past it. Take your stir sticks and use them to wedge your piece of wood or metal against the veneer strips. Cut them a bit longer than the gap between the wedge piece of wood or metal and the longhorn side of the neck pocket. It doesn't have to be super tight, you just want it to press out any extra glue and make sure it doesn't move while everything dries. Put blue masking tape (read as: not the cheap stuff) on anything you don't want to get glue off of later. Any tape or glue usually cleans up with a razor knife. Remember, this is just a shim. It doesn't require any more glue than it takes to keep it in place. Thin is the operative word. No cyanoacrylate or poly adhesives. Wood glue. I'm fine with Elmer's Glue for this one. Glue it, check that nothing moved and come back the next day. You may have some clean up or sanding, but it shouldn't be much. Did I mention go THIN on the glue? Put it on the strip, spread it evenly, then wipe most of it off with your finger. Tacky, not saturated. Anything I missed or flew past, let me know. HTC1 |
|
|
|
Post by pyrroz on Nov 30, 2022 12:13:26 GMT -5
Gee dude, I feel like Jesee Pinkman getting instructions from Walter White, I had to read the text 4 times... or should I say Lalo Salamanga? non native English language kicks in those moments. Pfffew finally I get the veneer part.
|
|
|
|
Post by pyrroz on Nov 30, 2022 13:06:42 GMT -5
hmmm not far I hope :
hardwood veneer hmmmm nowhere to be found. Maybe I'll have to track down the luthier I had gotten the Carvin-Gotoh veneer. His old place has long shut down. I must visit his new place and say hello. (he is not my prime goto luthier. This one wanted 250 EUR and he wanted to design the thing himself. Not my cup of tea, I want to be in command!! ha)
|
|
|
|
Post by cynical1 on Nov 30, 2022 13:27:26 GMT -5
Gee dude, I feel like Jesee Pinkman getting instructions from Walter White, I had to read the text 4 times... or should I say Lalo Salamanga? non native English language kicks in those moments. No, Mike Ehrmantraut...ask sumgai, newey or asmith... I even put everything in Greek...pictures and addresses...  I've done this job more times than I can remember...but never took a picture...έτσι σου έδωσα χίλιες λέξεις... HTC1 |
|
|
|
Post by pyrroz on Nov 30, 2022 14:19:28 GMT -5
Mike Ehrmantraut, hmm everybody likes Mike!
I located the veneer guy, I called him, bought some candies for him and his GF, he runs a music recording studio, guitar repair shop, his GF is into craft-work art kinda thing (hence the veneer). We talked politics, stories about the other luthier, the old guy, about covid, society, music, teenagers, the whole package. Nice dude. I am happy we became friends (again). He gave me this maple veneer:
if the fitting is not tight enough I'll add some more! or save the veneer for 10 years later, when CYN1 will AGAIN remember that I have it!
|
|
|
|
Post by cynical1 on Nov 30, 2022 14:31:59 GMT -5
And that works. You solved that problem. You aren't kidding. I looked all over Google and no one carries this stuff. I found some laminated stuff, but that's not it. Amazon has it for around $10.00 US. Some places call it wood tape, but it's just a roll of wood veneer with heat glue on it for applying veneer to an edged surface...like a bookshelf or counter top. If you were closer I'd give you the roll... Yeah, you don't need much of it. Try a cabinet maker. Offer to buy their scrap cutoffs...a handful would be a lifetime supply. I'd go find the luthier that helped you out last time. My guess is a pack of smokes, their favorite beverage and 10EUR will take you a long way. You could buy a guitar for 250EUR...I can see I got into the wrong trade. HTC1 |
|
|
|
Post by pyrroz on Nov 30, 2022 15:08:01 GMT -5
ok I got the extra veneer from the old friend. tomorrow is plug dowel time!
|
|
|
|
Post by cynical1 on Nov 30, 2022 15:09:30 GMT -5
I located the veneer guy, I called him, bought some candies for him and his GF, he runs a music recording studio, guitar repair shop, his GF is into craft-work art kinda thing (hence the veneer). We talked politics, stories about the other luthier, the old guy, about covid, society, music, teenagers, the whole package. Nice dude. I am happy we became friends (again). He gave me this maple veneer: Very nice dude. Sad, but we really are a pretty easy lot to schmooze...candy, drinks, smokes...the other kind of smokes...it all typically works... I remember all of your projects. I'm still in therapy. Lay the veneer against the shorthorn side of the neck pocket and trace the outline from back to front, then razor knife the outline. Make a few pieces if necessary. Better to do it now before you have a finish to worry about scuffing up after it's glued in place. This next step makes a bold assumption...and that is all of the fret marker dots are centered on the fingerboard...no reason to assume otherwise...but, I'm just that kind of guy... Put a towel on a table that is long enough for the entire guitar to sit on. Lay the guitar face up on the table and place the neck in the pocket. Take string...regular string, not the guitar strings...and loosely string up the D and G strings from the nut to the bridge. Feel free to tie them off, but use tape to keep them in the nut and saddles. Find a wash rag or towel to support the neck near the headstock so it doesn't fall out. With the strings taught now, start moving the neck in the pocket, with the neck resting on the base of the neck pocket, until both strings are equidistant from your fret markers. You may find you'll need to shim both sides to get it aligned. It happens. The cosmetics are secondary to the alignment. This is not a "laser calibration"...in that when it looks good to your eyes, then that's where it goes. I've seen things that came out or respectable facilities that suffered from this. Sometimes guitars are built on Monday mornings or Friday afternoons... You are much better prepared to do this job then when you started. Go slow and dry fit and test everything before applying adhesives or creating sawdust. This needs to be done before you drill any holes. That's the easy part, anyway. 30 seconds to drill 4 holes...3 hours of figuring out where they go...yeah, sounds about right... HTC1 |
|
|
|
Post by pyrroz on Nov 30, 2022 15:12:28 GMT -5
My guess is a pack of smokes, their favorite beverage and 10EUR will take you a long way. You could buy a guitar for 250EUR...I can see I got into the wrong trade. HTC1 Hey this is not USA man, the candies cost only 5 EUR, he didnt want the candies, but I looked at him with this eye :
so he said ok!
|
|
|
|
Post by pyrroz on Dec 1, 2022 0:54:43 GMT -5
good morning from the eastern hemisphere! No drilling, just fitting the dowels by sanding to the shape of the hole.
Then follow the neck dowels, harder to make.
|
|
|
|
Post by cynical1 on Dec 1, 2022 16:00:53 GMT -5
Good afternoon from the Western Hemisphere. Nice. You are now back at the beginning with a workable platform to finish this project. Once the glue is dried on your plugs you can drill holes. Until then... After you've cleaned up the back of the body at the plugs so the surface is flat again, it's time to locate the neck plate. Before you touch a tool, you need to feel comfortable with this process. You got that part...about not touching tools...right...? 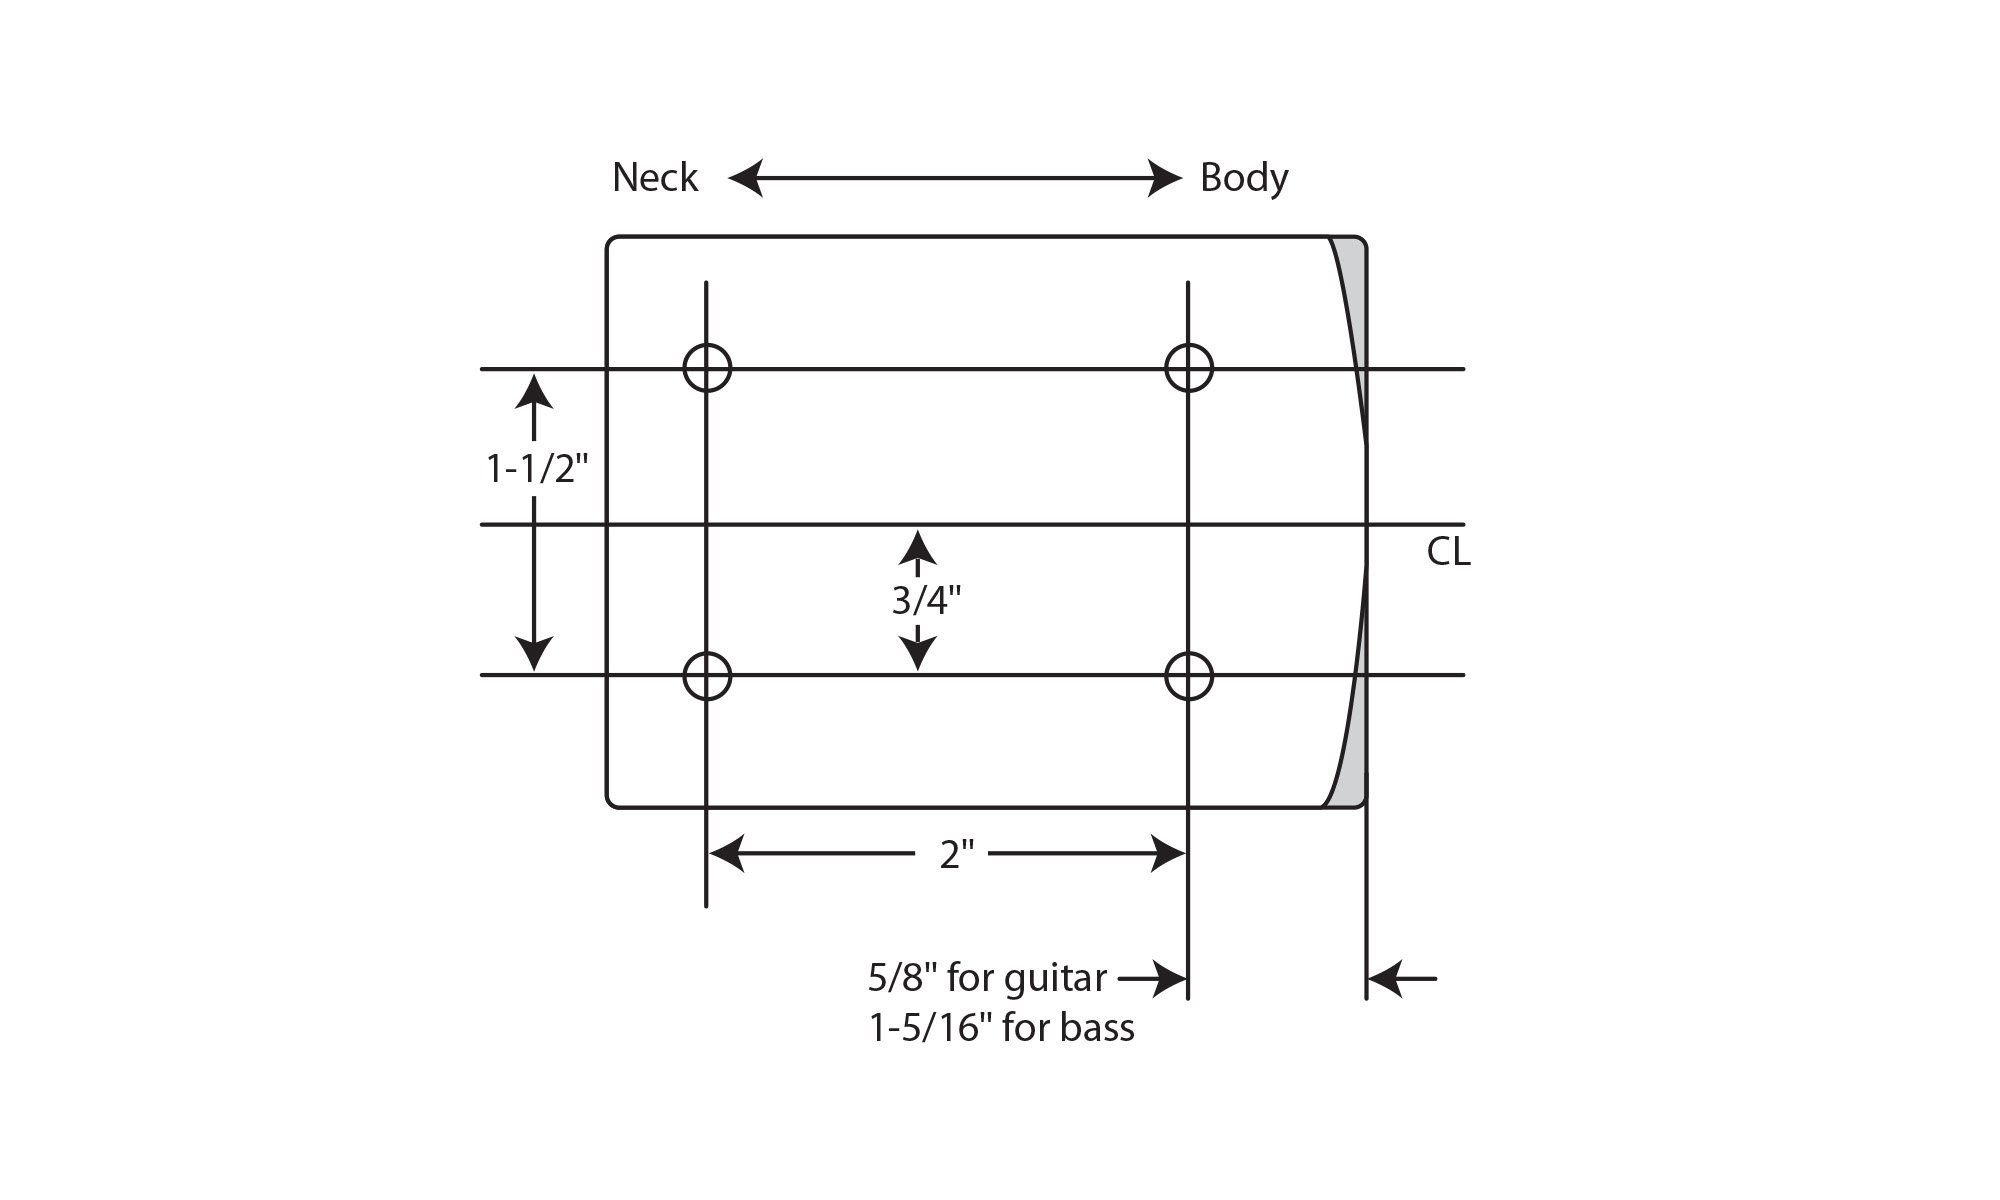 Quick conversions: 2" = 50.8mm 1-1/2" = 38.1mm 3/4" = 19.05mm 5/8" = 15.875mm This is a drawing of a neck in a neck pocket...in a perfect world. Don't worry about the width of the neck, or the length of the heel. What does pertain here is using a centerline, or "CL" as represented in the drawing. I'm gonna start there. I hope you have plenty of blue masking tape... First get some string, blue masking tape, a metal ruler (preferable, but as long as it's accurate and at least 50cm it'll work) and a good thin dark marking pen or pencil. This is not ideal, but you work with what you have. First, tape off the back of the body at the neck pocket and around the base where the strap button would go. 2cm from front to back is sufficient. Also, run a strip of tape inside the neck pocket at the top. One strip is enough. The next part assumes the bridge is still mounted. If not, now is a good time to mount it. This is where "working with what you've got" come into play. One the tape inside of the neck pocket, measure across the width at the top of the neck pocket and mark it on your tape. Run your string between the D and G saddles, loop it around the guitar like the Equator and tie it tight. Next, with the body flat, take your long metal rule (or equivalent substitute) and put one end on your mark in the neck pocket, run it across the middle of the D and G saddle and flex it down to make a mark on the tape at the bottom of the body. Enlist a spouse or offspring for this if necessary. Now that you have these lines marked, move the D and G saddle out of the way or on their sides. You don't need them. Slide your string loop, retied tighter if necessary, over the two marks you made on your tape. When you're satisfied that your sting is over these center lines, turn the body over. Make sure it's as clean a line around the body as you can get...no weave bend or slant. When you have that, you have a device to mark your centerline for the back of the body. Mark the tape behind the neck pocket on the body at the top, middle and a few centimeters down from that. Take your metal rule and see if it lines up with all three marks you made. If it doesn't, repeat everything until it does. Once it does, you have your centerline. Put your metal rule against the marks and draw that line out on the tape. Next, take your neck plate, tape the top and mark the centerline full length. The final thing requires a combination square. They look like this  You don't need to break the bank, but you really need one of these to make it easier and as accurate as you can get it. I'm going to assume you either have one, or will find one before proceeding. Loosen the nut on the combination square so the blade\ruler slides easily, but not sloppy. Place the anvil (the part with the nut in it) against the top of the neck pocket and the blade sitting inside of the neck pocket, vertical. Move the anvil to the shallow side of the neck pocket, hold it snuggly against the body, push the ruler into the end of the shallow side at the bottom of the neck pocket and lock it. Turn the body over and place the square like you did inside of the neck pocket. Move the anvil across the top of the neck pocket and make three marks, one to each side and one next to the centerline. Take your metal rule, line it up over the three marks and draw a firm line. This is now the useable base of the neck pocket located on the back of the body. Granted, the is a "cheap and dirty" way to do this...and I only offer it as I know Greek's arsenal of tools and space is limited...as well as his time... This relies on a good eyeball. The next part is really to confirm that everything is located and referenced correctly before wood is bored. Lay the neck plate on the body, eyeball your plate location with the center lines on the body and neckplate lined up, with the location equidistant from both sides, oriented more towards to top of the neck pocket (look at your other guitars for an idea of spacing)....and take a few pictures and post them back up here. I'm not trying to be condescending. Just the opposite...you have limited time and no time for another rework. Enjoy. HTC1 |
|
|
|
Post by pyrroz on Dec 2, 2022 3:45:24 GMT -5
Cyn1, i'll try my best. There are lots I dont understand. This sounds so so so hard to understand.
My screws are 4.7mm outer thread dia, 3.2 shaft dia. Why not turn
1) the plate upside down inside the neck pocket, double tape down the plate by the measurements by stewmac above, use drill press with drill bit 4.5mm or 5mm and make the body holes, then
2) place and double tape down the plate at the back of the heel (its natural position), assemble the guitar, and use outer E strings to guide alignment, clamp, and drill the neck holes using 3mm or 3.5mm drill bit.
One question I had is : maybe try and make one thread across body and neck? this should mean the bond is permanent and never to be unscrewed. This is what the older luthier did to the 7-string ibanez.
Cyn1, again sorry, if I have to follow your instructions, and provided that we have like 10 hrs difference, its gonna take so many back and forth to grasp every aspect of this, it will take week(s).
Of course I welcome and thank you for your very gentle proposition to have a video call, this would be awesome and maybe the only way I can grasp it!
This morning I did some tests with scrap hardwood. I had to get up early and lose one hour from my normal work. I'll try to read again what you wrote. I dont seem to understand. What I miss basically is this. If by doing a completely bad unguided careless and ridiculous job I managed to have a playing guitar, why would I fail by doing it as we had said earlier, or as stewmac says? Those new additions are a PITA for me to grasp.
|
|
|
|
Post by cynical1 on Dec 2, 2022 6:47:32 GMT -5
Cyn1, i'll try my best. There are lots I dont understand. This sounds so so so hard to understand.
I can appreciate the language barrier, the time difference...and how pictures would have made this much easier to grasp. It can be challenging to break this process into steps that can be followed by a novice. I've been doing these jobs for so long it's like riding a bicycle...easier to do than explain... You work in IT...so you know what it's like explaining technical concepts to users...now take that scenario and apply it to someone trying to do surgery on one of their instruments...that they would prefer works better after posting a question... Sometimes it's like trying to describe a spiral staircase...with your hands in your pockets... That said, let me go through your questions: Assuming your screws look like this:
 And you have: T= 4.7mm (3/16") R= 3.2mm (1/8") This is exactly what we call a #10 screw in the US...which is typical for a neck screw. The closest thing in metric hardware would be an M5 screw...but that would be a hair larger than your screw dimensions. That said, the charts call for a 9/64" drill in hardwood (maple neck) and 1/8" into softwood (your guitar body). That converts to 3.571875mm and 3.175000mm respectively. You could get away with drilling all of your holes with a 3.6mm (0.1457 decimal equivalent) drill bit, but if they sell 9/64"(0.140625 decimal equivalent) drill bits in Greece, that is what the screw you have calls for. One drill bit can do both in your situation, because you want the screw to grab on the neck wood, versus grabbing in the body, so the pilot hole size is more critical going into the maple neck. As to putting the plate inside of the neck pocket...I can't really recommend that, man. I don't know the history of who made that body...and can't put my eyes and fingers on this body, either. Sorry.
I think I follow your question here. I'm afraid to jump into any explanation here...as I'm not certain what you're describing. We have a similar problem it seems...at least I'm not trying Greek translations...you think it makes no sense now... I will say, locating and drilling for the neck plate does not require the neck to be in place. It really does require those centerlines located on the body...since all the routings for pickups and the bridge are on the body. The neck aligns to the body...so the body needs to be the reference point.
Your Ibanez was special...if we're talking about the 7-string. That was a factory mistake and your luthier had to overcome problems the manufacturer couldn't be bothered with. He had to get creative. You shouldn't have to do that here.
Don't apologize. I feel your pain on this. I'm describing processes in your second language...and sometimes things get lost in translation. And it's only 8 hours difference between Athens and Chicago. I used to have to work with techs in Europe and phone and video conferencing was doable.
I think, after 50 posts, that a video conference is necessary. The rest of this job is not technically difficult. It just requires a bit of math and geometry. Whether this job goes smoothly or becomes a dumpster fire is directly related to the amount and quality of your preparation, or layout work. Once all the lines are drawn and you know where everything goes, it's 8 trips with a drill, 4 screws and string it up...provided the neck angle is good, but I digress...
Any problems that arose from your first time through are fixed by the plugs. You are back to a clean start. Last time you used the SWAG Method. (SWAG= Scientific Wild @ss Guess) The new additions are just things we should have done the first time...PITA or not... One of the reasons for the industry migrating to CNC is that it gives you wickedly repeatable accuracy. You don't have that advantage here, so you need to mark this up yourself.
Let me know what you use for video conferencing\chat and we'll can set up a time where we're both awake. Shoot me a PM.
Hang in there, Greek. You are closer to being done with this than you think.
HTC1
|
|
|
|
Post by pyrroz on Dec 3, 2022 10:30:20 GMT -5
Thank you Cyn1 for all your help, too bad< I could not absorb more, but eitherway I dont think I had the temper to wait any longer.
Here is the result :
|
|
|
|
Post by cynical1 on Dec 3, 2022 13:47:10 GMT -5
...I dont think I had the temper to wait any longer. Ὁρμή...right? How does it play? HTC1 |
|
|
|
Post by pyrroz on Dec 3, 2022 14:07:25 GMT -5
...I dont think I had the temper to wait any longer. Ὁρμή...right? How does it play? HTC1
yep!! it plays very nice, considered my OCD (hahaha) and the fact that the guitar rests by the wall right now (yep I know, I gotta buy a case), this is a good sign It is good, much better with the correct body/neck joint than before. No shim. But I had to lower the saddles.
Now, I gotta level/crown/dress those frets! but this will wait .... I cannot stand any more work of this at the moment! I got a short leveling block 9.5, I gotta measure the radius (IMHO this is 12") and then convert the block to 12" or whatever, and then do the job.
|
|
|
|
Post by cynical1 on Dec 3, 2022 15:16:45 GMT -5
Don't forget your intonation before the show. If you forget, the first song may remind you... I'm glad this turned out well. It's always a thrill ride whenever you start one of these projects... They all seem to end well, though... Might I suggest, since Christmas is coming, that Mrs. Greek might select something from StewMac Books, Plans, DVDs section...for when you have these nocturnal bursts of inspiration... There are some good books in there that can help you plan and perform all kinds of dangerous acts with power tools. So, videos? HTC1 |
|
|
|
Post by pyrroz on Dec 4, 2022 1:32:57 GMT -5
Don't forget your intonation before the show. If you forget, the first song may remind you... I'm glad this turned out well. It's always a thrill ride whenever you start one of these projects... They all seem to end well, though... Might I suggest, since Christmas is coming, that Mrs. Greek might select something from StewMac Books, Plans, DVDs section...for when you have these nocturnal bursts of inspiration... There are some good books in there that can help you plan and perform all kinds of dangerous acts with power tools. So, videos? HTC1
Hi Cyn1, it is a super-vee trem that used to be in various guitars, the 2011 scalloped strat which was junk and sold, and also the sunburst strat (which I own since 1984). So I guess the intonation is ok-ish, pretty easy to fix. Hopefully I'll send some videos, as well!
|
|
|
|
Post by pyrroz on Dec 4, 2022 4:52:31 GMT -5
intonation :
I had to adjust as above to have a proper intonation ..
Does this look normal? usually the pattern goes like
e b g d
a e
maybe those strings suck big time?
Should I try with better strings ?
the current brand of strings is "allparts" made in Korea, hmm
|
|
|
|
Post by cynical1 on Dec 4, 2022 7:56:20 GMT -5
I've been intrigued by the Super-Vee trem since I first saw it in a NAMM Show video years ago. I have never gotten my hands on one, though. What do you think of it? How does it compare to a stock Fender trem? Does it stay in tune?
I wouldn't be concerned about where your saddles are currently located. If you get no binding or restriction when you bend it I'd be happy with it. I never really worry about what it looks like or where the saddles finally reside when intonating a guitar or bass. Sure, you can expect a familiar pattern where they line up physically, but it's not a problem if they walk a little forward or backwards. As long as the open string, fretted 12th fret and harmonic at the 12th fret all hit the same note you're good for a basic intonation. Trust your tuner\scope, not your eyes on this one.
It's possible your strings suck. You may find that different brands or gauges of strings will move the saddles a little when setting them up for the first time. Swapping a bridge from one guitar to another will usually cause you to have to re-adjust saddles in a set up. All normal. If you set the intonation and tune it up, but it just randomly starts walking out of tune, or just sounds "dead", then yeah, I'd try new strings, too. If it stays in tune and the intonation stays, they should be good...changing them would merely be a matter of taste to your ears.
If those strings are new, don't forget to re-check your intonation before the show. Don't ask me why I know that...
HTC1
|
|
|
|
Post by pyrroz on Dec 4, 2022 8:19:04 GMT -5
I've been intrigued by the Super-Vee trem since I first saw it in a NAMM Show video years ago. I have never gotten my hands on one, though. What do you think of it? How does it compare to a stock Fender trem? Does it stay in tune? I wouldn't be concerned about where your saddles are currently located. If you get no binding or restriction when you bend it I'd be happy with it. I never really worry about what it looks like or where the saddles finally reside when intonating a guitar or bass. Sure, you can expect a familiar pattern where they line up physically, but it's not a problem if they walk a little forward or backwards. As long as the open string, fretted 12th fret and harmonic at the 12th fret all hit the same note you're good for a basic intonation. Trust your tuner\scope, not your eyes on this one. It's possible your strings suck. You may find that different brands or gauges of strings will move the saddles a little when setting them up for the first time. Swapping a bridge from one guitar to another will usually cause you to have to re-adjust saddles in a set up. All normal. If you set the intonation and tune it up, but it just randomly starts walking out of tune, or just sounds "dead", then yeah, I'd try new strings, too. If it stays in tune and the intonation stays, they should be good...changing them would merely be a matter of taste to your ears. If those strings are new, don't forget to re-check your intonation before the show. Don't ask me why I know that... HTC1
The super-vee bladerunner is good, but IMHO overwngineered and expensive for what it offers (in the old sunburst brown strat I prefered a 6-string black one I had since ages ago). Also the spacing on the super-vee is not american. rather falls on the 10.5mm string-string spacing, as opposed to 10.8mm (floyd) or 11.2mm (vintage). This trem hasn't got extreme usage, sweat, or anything heavy duty, still it has shown signs of corrosion. It stays in tune as long as the situation at the nut is perfect. Can do semi-floating as well, which normal vintage 6-screws trem won't. Overall good I think.
|
|
|
|
Post by pyrroz on Dec 5, 2022 0:48:19 GMT -5
Hi All, I brought the guitar to the rehearsal last night. It was not a good experience, the bridge pup, Seymour Duncan Livewire Metal was a beast, unable to tame and the sound sucked. At some point I went to the spot where the singers were and what I heard was aweful. The recording guy said this sound is inappropriate for a show.. umh.. he made me look like a noob, he would not understand the fact that the bridge pup was a monster pup in a guitar being tested for the first time. So, I will swap pickguards, I have the EMG 85 / EMG 81 ready, and maybe use the guitar for the show. If not, I will use the usual Carvin or Aria (other strat). |
|


 If you don't have time to do it right, when are you going to have time to do it twice?


