|
|
Post by cynical1 on Jun 2, 2011 10:43:30 GMT -5
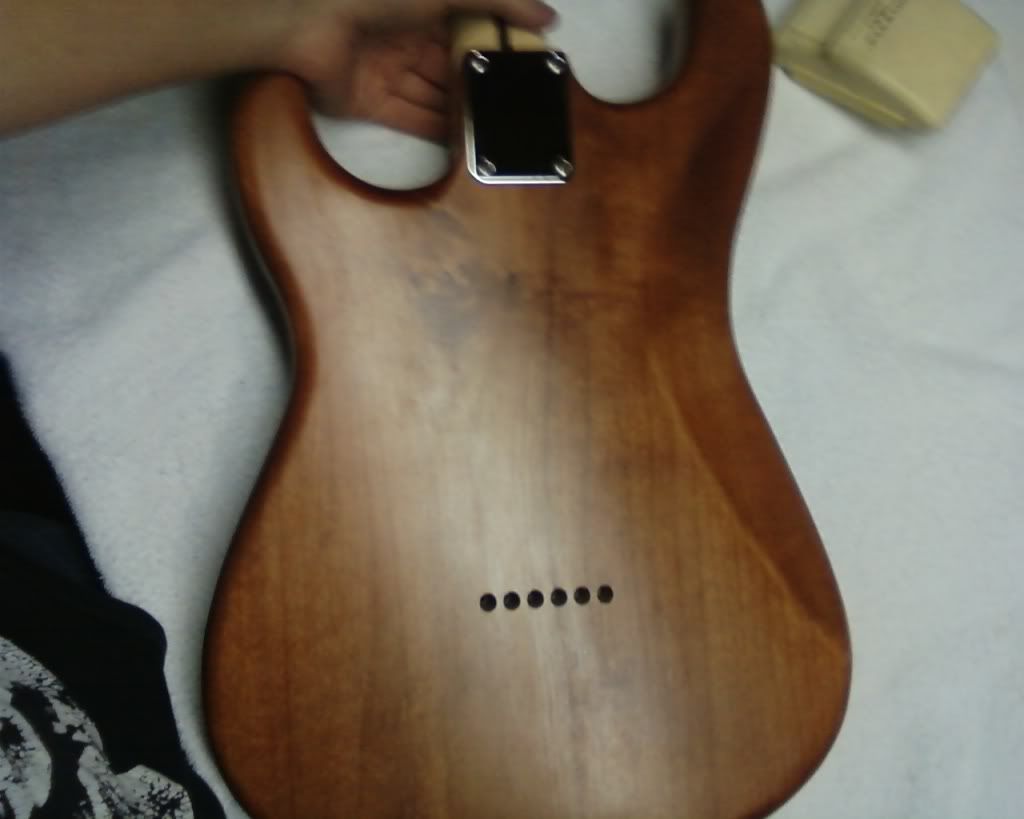
Well, the veneer guitar was really just an experiment...okay, an inspired altered state moment. What really inspired it was an old book press I'd picked up at an auction for around $20.00. I bought it to make veneer pickguards, but since we had all the veneer laying around we just did it. In case you've never seen a 3 Stooges movie, this is a book press: 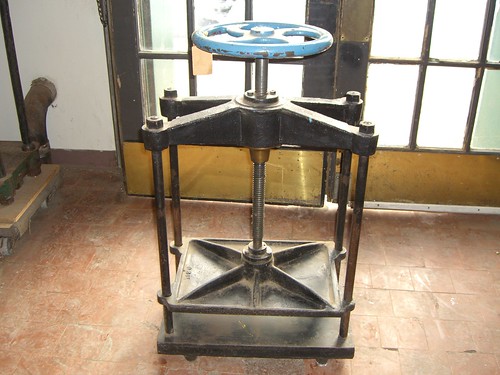 The one I had was 18" square and weighed a ton. I welded a 3" channel frame stand to bolt it to. It took 3 of us to move it...but I digress... The process was very simple. Lay down wax paper, brush yellow wood glue on veneer sheet and lay in press. Repeat about 30 times and crank the press down. It does make a helluva mess when you apply the pressure. We left it in all night and let it sit around the shop for about a week. I remember it being heavy, but once we cut it down and routed it out it wasn't too bad. I was concerned it wouldn't hold the neck without breaking, but it held together just fine. We painted it, put it all together and it worked just fine. The thing that impressed me the most was how well it held a note. Keep in mind that we purchased the veneer for cheap. Trying this with new cabinet grade veneer would cost you more then a single piece of wood. One thing you can do with a plywood guitar body is to treat it with a wood hardener. Like this, available in just about every home improvement store in the country:  To do it right you really should pressurize the vessel you put the piece of wood in, but letting it soak overnight in a covered container works. It has to be air tight or it'll dry up before it penetrates...and don't use plastic as it will melt plastic. Trust me. You can also brush it on until it just stops penetrating. It's especially good for the sides as it seal the plys very well and makes them seamless when painted. This stuff essentially plasticizes the wood, but Fender's been doing that for over 40 years, so don't let it bother you... All in all it was an amusing distraction, but you'll never get rich making veneer plywood guitars... But they are great fun for tormenting tone Nazi's with... Happy Trails Cynical One |
|
|
|
Post by sbgodofmetal on Jun 2, 2011 12:27:02 GMT -5
That answered a few questions l hadn't even posted yet. Thanks C1. l grew up watching the stooges, between my grandparents and my stepdad it was on as often as possible. The veneer l was looking at was $9.97 per set at LMI. lt may be 2nd grade but for the project i'm not that concerned about its grade.
|
|
|
|
Post by sbgodofmetal on Jun 2, 2011 13:05:26 GMT -5
So going either the plywood or veneer route, is there any specific type and or brand of wood glue you'd recommend using that l can get from a local hardware/home inprovement store???
|
|
|
|
Post by newey on Jun 2, 2011 13:12:01 GMT -5
A few years ago, Martyb1 over on the TDPRI forums detailed his build of his OSB Telecaster. The tonewood snobs still haven't recovered from it . . . Apparently, that particular combination of sawdust, formaldehyde and wood glue has killer tonal charateristics. 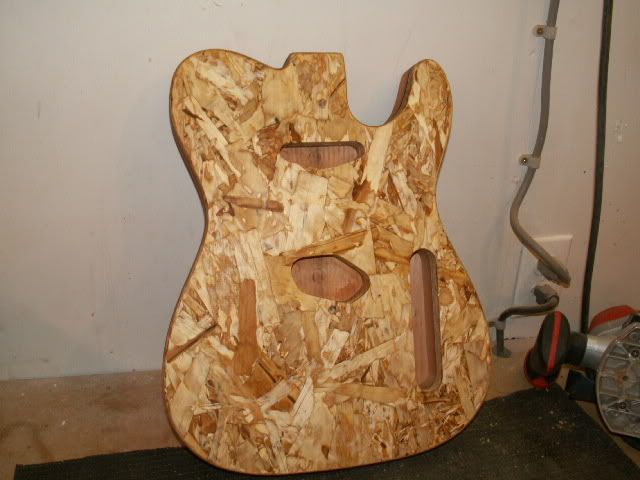 |
|
|
|
Post by ijustwannastrat on Jun 2, 2011 13:30:19 GMT -5
OSB on top of Alder? Oh, after reading it's Fir.
I am not sure if I want to bite the bait, open this can of worms, spring the trap, .....
hmmm, I know some guys claim that you need excellent tonewood for everything EXCEPT the cap. So they obviously saw this and had to come up with a good exception.
Kudos to the guy for doing it. Not my kind of look, but meh.
+1 for finding it!
|
|
|
|
Post by sbgodofmetal on Jun 2, 2011 22:33:22 GMT -5
+1 for making me wish l had a pickup truck. Since the tornado's of april 29th ripped through alabama you see that stuff everywhere being discarded and just plain ol' dumped on the road side. A potential tonal gold mine if it hasn't been rained on yet.
|
|
|
|
Post by sbgodofmetal on Jun 3, 2011 0:50:59 GMT -5
just found out today there's a new hardwood dealer moving into my area. Apparently they're huge contributors to the alabama G.E.D. program and that little tid bit of info was relayed to me at my girlfriends graduation this evening.
|
|
|
|
Post by sbgodofmetal on Jun 3, 2011 1:09:24 GMT -5
Thought this was too good to not share, www.builditsolar.com/Projects/WoodDrying/wood_kiln.htmand l could possibly get away with building small scale for drying precut body blanks and assorted other pieces too. Pefect way to save money as well cause gas/electric can get expencive but this way neither of those two bills will skyrocket. which will make the misses happy, she already claims its making her crazy. |
|
|
|
Post by sbgodofmetal on Jun 3, 2011 12:54:56 GMT -5
Here's an idea, take 2 pieces of 1/4" pine plywood, several pieces of 6mm veneer, 1/2" partical board, and some luan. Glue it all together with the partical board on top, cut and route a guitar out of it. As for the neck use everyone unfavorite puke wood 'POPLAR' ;D, And a birch fret board. l shall call it the "TONE NAZI REPELLER" and i'll air brush a swastika made up of 1/4 notes and have a big red circle around it with a slash running across it, then soak the body in wood hardener then clear coat it. ;D
|
|
|
|
Post by cynical1 on Jun 3, 2011 14:06:47 GMT -5
Well, that would be one unique instrument. I wouldn't count on poplar holding up as a neck wood. It's great for bodies, but a bit too flexible for neck construction.
And why not do an oak fretboard. Use quartersawn white oak and only a handful of people will be able to tell what it is... Wood dye the oak fingerboard a reddish orange and tell them it's quilted bloodwood...
And you really have to paint a guitar like that to pull one over on people. Once they see what it is then their ears will magically be able to tell right away what it is...but if it's painted, you can tell them anything and watch them expound on the benefits of what tonewood they think it is...
I can still see the stupefied "deer in the headlights" looks from people once we pulled the neck and showed them the 30+ plys of hickory...
HTC1
|
|
|
|
Post by sbgodofmetal on Jun 3, 2011 15:02:25 GMT -5
Such wisdom! Does oak really have a quilted look when stained or dyed???
|
|
|
|
Post by cynical1 on Jun 3, 2011 18:39:13 GMT -5
Does oak really have a quilted look when stained or dyed??? Got another one... HTC1 |
|
|
|
Post by JFrankParnell on Jun 3, 2011 18:49:34 GMT -5
sumgai's the expert on the quilted look...
|
|
|
|
Post by sbgodofmetal on Jun 3, 2011 18:50:09 GMT -5
HA! HA! But on a serious note, if l went with particle board and made the entire body out of it would it support the neck and hardware bolted to it??? 0r am l better off using a plywood or solid plank wood core???
|
|
|
|
Post by sbgodofmetal on Jun 3, 2011 19:21:26 GMT -5
Also what material could l use to make a mold out of for pouring in a sawdust/wood chip, glue/fornaldahyde mixture of my own. without it drying stuck to the mold??? l'm seeing a usefull way to manage shop waste and excess wood chunk/chips, instead of burning, dumping or throwing it out just run it through a wood chipper ('cept the saw dust obviously) mix it all up pour in mold smooth out the top let dry and have at it again. ;D
|
|
|
|
Post by newey on Jun 3, 2011 19:30:59 GMT -5
Not as simple as "pouring it into a mold", I'm afraid. The stuff is baked under high pressure as I understand it. And the chemicals involved are toxic and require special handling and permitting. Martyb1, from the TDPRI forums, did a second OSG guitar made from a bunch of OSB sheets; he didn't mention any problems with it supporting the neck or bridge. I don't see that as a limitation. Another guy over at TDPRI did a hollow-bodied Tele out of MDF, top and bottom, with pine or fir sides. It came out pretty good IIRC. Tonewoods are for wussies.  |
|
|
|
Post by cynical1 on Jun 3, 2011 19:41:00 GMT -5
I know I've posted this before, but this is what determines the cut of your the lumber:  And for reference, this is quatersawn white oak:  And this is quilted maple:  And just to keep everyone honest, this is bloodwood.  There'll be test Monday... Happy Trails Cynical One |
|
|
|
Post by sbgodofmetal on Jun 3, 2011 20:09:39 GMT -5
Ah l see how that can be mistaken then. And thats some pretty maple. My construction cost's just keep getting lower and lower. l n that thread he did mention a single strip of maple but l never saw where it was put though.
|
|
|
|
Post by sbgodofmetal on Jun 4, 2011 10:03:29 GMT -5
Other than the physical cut of the wood whats the differences in them??? Does the cut determine its strength??? Or is it a preference of grain flow??? Or a bit of both???
|
|
|
|
Post by cynical1 on Jun 4, 2011 10:40:58 GMT -5
Yes, there is a difference in the appearance and the strength of the different cuts from a raw log.
Flat, or plain sawn wood is the cheapest to produce and purchase, as the yield from the log is the greatest. This is the traditional cut you see in most saw mills. Drop the log in the carriers and just make boards... The wide blanks you traditionally buy for a guitar body are usually sawn this way, as you'd need a very large trunk to pull off a 12"-16" width otherwise. Flat sawn will also produce the widest variance in grain patterns.
Rift sawing is similar to quarter sawn but the angle of attack is different. I don't recall the exact angle, but the intent is to achieve the straightest grain possible from the raw timber. This will be stronger then flat sawn due to a higher dimensional stability in the grain. Due to the waste and additional labor involved rift sawn will cost more then flat sawn.
Quarter sawn is just what it looks like. You quarter the log and then go perpendicular to the rings. This will produce the strongest boards from the logs, but they will only be half the diameter at best, with everything else being smaller going out. It is generally a straighter grain with the rings appearing less noticeable. Some species, oak in particular, will also yield small flecks. It is also less likely to warp or twist on you. It is also more expensive then flat sawn.
Quarter sawn is most desirable for neck construction. You can best get away with a one piece neck with quarter sawn...and you can take a two or three piece quarter sawn neck to a riot during the day and still be able to play on it that night...
That's a Cliff's Notes version. A little time on Google should give you more insight, but I've got to go feed horses, so you're on your own.
Happy Trails
Cynical One
|
|
|
|
Post by sbgodofmetal on Jun 4, 2011 11:12:27 GMT -5
Thanks for clearing that up. l've pretty much got a general understanding of it now. A bit off topic but what kind of horses you got??? OK back on topic, building a layered plywood body is there a way l can get a laquer/varnish type finish without the ply layers showing through??? l'd rather not do a burst. What l want a dark walnut satin finish over birch, what i'd be using is brush on minwax l found at walmart, can it be done without the ply's showing
|
|
|
|
Post by cynical1 on Jun 4, 2011 11:37:35 GMT -5
A bit off topic but what kind of horses you got??? 6 Paso Fino's and one rehab quarter horse...long story on the quarter horse... I can see you're leaning towards the plywood body. I have nothing against experimentation, but if you're planning on using construction grade plywood I would first try and talk you out of it. Construction grade plywood generally routes for crap. It will chip, pull gaps and holes...and there isn't much you can do about it. Sure, you can go back with epoxy wood filler, but why set yourself up for hours of sanding when you don't have to. The few bucks you save going in will more then be made up by the sweat and labor down the road. It also doesn't take screws as well as a solid piece of wood. And if you're thinking of doing the 30+ pieces of veneer trick, keep in mind that by the time you buy all the veneer and the press you could have had a pre-routed mahogany body and walked away with enough money to buy a neck...with frets and a nut... This was a stunt, and I can't recommend it to anyone that doesn't have: A.) A good press or serious assortment of clamps to apply enough pressure to bond the veneer firmly. We used the book press and about 15-20 c-clamps to get enough pressure to feel good that it'd hold. B.) An abundant supply of veneer just laying around... But hey, it's your sawdust pile... And you bring up another good issue with plywood. The end grain. Because you have no idea what's in there, or how the bonding agent will take your stain, it's a real crapshoot staining plywood ends. This is why cabinet builders put a molding strip at the end grain of veneered plywood. On a plywood guitar you're really stuck painting the sides. Wood filler, wood hardener, primer and paint. That's about the only way to cover the plys smoothly. And it's going to take the first few coats of color unevenly as well. A trick I picked up along the way was to shoot a few coats of clear over the plywood, then color. It's more work, but in the end it makes for a smoother sides and it'll take the color better. HTC1 |
|
|
|
Post by sbgodofmetal on Jun 4, 2011 12:25:26 GMT -5
Ok l can understand that but with my mind frame and attenion to detail l had planned on dremeling starter lines to compensate for the pulling, chipping, & other assorted nastyness. But hey thats me, l try to be as proactive as possible. l've got a creative way of thinking and concider these types of difficulties as hurdles mean't to be jumped over. (OT) I've always liked clydesdales, ever since l first saw those beer comercials as a child. ls there a color you could recommend to match the walnut, a.c.a.p.?
|
|
|
|
Post by sbgodofmetal on Jun 4, 2011 12:42:30 GMT -5
Ran out of space again a.c.a.p.=as close as possible. l was thinking of the premium stuff thats about $30-$40 here. l'll most likely blacken the edges if i can't find a color to match it. As far as any solidwood all l can find locally that is thick enough is pine 2x4s or 2x6s that are almost always low grade and treated wood. lf it wasn't treated i'd concider it.
|
|
|
|
Post by sbgodofmetal on Jun 4, 2011 12:53:40 GMT -5
l could go to lowes in either muscle shoals or cullman alabama, and get a 2''x1'x10' pine board but with no truck l couldn't bring it home. Unless they'll precut it on request, i'll try to call this evening and find out for sure though.
|
|
|
|
Post by cynical1 on Jun 4, 2011 15:10:35 GMT -5
If you're going to Lowes, why not pick up the precut boards. Last time I was there they had oak, poplar and pine planed 1" thick and anywhere from 2" out to 6". They even had some 3/4" thick boards, too. The lengths are only 2'-4', so unless you heading out on a moped they'll fit in any vehicle.
You'll have to get some long pipe or bar clamps to glue the pieces together to make your width, but that's a no brainer...and a lot quicker then screwing with the ends on the plywood...
These woods, with a pre-stain, will also take your walnut stain much better. You'll need some grain filler on the ends before you shoot the clear if you use oak, but for a top it would be interesting.
You can even get adventurous and route chambers in the top and bottom.
Getting back to the plywood thing... It is general practice to bandsaw, or CNC if you've got the spare 20K laying around, your body blank. Plywood takes a special tooth on the blade to reduce chipping.
Once the blank is cut to size you use a drum sander to clean up the lines.
Once the body is where you want it you'll use a radius router bit to put the radius on the body. If you're binding it, then it's another jig or fixture to route that.
The neck pocket and cavity routings are best done from a template.
Nowhere in this list of processes will a Dremel tool make the job cleaner or easier. Show me a man who says he can route a straight line with a Dremel tool and I'll show you a man who'll lie about other things, too... And the plywood is going to have a field day on your Dremel bits. The glue/bonding agent used tends to be hard and when it melts from the heat of the bit smokes like crazy.
Long and short of it, while the plywood may look like the cheapest and easiest way to go, it ain't. You go this route, remember, I warned you.
HTC1
|
|
|
|
Post by sbgodofmetal on Jun 4, 2011 15:12:34 GMT -5
ls there any specific router that you'd recommend for a beginner???
|
|
|
|
Post by cynical1 on Jun 4, 2011 16:13:38 GMT -5
As far as brands, you're gonna be limited to what the store you can get to has in stock.
Bosch, DeWalt or Porter Cable are about the most common one. And for the most part they're good tools, if you buy far enough up into their line. By this, I mean count on spending $150.00-$200.00, or stay home. Most of the $99.00 and below stuff is garbage, unless you're buying a small palm\laminate router. Triton makes a real nice one, but that'll set you back over $400.00...
I've got a fixed base Mikita router that I've had for over 25 years and it still works like a charm...and that set me back a couple hundred back in the mid 80's.
A plunge router is nice, but as long as you have enough material cleared away with your forstner bit, a fixed base is fine.
For a guitar, top bearing router bits are a must. They're not cheap ($15.00-$35.00\e) and most home improvement stores will not stock them. 3/8", 1/2" and 1" diameter bits should cover most things you've got to do in a guitar. Stew-Mac carries them, but you can do better going to an on-line tool store.
And this is just the tip of the iceberg when it comes to tools. In order to have the arsenal of tools necessary to build a guitar or bass, and not fight yourself in the process, is anywhere between $2,500.00 and $5,000.00.
Can you do it for less? Sure. Will the results be the same. No. Just buy a lot of wood filler...
This is why I started to lean towards guitar salvage or rescue. Most of the big stuff is done, and I can buy out whatever else I need. Just the fretting and nut tools alone can run over $300.00, so why not just buy a neck for $150.00 and just dress the frets...
Building guitars can be fun, with the right tools. I loved hanging around at S.D. Curlee back in the day. But I can't recommend it to anyone who isn't committed to learning, and failing and reinvesting constantly.
There is no paint by numbers for this. And it ain't a cheap hobby to acquire. I built guitars for years, but sold everyone of them. I had to in order to cover the cost of the tools, materials and supplies.
You might want to spend a few months making a list of all the tools you need, processes employed and accepted practices before you start this project. I can't teach you this on an Internet forum. No one can. I'm not going to give you a list or step by step guide, either. The ghost of ChrisK rises a bit here... It's time for you to start doing some research on your own.
I'll help you along the way, but I spent 30 years learning this stuff. You need to start digging your own hole now, grasshopper.
HTC1
|
|
|
|
Post by sumgai on Jun 4, 2011 16:23:29 GMT -5
[glow=red,2,300]Holes Dug,[/glow]
[glow=red,2,300]While You Wait![/glow]
Lessee, in Internet time, that oughtta be about 15 minutes.......
|
|
|
|
Post by sbgodofmetal on Jun 4, 2011 16:31:28 GMT -5
l've been digging into tools, parts, electronics, trying to find affordable alternative's to as much as possible without landing in the ER or worse, but google can't give me everything. l've found very little useful info from google, and some times its best to ask one who's had experience on things. l don't expect 'ANYONE' to just flatout teach me on a forum. l know a good bit on what it takes and the cost thereafter, but l'm far from knowing everything. l had very much intended on starting my own shop.
|
|