dazzerr
Rookie Solder Flinger

Posts: 21
Likes: 0
|
Post by dazzerr on Jun 21, 2011 14:47:43 GMT -5
Hey guys,Ok So currently My Ibanez is wired up as so..HSH:- Neck is via a on/off/on miniswitch which does Parallel/Single (N)/Series
- Bridge is wired up standard Series via no switches
- Middle is wired up standard Series via no switches
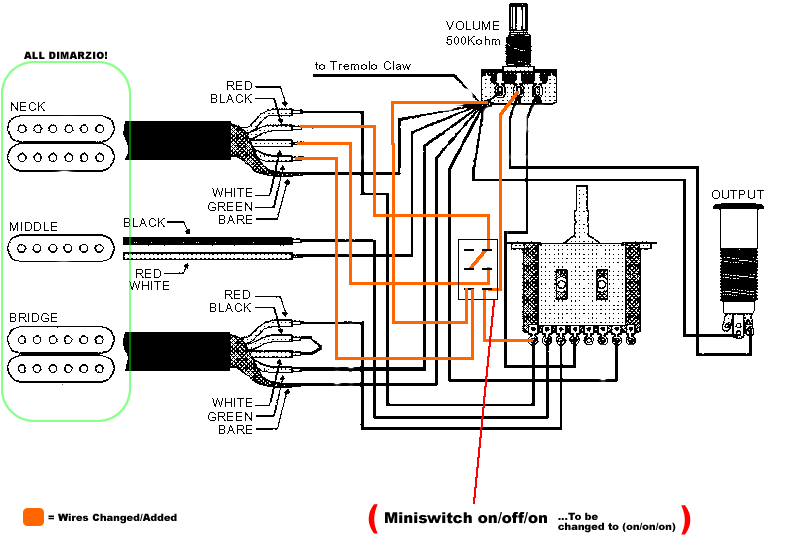
I only recently Input the miniswitch to expand on my tonal range of course, and I plan on putting more in in future when I broaden my understanding more first. To Achieve the Switch Mod on the Neck I simply copied from this diagram: Click here!  SO, MY PROBLEM... SO, MY PROBLEM...Okay, just to clarify. I realise the switch I have used is an on/off/on switch, so for a start, the Single (N) part of the circuit I expect will not work properly, as I have tested already. My Problem is with regards to a couple of things. I will try my best to explain...
Issue 1.The volume Knob acts quite like the tone knob. Note, I do not have a tone knob in my circuit, that was removed appropriately. When I adjust the volume, the lower i adjust it, the muddier the sound gets. It does not adjust the volume from what i can hear, but it only gets rid of the high end UNTIL I get to "1" (of 10) and just as i drop below 1, the volume simply cuts off to nothing... Thats not volume, thats like a Killswitch/Tone knob in one!  This does apply to every switch position/pickup... EXCEPT the "Single (N)" position on the neck, which is currently bypassed as it is "Off" (As the switch is on/off/on). The Single position works like the volume knob should!  There are no Capacitors in the circuit. Can anyone help with what the problem could be/how to solve it? Issue 2.Even though the Bridge pickup is not wired in the miniswitch circuit mod, It is still effected by the switch, even when in bridge position (Neck not active). The effecting is that, on all the "On" positions of the miniswitch, the Bridge pickup appears weaker than it should be. When the miniswitch is in its "Off" position, the Bridge works perfect in tone! :S Can anyone help with what the problem could be/how to solve it?
Okay so they are my problems, Sorry its long winded but i have tried to explain my issues as detailed as possible. A couple of notes on my wiring with regards to the original diagram I shown at the beginning of this thread: I thought I done this correct but there must be a mistake somewhere :S All the wiring is straight forward although, where the diagram refers to the "North Start" (RED WIRE which is currently connected to the 5 way switch by default in the neck position) connecting to the bottom right pin of the miniswitch, I have got a wire and wired directly from the pin on the 5 way switch, to the pin required on the miniswitch. Im not entirely sure if this is correct but I'd imagine so seeing as of course I want my 5 way switch to work as it should, only with the choice of this miniswitch too... I hope this makes sense! And I Thank you very much for your time in reading. If anyone could help or make any suggestions I would greatly appreciate it!  Thankyou, Darryl PS - I will be changing the miniswitch to on/on/on when I get hold of one! Of course... haha. Also, I dont want a tone knob anywhere in my circuit. That is why I dont have one. MY VOLUME KNOB IS WHERE MY TONE IS, SO I NEED IT TO WORK PROPERLY ASAP 
|
|
|
|
Post by roadtonever on Jun 21, 2011 16:10:57 GMT -5
The rapid drop in volume around 0 is common in asian in audio taper (A500K)pots and made in asia. To retain treble as you turn down the volume treble-bleed mod is used and this is the place which the most comprehensive discussion on that subject! Also there an effect a tone knob has when at 10 that make the high-end falloff less steep. This can be re-created by adding a 500k(or 1M if youre paranoid) resistor between the negative (-) wire of the pickup and the negative lug on the output jack. Lastly watch out for varying pickup wire colors if you happen to be following a diagram from a different maker than the pickups you own. Here's a good reference: guitarnuts2.proboards.com/index.cgi?board=reference&action=display&thread=3190 |
|
dazzerr
Rookie Solder Flinger
Posts: 21
Likes: 0
|
Post by dazzerr on Jun 21, 2011 17:01:55 GMT -5
Thank you for your reply. Very handy link you have supplied me there, although I am very aware of the different colour codes etc. From what I read, I think you have defined the Issue 1 problem being that the pot is simply "asian in audio taper (A500K)pots and made in asia". Makes sense, I know its nothing elaborate. So your saying the solution would be to have the treble-bleed mod in place? This would be handy and maybe what i need also, but this will retain the treble which is great, but im still lacking the whole point of the volume pot right? By this i mean, most importantly I want to be able to adjust the volume steadily/Gradually, and not have it dip so soon around 0-1  Any suggestions for this? Thankyou for your time |
|
|
|
Post by newey on Jun 21, 2011 18:31:35 GMT -5
As to problem #2: This has my head swimming. Please post a diagram of how you have this wired now, that may save a lot of head-scratching.  As to problem #1, the value and taper of the pot may be a part of the problem- but we haven't yet defined what you have now. Do you have a multimeter to check the value of the pot and to check that it is operating properly? Are any of the electronics active? Or, perhaps, were they in the past? |
|
|
|
Post by asmith on Jun 21, 2011 18:53:23 GMT -5
Problem #1 sounds like your volume control is wired wrongly. If the control works properly in one position, then we know it shouldn't be the potentiometer. It sounds as though the potentiometer is wired currently like a rheostat to ground in certain configurations, and only two lugs are in use. This would produce your results - the symptoms fit. A correctly wired volume control uses all three lugs of the potentiometer in every configuration. At the moment it sounds like your control is wired like a "tone control without the capacitor." For now, take two beers a day and plenty of rest. Surgery will commence as soon as we finalise the diagnosis of the problem. I'm with Newey on the diagram. Even if it's in MS Paint. We have a great thread on posting images. This will save tons of time. Get on it, STAT! |
|
|
|
Post by ashcatlt on Jun 21, 2011 19:04:15 GMT -5
Problem #1 sounds to me very much like the symptoms of a Tone control whose cap has been shorted. Leads me to some conclusion re: the fix, but as newey said we just need more.
A careful drawing of the whole scheme as wired now, or some good focused photos of the wiring will help. Also, got a meter?
|
|
dazzerr
Rookie Solder Flinger
Posts: 21
Likes: 0
|
Post by dazzerr on Jun 22, 2011 1:42:26 GMT -5
Thank you very much for your replies! asmith is right, The potentiometer does work in one position, therefore the wiring must be of flaw in the other positions. I would also much agree, A Diagram will make things a whole lot easier. I will get to it today and post for you later. Thanks again |
|
dazzerr
Rookie Solder Flinger
Posts: 21
Likes: 0
|
Post by dazzerr on Jun 23, 2011 3:00:48 GMT -5
|
|
|
|
Post by newey on Jun 23, 2011 5:54:14 GMT -5
dazzerr-
OK, I see a problem. It may not be the only problem, I haven't had a chance to check the entire diagram thoroughly. But there is a problem with the wiring of your volume pot and the mini-switch.
The basic idea of this mini switch is that it is a module that interposes between your neck pickup and either the volume pot (if there's no other pickup selector switch) or the pickup selector (if there is one). Your mini switch is wired to both the volume pot and the pickup selector.
Look at the diagram you're working from (from Guitar Electronics). Look at the lower right-hand lug of the switch as shown in the diagram. The diagram shows the neck pickup "hot" connected there. It is then to be connected to either the volume pot, if that's next in line, or to the pickup selector switch if that's next- but not to both.
You have the neck pickup connected to the pickup switch first, then to the miniswitch, then to the volume pot.
To fix this, wire the neck hot to the switch, as shown by Guitar Electronics. The right lower lug is then connected to lug #1 of the 5-way (where the neck hot goes at present). Remove the wire from the lower right lug to the volume pot.
I note that you also have a superfluous wire from the second pole of the 5-way to the grounding point on the volume pot. This is the black wire furthest to the left on the 5-way, as shown on your diagram. It isn't connected to anything on the switch because the second pole of the switch isn't being used- the common lug isn't connected to anything on that pole.
So, as shown in your diagram, that wire isn't doing anything as it's not connected to anything at the switch end. However, I point this out because, although your diagram shows the 2 common lugs on your 5-way as being disconnected, those commons are often connected by a tiny bare-wire jumper at the factory. The common are the 2 center lugs on the five way; one of yours is properly connected to the volume pot "hot", the other should be disconnected.
If there is, in fact, a jumper between the 2 poles, then that extra wire could be causing you to have volume control issues (in switch positions 2,3,and 4 anyway).
So, remove that wire while you're in there just to be on the safe side. If it's not messing you up, then it's doing nothing anyway and is superfluous.
Again, there may be more issues here, those are what I saw at first glance.
|
|
dazzerr
Rookie Solder Flinger
Posts: 21
Likes: 0
|
Post by dazzerr on Jun 23, 2011 7:46:32 GMT -5
Thank you very much for your assistance newey! Now you mention it, looking back at what I've done that is quite a silly mistake I have done there with regards to connecting the miniswitch to both the selector and pot Nevertheless, thankyou for pointing this out! I will remove the 2 wires you have pointed out and update the diagram to make it clear what is left
EDITnewey, I did exactly as you said and everything works fine now! The volume works as normal, the pickups work as normal... Everything works fine! Thank you all very much for your assistance! And you newey for seeing my problem
~PROBLEM SOLVED~
Whilst im going through this, I have succesfully completed this Mod, I was much considering doing something similar to my Bridge... BUT, Im not entirely sure what to do with it. I dont see much use in it being Coil tapped, or parallel really? Would anyone suggest anything? If theres nothing anyone could suggest for my Bridge Pickup (Dimarzio Tone Zone), are there any more mods which can be done to my guitar to increase my tonal range? Would anyone actually suggest doing exactly the same Mod on my bridge pickup?Any suggestions are much apreciated Thanks again! |
|
|
|
Post by asmith on Jun 23, 2011 10:03:16 GMT -5
Depends how far you're willing to go to mod the appearance. Some mods take a simple switch, some take up two push/pull pots all to themselves.
|
|
dazzerr
Rookie Solder Flinger
Posts: 21
Likes: 0
|
Post by dazzerr on Jun 23, 2011 10:23:47 GMT -5
I do care about the appearance but, judge from this picture: 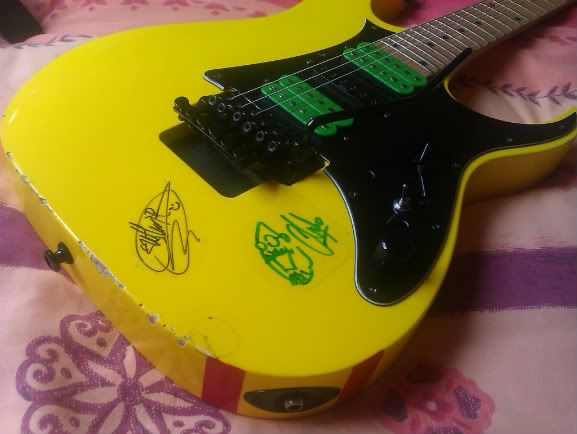 I care, but i like it "Tatty" I guess...  I want more mods! ;D Just need suggestions now As you can see I have at least one hole in my scratchplate waiting for a Mod ;D |
|
|
|
Post by asmith on Jun 23, 2011 11:03:34 GMT -5
Sounds like the perfect place for a push pull pot. Some suggestions: You haven't got a phase switch in there yet, and I just posted a variable half-to-full phase switch. Or blower/"solo" switch that bypasses the volume control. Or a variable coil tap / intra-coil tone control - a potentiometer that, depending on the status of the switch attached to it, acts as either a tone control or a volume control for just one coil of the humbucker. Just my suggestions. Others will have others. |
|
dazzerr
Rookie Solder Flinger
Posts: 21
Likes: 0
|
Post by dazzerr on Jun 23, 2011 11:27:41 GMT -5
sounds interesting asmith! Exactly what Im looking for, Some interesting things to play with. I dont quite feel the need for a blower switch at all, or the variable coil tap (unless you can convince me otherwise ). Im not sure that this would benefit me at all... Although the Phase switch sounds interesting! Could you elaborate upon what the phase switch would do for me? Also, has anyone else got any interesting suggestions? |
|
|
|
Post by asmith on Jun 23, 2011 11:41:15 GMT -5
|
|
dazzerr
Rookie Solder Flinger
Posts: 21
Likes: 0
|
Post by dazzerr on Jun 23, 2011 11:54:53 GMT -5
Ahh interesting. Perhaps something i might consider Thankyou for your explanation. I will revise into this more and I could potentially incorporate this somehow. Any other wise ideas? Does anyone think it would be a good idea to simply coil tap or parallel (Or both) on the bridge? Im not suggesting this only, please be creative. I like creativity Jacks Guitar here: Looks very interesting! Anyone any ideas on what mods he has built in that thing |
|
|
|
Post by thetragichero on Jun 23, 2011 13:51:26 GMT -5
i think i almost PREFER a humbucker in parallel, but i'm an SSS stratoholic so i'm probably biased |
|
|
|
Post by Yew on Jun 23, 2011 13:58:14 GMT -5
If you are using a push pull for a variable coil tap, I have a variable broadbucker/coil tap schematic somwhere. It couble probably do any two of the variable ideas you choose
|
|
dazzerr
Rookie Solder Flinger
Posts: 21
Likes: 0
|
Post by dazzerr on Jun 23, 2011 14:26:29 GMT -5
I very doubt I would be using any push/pull knobs to be honest  Thanks |
|
|
|
Post by asmith on Jun 27, 2011 5:08:09 GMT -5
It's almost as if the idea of not using a P/P Pot killed the brainstorm. You could use an Multi-Pole, Multi-Throw rotary switch in there, to select a whole array of crazy schemes. Or a single On/Off/On switch can give you a lot more options out of your standard tone control. Two simple ideas using two simple components. What would you like to see fill the hole (said the actress to the bishop)? Then we'll work in regards to that. |
|
dazzerr
Rookie Solder Flinger
Posts: 21
Likes: 0
|
Post by dazzerr on Jun 27, 2011 8:58:55 GMT -5
The Rotary switch sounds interesting...
I do not have a tone control either.
|
|
|
|
Post by asmith on Jun 27, 2011 13:36:28 GMT -5
Try this thread on for size. It might give you an aneurysm if you're not careful about it. It's a design for a Humbucker and two Single Coils, but it might as well be for two Humbuckers. Let us know what you think.
|
|
dazzerr
Rookie Solder Flinger
Posts: 21
Likes: 0
|
Post by dazzerr on Jun 27, 2011 14:06:32 GMT -5
That thread makes my brain sizzle Hehee, well the most interesting thing i got out of that was the picture of the rotary switch... It looks interesting to play with. What mods in particular are these good for? Thanks for your interest & help asmith
|
|
|
|
Post by asmith on Jun 27, 2011 15:05:42 GMT -5
I haven't played with rotary switches myself, so you're hearing second hand news from me. However, what's less important than the form of the switch is the content of it: poles and throws. Poles are the things that move in the switch, for want of a better explanation. However many poles you have is however many things are being switched at one time. Throws are the options that the switch has to land on. A three-throw switch has three options. The most I've played with is Four-Pole, Five-Throw switches. Rotary switches offer a lot more switching options than that, or they can be much simpler. There are some schemes out there, like the infamous Varitone, that are quite simple. Then there's stuff like that thread I posted earlier that aren't. In general, if you're willing to wade knee-deep in them, because of the staggering amount of poles and throws available, rotary switches seem to be very good at offering a ton of combinations from a relatively simple set up. For example, you yourself, with your two humbuckers, have in fact four coils that you can combine with each other in a very large number of different ways; series, parallel, series out of phase, parallel out of phase, in series with a cap, in parallel with a cap, in series with an inductor, the list goes on. I suggest you Google series/parallel wiring, and get a broader feel for what's available in pickup combinations. There should be some Youtube videos out there that adequately demonstrate the different sounds (roughly) available. Don't be afraid to wander around the history of this board as well, there's some great knowledge here in amongst all the fluff. |
|
dazzerr
Rookie Solder Flinger
Posts: 21
Likes: 0
|
Post by dazzerr on Jun 27, 2011 16:05:51 GMT -5
Brilliant I'll take a look around, alot of interesting things i have to learn about. Wiring diagrams are generally easy enough to wire from I feel but combining mods I may have a problem with in future perhaps. If so I will be asking away again Thank you for your detailed explanations and guidance upon what I requested, I much appreciate your help |
|
|
|
Post by newey on Jun 27, 2011 17:01:13 GMT -5
You can think of a rotary switch in the same way as a lever switch. A 4P5T Superswitch is wired the same way as a 4P5T rotary.
|
|
dazzerr
Rookie Solder Flinger
Posts: 21
Likes: 0
|
Post by dazzerr on Jul 8, 2011 11:11:33 GMT -5
Okay so Ive got the correct switch and everything. Everything works great I cant remember exactly but, I am pretty sure my sustain has gone downhill... Could anyone diagnose why? Could it be the quality of solder I used, or Wire? :S Ive been making do with general purpose multiwire and solder I had in my garage. Would anyone recommend actually purchasing more quality materials? If you could please name specifically what you think I need and I will look into buying it I need more sustain xD Thanks |
|
|
|
Post by newey on Jul 8, 2011 14:09:02 GMT -5
I don't know if your perceived loss of sustain is real or just an artifact of memory, but there is certainly nothing in the wires or solder that could be affecting it.
Usually the only thing of an electronic nature that would affect sustain would be a pickup swap. The rest of the sustain equation is mechanical, not electrical- the nut, the strings, the saddles, etc. A biggie is the neck to body connection.
Did you perhaps change strings, remove the neck, or do any other mods while you were doing the wiring?
|
|
|
|
Post by sumgai on Jul 8, 2011 16:45:00 GMT -5
extending newey's pontifications..... He's correct - with the one exception that he mentioned, sustain is a mechanical function, pure and simple. Start at one end of your axe, and check all screws for tightness. Do that for the neck too, even if you didn't remove it - why do only part of the overall job? Be sure there's no foreign material present getting in the way, such as under a bridge plate or under a saddle - either will kill sustain in a hurry. More subtle is the other end of the guitar. Check the nut, not only for unwanted substances in the notches, but to be sure that it hasn't come loose in any way - you don't want to find that it's being held in place merely by string pressure alone. Ditto for the string trees - if you have 'em, check them out too. Finish off by making sure the machine heads themselves are going according to Hoyle. As for solder, Radio Shack carries suitable solder, albeit for a pretty penny. Sears has it too, if you ask for Electrical stuff, and not for Plumbing stuff. Other local stores, ditto. Even Amazon's got it, if you swing that way. An example (but not the only/best possible, just an example): Amazon Solder, reasonably priced. (Smaller quantities available.) If you already have comparable solder, then don't worry about that aspect. HTH sumgai |
|


 This does apply to every switch position/pickup... EXCEPT the "Single (N)" position on the neck, which is currently bypassed as it is "Off" (As the switch is on/off/on). The Single position works like the volume knob should!


 Any suggestions for this?


 I want more mods! ;D Just need suggestions now


 Thanks