|
|
Post by lpf3 on Feb 21, 2012 16:15:04 GMT -5
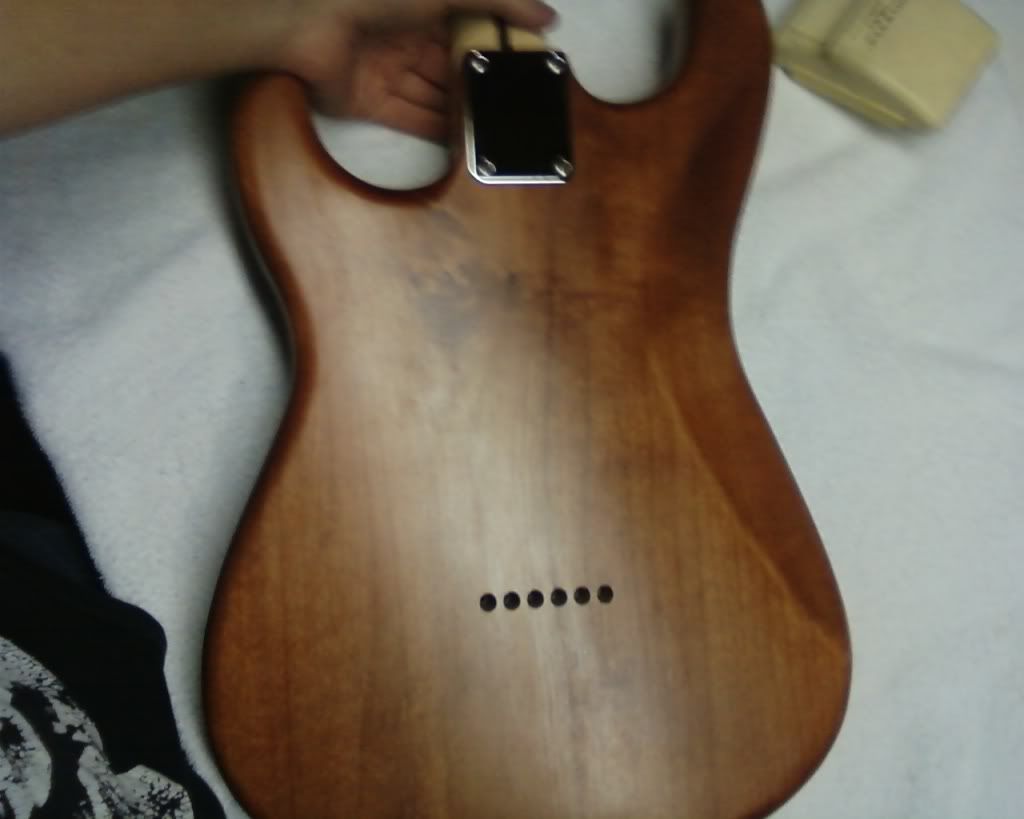
So, I finally finished my first scratch build- it was a joint venture with my son & fellow Nut, Leo. Here's a few shots of the guitar & the build process........  It's a 1- piece Pine body, with a 2- piece Maple neck. I used Ron Kirn's templates that I got off the 'bay, with some minor mods to the neck pocket template. I started with a large plank of 8/4 Pine that yielded 3 body blanks. Using the templates & a flush trim router bit, mounted in the table, we cut the body.   Note the drill bits in the neck pocket template- they're used as indexing pins in the string- thru holes in the body. It's a really cool way to consistently position the neck pocket. Ron Kirn's idea, not mine........ Cool though.   The finish is a story unto itself, but basically is Reranch Mary Kaye White, mixed with clear lacquer & shot on as a toner until I got the desired coverage. Then shot 3 spray cans of Deft Satin Lacquer & let it hang for a month.  The photo doesn't completely do it justice; a bit more grain shows through than the pic shows.......... While that was curing I made the neck. I had to make the templates from scratch, which turned out a little tougher than I expected. I refined them 2 or 3 times and ended up making 3 necks before I had the one I ended up using. Not a total loss though, I was able to use those other necks as an alternative to fossil fuels.......... ;D  Here's the neck shots, the first is a surrogate body that I made in order to properly lay out the location of the tuners.   I made a separate template for a 25" and 25 1/2" scale; this guitar has the 25 1/2".    After routing out the neck blank I made a jig for routing the truss rod channel.   Next, slotting the fingerboard. I cut a 1/4" piece of Maple out of the same board that the neck came from to get a good color match, & used the fret slotting template from Stew- Mac. I made the mitre box ......  Here it is after I glued & clamped the board to the neck.  And the headstock transition is profiled.  Here's a handy little jig I made for locating the position of the side dot fret markers. I used to draw an "X" between the frets to find the center, but I hate doing that and my results weren't always consistent. This jig lets me maintain the same height all the way down the neck; the center of the frets I just eyeball....  I radiused the fingerboard with the 9.5" sanding block from Stew- Mac, then pressed in the frets with their fret press caul in my drill press. I don't have any pics of the fretting process but here's one after they've been installed, but not trimmed yet.......  Pressing the frets in is a great way to do it, but I have to say that I don't look much like Dan Erlewine does in his videos. ;D Maybe with some practice........ One thing I really like about pressing the frets in is it makes leveling go alot easier. I radiused the fingerboard and pressed the frets in with a tool of the same radius- then leveled with the same radius sanding block that I used on the 'board- Certainly went a lot smoother than I expected. And you don't have to remove a lot of material this way so re- crowning goes just as well. Next came the neck carve....... A lot of work I suppose but surprisingly , not as hard as I expected.     I always get a warm feeling when I read those 3 words, "Out For Delivery"  So here's a shot of the parts......  Of course..............  We went with a simple wiring scheme for this one, partly so we would have at least one guitar with the vintage Tele wiring, and partly because Leo doesn't care for the N + B sound and wanted to try something different. Here's the wiring plan-   And this is what we came up with........     Well, thanks for checking out & putting up with such a long post. Hope ya's enjoyed it................ Take Care, -lpf3 |
|
|
|
Post by lpf3 on Feb 21, 2012 16:49:56 GMT -5
I guess I really didn't say much about the specs, but here's what we went with: Lollar Vintage Tele pups with the '52 Tele switching scheme. 1) Neck + cap 2) Neck 3) Bridge Bone nut, 1 11/16" nut width; 25 1/2" scale Kluson tuners Wilkinson bridge w/ compensated saddles, string thru body The tone pot is a Fender no- load 250K, with a .022 tone cap The cap at the neck pup is .047 Here's a shot of the wiring  Topped off with a Fender bakelite pickguard. I'll try to get some sound samples up soon......... lpf3 |
|
|
|
Post by cynical1 on Feb 21, 2012 18:36:58 GMT -5
Considering I'm not the biggest Telecaster fan in the world, I have to save that's a very clean and sweet looking guitar.
And I like the idea of a wider nut...especially with my aging bass player fingers... I also like the headstock design.
The finish came out nice. It can be tricky getting that translucent finish and it looks like you nailed it.
And making a neck from scratch is nowhere near as easy as they make it look on the Net. The templates and fixtures make life much easier. It can take years to build up a good stock of them, but you appear to be on your way.
How does little Leo like it?
And the wire contour tool...man, I haven't seen one of those in ages. You find that in an antique store?
All in all a very solid looking guitar. So...where's the sound samples?
Oh, almost forgot...a solid +1 to you, sir!
Happy Trails
Cynical One
|
|
|
|
Post by newey on Feb 21, 2012 20:49:42 GMT -5
lpf3-
I am a big Tele fan, and that's a beauty for sure. You should repost it for the guys over at TDPRI.
I'll second the +1!
|
|
|
|
Post by 4real on Feb 22, 2012 0:15:13 GMT -5
fANTASTIC AND A GREAT PICTORIAL THERE...oh, caps lock...still worth shouting it out loud...well done!
|
|
|
|
Post by cynical1 on Feb 22, 2012 0:16:13 GMT -5
Pete - I meant to mention this earlier, but I spaced it out...CRS...non-judgmental CRS to be precise... It has to do with your truss rod jig: Anyway, on the truss rod jig...you actually want a radius on the groove for the truss rod. The actual jig itself changes depending on whether you back route the neck with a skunk stripe, or top route it and cover it with the fingerboard. I don't have one to show you anymore, but I dug around Google and found a few images to illustrate the point. This is a good representation of what I'm talking about: 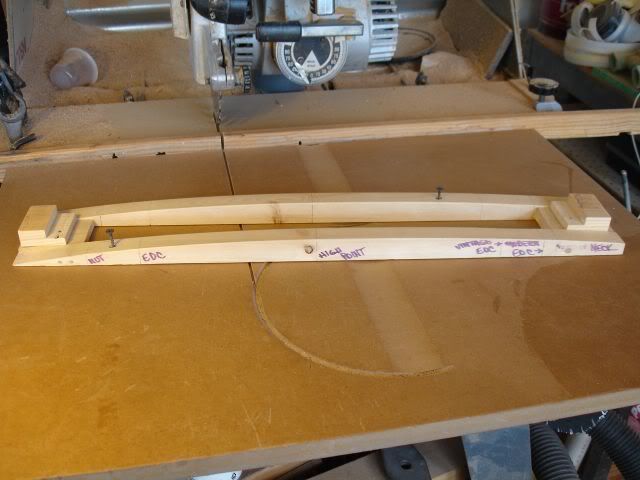 Here's the blueprint from Uncle Leo detailing the radius: 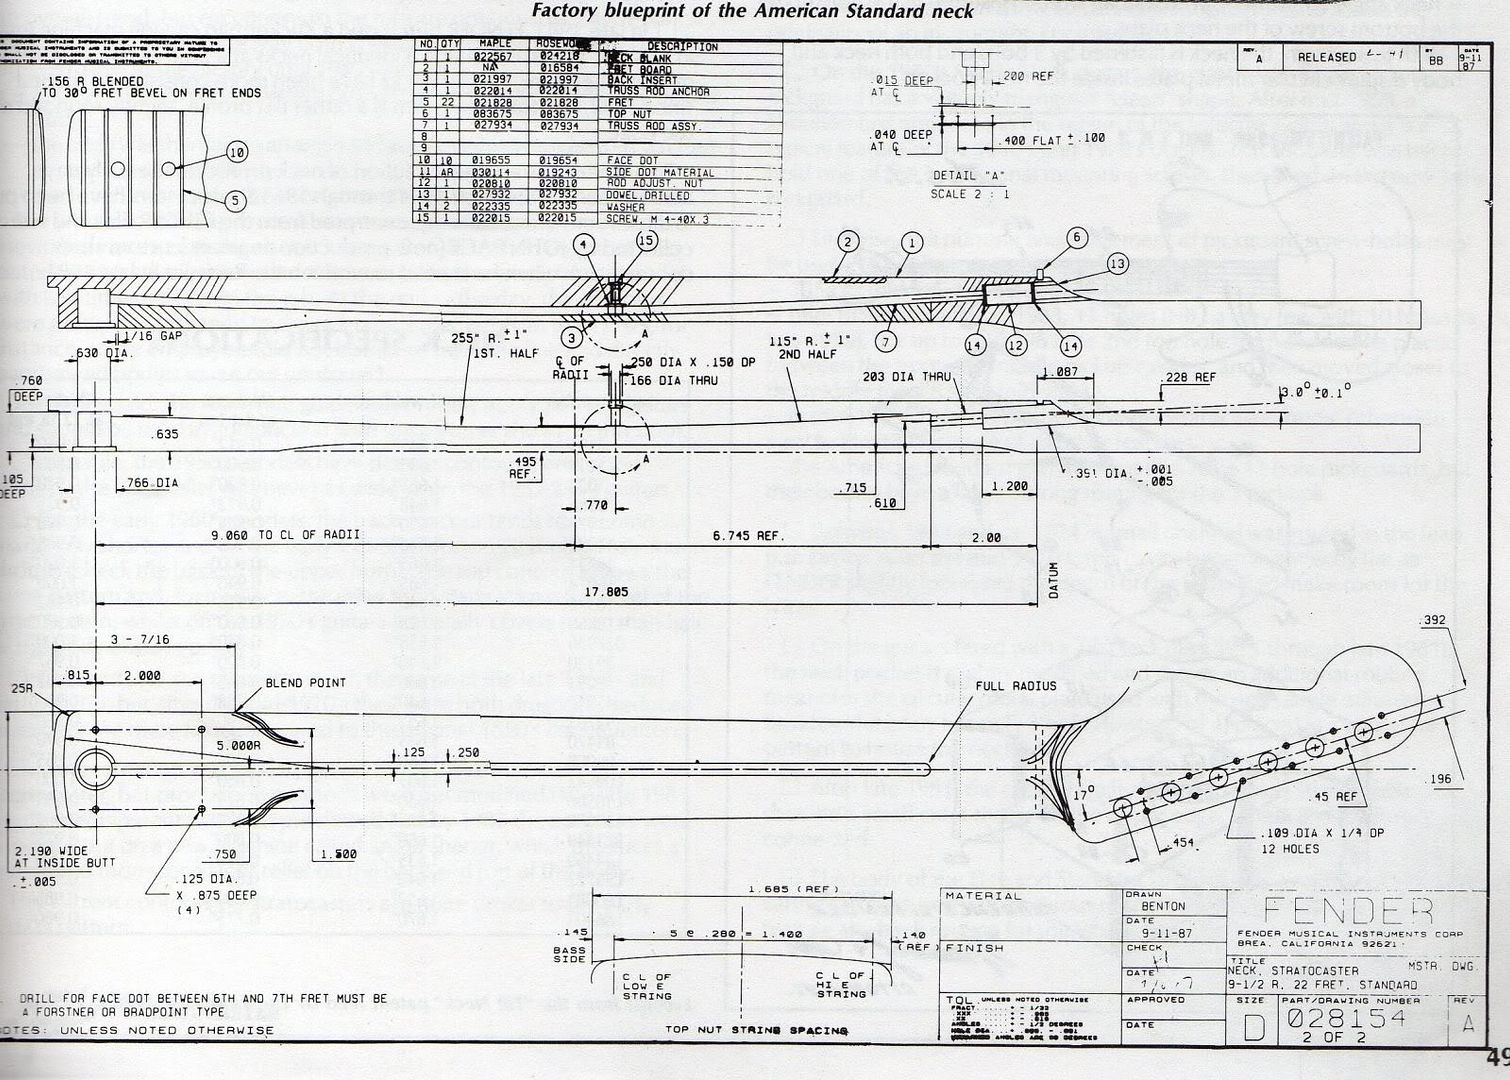 Click on Image for full size Click on Image for full sizeIf you've ever had a truss rod bouncing around inside of the neck at full relief you can bet that as long as the nut isn't sheared it's because of a straight routed truss rod channel. You loose a lot of function in the truss rod without this radius. That's it...and have you got anything in a Jazzmaster in the works? Happy Trails Cynical One |
|
|
|
Post by lpf3 on Feb 22, 2012 12:50:53 GMT -5
Thanks for the nice comments, guys- (and the karmas ). I think I will, I know Ron Kirn is a regular poster over there & he might enjoy seeing work that started with his templates. I struggled with that finish, I wanted to let the grain show but the grain on Pine isn't very prominent once you start putting a color on it. To make it harder, the Reranch colors come in spray cans & it didn't take much to totally obscure the grain. In the end I poked a hole in the spray can (don't try this at home ) and poured the contents into my spray gun cup & mixed in an equal amount of clear. This made it more like a toner & I had a lot more control over the translucency. He hasn't played it yet. He lives in New Joisey. (that's another city for sure ;D ) Yeah, it's unbelievably playable & cleaned up my playing better than years of practice.  Another thing I did that was Leo's idea was the absence of position markers. He likes the clean look & now that I'm used to it, so do I. You don't really need them- I find the side dots to be enough. They still sell 'em at Home Depot for 7 or 8 bucks. As soon as you move back to the world, you'll see..... ;D Thanks again, guys. I had an IT moment with my computer & haven't re- installed all my recording stuff yet, but I'll get some samples up soon....... -lpf3 |
|
|
|
Post by lpf3 on Feb 22, 2012 13:31:03 GMT -5
Pete - I meant to mention this earlier, but I spaced it out...CRS...non-judgmental CRS to be precise... It has to do with your truss rod jig: Anyway, on the truss rod jig...you actually want a radius on the groove for the truss rod. The actual jig itself changes depending on whether you back route the neck with a skunk stripe, or top route it and cover it with the fingerboard. I don't have one to show you anymore, but I dug around Google and found a few images to illustrate the point. This is a good representation of what I'm talking about: Here's the blueprint from Uncle Leo detailing the radius: Click on Image for full sizeIf you've ever had a truss rod bouncing around inside of the neck at full relief you can bet that as long as the nut isn't sheared it's because of a straight routed truss rod channel. You loose a lot of function in the truss rod without this radius. That's it...and have you got anything in a Jazzmaster in the works? Happy Trails Cynical One First, thanks for the picture of the router jig, and the Fender plans- sooner or later I'm going to have to learn to do a one piece neck like that. For now I'm using this truss rod from Stew- Mac & it takes a straight channel. I did make what I think (hope) are improvements in the construction of the neck, though. Note the square corners in the slot in Stew- mac's cross section photo.......  I don't like all that dead air space in the neck. Instead I designed my jig to use this guide bushing and a round nose bit like so:  This gave me a nice snug slot for the rod assembly to sit in. Here's a cross section from a neck that didn't work out- but it shows where I'm going with this........  I worked some epoxy into the sides of the slot and at the stationary end and it's secure enough so that it doesn't rise out of the channel when tightened, it takes the neck with it. With the fingerboard glued on- it becomes as one & is extremely stiff. No rattles either. This brought up an interesting and unwanted side effect- string tension won't move it. On one of the necks that didn't work out, I leveled it dead flat before fretting. The slight wedging action from the fret tangs actually gave it a very slight back- bow & I was depending on the strings to pull it into at least a little relief. Nada. Strung up with 10's & let it sit for a while & nuthin'. At least I was able to save the truss rod.  For this neck, I took a couple of turns on the truss rod & deliberately back bowed it- and then sanded that level. When I backed off on the rod- instant relief.  . When I strung up the guitar I had about .011 relief at the 7th fret (strung up with 10's) and now, about a week and a half later, I still have about .011 of relief. And, with the changing weather here we've had wild humidity swings between 23% & 100% and so far, so good. I have no idea what's gonna happen when I ship it to New Jersey but I guess I'm gonna find out. -lpf3 |
|
|
|
Post by newey on Feb 22, 2012 17:05:17 GMT -5
What, you build the kid a guitar and he can't be bothered to come pick it up and visit with the old man? ;D ;D
Kids these days . . .
|
|
|
|
Post by cynical1 on Feb 22, 2012 19:15:53 GMT -5
For now I'm using this truss rod from Stew- Mac & it takes a straight channel. I did make what I think (hope) are improvements in the construction of the neck, though. Note the square corners in the slot in Stew- mac's cross section photo....... I saw that truss rod on the StewMac site and wondered...I've got a neck that needs a new truss rod for Project #4... My only concern is that this is a thin neck and I don't know if I've got enough beef to route that large a channel. I do like the channel that covers the rod. You'd have be be pretty sloppy to glue that one in place when you mounted the fingerboard... Seems like the best of both worlds...the adjusting and non-adjusting rod all in one. I would imagine it would be great for 5 and 6 string 3-5 piece necks... And as far as leveling the frets, years ago a shop I worked in had a fixture that tensioned the neck to simulate actual string tension as you leveled them out. You just check your rod adjustment prior to pulling the strings, then dropped the guitar or neck in the jig and torqued to to the same relief so when the fret were leveled on the bench in the jig it just dropped right back in once it was restrung. Somebody is probably making them now for a small fortune, but if you're planning on doing your own necks in any type of quantity then it's really a must have fixture. They'll just pull the truss rod and insert a zip gun. Happy Trails Cynical One EDIT: Speak of the Devil... Look what I found:   This is much sexier then the one we had, but you get the idea. HTC1 |
|
|
|
Post by lpf3 on Feb 23, 2012 10:42:36 GMT -5
What, you build the kid a guitar and he can't be bothered to come pick it up and visit with the old man? ;D ;D Kids these days . . . I know. Truth is, I'd love to see him but if he comes to my house I might have to return his Wolfgang........ ;D -lpf3 |
|
|
|
Post by lpf3 on Feb 23, 2012 11:01:21 GMT -5
I saw that truss rod on the StewMac site and wondered...I've got a neck that needs a new truss rod for Project #4... My only concern is that this is a thin neck and I don't know if I've got enough beef to route that large a channel. I do like the channel that covers the rod. You'd have be be pretty sloppy to glue that one in place when you mounted the fingerboard... Seems like the best of both worlds...the adjusting and non-adjusting rod all in one. I would imagine it would be great for 5 and 6 string 3-5 piece necks... And as far as leveling the frets, years ago a shop I worked in had a fixture that tensioned the neck to simulate actual string tension as you leveled them out. You just check your rod adjustment prior to pulling the strings, then dropped the guitar or neck in the jig and torqued to to the same relief so when the fret were leveled on the bench in the jig it just dropped right back in once it was restrung. Somebody is probably making them now for a small fortune, but if you're planning on doing your own necks in any type of quantity then it's really a must have fixture. They'll just pull the truss rod and insert a zip gun. Happy Trails Cynical One EDIT: Speak of the Devil... Look what I found: This is much sexier then the one we had, but you get the idea. HTC1 I don't know how thin the neck is on Project #4, but for a reference: That neck cross section in my photo is right at 27/32" at the thinnest point and there's 3/16" of wood left under the truss rod. That might work for your neck. It is a nice truss rod, excellent quality & all that. There's plenty of adjustment; when fully tightened there is a huge amount of deflection- I don't know how that translates once it's glued into a neck but I can't imagine ever needing all of the adjustment anyway. I like that neck jig & shop stand. (money money money mo-n-ey). I've seen some similar DIY stuff around the 'Net. Well, you know- someday I'm gonna......... Something about that picture seems staged, though. No glue or stain on his pants, no sawdust in his hair. No debris from flying tools and no blue streak of curse words coming out of his mouth. ;D ;D ;D ;D -lpf3 |
|
|
|
Post by ijustwannastrat on Feb 23, 2012 23:17:35 GMT -5
There's also two of him...
Beautiful guitar. I just wish you made more teles, to compensate for the multiplication of elderly blonde (platinum?) models.
And your guitar is much sexier, to boot!
|
|
|
|
Post by reTrEaD on Feb 24, 2012 0:24:46 GMT -5
There's also two of him... :lol: And as far as leveling the frets, years ago a shop I worked in had a fixture that tensioned the neck to simulate actual string tension as you leveled them out. You just check your rod adjustment prior to pulling the strings, then dropped the guitar or neck in the jig and torqued to to the same relief so when the fret were leveled on the bench in the jig it just dropped right back in once it was restrung. It seems like that would be counterproductive. I would have guessed just enough tension to get the neck flat, with no relief at all would be the best situation for fret leveling. |
|
|
|
Post by cynical1 on Feb 24, 2012 0:49:38 GMT -5
It seems like that would be counterproductive. I would have guessed just enough tension to get the neck flat, with no relief at all would be the best situation for fret leveling. Actually, if you think about it, it makes perfect sense. Your truss rod normally has enough tension against the 103# to 150# of string tension to place the fingerboard where the player wants it after a proper setup. Remove the strings, you remove the tension. Removing the tension can produce a slight backbow. Granted, this takes a 2-3 days to be significant, but if you get busy in the shop it isn't hard to have the guitar on the bench for a couple of days. By simulating the tension on the neck that the strings naturally provide you will level the frets at playing conditions. These are really more practical in a repair shop, but if you have the time to string up a new guitar and let the neck react to the tension, then set your truss rod, it really makes the finished product that much more precise. Ever buy a new guitar and the neck and frets appeared to be setup by Ray Charles? Sounds like a simple thing, but the hand can detect very subtle things. For the week it sits watching you strung up it can make all the difference to the prospective customer in the shop. Does it really make that much of a difference? To the average guy who does one fret job every 5-10 years...no, not enough to justify the expense. In a shop that makes a living off of the repairing the most important part of a guitar? I'd have to say that it does. BTW, you can make one of these relatively cheap. The gauges are the most expensive part of the assembly, and you can pick those up at just about any machine shop supply house. And you can make the modified spool clamps and stand-offs for cheap and 1" plywood is pretty easy to scare up. Building fixtures and jigs probably constitutes 2/3 of the time a luthier spends starting out a shop, and the practice never really ends. Happy Trails Cynical One |
|
|
|
Post by reTrEaD on Feb 24, 2012 8:22:30 GMT -5
Actually, if you think about it, it makes perfect sense. Your truss rod normally has enough tension against the 103# to 150# of string tension to place the fingerboard where the player wants it after a proper setup. Remove the strings, you remove the tension. Agreed. Removing the tension can produce a slight backbow. Granted, this takes a 2-3 days to be significant, but if you get busy in the shop it isn't hard to have the guitar on the bench for a couple of days. No arguments here, either. Allowing the neck to bow backward is undesirable for two reasons. Minor reason - allowing the neck to bend increases the possibility of warping. Major reason - if the neck is bowed back, you would have to attempt to follow the same contour (end to end). A stone or block is usually long in this direction. With a lot of care, you could follow this arc. But more likely, the frets would end up closer to flat along the long axis of the fretboard, while the fretboard itself was bowed back. The frets near the middle of the board (eight fret or so) could easily end up shorter than the frets near the nut and heel. By simulating the tension on the neck that the strings naturally provide you will level the frets at playing conditions. This is the part that seems less than ideal. "Playing conditions" has a small amount of forward bow (relief). Following this contour would seem even harder than following a backbow contour. The middle of the stone or block wouldn't be in contact with the frets. Only the ends. The natural tendency would be to end up with shorter frets at the nut and heel. Maybe I'm missing something, but it seems like having the board dead-flat (end to end) while fret leveling, would be much easier to work with. It's hard enough to maintain the radius when that's the only part that requires thought. If you're also trying to maintain the relief (bow), the task would become far more complicated. |
|
|
|
Post by cynical1 on Feb 24, 2012 10:37:20 GMT -5
By simulating the tension on the neck that the strings naturally provide you will level the frets at playing conditions. "Playing conditions" was not the best choice of words. Tension to offset the backbow the truss rod will introduce once the strings are removed is more to the point. HTC1 |
|
|
|
Post by lpf3 on Feb 24, 2012 12:56:59 GMT -5
Allowing the neck to bow backward is undesirable for two reasons. Minor reason - allowing the neck to bend increases the possibility of warping. Major reason - if the neck is bowed back, you would have to attempt to follow the same contour (end to end). A stone or block is usually long in this direction. With a lot of care, you could follow this arc. But more likely, the frets would end up closer to flat along the long axis of the fretboard, while the fretboard itself was bowed back. The frets near the middle of the board (eight fret or so) could easily end up shorter than the frets near the nut and heel. By simulating the tension on the neck that the strings naturally provide you will level the frets at playing conditions. This is the part that seems less than ideal. "Playing conditions" has a small amount of forward bow (relief). Following this contour would seem even harder than following a backbow contour. The middle of the stone or block wouldn't be in contact with the frets. Only the ends. The natural tendency would be to end up with shorter frets at the nut and heel. Maybe I'm missing something, but it seems like having the board dead-flat (end to end) while fret leveling, would be much easier to work with. It's hard enough to maintain the radius when that's the only part that requires thought. If you're also trying to maintain the relief (bow), the task would become far more complicated. Yes. And these points address some of the fears I had about backbow-ing the neck to start with. A long time ago an old(er) woodworker told me that "Maple Has A Memory", meaning that whatever you do to Maple it always seems to come back to its original state. Even so, I was afraid that if I left it backbowed for too long it would stay that way. So I worked as quickly as I could- I backbowed it, sanded, & immediately released the truss rod. I was also concerned that a sanding block would simply follow the back bow, or even accentuate it. To this end I cut up a sanding belt and attached it to a 2 foot carpenter's level with double stick tape. This allowed me to keep the sandpaper in contact with the entire length of the 'board at all times; so when I was done it was flat from end to end. Thankfully when I released the rod I had the desired results. This video shows where I got the idea, check out what he's doing at around 8:51....... When I leveled the frets then, I straightened the neck as close as I could with a straight edge & feeler gauges, and used the radius sanding block to do the leveling; worked like a charm. I have one low fret that I think was from me getting too crazy with the crowning file- it will have to be replaced- other than that it's a good fret job, no buzzes or fretting out. I plan to use this technique on every build; I think with experience it can only get better. -lpf3 |
|
|
|
Post by lpf3 on Mar 17, 2012 15:40:45 GMT -5
As promised here's a couple of sound samples. I recorded two short licks in each position- 1- direct into ProTools, dry; and then the same lick with Pod Farm just to put a little something on it. My amp sim is a 58 Bassman thru a 65 blackface cabinet with a little compression & reverb. I took it apart & made a couple of corrections, put it all back together & gave it a final (yeah ) setup. All in all I'm pretty proud of it, my first build came out pretty nice if I do say so myself........ Here's the link. 1)- Neck + Cap 2)- Neck 3)- Bridge enjoy- -lpf3 |
|
|
|
Post by cynical1 on Mar 17, 2012 21:25:49 GMT -5
Very pretty. And I don't think it's just the Lollars either. Like I always preach, tight joints, tight tolerances and perfect alignments are what makes a guitar sound best. I think you proved my point.
Ya makin' anything but Teles?
Happy Trails
Cynical One
|
|
|
|
Post by lpf3 on Mar 18, 2012 12:08:18 GMT -5
Very pretty. And I don't think it's just the Lollars either. Like I always preach, tight joints, tight tolerances and perfect alignments are what makes a guitar sound best. I think you proved my point. Happy Trails Cynical One Thanks Sort of. I've got a couple on my workbench that are Tele shaped- but are going to be kind of hybrids. They're solid chambered Beech with maple caps. One has a P- 90 at the neck and a HB at the bridge and the other has 2 p- 90's. Both are 25" scale with a 12" fretboard radius. Both are rear routed, with a Gibby type toggle in the upper bout. After that; I'd like to come up with my own body shape.........? and a set neck............. -lpf3 |
|
|
|
Post by cynical1 on Mar 18, 2012 12:28:54 GMT -5
You're entirely welcome.
And as far as the set neck...if you're going to go through the work of mailing the neck angle without the benefit of a shim down the road, why not just do it full bore and go neck-through?
I won't diminish the benefits of a set neck, but it's still a half measure when compared to a neck-through design. And you can still chamber the wings, route a cavity between the wings through the bottom end of the neck-through portion, 1/4" or 3/8" top cap it and add some very interesting tonalities.
And developing a unique body shape is no mean trick. Myself, I tended to work off of the Jazzmaster shape, but I have a few more electronics to bury in the design I'm working on.
This is a tough time to be getting into the guitar building business. The only niche any of us are going to get a foot in is by build quality and workman like functionality. Working musicians are never going away, but they are not all Joe Perry... A high quality bulletproof instrument that will not require a second mortgage is where we need to focus. I think you're on the right track.
And has little Leo tried the guitar yet?
Happy Trails
Cynical One
|
|


 . When I strung up the guitar I had about .011 relief at the 7th fret (strung up with 10's) and now, about a week and a half later, I still have about .011 of relief.