jaylow
Rookie Solder Flinger

Posts: 13
Likes: 0
|
Post by jaylow on Jun 23, 2012 2:19:22 GMT -5
Hello everyone! I dusted off an old project and now I'm trying to tinker with Dan Armstrong superstrat wiring. I had wired it up previously and was unable to select the neck and middle pickups by themselves any more as the bridge was always in the circuit, regardless of what position the bridge switch was in. After more examining of the switches I had, I found out that they operate much like the switch on the left of this picture. 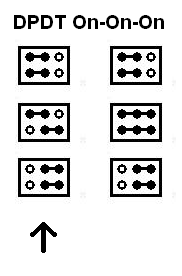 For the switches to work properly, do I need a switch that works like the one to the right? Is there a way that I can adapt the switch on the left to work like the one on the right or a way to wire up the circuit using the switch on the left so that the same effect can be achieved? Thanks for your help! |
|
|
|
Post by newey on Jun 23, 2012 6:59:57 GMT -5
jaylow-
You've resurrected a debate we had here a long time ago. Our member wolf claimed that On-On-On switches like the one you describe on the right in fact existed, but couldn't point to a commercially-available example of any such switch.
The late ChrisK contended that all On-On-On switches operated like the example on the left. And there the debate sat (and still does).
As far as wiring your circuit so as to select N + M, please post a diagram showing exactly what you have wired into the guitar now and perhaps we can get some ideas for you. "DA Superstrat wiring" is not descriptive enough as there are variations.
|
|
|
|
Post by reTrEaD on Jun 23, 2012 9:02:01 GMT -5
Is there a way that I can adapt the switch on the left to work like the one on the right or a way to wire up the circuit using the switch on the left so that the same effect can be achieved? You could wire up a switch on the left so that it acts like a single pole version (basically just the upper half) of the switch on the right. But if you need both poles like the switch on the right, you could start with a 4PDT on-on-on switch and wire it so it functions like the switch on the right. |
|
jaylow
Rookie Solder Flinger
Posts: 13
Likes: 0
|
Post by jaylow on Jun 23, 2012 10:17:16 GMT -5
Upon further checking, the switch I have is a mirrored version of the switch on the left. I used a multimeter to see which poles were connected together when the switch was in the centre. With regards a diagram, I kinda disassembled the On-On-On switch in the hopes of find a solution so I could just pop in the correct stuff when I figured it out. I used this diagram from ssstonelover and followed wire by wire but using my mirrored version of the left switch I posted earlier. guitarnuts2.proboards.com/index.cgi?board=schem&action=display&thread=3177I'm away for the weekend but if that doesn't help, I'll try to draw something on sunday/monday when I return. |
|
jaylow
Rookie Solder Flinger
Posts: 13
Likes: 0
|
Post by jaylow on Jun 27, 2012 14:18:31 GMT -5
I got it to work! I just mirrored the connections and it did exactly what I wanted it to do. I feel like such a noob and yet a genius at the exact same time.
In the event that anyone ever comes across the same problem for superstrat wiring, it's the switch on the left that you're looking for. And if it results in weird pickup combos, then mirror the connections on the On-On-On switch and it should be good.
|
|
|
|
Post by newey on Jun 27, 2012 15:54:13 GMT -5
Glad you got it going. As I said earlier, as far as anyone can tell us, the switch on the left is the only type of On-On-On that exists. You do have to check it with a meter, and then mark it in some fashion to know where the center position connects, in case you rotate the switch while wiring it or installing it.
The orientation does matter, and most of the switches don't clearly show which way the center contacts connect.
|
|
jaylow
Rookie Solder Flinger
Posts: 13
Likes: 0
|
Post by jaylow on Jun 29, 2012 0:13:26 GMT -5
Yep. Learned that the hard way. But now I'm enjoying the neck/bridge combo. Very telecaster-ish. I threw in a phase switch too for some added fun. All that's left is to wire up my piezo buffer when the parts arrive and my "do-it-all" guitar project will be complete!
|
|


