Deleted
Deleted Member
Posts: 0
Likes:
|
Post by Deleted on May 9, 2013 6:26:58 GMT -5
Hello, I think its time to install the new nut on the Carvin. Most of the problems i had with this guitar are documented here and here. Now i got : - new Gotoh nut, top mount - type- new drill press stand- new drill press vice- mounting hardware - bolts, nuts - a 2.5mm screw extractor + drilling bit, #1 Screw Extractor by Irwin 53701I will start checking things today. First will be if the old screw needs to be removed first. If yes, which means, if contact with the new screw is unavoidable, then i will have to do this first. Everything will be documented with photos. The gotoh nut seems well built, and the mounting screws seem massive in comparison to the chinese nut. Also lots of extras with the Gotoh : string tension bar (i wont need this most probably, but who knows), nut shims of 3 different thicknesses. Seems ok, i hope it sounds ok as well, let's hope the sitar-curse will be lifted this time! |
|
|
|
Post by cynical1 on May 9, 2013 10:12:12 GMT -5
I'm really crossing my fingers that you don't have to remove the old sheared screws. A #1 screw extractor is very small and requires a very light and steady touch. It also requires a 9/64" drill bit. This converts to a 3.6mm drill bit, which I don't believe exists. You might be able to get away with a 4mm bit, but a 3mm bit may be too small to allow the extractor to gain purchase in the sheared screw. Either way, if you don't have a t-handle tap wrench you're going to want to score one of these to hold the extractor. Take the extractor with you to make sure the collet adjusts down to hold the extractor securely. They look like this:  I mention all of this as if you put too much force on this extractor, or attack the screw from an angle, and it snaps off you're f  d with a capital F. You cannot re-drill a broken extractor like a sheared screw. So, if you do have to remove the screws, do the meth after you do the job and you'll be good to go. Happy Trails Cynical One |
|
Deleted
Deleted Member
Posts: 0
Likes:
|
Post by Deleted on May 9, 2013 10:44:21 GMT -5
Wow man, too much info again, i am not sure i understood it all. The irwin extractor came with its own drill bit and i bet its much smaller than 3mm. Heck how could i drill a 2.5mm sheared screw with a greater diameter drill, in the first place? Now about the t-handle, i lost you man. I was under the impression that the drill press stand + vice will help to remove the screw!!! Can't i use the stand for this? Because if this is ok and no screw needs to be extracted, then i would go and measure the new mounting screws, then follow the chart and find the appropriate drill bit, and i guess i could do it by hand, no drill press stand involved. Ok, i gotta calm down... I am straight off heading for home. I will do all the initial assessment and come back with info... i will try and understand everything you say, before i do the next move. NO MORE CARVIN damaging this time  |
|
|
|
Post by cynical1 on May 9, 2013 11:38:03 GMT -5
Hey, if the drill bit came with the extractor, then by all means use that drill bit. That problem is solved. What you're using the drill stand and drill vice for is to drill the pilot hole for the extractor. Provided you have the neck square and level in the vice this will give you a nice clean straight hole to insert the extractor. Now about the t-handle, i lost you man. I was under the impression that the drill press stand + vice will help to remove the screw!!! Can't i use the stand for this? In a word, no. The potential for snapping the extractor goes up exponentially in any scenario using power tools. You want a steady and slow force exerted while the extractor digs into the screw and begins to turn it counterclockwise so it can be unscrewed and removed. The arrangement looks like this:  In your case, ignore the part about using vice-grip pliers. Your #1 extractor is way too small for that to end well. The drill press is to allow you to drill a straight hole into the screw to insert the extractor. It'll also allow you to drill the new holes for the new nut precisely and straight. Again, I'm with you on that one. If the location for the new nut mounting holes miss the old screws then you dodged a bullet. Based on experience, you'll be using the extractor somewhere else eventually...  Yes, by all means, put that Adriatic adrenalin in check... Exactly. No more carvin' on the Carvin this time. Happy Trails Cynical One |
|
Deleted
Deleted Member
Posts: 0
Likes:
|
Post by Deleted on May 9, 2013 13:58:00 GMT -5
^^^ LOL man, nice one!! Thanx about T-handle, will do this first thing tomorrow morning, with the extractor in hand. Now, i got mixed feelings after the initial assessment.... In short no good news from many aspects. 1) the new nut on top of its place seems like this : right top big hole. We can see the old screw (visible piece of metal) in the lower region. 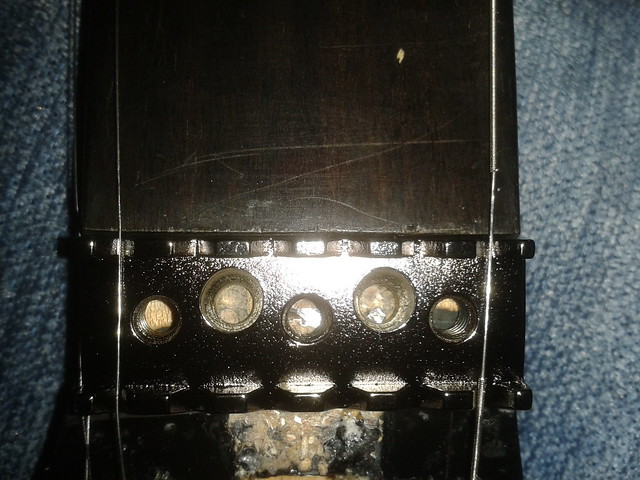 here upside down and zoomed : bottom left big hole. We can see the old screw (visible piece of metal) in the upper region. 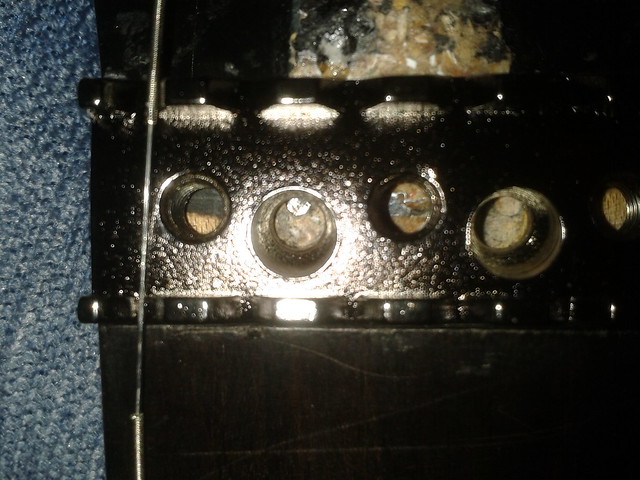 So there will be an partial overlap with the old screw. At least this is the case visually. (or am i wrong in seeing this and over-exagerating ??) 2) equally worrying, the new Gotoh nut is considerably shorter than the old Schaller (Gotoh is R1, Schaller is L3), but that was expected. The strange thing is that when i put the strings in full tension with the Schaller, the open strings do not buzz on the first fret. Gotoh is about 0.5mm shorter. When i put all shims of the Gotoh (worth 0.9mm) i still get buzz on open strings!!! I have measured this many times and is driving me crazy. 3) Suppose i manage to extract the old screw, i must think of a way to better shim the new nut. Maybe some layer of softwood or other wood, glued to the guitar's surface? I dont like metal shims, i think i exceeded the limits of 0.9mm. Going beyond that will not be stable i think. There will be too much material, shims, nut unglued to each other.... in short, not very good news..... i only wish this fine guitar will be fixed in the end.... |
|
|
|
Post by cynical1 on May 9, 2013 14:42:48 GMT -5
Thanx about T-handle, will do this first thing tomorrow morning, with the extractor in hand. No problem. I've broken my share of extractors over the years, so I'm just trying to spare you the thrill. And yes, Virginia, it looks like the old sheared screws need to come out. So much for crossing my fingers... As long as you center the hole in the old screws, drill it straight with the drill press and go slow and steady with the extractor you should be alright. Remember to take your time and measure twice, drill once... Use a bubble level to make sure you're square in the vice. Now, the subject of the holes once the old screws are out. Either way you place the new nut you've got way too much of a hole left to just leave it. The holes need to be filled. Before you start reaching for that magic potion of toothpaste and sawdust, let's review your options. If it was within the diameter of the new hole we wouldn't be having this conversation. If it were just a small tangential intersection I'd say epoxy wood filler would probably do the trick. Based on your pictures I'd say your looking at having to use real wood to fill those holes. I don't know what's available in Greece, but you need to find the smallest hardwood dowel rod you can, redrill the holes to accommodate said dowel rod and glue it in place. Once the glue has set just level it off with the nut shelf. This isn't terribly involved, but it does sort of slow down that instant gratification thing you may have been looking for. Next on the list is shimming up the nut shelf. In an ideal world you'd just glue a piece of hardwood to the existing shelf and reroute it to the proper depth. That takes more tooling than you probably want to invest in, so let me offer Option #2. First off, forget about the word softwood. This is a maple neck. If you're going to add to hardwood, you need hardwood to do it with. I'm pretty sure they have hardwood veneer strips over there somewhere. They usually come on a roll and look like this:  Most every home improvement and hardware store here sells them. You're looking for the 1" (25.4mm), or thereabouts, wide strips. They will most likely have some heat activated adhesive bonded to them so they can be ironed on to the substrate. You'll need to remove this adhesive. Acetone works pretty good, or old cheap nail polish remover (which is usually 99% acetone). Cut pieces larger than you will need off of the roll and just soak the strip in the acetone for 5 minutes. Any glass jar you can get your fingers in will work. After 5 minutes you should be able to remove the strips and just peel the adhesive off of the back. Lay them flat and let the acetone evaporate off. Take some 320 or 400 grit dry sandpaper and lightly sand the now glueless strips to make a clean surface for gluing. Next, lay the strips on the nut shelf and mark the length from underneath with a pencil. Measure out the width and mark that on the same strip. Now you have the final dimensions detailed so all you need to do is cut them to size. An Exacto or utility knife works fine for this job. Once you determine how many strips you'll need use standard old fashioned yellow wood and lightly coat the entire top and bottom of these pieces with a brush and clamp them into place on the nut shelf. Watch for the pieces to creep when applying pressure. Readjust as needed. Putting some masking tape around the area you will be gluing these strips will minimize the mess from the glue as it leeches up when you apply the pressure with the clamp. If all of that seems like too much work just pick up some brass shim stock and keep piling it on until you lose the buzzing. Make sense? Happy Trails Cynical One |
|
Deleted
Deleted Member
Posts: 0
Likes:
|
Post by Deleted on May 9, 2013 15:23:12 GMT -5
Perfect sense, till you mentioned the old fashioned yellow wood. I didn't get this. man, needless to say, if there was no wife around and kids sleeping i would right a song for you and post it to youtube. Now about brass shim vs hardwood. The Gotoh already came with 3 different brass shims : 0.5mm, 0.3mm and 0.1mm (totaling 0.9mm). But i dont like such a loss of adhesiveness. So, to recap for tomorrow : i gotta buy : 1) blue 3M tape 2) T-handle while bringing the extractor with me 3) hardwood veneer stripes 4) some handy clamps pls elaborate a little bit on the yellow wood part. just hope tomorrow i won't get in a fight with some other person who will prove later to be from some nearby village.  PS its only one old screw which needs to be removed. The other piece of metal visible in the center, to be honest, i have noticed that, but dont know what it is. Update : ok, yellow wood is some kind of glue right? PS2 Just a question : what will we do if i screw up with the extraction phase? theoretical question. |
|
Deleted
Deleted Member
Posts: 0
Likes:
|
Post by Deleted on May 9, 2013 15:39:47 GMT -5
Does the hardwood stripes in question look like this? : 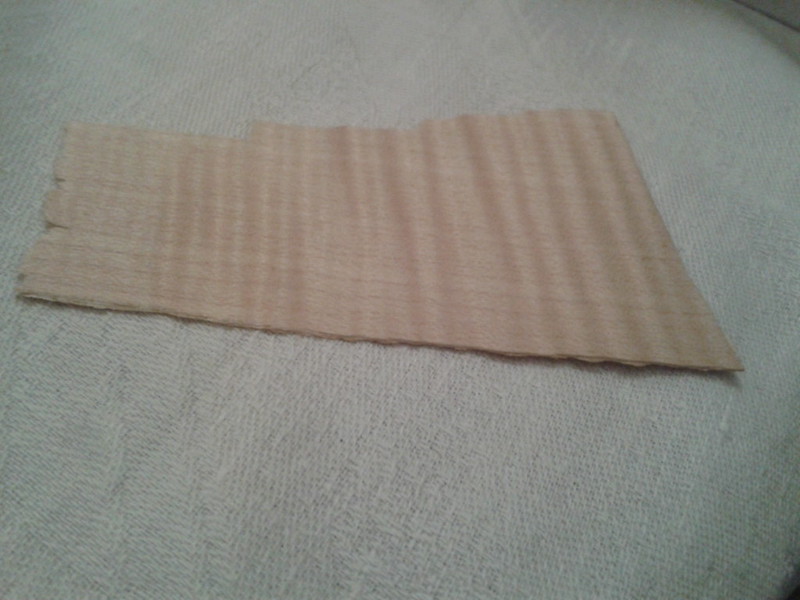 |
|
|
|
Post by cynical1 on May 9, 2013 17:00:53 GMT -5
Sorry, that was supposed to be "yellow wood glue"...fingers must have stopped working on that word...
The piece of what looks like veneer should work. It does look like nice piece of fiddle back veneer, and as long as it's dry and flat it'll work fine.
A standard bar clamp should work. Remember to put a flat piece of wood across the strips to balance the pressure, and use your sanding block under the neck with a piece of rubber or a towel between it and the neck to prevent scarring or denting.
You don't need a ton of pressure, just about enough to start to squeeze the glue out. Go thin on the glue and it'll bond just fine. I prefer TiteBond II, but any high quality wood glue should work fine. It's going to have screws in it anyway, but you do want the surface to be as flat as possible.
Ain't this great fun?
Happy Trails
Cynical One
|
|
Deleted
Deleted Member
Posts: 0
Likes:
|
Post by Deleted on May 9, 2013 22:48:03 GMT -5
All clear. I am not sure i will have access to bar-type clamp. I'll think of something. Its gonna be better than the metal shims anyway.
But for now my main concern is getting the screw out. I didn't drill before screwing it, and i certainly didn't use wax or soap---> not a good thing for the extraction job.
I had a thought last night : Supposed i dont manage to extract the old screw. Would it be far fetched to say that even if there is contact between new screw and old screw, this will actually by a *good* thing? Increasing grip? Can this old damn screw work in favor of the new one?
If the above statement is pure idiocy, then what would be an alternative to extract the screw? Drill around it, extract it with pliers, and then stick a bigger diameter hardwood dowel?
|
|
|
|
Post by cynical1 on May 9, 2013 23:18:17 GMT -5
You may still need a shim after building up the nut shelf, but nothing as severe as it is now. Bar clamps are relatively cheap. This type normally sells for less than $15.00 in the US:  The screws are obviously firmly in there, or they wouldn't have sheared off. You probably put the initial stress crack in it when you screwed it in...especially if you used a drill to do it. Hardwoods need a larger pilot hole than softwoods. Remember this and double check this when you drill the holes for the next nut. If you have to take a razor knife and cut the wood around the top of screw then so be it. Remember, anything done to the wood can be repaired, and it's going to be covered by the nut anyway. If you break off the extractor in the screw the job becomes exponentially more involved. Just make sure the hole in the screw is deep enough to allow the extractor to really sink in and grab it. Slow even pressure is what you need to focus on. No Son of Hercules stuff here. Let's see how it goes with the extractor before we broach the subject of what next. You don't want a wood screw to come into contact with the old metal screw. It will more than likely flatten the threads on the new screw as you torque it in and allow no purchase to hold the nut down. Focus on getting the screw out, not on trying to solve a problem you don't have yet. Happy Trails Cynical One |
|
Deleted
Deleted Member
Posts: 0
Likes:
|
Post by Deleted on May 9, 2013 23:43:21 GMT -5
Thanx for the prompt answer. I gotta concentrate on the extraction job. Buying a proper T-handle will be the job for today.
|
|
Deleted
Deleted Member
Posts: 0
Likes:
|
Post by Deleted on May 10, 2013 2:09:49 GMT -5
Just coming from the big hardware store. They had nothing that would house the screw extractor. Nothing like a t-handle for this small-screw erwin extractor. Also checked for some veneer wood stripes, i found those with the glue, but this seemed nothing like real wood. Too plastic. I bought some stripes that seemed more "woody" and thicker, without any glue. But i bet two layers of the veneer i showed you in the pic above (2*0.6mm=1.2mm) will do the job.
But i gotta resolve the t-handle issue first. Any ideas of its commercial name?
|
|
Deleted
Deleted Member
Posts: 0
Likes:
|
Post by Deleted on May 10, 2013 5:07:54 GMT -5
Just got a t-handle tap wrench looking exactly like :  tonight's gonna be the big night. i am terribly nervous for the extraction procedure, as i never done it. So, to summarize : 1) I tap with a hammer a sharp prong in the center of the broken screw center to make for some pilot for the drilling bit. 2) I try to fasten the neck as tight as i can without damaging, wrap it in a towel as suggested by Cyn1, (i am afraid the sanding block does not fit in the vice's max spacing), then try to center the drill bit exactly to the point marked above 3) put the power drill in : a. clockwise b. minimum speed c. normal mode (not "devastation" mode) - i cannot describe this in english 4) try to drill a hole in the center of the screw very carefully (if i miss this, then i am screwed) 5) when (and if) the hole is drilled, then try to insert the extractor. 6) tap it in a little bit to gain more purchase in the hole 7) attach the t-handle and try slowly to turn it counter-clockwise 8) extract the screw 9) fill a hardwood dowel (toothpick?) of same size and glue it in The next steps have to do with the wood shims and are to be followed after i am lucky enough to get the above through. Cyn1, any remarks? |
|
|
|
Post by cynical1 on May 10, 2013 8:22:53 GMT -5
Just got a t-handle tap wrench looking exactly like : That style works just as well. The other style is usually a little cheaper, but as long as you're careful and make sure you go in straight it'll work fine. That's what she said... (Sorry, couldn't resist the cheap shot)I'm just going to walk through your list and comment in red. 1) I tap with a hammer a sharp prong in the center of the broken screw center to make for some pilot for the drilling bit. They're normally referred to as a center punch. They look like this:

A good center punch shouldn't require too much force to make the dent. Normally one good wrap does it. the neck doesn't need to be in the vice for this step, but make sure the neck is well supported when you do this. You're just doing this step to make sure the bit doesn't walk on you when you start to drill.2) I try to fasten the neck as tight as i can without damaging, wrap it in a towel as suggested by Cyn1, (i am afraid the sanding block does not fit in the vice's max spacing), then try to center the drill bit exactly to the point marked above Well, that sucks that the sanding block doesn't fit in your vice. Adapt, Adjust and Improvise. Let me float this at you. A new sanding block costs around $15.00. A new neck for the Carvin will run you well over $100.00. If it were me I'd modify the sanding block to fit in the vice.
If you have a router, or router table, or a table saw with a dado blade...or access to any of these tools...I'd route the back non-radiused side of the sanding block to fit in the vice. If your sanding block looks like mine you should be able to make two square notches on either side. Like this:

Pardon the cheap graphics, but the point is to just narrow the back of the sanding block enough to allow it to fit squarely into the vice. The radius side of the block is still good. You'll need to determine just how narrow it needs to be to fit in the vice, but getting the depth on both notches identical is critical.
The prime objective here is to align and protect the neck.3) put the power drill in : a. clockwise b. minimum speed c. normal mode (not "devastation" mode) - i cannot describe this in english Sounds right to me. The minimum speed thing is important. Drilling metal always requires a slower speed than wood. And I would say "devastation" mode translates very well. Avoid devastation mode at all costs.4) try to drill a hole in the center of the screw very carefully (if i miss this, then i am screwed) As Yoda once said, "No try, do!" Double check all of your clampdowns, angles and operation of your drill press prior to starting the drill. You already know how small that drill bit is, so you also know that going slow and easy will keep it from breaking off.
I'd say those were probably some cheap screws to begin with, so they should drill relatively easy. In a pinch, you can always use some turpentine on the bit to act as a cutting agent. Use sparingly, as you don't want it all over the wood. Check how well your extractor goes into your holes before breaking the setup. This way, if you need to drill deeper you're not setting the whole thing up again.5) when (and if) the hole is drilled, then try to insert the extractor. There you go with those negative waves again...6) tap it in a little bit to gain more purchase in the hole Very lightly, if at all. Use something small to do the tapping. Remember the conversation we had about devastation mode...7) attach the t-handle and try slowly to turn it counter-clockwise Opinions vary, but I'd have the handle in place prior to doing any tapping in of the extractor. The last thing you want to happen is to have the extractor angle in to the screw, or God forbid, you break the extractor off in the hole putting on the tap handle. Normally, if the hole is drilled correctly you shouldn't need to do any tapping in the first place. Remember, these aren't hardened Grade 8 machine bolts we're talking about here...these are probably some low grade wood screws8) extract the screw Yes.9) fill a hardwood dowel (toothpick?) of same size and glue it in I'd shelve the idea of using a toothpick...unless you guys have some seriously huge toothpicks over there... I'd get warm and fuzzy with the dowel rod approach. The next steps have to do with the wood shims and are to be followed after i am lucky enough to get the above through. OK, I hate to keep harping on this, but if you're going to do the job, then get comfortable with the steps, know them inside and out, and just do it. There's no luck involved.Here's the deal. You already know what you don't want to do. You've already repented in leisure enough with this guitar. You have taken a very serious approach to it this time. You have invested in tools and equipment. You've also displayed a good amount of patience...which I know was not easy for you. That being said, you're going to be fine with this. If you have to set this up and stare at it for hours to feel comfortable, then that's fine. If, at any time during this process, you feel uncomfortable or uncertain then just stop. Ask more questions. One day waiting for an answer is better than 3 days fixing a mistake. Anyone who has worked on guitars for a while has been exactly where you are now. You've had enough"oh crap" moments, and you want to improve your skills. As you've seen, it ain't cheap doing it right, but if this nut repair goes right you'll never have to install a nut on this guitar again. 20 years down the road, if you still have the guitar, you'll be glad you took the time today and did it right. May the force be with you. Happy Trails Cynical One |
|
Deleted
Deleted Member
Posts: 0
Likes:
|
Post by Deleted on May 10, 2013 10:06:52 GMT -5
Thanx (a lot),
lets just make a stop to the sanding block chapter, a little bit. Your initial advice was to attach the block from underneath the neck with blue 3M tape, and then the block to the vice right?
I had this idea : what if i manage and cover bottom and both sides of the said point in neck, with 3 big enough pieces of rubber, like a bigger version of the one e.g. used by kids to erase/correct writing?
Would the vice pressure still kill the neck ?? (its neck-through BTW, so if the neck is dead, the whole guitar goes off). I don't think so, since i have tried the vice, and the pressure did not seem deadly and fatal.
An alternative would be to find other options for fastening the neck.... Find something hard to withstand the force of the vice, yet easy to tape the neck over it, correct?
|
|
|
|
Post by cynical1 on May 10, 2013 10:47:14 GMT -5
OK, so the neck doesn't come off...we can work with that. In fact, that may work in your favor keeping the neck stable during surgery. I used to have an old pipe floor stand I modified to hold a guitar in place for just such operations as yours. The only trick is to make sure the neck is level and square going into the drill press. Based on the neck angle out of the body laying the guitar perrfectly flat may work against you. Granted, the angle isn't much, but these aren't big screws you're trying to extract. You can use just about anything stable to align the guitar's nut shelf to the base of the drill press. You can use the drill vice to cheap if you have to. Using a bubble level, or an angle finder will help. Double check all angles to make sure you're level and square. This is where that softwood comes in handy. If you place small pieces of softwood between the teeth of the drill vice and the neck they will act as a cushion from the metal on the vice. Putting some rubber (I used to use old inner tube rubber) between the wood and the neck will further protect the finish. Something like this:  The maple will be harder than your softwood, IE: Pine, so if you over tighten the compression will go into the softwood versus the neck. If you hear the crack, you went too far... The whole purpose of this exercise is to make certain the neck doesn't move while you're drilling. That's it. Make sense? Happy Trails Cynical One |
|
|
|
Post by sumgai on May 10, 2013 11:37:07 GMT -5
c. normal mode (not "devastation" mode) - i cannot describe this in english 'dude, you just did describe it in English, and quite well! ;D I think your intent was "fast speed", which is certainly destructive when used inappropriately, so you could've said "destructive mode", or you could've used my personal favorite, "demolition mode", but they all mean the same thing, at least when it comes to working with wood. Don't take this as an English lesson, that's not my intent. I'm only saying that you managed to use a word very appropriately in context, a word that most Americans would not think to use, unless their favorite activity is to read the dictionary. I've said it before, and I'll say it again - your English is better than probably any other non-native English speakers we have here, particularly including the Australians! If you ever heard gumbo over the phone, you cry out in despair!  ;D
Now for the serious stuff. You asked if you could use a toothpick or something, and c1 said 'use a dowel'. Although the hole will be hidden by the new nut, the fact is, if you leave a big hole, your new screw will not have 100% thread contact - it'll be missing between 10 and 20% of that total. In itself, this isn't so bad, but considering the job of holding the (new) nut in the tightest possible contact with the neck, then you'll want to drill out the hole when the broken screw is gone, making it the same diameter all the way down (or very nearly all the way, the end of the drill bit is tapered....). Using a tight-fitting dowel of any material will be better than leaving the hole empty, or filling the (slanted) hole with a bunch of toothpicks that leave (comparatively) large gaps. Fortuantely for you, the drill-press setup is exactly what you want for enlarging the remaining hole - all that's needed is to change the drill bit to the correct size, and you're all set.... so don't break it down until you've done this step too. Toothpick fillers are fine for non-critical holes like pickguard screws and such, but not in locations like this, where the guitar's performance depends on the repair being as strong as the original material. Otherwise, c1 said it all. Now, go do it! ;D sumgai |
|
Deleted
Deleted Member
Posts: 0
Likes:
|
Post by Deleted on May 10, 2013 12:19:16 GMT -5
Thanx guys, this evening i returned home a complete wreck. Didn't sleep well because i didn't know if a ever manage to get across a t-handle. I was ultra lucky. The big store did not have them, and the small store i finally got it, at first they said, no it won't do. I had to see it closely to observe that this may be the thing i am looking for. I spent some time trying to modify the wooden sand block to fit the drill press vice. I managed to prove the concept, it fits but with some force, not what we want, tomorrow i gotta remove more wood to make it easily fit inside the vice's teeth. Then i will revise this thread to make sure i understood it all. PS my knowledge of the word "devastation" is because i listened to too much thrash metal as a kid  By drill has the following controls : 1) speed 2) clockwise/counter-clockwise 3) drill mode or "demolition mode", the first pictured with a drill bit, the second with a hammer. So speed and drill/demolition mode are two different controls. |
|
Deleted
Deleted Member
Posts: 0
Likes:
|
Post by Deleted on May 10, 2013 13:11:17 GMT -5
Just an update to this... maybe i measured smth very wrong... re-measured the cheap chinese wood screw (its unbroken twin) : 2.5m in the threaded part, 2mm in the non-threaded part, which means, maybe i am royally screwed.
In the mean time, my son has been giving me headaches for the whole past week, i almost beat him, when he jumped onto my head, when i was measuring things yesterday, and today he just broke a glass by kicking on our front door. Thank God we didn't end up in hospital. My time thus will be limited. I might resort to my old-proven "balkan cowboy" practices. I will try not to.
|
|
|
|
Post by cynical1 on May 10, 2013 14:41:50 GMT -5
OK, reality check. While I'm not expertly versed in all things metric, I am familiar with standard wood screw sizes. From my experience most of these top mount nuts will use a #6 wood screw. The shank size on these measure at 9/64" (3.57mm).
If what you've measured is correct, then these screws correlate to a something smaller than a #2 wood screw, which has a shank size of 3/32" (2.38mm). For reference, the screws holding your pickguard in place are probably bigger than that.
Either you got a real POS setup with the old nut, or something is amiss in your measurements.
A #1 screw extractor is recommended on screws as small as 1/8" (3.17mm), or a common #5 wood screw.
If these sheared screws really are 2mm in diameter at the shank then you can pretty much disregard everything above on getting them out.
Double check your measurements on the actual screws in the neck and report back...and start looking for a very sharp knife and a small pair of vice grip pliers...
Happy Trails
Cynical One
|
|
Deleted
Deleted Member
Posts: 0
Likes:
|
Post by Deleted on May 10, 2013 15:20:46 GMT -5
|
|
|
|
Post by sumgai on May 10, 2013 15:38:15 GMT -5
my knowledge of the word "devastation" is because i listened to too much thrash metal as a kid What? There's such a thing as too much metal? Say it ain't so! No, seriously, your foundations for the word "devastation" are on target, there's no distortion in the meaning and intent of the word. However.... True, they are different controls, but think - a hammer doesn't always mean demolition/destruction/devastation, it can also mean a way to construct/build/force into compliance/etc. In short, the image of the hammer isn't there to give you a way to tear down the world. In fact, it's meant to be used as a way to force a masonry drill bit through concrete, bricks or other rock-like materials. By applying an axial force as well as a torsional force at the same time, the drill motor can drive the drill bit further into the material. Normally speaking, this is not necessary, nor desirable, for most things like wood, metal, plastic, etc. Insofar as I know, the above-described materials are the only ones that benefit from the "hammer" setting.  Summary: either too much speed, or engaging the hammer action can cause a helluva lot of havoc, in double-quick time! I hadn't thought that you were describing a hammer-drill, sorry about the confusion on my part. sumgai |
|
Deleted
Deleted Member
Posts: 0
Likes:
|
Post by Deleted on May 10, 2013 15:47:12 GMT -5
Aha, SG, thanx for the clarifications.
Cyn1, triple checked. 2mm on both the actual broken screw, and its twin diameter on the shank. The vice grip pliers and sharp knife theory gains momentum.
However, i was wrong about selling the tools i bought. I will need them for nearly every guitar-involved work in the future.
In the mean time, son took his lesson, and just seems a more mature little man now...
loads of positive waves!!! tomorrow its knife + pliers time!!!
|
|
|
|
Post by cynical1 on May 10, 2013 15:51:56 GMT -5
Well, going by what you see and without actually being there I see two options for you. Neither are terrible, so don't start reaching for the Xanax yet...
Depending on how good the metal is in these screws it might just be easier to drill a pilot hole through the sheared screws with the small bit, then re-drill for your dowel hole, again, right through what's left of the sheared screws. If the screws are as cheap as they sound, you should be able to just swap bits without breaking the setup. You'll still have to slow the speed down on the drill and be careful you don't build up too much heat as you don't want to scorch the wood, but that might be the easiest way to go.
Make sure you measure the depth of the hole you need to drill based on the other screws you mentioned and use some masking tape on the drill bit to mark your depth. I doubt you want to come through on the other side of the neck...
The other option is not as pretty, but just was effective. If you have a small sharp wood chisel or a strong very sharp knife you can carve around the sheared screws until you can grab them with a small pair of vice grip pliers. If the screws are really cheap this can be an agonizing chore as they'll keep shearing off constantly.
Then you just drill the carved mess to accommodate a dowel rod and your work is done.
One thing about the dowel rod pin. Once your new holes are drilled, which should be the same size as the dowel rod, (sand the dowel pin to adjust for a snug but not overly tight fit) make sure your height is about a hair under the depth of the hole. You don't have the tools to cleanly knock it flat, and working that nut shelf with a file and\or sandpaper can knock it out of square.
By leaving it a hair short you can just use a putty knife and some wood filler to make up the gap and not effect the current nut shelf routing. When you re-drill the holes for the new nut there will be more than enough wood for the screw to grab.
Make sense?
Happy Trails
Cynical One
|
|
Deleted
Deleted Member
Posts: 0
Likes:
|
Post by Deleted on May 11, 2013 0:07:04 GMT -5
Perfect sense, unfortunately more than perfect. What i mean : i was already idiot enough to have worked the nut shelf with a file.... to get rid of the pathetic wood sawdust mass i had tried to form. Does this mean i have ruined the radius of the nut shelf? Is this your main concern about why filing might have been bad?
Could i correct this after I built up the wood stripes shim, and try to re form the correct radius?
|
|
|
|
Post by cynical1 on May 11, 2013 1:28:35 GMT -5
OK, first off, the radius is in the nut, not the shelf. I believe this is the nut you have:  The nut shelf needs to be flat and square. This operation is traditionally performed with a router and a special jig or fixture. More than likely this was done with CNC equipment at Carvin, but you get the point. Let's get the screw situation dealt with first and then we'll deal with the nut shelf when you get to it. Anything else...? Happy Trails Cynical One |
|
Deleted
Deleted Member
Posts: 0
Likes:
|
Post by Deleted on May 11, 2013 3:36:10 GMT -5
Spot on about the fgr-2 gotoh nut. Well, i removed the screw : the hard way. I tried to drill on it, but there was no way to achieve absolute accuracy, the drill bit would find the least resistant path around the screw, but not on top of it. (i used the irwin drill bit, that came with the kit. Apparently the spiral extractor was never used, also the drill bit broke in an attempt to "attack" -destroy the screw from the side: this was silly, but not fatal, i hope). So, finally, i explicitly drilled around the screw, till i could grab with some tool women (and some men recently : Ronaldo of Real Madrid) use to pull out eye brows. Here is the situation after the screw extraction : 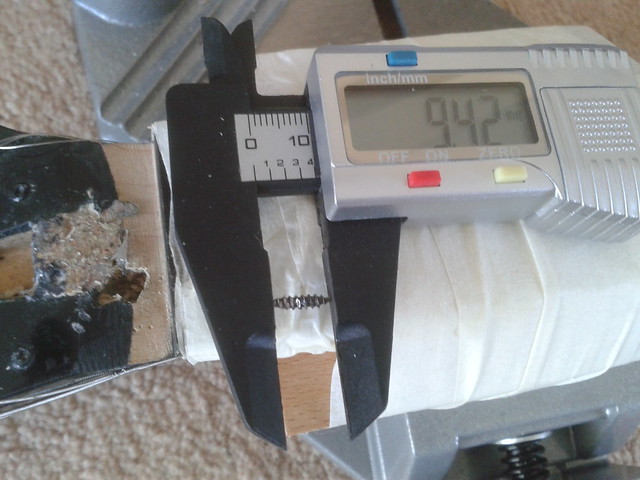 The screw was 9.5mm long in the wood. (~ 3/8") The shape unfortunately was not exactly round, and it is about 8mm in largest width (~5/16"). After drilling with 6mm drill bit and 8.5mm depth it looks like : 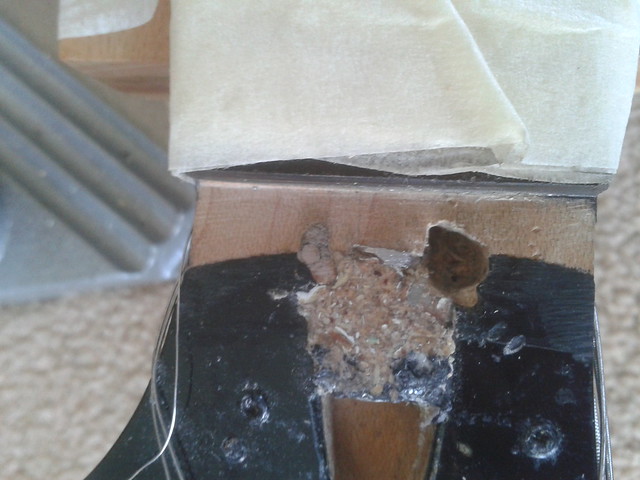 I guess the shape is still not round, and i gotta go for a bigger drill bit? I will try 7mm to make it rounder, then i will get some hardwood dowel. |
|
Deleted
Deleted Member
Posts: 0
Likes:
|
Post by Deleted on May 11, 2013 6:37:50 GMT -5
Re drilled with 7mm drill bit. Then i took a 8mm dowel from beech tree (shown in the pic), shaped it with sand paper to match the shape of the new hole, and cut it exactly at 9mm depth, and then installed it with strong bison glue. Here it is:  Since in this area : 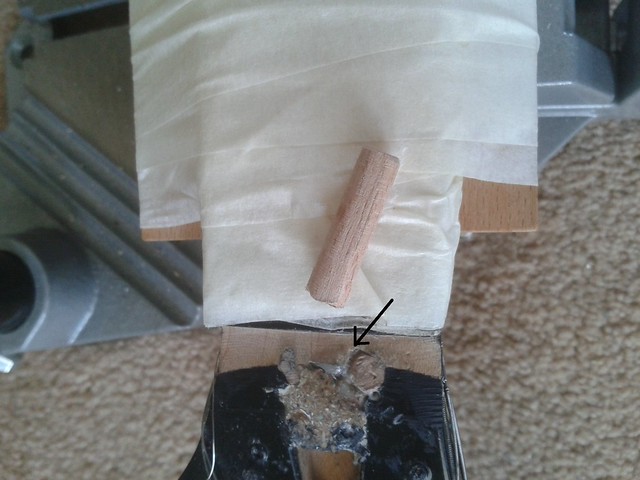 i was worried that there was an empty space, i cut a small slice of beech wood and stuck this in this area. Checked and the new screws will not be affected at all by this. I will let it dry some 12+ hours. Later in the evening, i think of working out the shim. Some time next week i'll get some clamps in order to put pressure to the wood shim layers and also glue them down to the nut shelf. It will be a long calm sunday tomorrow |
|
|
|
Post by cynical1 on May 11, 2013 11:10:48 GMT -5
Greek, don't take this the wrong way, but whatever you do, never consider a career as a bomb technician or nuclear power plant engineer...  ;D Remember that conversation we had about "devastation mode"? But hey, you got the screw out. I can only imagine what said "tool women (and some men recently : Ronaldo of Real Madrid) use to pull out eye brows" looks like, but you have to use what you got. Beech, depending on species, is close enough to maple to work fine. I know using real wood versus some filler makes more work, but the results justify doing that way. It's hard to tell from the pictures, but does the dowel pin stick out above the hole? As long as the majority of the hole is filled with real wood, and the new screws will contact this wood, aesthetics are not that important. The new nut will cover all of this anyway. I'd give it 24-48 hours to set up before you started working on it. You can use this time to determine how flat and square the exiting nut shelf is prior to installing the wood shims. The nut shelf has to be as square and flat as possible before you start gluing in the shims. Trying to use the shims as a means of making it square and flat is an effort in futility. Take Sunday off. Your blood pressure will thank you. Happy Trails Cynical One |
|


