Deleted
Deleted Member
Posts: 0
Likes:
|
Post by Deleted on Jul 12, 2013 2:51:35 GMT -5
Hello, during the last Aria Strat electrical-pot-switches, push-pull splitting, bridge tone, rebuild described here, as i was acting in haste (as i used to most of the time), i used some generic electric wire i found somewhere in the house, for wiring pots, switches, grounds. I had terrible soldering problems. The thing would not stick to the pot's chassis. Yesterday i took it out to play, and the volume pot (dimarzio if i am not mistaken) didn't work... argghhhhh. I'l have to re-open the guitar and use proper wire, i suppose. Now the question is which one. I read in other threads as well about this 22 AWG type wire. I guess just buying some of this at least will solve some of the soldering problems i had, correct? |
|
|
|
Post by newey on Jul 12, 2013 5:53:02 GMT -5
Soldering to the back of pots is tough no matter what wire one uses. Try roughing up the surface of the back of the pot with a little bit of sandpaper, this will help the solder adhere better.
There's nothing special about 22 gauge wire, just that it's a good size to work with inside a guitar, not so thick that it's hard to bend it where you need it to go, but not so thin that it's hard to work with. I use 24 gauge myself, but 22 gauge is easier to find in stores.
A couple of years back, I bought a big bundle of 24 gauge wire, in 5 inch long pieces, with both ends pre-tinned with solder. I got these from one of the DIY pedal-building suppliers, can't recall which one at present. But these are very handy, although a bit more expensive than just buying a spool of wire.
|
|
Deleted
Deleted Member
Posts: 0
Likes:
|
Post by Deleted on Jul 12, 2013 6:10:03 GMT -5
Try roughing up the surface of the back of the pot with a little bit of sandpaper, this will help the solder adhere better. Cool tip man, thanx. Now i remember with that particular wire i had also issues with soldering it to pins as well (besides the back of the pots), and it was the first time i used my own generic wire. In all other cases i used existing stock wire in the guitar since purchase. That's why i was kind of concerned with it. |
|
|
|
Post by lunaalta on Jul 12, 2013 8:20:12 GMT -5
I think it would be unusual to find a wire that doesn't solder properly, since this is a very common way of joining wire, and a very efficient way too.
Tinning the wire and connection is a very important step to getting a good connection. If both surfaces are well tinned, you'll just need to heat the solder surfaces to get them to connect.
'Tinning' is the act of applying a small amount of solder to both surfaces to be joined.
If a surface has old solder on it, it is worth cleaning it off and applying new solder.
The size of the back of a pot aids the dispertion of heat. Not desirable, since it can be hard to get to the correct temperature to melt your solder. Sometimes a hotter iron will help, but then be careful not to keep the heat on too long. Too much heat may damage parts close to your soldering place.
Since this area will be hotter than normal, care should be taken to keep the surfaces in contact, without movement, until the solder has cooled sufficiently for it to harden. Not doing so is the main cause of 'dry joints'.
As newey rightly comments, scratching the surface of the pot will remove any oxidation/dirt, helping you get solder to 'stick' better. This can also help if you are using old wire. This too can suffer from oxidation/dirt problems. So, either cut back your wire to a clean area, or scratch off the surface, with a blade, to expose nice bright areas to solder to.
Flux is solder's greatest friend!
You are probably using solder with flux within it's core. It is always advisable to clean off 'globs' of old solder from the iron and surfaces and touch some new solder on, just before you start your solder joint. This ensures there is some fresh flux involved, which can help the 'flow' of the solder.
Soldering is a bit like painting a house. Everyone says it is easy and anyone can do it. Problem is, not many people have learned the simple basics, and that's when things might go wrong.
You may know all of these things, of course, in which case, you can ignore the above. I just thought I'd cover bases, in case you don't have this knowledge, 'yet'.
|
|
Deleted
Deleted Member
Posts: 0
Likes:
|
Post by Deleted on Jul 12, 2013 9:37:55 GMT -5
Aha, maybe my wire was there being oxidating for ages. I will take all under consideration next time i fix this. Gracias!
|
|
|
|
Post by JohnH on Jul 12, 2013 15:44:00 GMT -5
I think tinning the ends is key before joining. I do that to all stripped wire ends and lugs in electronics work. The only exeption is on component wires, if they are fresh and clean and the factory tinning is still shiny.
My latest soldering project has been some connector pieces for our electric fence system to carry the pulse under gates. This involves soldering some mains cable (not using it for mains, but its ecconomical and double insulated) to some thick galvanised washers. I use the same technique as on a guitar wiring, though it takes a bit longer to get the flow happening. I good solder joint is stronger than the parts, even its just based on contact face to face without mechanically wrapping the wire.
|
|
Deleted
Deleted Member
Posts: 0
Likes:
|
Post by Deleted on Jul 15, 2013 9:49:46 GMT -5
get rid of any GREACE/Oils (from fingurs / Mouth (i still strip with my teeth, the girlfriend likes it but means have to buy more))
and Tin them as John said, i think i recall having a Tinning bath one time for Cables
and leave the cable loose, too much temp to put a clamp on the end to stop it moving .. Making a HEAT SINK
|
|
Deleted
Deleted Member
Posts: 0
Likes:
|
Post by Deleted on Jul 16, 2013 11:16:31 GMT -5
guys thanx, i just realized i never did any tinning at all! All my soldering seemed to work without tinning. Next time i will buy guitar hookup-specific wire (just to make sure and eliminate all other negative parameters) and then apply tinning as well. Great tip Lunalta, John and Angel!
|
|
|
|
Post by sumgai on Jul 16, 2013 17:04:37 GMT -5
'dewd You don't need to spend an exhorbitant amount of money on "guitar specific wire". We had a thread here several years ago, I don't seem to be able to find it just now (D2o would probably trot it out in a flash), but it dealt with what kind of wire to use inside our guitars. With the exception of using shielded wire for things like acoustics or semi-hollow bodies, most of us use anything from 18ga. down to 24ga, either solid or stranded. Some varieties come "pre-tinned", and if that claim is made, you should test it first in a non-critical application, before relying on the seller's claims. Sources. That's the biggie, where to get wire. Suggestions back then were: 1) computer cables such as serial or parallel ports, monitor cables, USB cables, or flat-ribbon style Floppy/Hard drive cables; 2) door-bell wire (usually 22 or 24ga., and usually in a twisted pair); 3) any kind of small signal wire (not meant for house-current AC), new or used/recycled, except; 4) Do NOT, under any circumstances, use Litz wire - that's a Romper Room No-No! So long as you can bend it to shape and you can handle it without dropping it or breaking it, then it'll work just fine. We ended up with these main points: a) If you have to buy some, try to buy as much as your wallet can afford*; and b) Pre-tin everything before you start soldering; c) If you're soldering to pots, scratch them up first with course sandpaper; d) Use the correct soldering iron heat range - 15 - 40 watts is sufficient for everything you're likely to encounter inside of a guitar. Do all that, and you should be good to go!  HTH (All of the above is from memory, which as we all know, is failing at an ever-increasing rate. If I've omitted anything germaine, please don't hesitate to fill in the gaps.) sumgai * About buying wire - As you buy larger quantities, not only do you get a better price (per foot), but there will come a time when you undertake another project, and you'll be glad to have all that "extra" wire already sitting there on your workbench - no waiting on the delivery man again! Trust me on this.  |
|
|
|
Post by 4real on Jul 16, 2013 18:45:02 GMT -5
Any component like a Pot will require filing or sanding to remove grease and/or plating or oxidisation and tinned ready to be joined...many threads have shown how to do this. Connecting a wire to this tinned pot to a tinned wire requires minimal time and heat for a perfect join, you are only melting the two pre soldered components together. For wire, one can find it in lots of different places and cheap to free. Always cut a new end and strip to fresh, twist so there are no lose 'wires' in the strands and tin immediately...twisting the ends will avoid stray strands coming loose when resoldered and potentially shorting somewhere. Some nice wire strippers/cutters are invaluable and not expensive... I use this kind which will take off the outer layer of a shielded cable well...  For wire, may as well buy a bag of mixed 'hookup wire'... jaycar.com.au/productView.asp?ID=WH3025&form=CAT2&SUBCATID=995#1For $5 there you get 2 metres in 8 different colours. Using different colours looks good and makes trouble shooting a lot easier, using one colour for ground for instance makes things a lot clearer. Other sources are above, for iner wire, I ahve 'rainbow ribbon' wires that I just strip off teh colour and length from the ribbon...  A metre at $3.30 will give you 16 meteres of 16 different colours...and you can find it useful to keep them in pairs, say for a battery connection in an active circuit, or often I will add 5 in a small ribbon to a 4+ground HB pickup shileded connection, it is a lot easier and neater to connect these wires from the pickup cable, than to stry and solder braided wire to anything... ... I use sheilded cable extensively in my wiring, this eliminates the need for cavity shielding pretty much, especially from Pups or say in an LP where the wires need to go back and forth to the upper bout selector switch which can not be sheilded. For sources of finner sheilded cable, you can find decent cheap shielded RCA wires and just cut them up. I ahve some 4 independently shiled 'ribbon' that I just tear off for most project, the internal wires are separately coloured and can be torn off separately or used in joined pairs say, to go back and forth through a cavity, such as in an LP. ... Always, where possible, solder out of teh guitar to a carboard template... This picture of my strats wiring shows most of those techniques and largely using 'rainbow' cable...such as out of that HB cable and all over that superswitch... 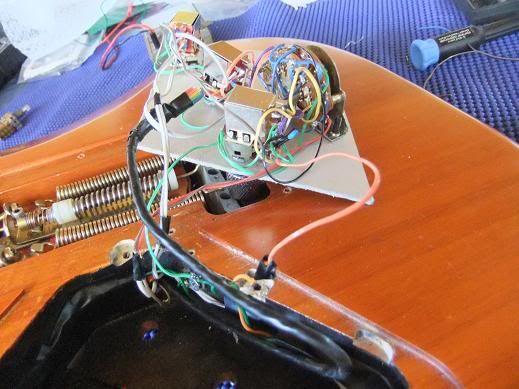 And installed...  similarly my LP... 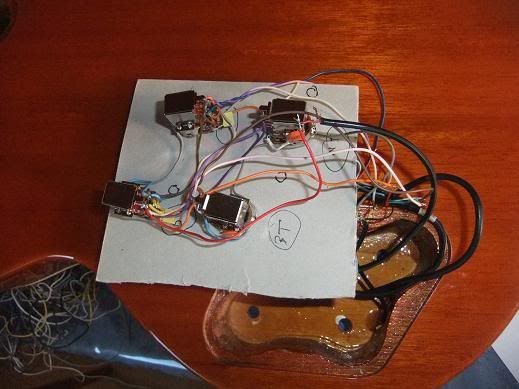 Both were wired so as to allow testing before installation... Use PVC tape where appropriate and consider putting some over the sheilding if it is at all possible that the selector say or a stray wire might short against the foil. Keep the soldering iron tip clean and fresh, I use a brass scourer type thing dip the soldering iron in to clean off excess solder constantly. For de-soldering, you can get special braid, but off cuts of cable sheilding work almost as well to 'soak up' excess solder and make components return like new and suitably tinned... |
|
Deleted
Deleted Member
Posts: 0
Likes:
|
Post by Deleted on Jul 18, 2013 3:18:54 GMT -5
'dewd You don't need to spend an exhorbitant amount of money on "guitar specific wire". We had a thread here several years ago, I don't seem to be able to find it just now (D2o would probably trot it out in a flash), but it dealt with what kind of wire to use inside our guitars. With the exception of using shielded wire for things like acoustics or semi-hollow bodies, most of us use anything from 18ga. down to 24ga, either solid or stranded. Some varieties come "pre-tinned", and if that claim is made, you should test it first in a non-critical application, before relying on the seller's claims. Sources. That's the biggie, where to get wire. Suggestions back then were: 1) computer cables such as serial or parallel ports, monitor cables, USB cables, or flat-ribbon style Floppy/Hard drive cables; 2) door-bell wire (usually 22 or 24ga., and usually in a twisted pair); 3) any kind of small signal wire (not meant for house-current AC), new or used/recycled, except; 4) Do NOT, under any circumstances, use Litz wire - that's a Romper Room No-No! So long as you can bend it to shape and you can handle it without dropping it or breaking it, then it'll work just fine. We ended up with these main points: a) If you have to buy some, try to buy as much as your wallet can afford*; and b) Pre-tin everything before you start soldering; c) If you're soldering to pots, scratch them up first with course sandpaper; d) Use the correct soldering iron heat range - 15 - 40 watts is sufficient for everything you're likely to encounter inside of a guitar. Do all that, and you should be good to go! HTH (All of the above is from memory, which as we all know, is failing at an ever-increasing rate. If I've omitted anything germaine, please don't hesitate to fill in the gaps.) sumgai * About buying wire - As you buy larger quantities, not only do you get a better price (per foot), but there will come a time when you undertake another project, and you'll be glad to have all that "extra" wire already sitting there on your workbench - no waiting on the delivery man again! Trust me on this. Thanx, great tips SamGaj! Also, i guess common alarm systems wire would do as well. I have lots of this, i might give it a try. just a quick one regarding tinning. I warm the wire with the iron. Immediately i attach the solder to the wire and let the two sort of bond together. Then i scratch the surface on the pot, sand it, etc. Then i warm with the iron both surfaces and let them bond there together to eternity!! (well till the next mod)! |
|
|
|
Post by newey on Jul 18, 2013 6:18:53 GMT -5
If a picture is truly worth a thousand words, then a video is worth a thousand pictures. Or something like that. Here's a pretty good tutorial on how to tin a wire:
|
|
|
|
Post by lunaalta on Jul 18, 2013 7:42:36 GMT -5
Good video find, Newey, nice one. Especially the part about putting the iron on the opposite side of the wire to the solder, and let it flow through the wire, ensuring a good coating of solder. This is how I was taught, way back in the 1970s.
GD, don't forget to tin the back of the pot, as well! Both surfaces to be joined need tinning!
Then you'll just need to bond the soldered surfaces together.
It would be a good idea to practice on some spare wire/pots, just to get used to how to do it.
As has been mentioned, it is a little harder to solder to a pot, since the amount of metal involved (size of the pot) soaks the heat away.
When soldering components together or to a circuit board, extra care must be taken not to over heat, and damage, the components, but that's another story.
Good luck, and be careful not to burn yourself.
|
|
Deleted
Deleted Member
Posts: 0
Likes:
|
Post by Deleted on Jul 20, 2013 1:45:05 GMT -5
great tips newey. I'll have to watch this video closely.
Luna, multcas gracias amigo. Great tips. The problems on this guitar are maybe due to tinning. (BTW GN2 rulez!). Before this, all pots, wires i used in other guitars and in this guitar were most probably tinned by the factory. I just changed pups and wiring, but used the same wire, components, so no problem. It was only on this last mod on this particular guitar (changed everything except pups), that i had problems. I will apply tinning for sure.
Anyway, i just cannot imagine of a way that the volume pot is not functioning properly. When i push the knob by the sides it works for a while. After some minutes, it starts again to not function, not reduce volume, but only slightly. It is a push-pull dimarzio pot. I cannot imagine how it broke to easily, if it turns out to not be a tinning-soldering problem.
|
|
Deleted
Deleted Member
Posts: 0
Likes:
|
Post by Deleted on Jul 28, 2013 10:01:08 GMT -5
Just an update on this. I just applied quite a bit of electric contact spray externally (without opening thee pickguard) and the dimarzio vol push-pull pot now seems to work correctly.
|
|


