Deleted
Deleted Member
Posts: 0
Likes:
|
Post by Deleted on Sept 15, 2015 14:31:41 GMT -5
Looks good, anything done to the front side.
|
|
|
|
Post by strat80hm on Sept 16, 2015 0:48:14 GMT -5
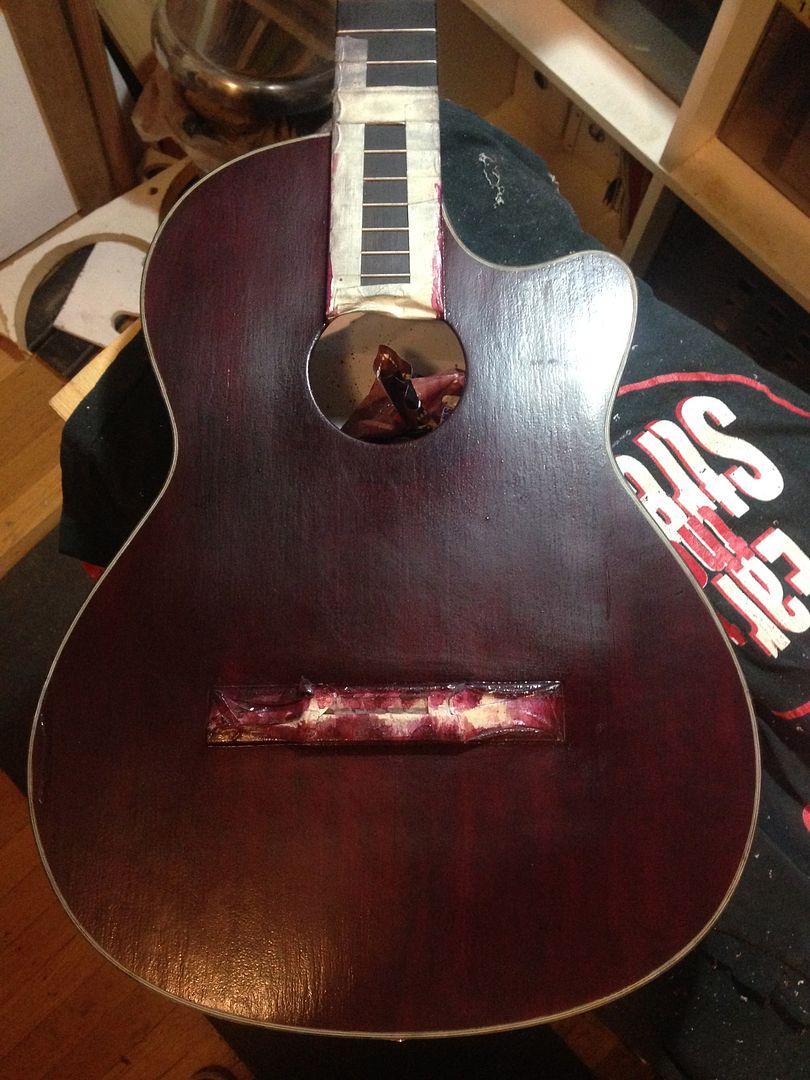
Looking good! Having the time and guinea pig around to experiment on can be fun. Yeah, I never had a lot of use for solid pigments. As you said, they may, or may not, fully dissolve and keeping them consistent through multiple batches can be challenging. Just give the shellac plenty of time to harden and the clear coat, once buffed out, will polish up nicely. One caution, trying to simulate wood grain with brush strokes always works best with a matte finish. A mirror polished final clear coat will betray every imperfection and magnify attempts at a faux finish. I appreciate your support guys! Indeed, solid pigments are challenging. Also recreating a color s aint easy - i know, i should have taken notes, but i was like "i ll remember.." How long is plenty of time? Good thing to know that the clear coat can take care of this, as i m definitely going for matte finish. Looks good, anything done to the front side. It s fun indeed, thanks! Removed the strings and stuff around 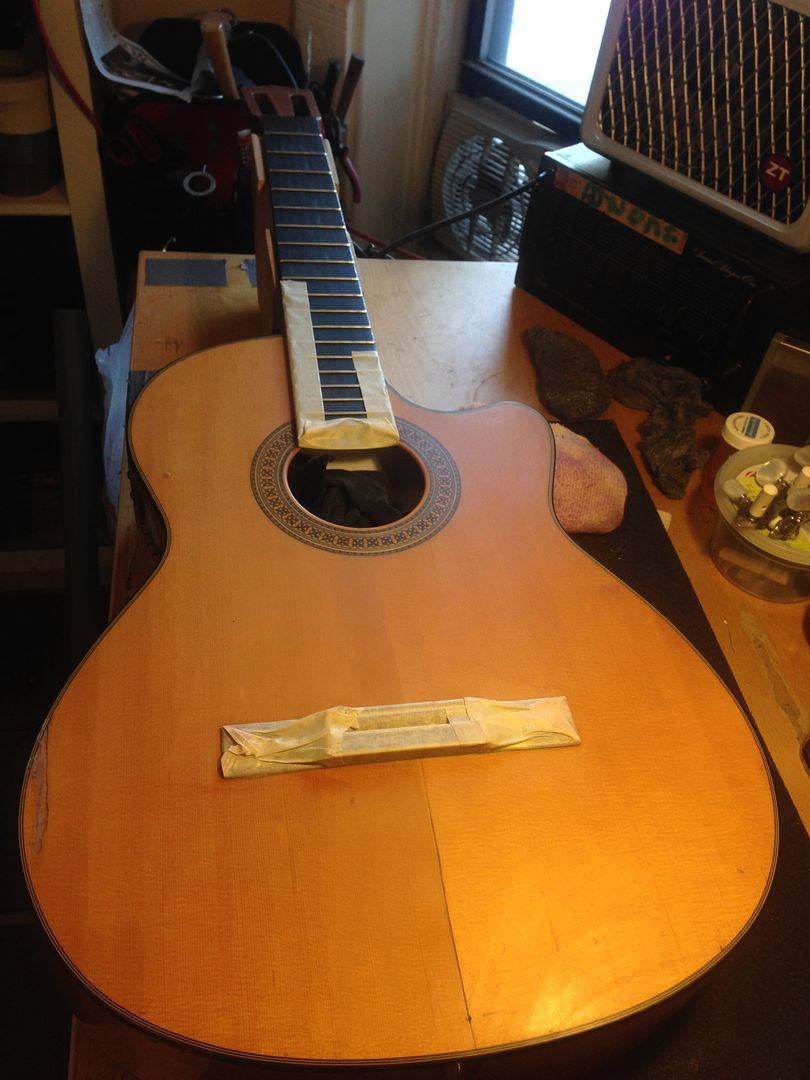 I cosmetically arrangedthe front crack (CA glue then razor blade)  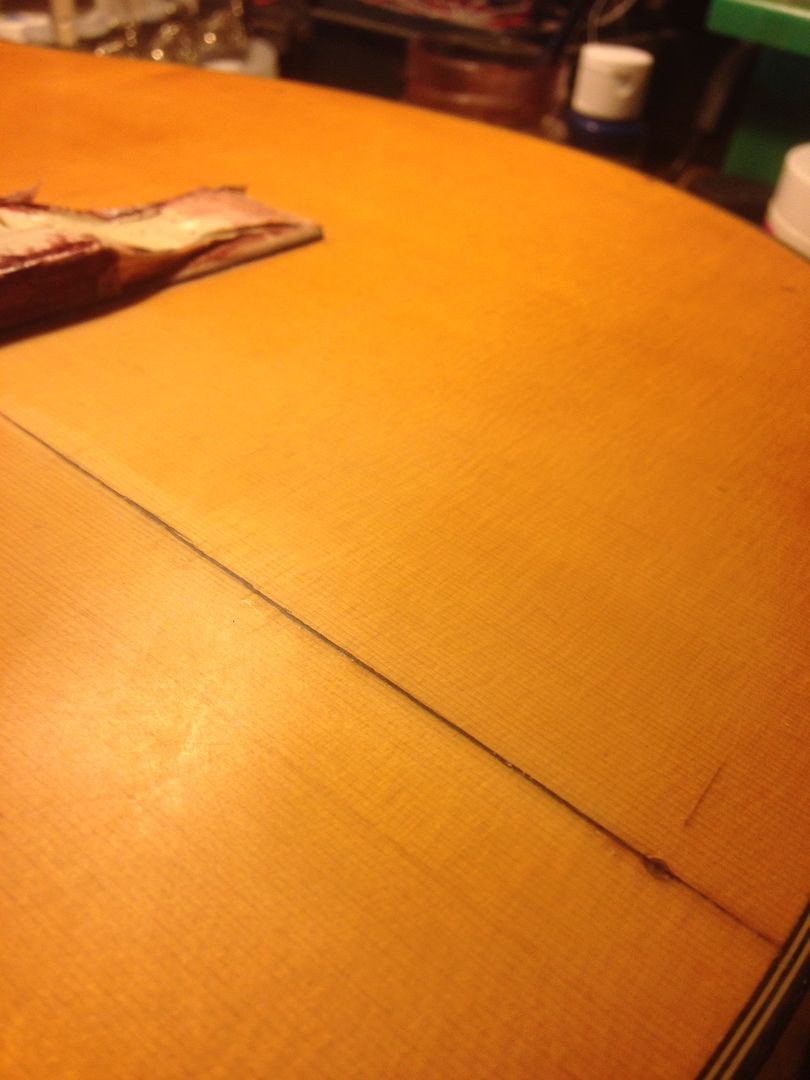 And started some coloring 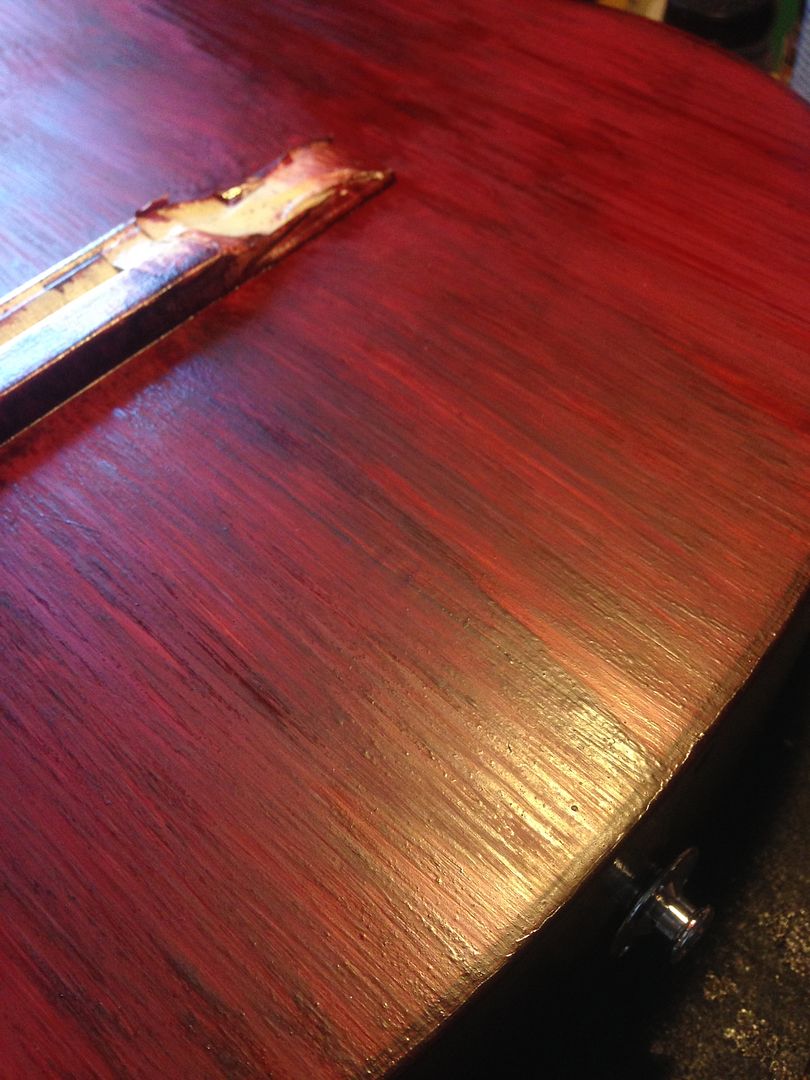 I m not happy with the front color yet - though the fun with shellac is that each layer "correct" the previous one, so i can go brighter or darker freely. Very nice product, didnt know about it. I got some amber and some even darker on (although it s labelled CLEAR). Thing is i have a last minute gig that i d need to bring this guitar to tomorrow - wondering if it s any sturdy for that as is? Then i d correct the front color and apply coat. Besides the pain re-assembling/disassembling, is this any safe? |
|
|
|
Post by cynical1 on Sept 16, 2015 13:56:57 GMT -5
I'm guessing you used a de-waxed shellac. Zinser shellac premix is typically de-waxed, so I'm guessing that's a safe assumption, since they're about the only folks still making shellac. If the shellac is new, check the date on the can to determine this, it should harden within 24-48 hours. Humidity, temperature, age of shellac, etc...can increase this. An old trick to test how good the shellac is to use a piece of glass, drop some shellac on it and see how long it takes to harden. If it's more than a couple days it's time to deep six the can.
Yeah, a matte finish can hide quite a bit. A high gloss will enhance all the flaws.
That turned out pretty damn good. Nice work. Are you going to try the same surgery around the big divot?
Yeah, "clear" shellac is somewhat misleading. Shellac comes from the resin secreted by the female lac bug in Asia. As with all organic things, results vary. Typically it's converted to "flakes" then mixed with some type of alcohol\ethanol to apply. It was extremely common up until the early 20th century when it was largely replaced by nc lacquer as a final hard finish.
Wow, never heard that one before... Without putting any hands on this guitar, it's hard to say with any certainty. If the finish doesn't deform when you touch it, you're probably safe. The shellac is tougher than you'd think. Look at any antique well cared for from the 19th century and you're probably looking at shellac.
The assembly\disassembly should present to issues, as it looks like all you're doing is changing strings. Cut your nails first to reduce gouging and just be careful.
Now, for the potential problems... You're using shellac as a sealer for the lacquer. Any contaminants on the substrate when you shoot the lacquer can create problems. Blushing and fish-eye are common problems due to contamination left behind. Oils, sweat, silicone, etc can become an issue. Wiping the surface down with naphtha or lacquer thinner should remediate these issues.
You're probably going to continue with the coloring after the gig, so just wipe the guitar down when you're through playing it, stuff it in the case and wipe it down with some lacquer thinner when you get home and you should be fine.
Looking good. Keep posting the pictures. It's nice to see the transformation.
Happy Trails
Cynical One
|
|
|
|
Post by strat80hm on Sept 16, 2015 15:33:22 GMT -5
Cool Cyn Zinsser Shellac indeed - 2 "old" pots that i got from Pratt, 1 new one from HDepot. Will test it then, thanks. Age might not be the same for each pot - i noticed that some layers had a glossy finish while others would be matte, unsure of why, but well, no big. I have a Clear Shellac spray, could i use that for clear-coating? That d be convenient! I left the big divot as is - it would have been against my "let it be" inclination  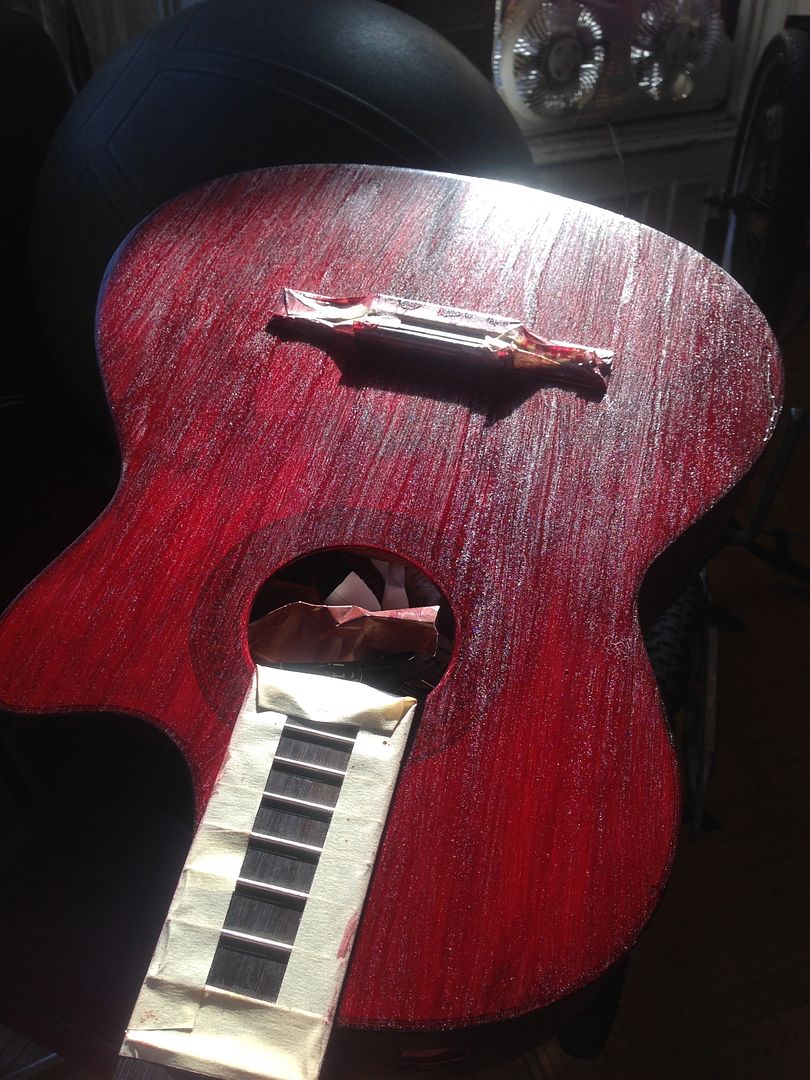 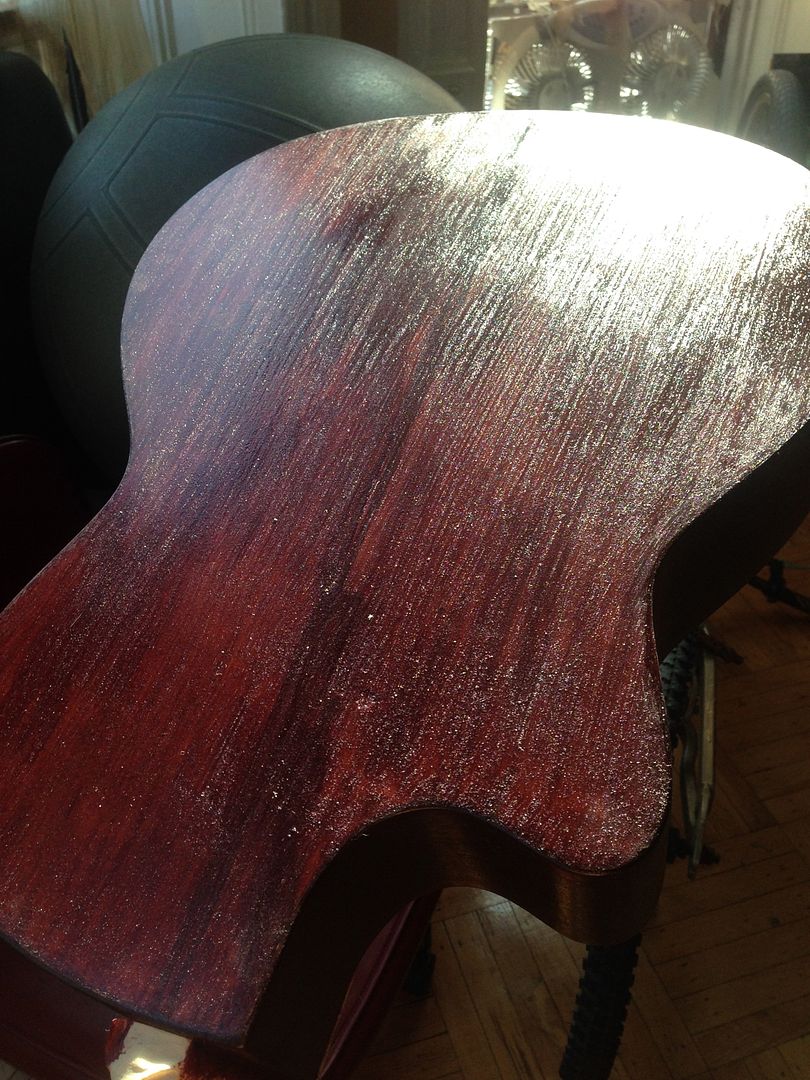 Thanks for precisions - so you say that naphta of lacquer thinner (or lighter fluid?) would not damage the shellac? good to know. Indeed finish seems hard yup - i could try to play it tonight - i d have to put back strings and pegs and preamp too. |
|
|
|
Post by cynical1 on Sept 17, 2015 11:31:21 GMT -5
I have a Clear Shellac spray, could i use that for clear-coating? That d be convenient! You could leave it with just shellac. If it was an end table I'd say great. This is a piece of wood that's going to be potentially exposed to temperature extremes, variances in humidity and skin oils and sweat. While I like shellac for many things, as a final finish I tend to use it primarily as a sealer between different finishes. If it were my guitar I finish it with lacquer, as lacquer tends to stand up to being handled better than shellac. If you have no facilities to spray it, you can thin the lacquer about 10%-20% and brush or wipe it. Most "brushing" lacquers have a retarder that allows it to level better by slowing the drying time. If you're going for a matte finish, use a satin lacquer and just use 0000 steel wool at the end of the process rather than buffing it out with rubbing\polishing compounds and swirl remover. One serious caveat to lacquer is the curing time. Unless you bake it, allow about 20-30 days for the lacquer to completely cure before exposing to a tour or heavy gig cycle. The old rule of thumb was that until you can put your nose right on the finish and not smell the solvent, don't buff it. Probably should have mentioned that sooner... The next logical question is why use lacquer? Man, I hate to start down this road, as it may get long, but I'll try to keep it brief.
[GOSPEL]
The primary task of any wood finish is to protect the wood from external contaminants. Oils, shellacs, lacquers, varnishes, polyurethanes (which is just plastic varnish) and epoxies all perform this task. Some do it better than others. You really need to look at what the wood is going to be exposed to in order to make the best decision.
[/GOSPEL]Let's start with oil finishes. Tung oil, linseed oil, marine oil...etc...will all protect the wood they're applied to. They're easy to apply, as all you need to do is grab a rag and wipe it on. I've done more than a few bookcases with oil finishes and they've worked fine. All the bookcase does is sit there and hold books. The downside of oil finishes is that they don't have a tremendous staying power. Used on a guitar or bass you'll find that, depending on use, you'll repeatedly be applying more oil to protect the wood. Who wants to do that? Shellac was the bomb in the 19th century. It would dry hard, had good staying power and could be polished to a mirror finish with some paste wax. The problem with this method wasn't the shellac so much as it was the wax. Once you start down that path you're always polishing it. Once enough wax builds up you start having issues. Who wants that? Around the beginning of the 20th century nitrocellulose lacquer arrives. Woodworkers rejoice as the stuff is dirt cheap, easy to work with and polishes to a mirror finish without the wax. The biggest advantage to me with lacquer is that repairs can be made seamless since each new coat of lacquer melts into the previous coats. Once you match the color and depth (remember the Satellite City CA super thick adhesive?) lacquer polishes out to a seamless repair. The downside of lacquer is the fumes. Work with this stuff long enough and you're talking to trees and flowers after a few decades. The downside on guitars comes from humans. Sweat and oils will soften the lacquer eventually leading to a failure of the finish. Take a look at Rory Gallagher's or Stevie Ray Vaughn's Strats and you'll see what I mean. Varnishes actually have a little bit in common with shellacs, as they contain a resin component, and shellac is a resin. They also employ a drying oil and some type of solvent. Varnishes are nothing new, they've been around for thousands of years. Only in the 20th century did the durability of the resins employed increase the durability and reduce the fumes in varnish. Polyurethanes are just a varnish with a plastic resin component. Unlike lacquer, varnishes do not melt into the previous finishes. This is why repairing the finish on poly/catalyst coated wood is such a challenge, as the new finish merely "sits on top" of the previous ones. Epoxy coatings are a bit unique in that they share common traits with varnishes, but mixing, application and pot life are significantly different. The epoxy resin is extremely hard compared to any other finish out there. The time involved in sanding and polishing out is also much longer than other finishes, which is why they only appear for very specific and specialized applications. Jaco Pastorius used Petit marine epoxy to coat his fretboard on his Jazz bass when he yanked the frets out. I've done a few of these and have to say, the epoxy rings like ebony after about 6 coats. Granted, the labor to sand it down, smooth it out and maintain the neck radius be tween coats makes this a very labor intensive task. It normally takes about 1-3 hours per coat starting with 60 grit and working down to 0000 steel wool between coats. About as much fun as having your gums scraped. The advantage is that you can easily use roundwound strings on a fretless bass and not chew up the fingerboard. OK, that's enough of that for now. I'm sure some will think I over simplified all this, but who wants to read 50 pages of text on the finer points of wood coatings...unless they have insomnia... Fair enough. At least you didn't put a flower decal over it... Head to Home Depot and get some real lacquer thinner. The stuff is cheap, and that's all that's going to be in the can. Lighter fluid varies from brand to brand and lacquer thinner evaporates quicker. Always embarrassing to ignite your guitar while lighting a smoke... Yeah, always the downside of working on a guitar you gig with. You could probably keep using this guitar at gigs until you know you have enough down time to apply the lacquer. Shellac is great stuff. Sad part is no one uses it anymore as most people don't even know it exists. The red looks pretty cool. I like it. Let me know if you notice anything different with the tone since you've applied the shellac. Happy Trails Cynical One |
|
|
|
Post by strat80hm on Sept 17, 2015 12:51:37 GMT -5
Good guidance Cyn, much appreciated. Got lazy and took another guitar to the concert last night haha - glad i did as i d feel lazy today! I m planning on using it on an important on on Saturday night in Brooklyn, which gives me about 2 days! So I found some Krylon Acrylic Crystal Clear spray, could this do the trick over shellac? I contains acetone  Otherwise I m gonna follow your expertise and get some matte lacquer today (Minwax)- along with lacquer thinner for cleaning up here and there. How many layers of shellac? Glad you like the red - i might add another layer to get to where i d like, though i m wondering: is there any limit to the number of layers? I ve done 4 so far i guess. Also, while i light-sand with thin steel-wool in between layers, i m not getting anything very "flat" surface-wise (not that i dislike it though). Should i sand more? Although you mentioned earlier that from the rugous state i m at now, i could get to smooth with the lacquer: how so? Just by applying and sanding? |
|
|
|
Post by cynical1 on Sept 17, 2015 14:12:26 GMT -5
So I found some Krylon Acrylic Crystal Clear spray, could this do the trick over shellac? I contains acetone Well, the acetone is a pretty good indicator that it's a catalyst\acrylic lacquer. It would work, but I have to admit, I'm not a big fan of Krylon. Minwax makes a good product. From experience, if you can find Cabot brushing lacquer you'll like the results better. I've used it for repairs for years and it's always been reliable. 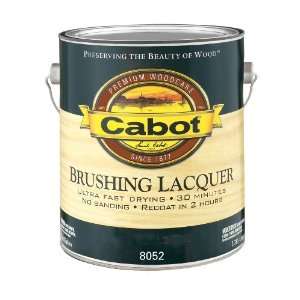 You can thin it, wipe it, brush it and it always does what it says on the can. It levels very well right out of the can. The number of coats, while important, is not as important as the final mil thickness of the finish after sanding\polishing...etc. When trying to flush a headstock decal you may spray 20-30 coats. You sand in between coats until the decal appears to be seamless in the final finish. Of the 20 coats, there's only the equivalent of 6-8 coats left. Case in point:  This was actually poly, thinned 50\50 with mineral spirits and hand wiped. There's about 40-50 hand wiped coats to accomplish this one...with a lot of sanding in between. Thinning reduces the final mil thickness, but on poly it levels great. I don't dislike poly, it just won't buff out as well as lacquer and it's tough stuff to work with. Yeah, sanding out a finish to a flat smooth final finish does have a learning curve. From the pictures I've seen, my guess is you're not sanding enough. The first couple of coats you just knock off the debris and high spots. As you add more coats you really need to work towards a smooth surface. After 4-6 coats you'll find you're removing most of these coats to get that flat surface. Just keep adding and sanding the shellac until you can hold it at an angle to a light and not see anything but flat. This is why matching all your colors perfectly is so important, because the last thing you want is a technicolor rendition at the end. Wet sanding really isn't that critical to the matte finish you're after, but smooth is. You can find 360 grit and 400 grit dry sandpaper at most home improvement stores. Ideally, you're going to want to start by flushing all the brush marks in the existing shellac. Work in one direction. You don't want to bear down too hard, but you need enough consistent pressure to actually remove material. Be especially careful on the sides and edges as it's very easy to burn right through them. There are all kinds of abrasive pads that simulate steel wool. They also have the advantage of not leaving little pieces of metal all over everything. I prefer steel wool, but that's just me. I'm certain 3M would have a differing opinion. Don't panic when you see all your efforts sanding away. You're not going to get it smooth unless you remove material. Remember to change your sandpaper often and use a tack rag prior to adding additional coats. If the shellac is not smooth as glass your lacquer will never fill it flush. Remember the earlier post on dry mil thicknesses of lacquer. In finishing, applying the finish is the easy part. It's all the endless sanding...and sanding...and sanding...and then some more sanding that yields the perfect result at the end. This is Project #1:  That's about 15 coats of red with another 10-12 coats of clear lacquer, all sanded smooth with 400 grit wet or dry between each 3rd coat after waiting a few day between cycles. Once it cures after 30 days I started with 400 grit wet or dry, moved to 800, then 1500 and finally 2000 grit paper. Then two rounds of buffing compound, two rounds of polishing compound and finally a couple rounds of swirl remover. Then I tossed some car wax on it. It doesn't come that way out of the can. Have I scared you off yet? Happy Trails Cynical One |
|
|
|
Post by strat80hm on Sept 17, 2015 14:30:01 GMT -5
That's about 15 coats of red with another 10-12 coats of clear lacquer, all sanded smooth with 400 grit wet or dry between each 3rd coat after waiting a few day between cycles. Once it cures after 30 days I started with 400 grit wet or dry, moved to 800, then 1500 and finally 2000 grit paper. Then two rounds of buffing compound, two rounds of polishing compound and finally a couple rounds of swirl remover. Then I tossed some car wax on it. It doesn't come that way out of the can. Have I scared you off yet? Hahaha, yes, now i am afraid.. that it wont as simple as pressing on a spray and watch it dry out - ok, so time, patience and elbow grease, got it. As for the clear coat, obviously i m not there yet, good to know, back to shellac and pigments. - and the bulk of a good job is to layer and sand (with water) and repeat, all right, i ll do that today then. More soon Impressive job on that red solidbody here Cyn, love it. |
|
|
|
Post by cynical1 on Sept 17, 2015 14:42:51 GMT -5
Thanks. That one was a labor of love.
One thing on the shellac. If you're getting a lot of brush marks you can try thinning it with denatured alcohol. Your final mil thickness decreases, the curing time goes up a bit, but it will level better.
I wouldn't wet sand the shellac. A 360 or 400 grit dry will work fine. Some steel wool, 00 or 000 after the sanding will help. It's a process...coat, sand, coat, sand...and eventually it's flat.
I'd lose the dry pigment and stick with the TransTint dye. Write down your volumes. IE: 2 oz. shellac, 1/2 oz. denatured alcohol, 15 drops of dye...whatever...and keep ALL of your batches consistent. You'll thank yourself later.
If you want to warm it up, drop some amber dye in the lacquer when top coating the shellac.
And you make a good point, a good finish is a lot more work than anyone thinks it is. Ever wonder why repainting a guitar is so expensive? Do one and you'll know.
Keep at it, we're all pulling for you.
Happy Trails
Cynical One
|
|
|
|
Post by strat80hm on Sept 18, 2015 15:34:57 GMT -5
Thanks. That one was a labor of love. One thing on the shellac. If you're getting a lot of brush marks you can try thinning it with denatured alcohol...It's a process...coat, sand, coat, sand...and eventually it's flat. Still layering/sanding and seeing results coming. 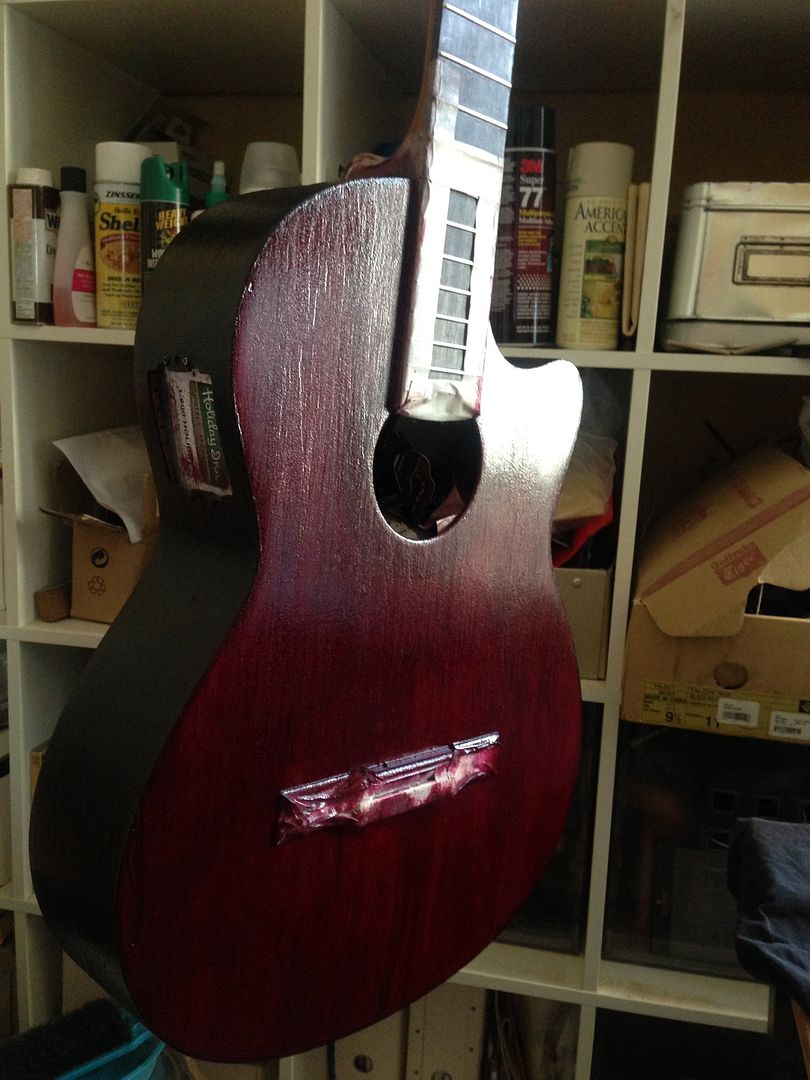 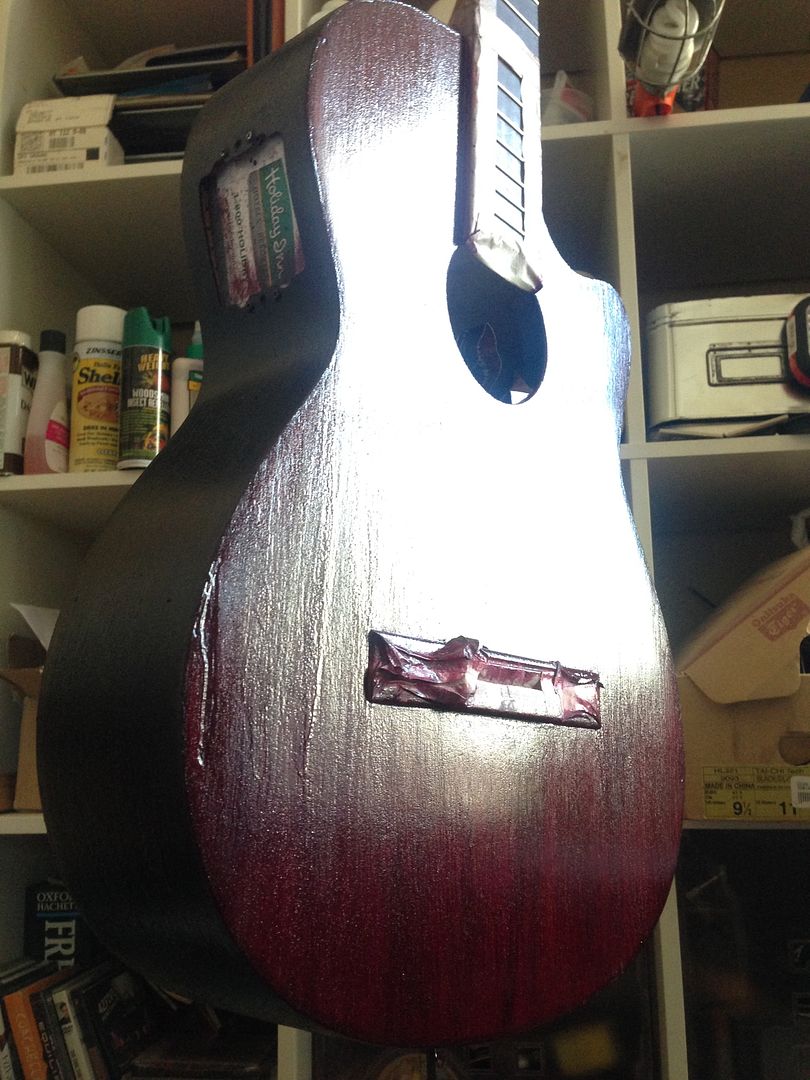 While taken into the fun of flat mirror type process, I realize that from the beginning on, my goal has always been to get that "naked wood" finish like on my LaPatrie - meaning matte, with some asperities, uneven-ness. I do not want a plain colored instrument, but more something a bit rough and organic. In that regards, brush marks are actually part of the desired results, though now i m wondering when to stop haha I suppose i could go for a couple more layers just for the sake of getting a thick/solid finish - and then stop when it looks right. Then only would i go for the clear coating. Hope this makes sense. |
|
|
|
Post by cynical1 on Sept 19, 2015 21:52:48 GMT -5
I think I'm following you. You want brush marks on this guitar. That's OK, it's your guitar.
I would caution about adding too many more coats of shellac to this. Not that it's terribly critical with the preamp, but every additional coat added will color the sound to a degree...no pun intended.
Pretty much wherever you stop at with the shellac will remain through the lacquer...brushmarks and all. Using lacquer, unless you dope about 90 coats on, won't fill anything in the way of brushmarks.
I would also caution against leaving too radical a difference in the shellac coating. Uneven coats tend to react differently to environmental factors. You're already looking at three different strata on this guitar when you're finished. The original factory finish of God only knows what, the shellac and finally the lacquer. Too heavy a coat anywhere in there could lead to crazing or cracking of the finish if the right conditions exist or present themselves.
If it were me, I'd be happy with the randomness of the colors from the different dye saturations and work more to level the shellac prior to the lacquer. Remember, the shellac is really only there to act as a sealer coat between the factory finish and the lacquer. You can still work more color into the end result by dying the lacquer.
Make sense?
Happy Trails
Cynical One
|
|
|
|
Post by cynical1 on Sept 21, 2015 22:19:16 GMT -5
NOTE: I screwed up here and hit EDIT instead of QUOTE and wiped out your post. Sorry, CRS is a terrible thing. Anyways, here's my reply:
Looking good. I liked the video on making faux wood grain. They did make it look a bit too easy...
This is probably easier to show than it is to explain. When you first start adding shellac\lacquer...whatever, you tend to just scuff the early coats so the high spots, dust, hair, whatever are removed. As the thickness increases you actually wind up sanding most of it off to get that perfectly flat substrate. When wet sanding the trick is to sand each grit until you can't see the sanding marks. It's a light touch evenly performed. Easy to explain, but it takes years to perfect. For reference, there are are no shortcuts.
In your case, if you can see obvious high brush marks, then you really want to flush it back. Remember, the final lacquer is only going to be several mils thick, so anything you don't get flush you'll prior to applying the lacquer, you could wind up sanding through the lacquer back into the shellac. Not what you want to do.
As I said before, the effect of the different color red or amber from the shellac, sanded smooth, will create a cooler effect than a bunch of brush marks...not that I'm casting aspersions on your whole brush mark thing...
The clear shellac over your colored shellac is not a bad idea. If you SWAGGED the dye in the shellac, you're probably already getting some unique results as you sand it down. Obviously, you don't need to get it NASA flat, so if there are some brush marks it's not the end of the world.
One thing you can do to eliminate any sand through after the lacquer is on is to start with an 800 grit wet or dry, knock the gloss off, then go to a 000, then 0000 steel wool. This will keep your matte finish intact and reduce the odds of you sanding back into the shellac.
Another downside of using too thick a coat is something you'll find when you scrape the binding. If the shellac is too thick you'll find you've created a "step" between the binding and the shellac. You can lightly sand this out, but be careful around the edges. That's the place everyone sands through starting out. A light touch and more time is the trick. Easier to do it right than to do it twice.
I'm getting anxious to see the finished work. You're doing this the old school way, so if nothing else, you can be certain no one else out there has a guitar that's going to look like this one.
Happy Trails
Cynical One
|
|
|
|
Post by strat80hm on Sept 21, 2015 23:32:54 GMT -5
NOTE: I screwed up here and hit EDIT instead of QUOTE and wiped out your post. Sorry, CRS is a terrible thing. Anyways, here's my reply:
In your case, if you can see obvious high brush marks, then you really want to flush it back. Remember, the final lacquer is only going to be several mils thick, so anything you don't get flush you'll prior to applying the lacquer, you could wind up sanding through the lacquer back into the shellac. Not what you want to do. As I said before, the effect of the different color red or amber from the shellac, sanded smooth, will create a cooler effect than a bunch of brush marks...not that I'm casting aspersions on your whole brush mark thing... The clear shellac over your colored shellac is not a bad idea. If you SWAGGED the dye in the shellac, you're probably already getting some unique results as you sand it down. Obviously, you don't need to get it NASA flat, so if there are some brush marks it's not the end of the world. I'm getting anxious to see the finished work. You're doing this the old school way, so if nothing else, you can be certain no one else out there has a guitar that's going to look like this one. Thanks for shortening this otherwise too long thread Haha Here are some evolutions: - i needed to scrap the binding to get a better sense of "when to stop": i had never done that, and even with a carefully designed too (box-cutter blade held in a piece of broom-stick), this took a while. Admittedly, there was some thickness to scrap through. 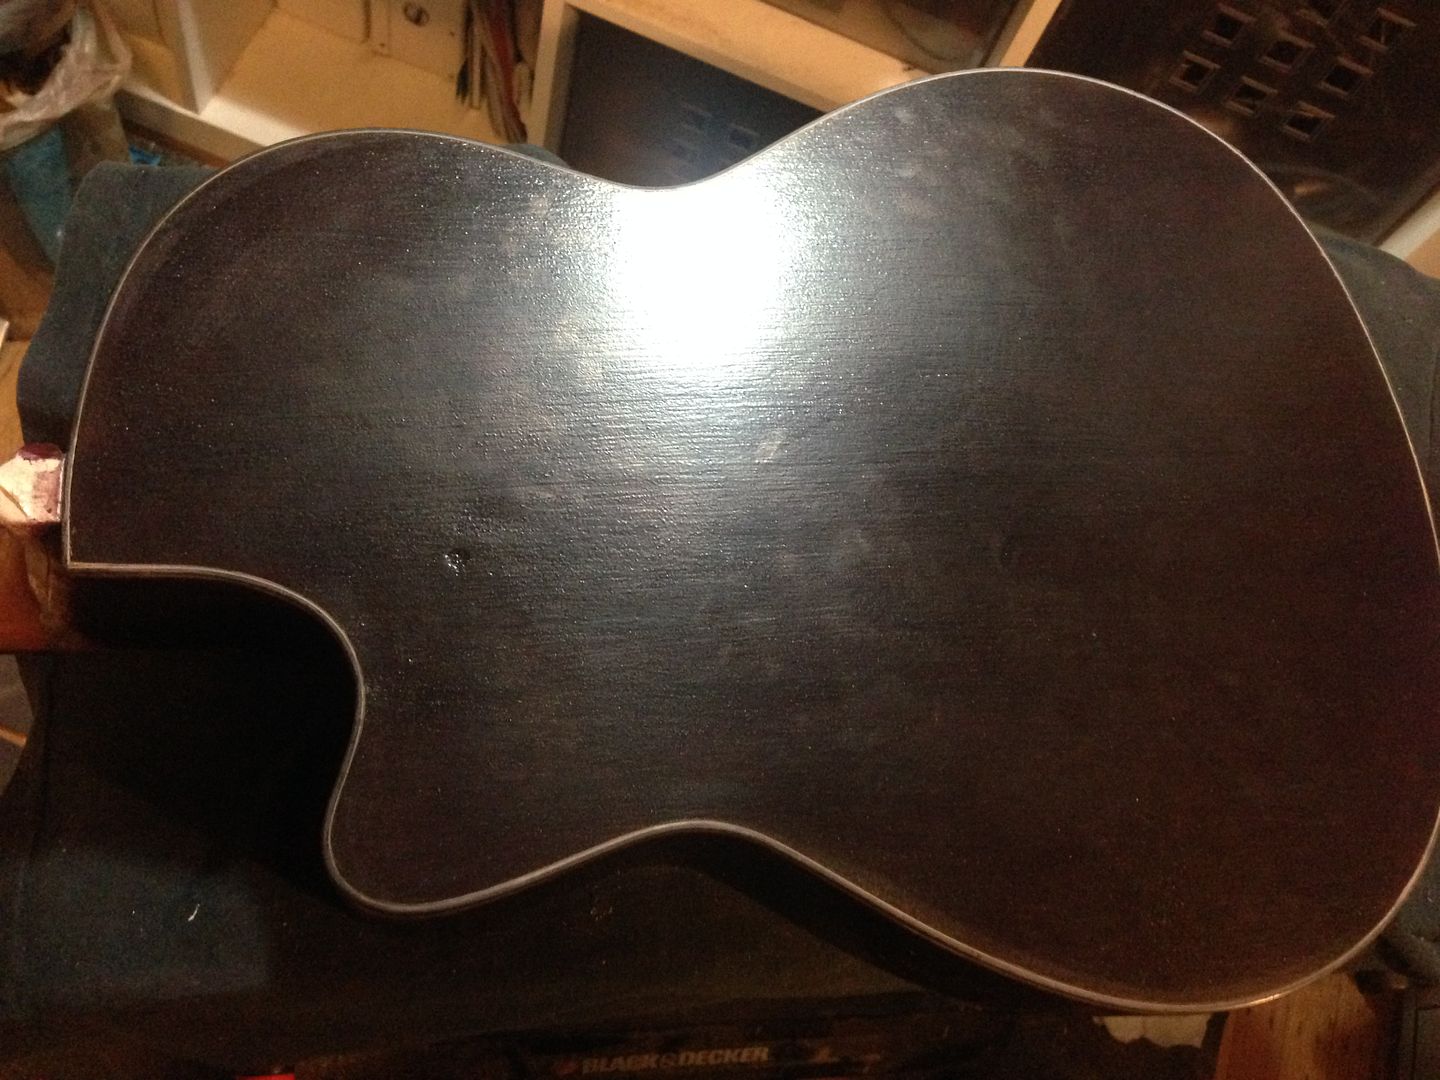
- in the end the white part of the binding is standing out nicely (maybe too much for me, it s a tad too pretty for my taste)
 - i sanded (steelwool, sanding paper 240 and 320) and got carried away and ALMOST got to flatland - stopped just before! But yes, i understand a bit better why it s probably gonna be stronger a finish if flatter. 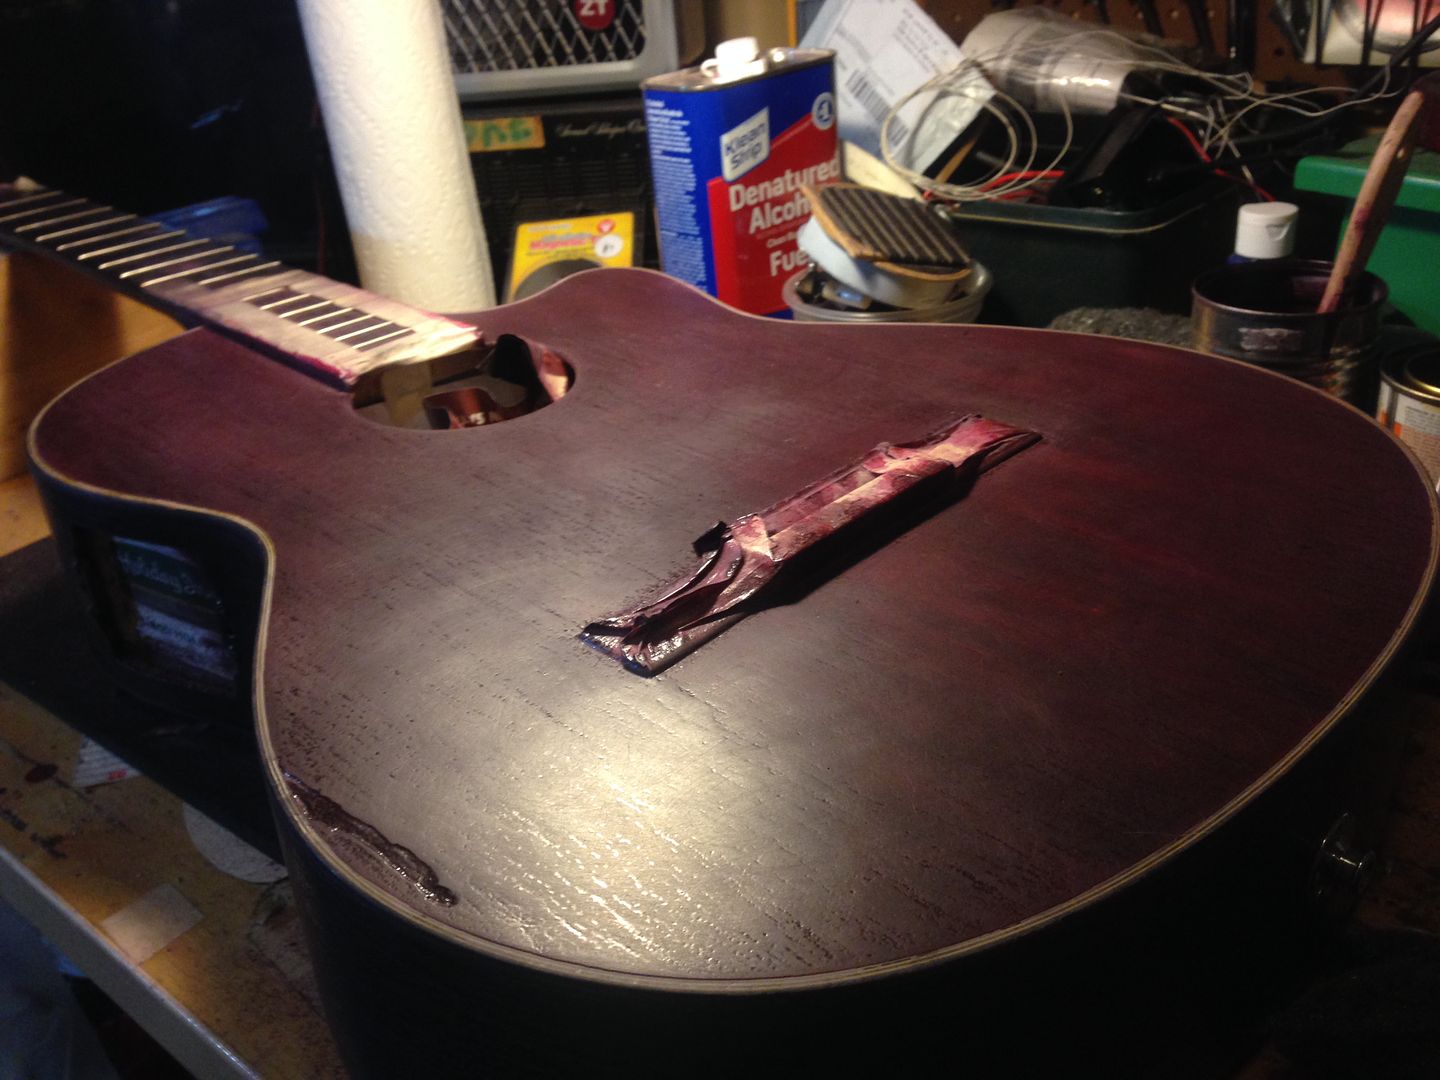 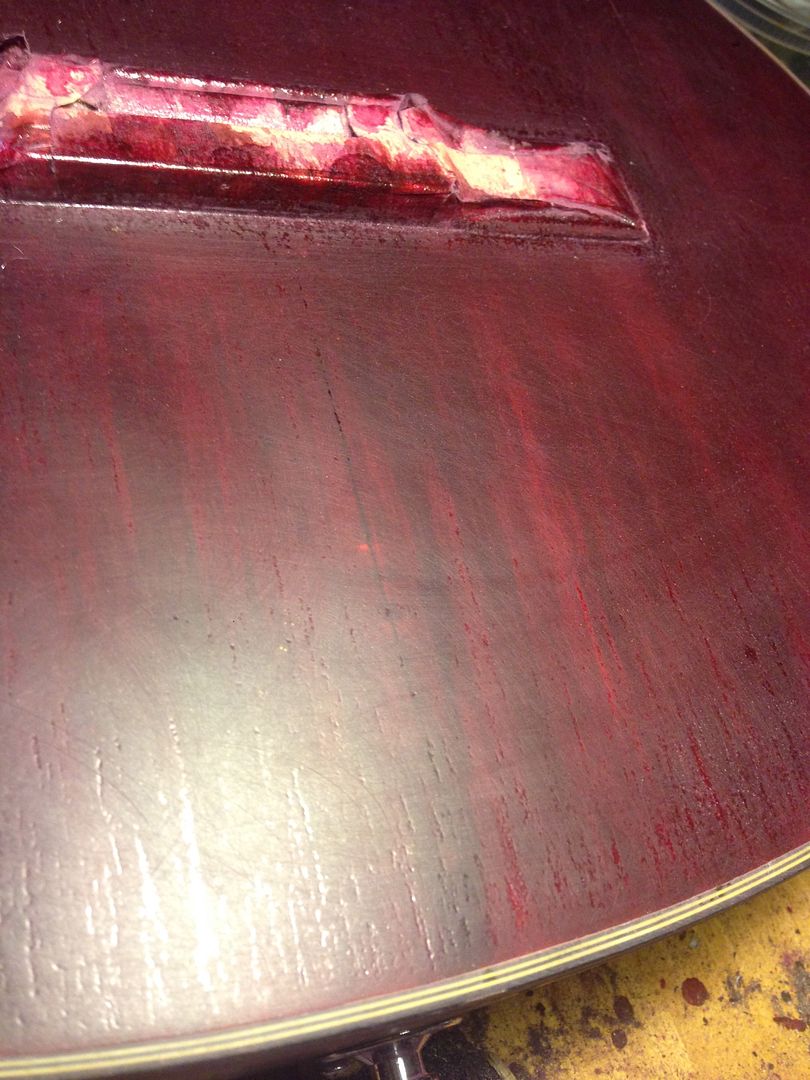 - then 1 last layer of red shellac for eveness in color I m gonna let it dry overnight and see what i have. If all looks nice, i ll sand a bit, scraped the binding again (should be faster with only 1 layer) and will go for the coating. I appreciate you sharing your experience in this - indeed, i need a sturdy matte clear coating so that i can keep on playing bongos on this thing without thinking twice. |
|
Deleted
Deleted Member
Posts: 0
Likes:
|
Post by Deleted on Sept 22, 2015 0:52:39 GMT -5
hey WOW!!! nice job!
how about that scar on the right bout edge on the front? Any putty going in there?
|
|
|
|
Post by strat80hm on Sept 22, 2015 1:05:58 GMT -5
hey WOW!!! nice job! how about that scar on the right bout edge on the front? Any putty going in there? Thanks Greek! Nope, no plastic surgery haha - the guitar came with a scar and life still goes on. Plus i never liked new guitars and never bought any so far, so i dont want this one to look new either. |
|
Deleted
Deleted Member
Posts: 0
Likes:
|
Post by Deleted on Sept 22, 2015 3:28:48 GMT -5
Ok, but the general overhaul you did was cosmetic as well. IMO since you have the skills and you already fixed the crack it would be nice to fix the scar as well. It is like painting a car on top of existing dents and bumps, it does not make cosmetic sense.
In short, your guitar has been already re-newed!!! The scar adds nothing to the already lacquered guitar.
|
|
|
|
Post by cynical1 on Sept 22, 2015 9:43:48 GMT -5
...the guitar came with a scar and life still goes on. Plus i never liked new guitars and never bought any so far, so i dont want this one to look new either. Years ago I worked in a music shop and one of the regular customers would always ask for a screwdriver anytime he bought a guitar. He'd grab it by the blade and pop the handle off the back somewhere. Handing back the screwdriver he'd always say, "Well, there's the first nick, glad I got that out of the way." I'm with Greek on this, the guitar is looking very good. The repair on the crack came out very nice indeed. As far as scraping the binding, there really is no hard and fast rule as long as the depth scraped is consistent all the way around. You always try to leave some of the binding covered with paint so it looks seamless to the finish. You can use a single edged razor blade, Gibson uses a long piece of tool steel with a double chisel point ground in and I have an old and very short wood handled chisel I've ground a double point in that I use. It's whatever fits comfortably in your fingers. The real trick is getting the right grip to make long passes comfortably so the depth remains consistent. You did good for the first time through with your little invention. I would caution you about going back for a second pass. I believe we've recently cover this ground in another thread, but "THE ENEMY OF GOOD IS BETTER." It looks good in the pictures, so I'd just leave it. It's like trimming a mustache...the more you go back to even it out the great the odds are you'll be shaving it off. Adding some amber dye to the first few passes of lacquer will give it an aged look and take away some of the contrast to your darker red finish. It looks pretty good now where you've sanded it. The glossy areas won't be as critical with a matte finish. If you were going for a high gloss mirror finish I'd say you've got a lot more to sand, but for your "rustic" look it should be fine with a satin lacquer and some 0000 steel wool. Happy Trails Cynical One |
|
|
|
Post by strat80hm on Sept 23, 2015 19:08:34 GMT -5
You re absolutely right on this, it doesnt make cosmetic sense! Although i gigged with this guitar for a couple years and i kinda like that scar, i got used to it i suppose. My only intent was to fix the structural issue around the loose bracing and the open crack - all the rest, all the mess, i like! Then i wanted the guitar darker, thus the shellac, pigments, etc.. Also i do not feel like i have much skills at all - this whole thing is a first time for me, so the less work the better Yeah, that d be me: brand new objects make me feel nervous, not sure why. I like broken in things better. Thanks, went slowly, scrapped too much here and there - hence the extra layer of red to cover up the mess - it s better now. Here s the tool by the way: 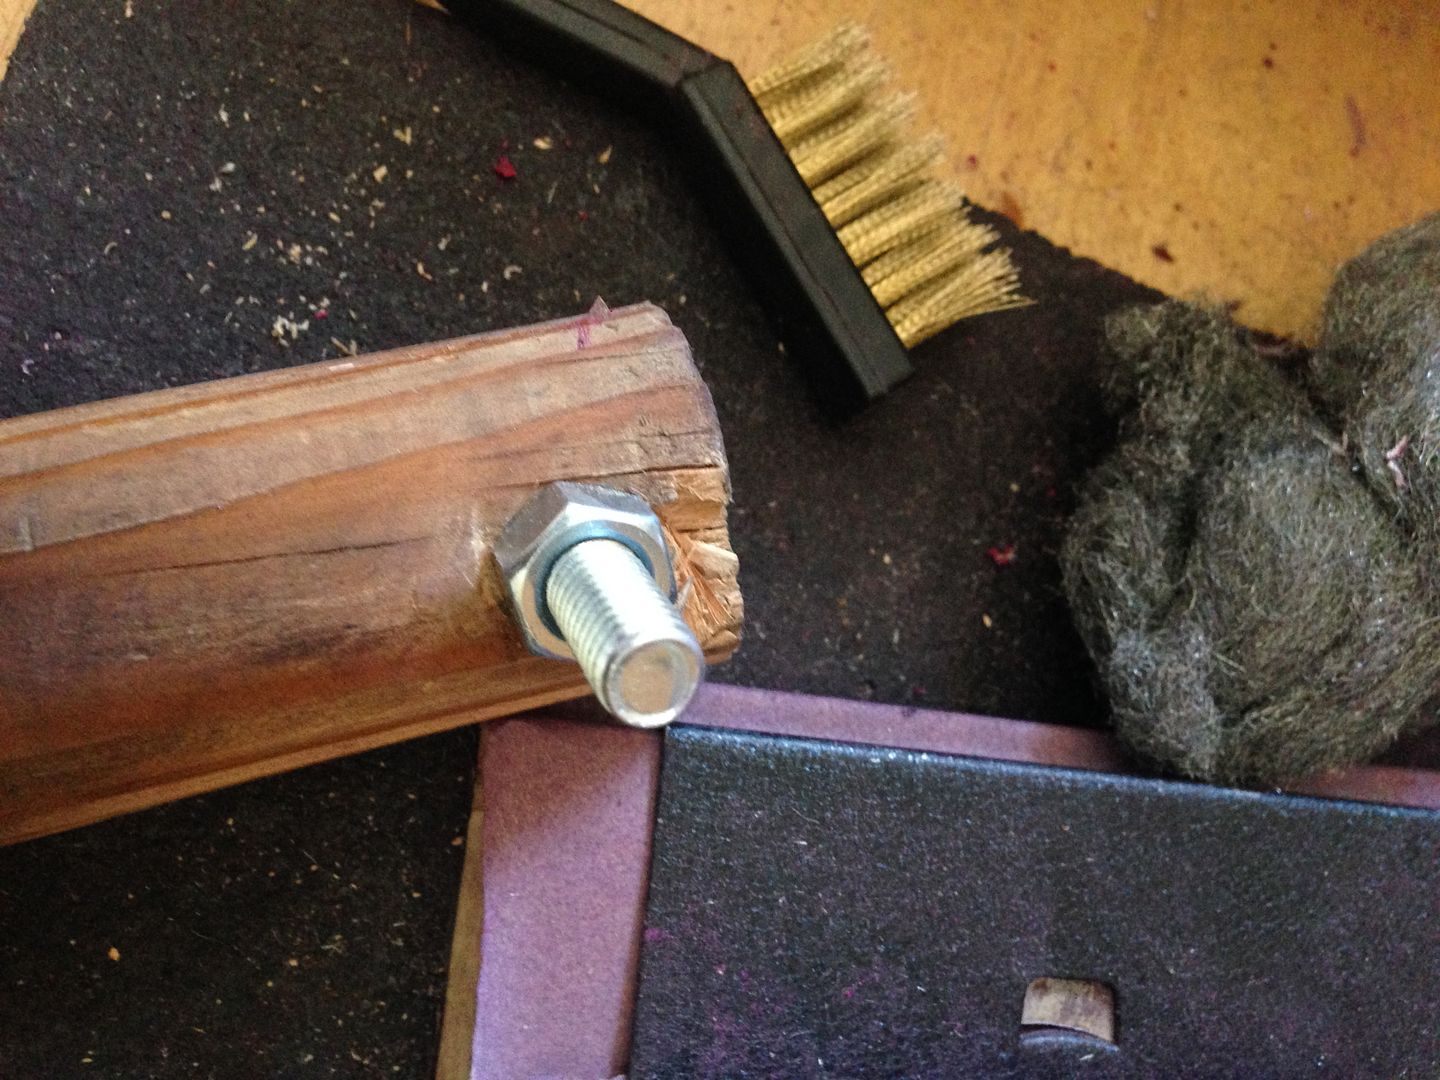
Here s the guitar after that dreaded "extra layer of red" 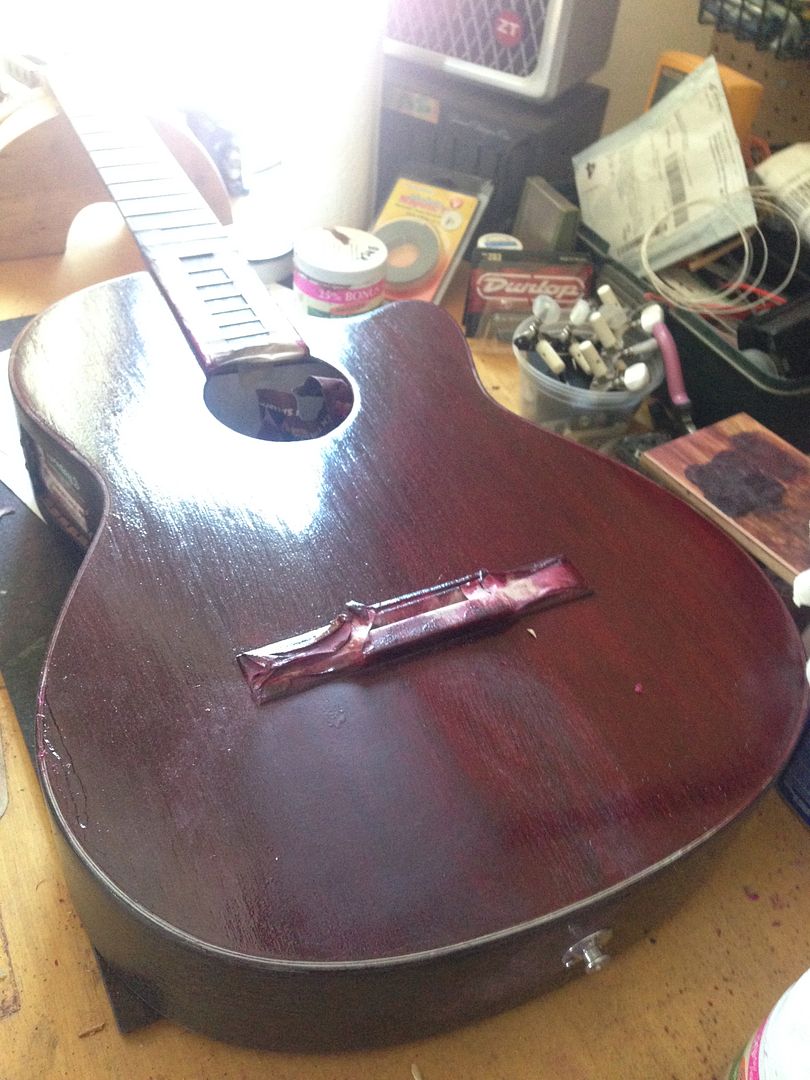
Then after some sanding 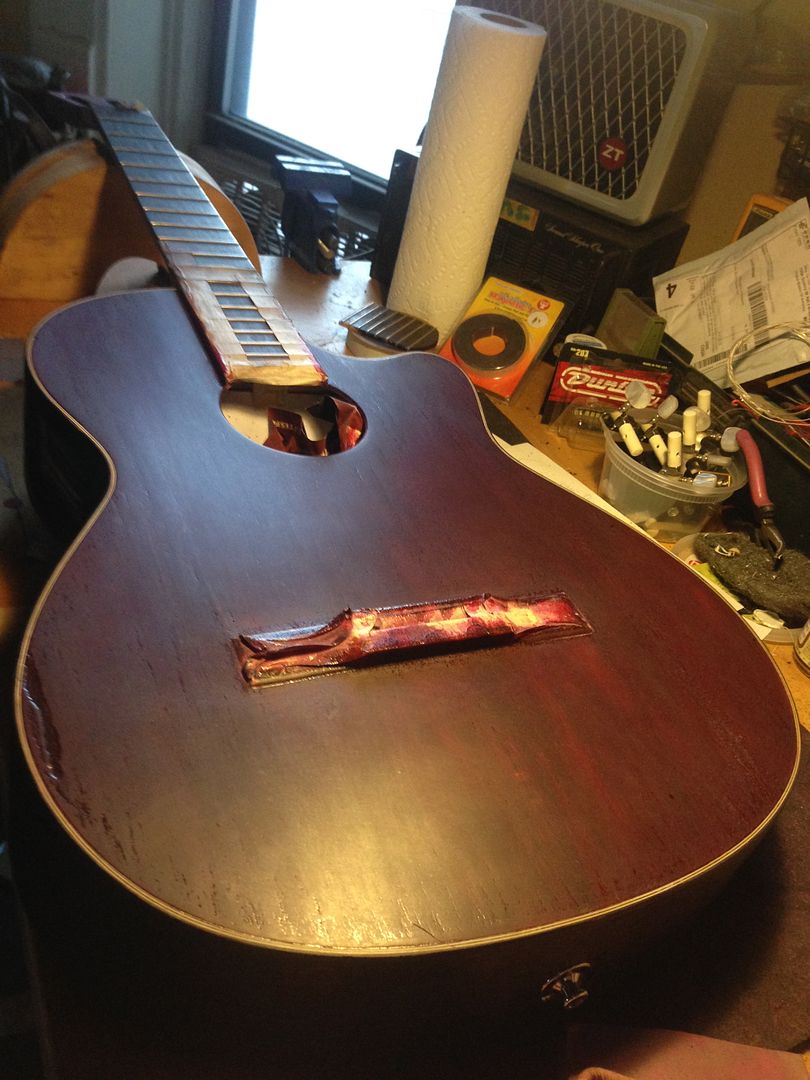 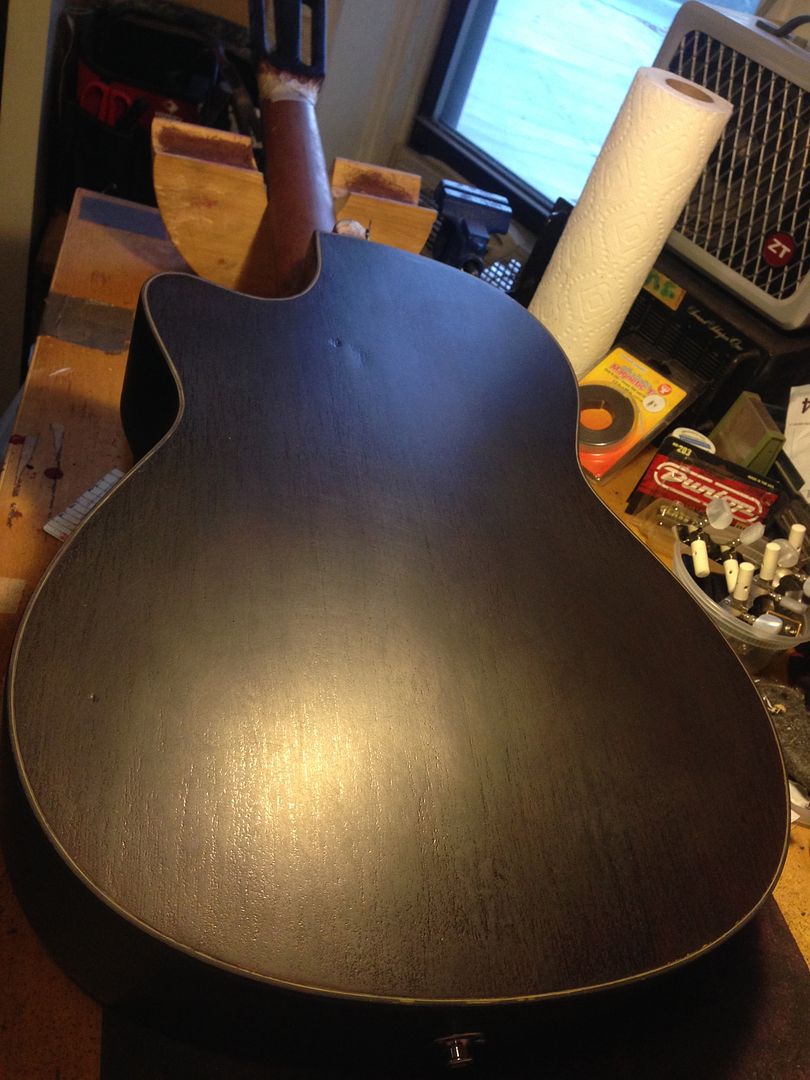
More fine-sanding 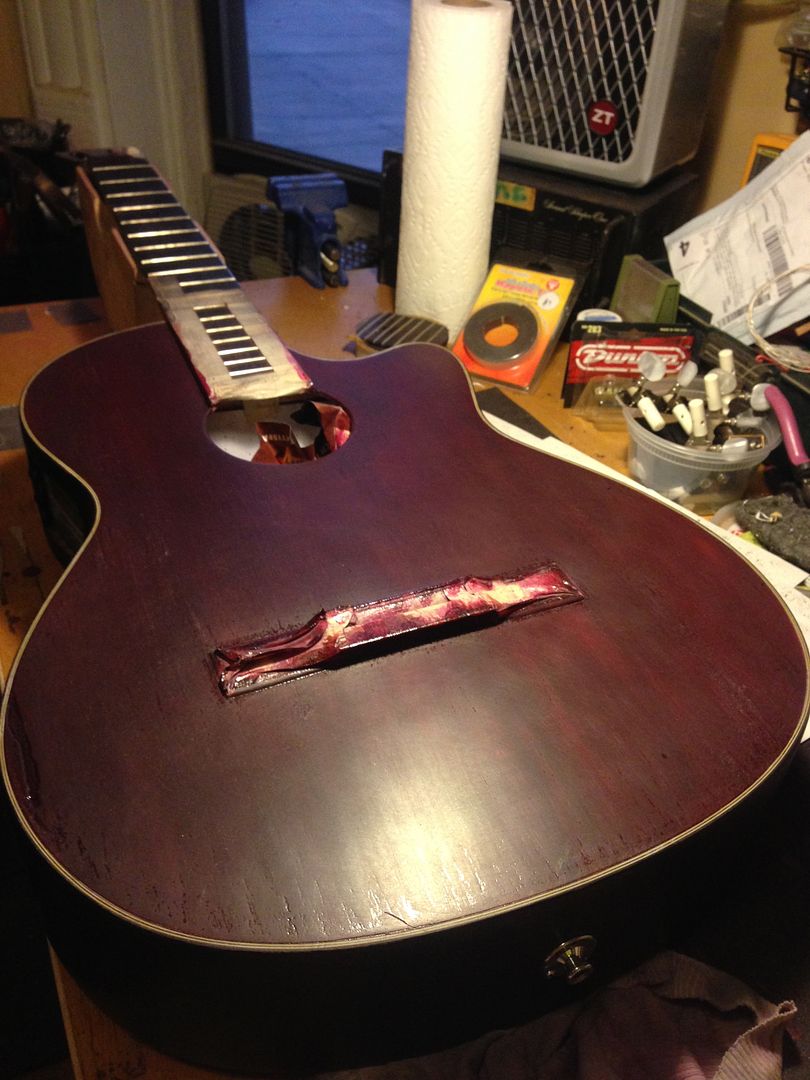
That extra-layer allowed to hide spots where i scrapped the binding too wide  Matter of factly, i just finished sanding that extra coat of red (sandpaper 200, 320, steelwool 000 and 0000), then passed a tack rack: i suppose it s ready for the first layer of lacquer, although i have a doubt: the tack rag left some stickiness all over, is this desirable or should i rub it off - if so with what? This should be written on my workshop walls - messed up a lot of good for the sake of better yup.. Here i might have sanded to much and reached an early coat (with solid pigments), resulting in little pink or white dots here and there. Wondering if i leave it as is OR start over another cycle (coat, sanding).   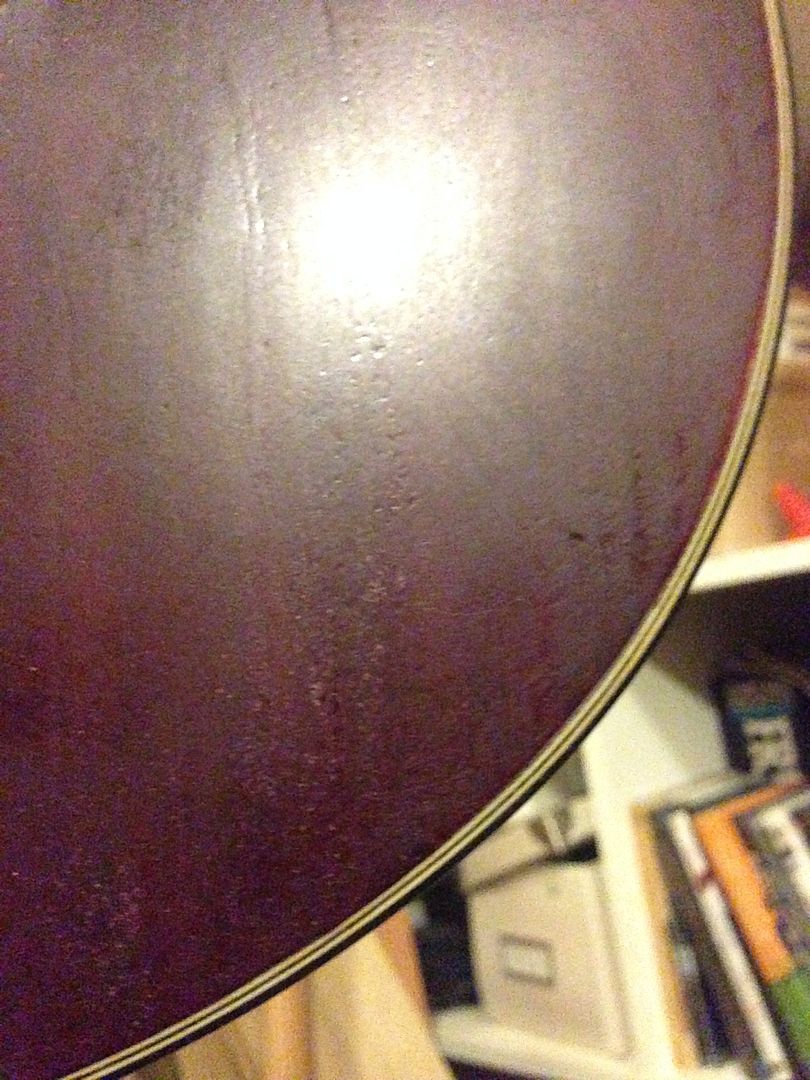 |
|
|
|
Post by strat80hm on Sept 23, 2015 20:35:07 GMT -5
It seems i just pressed to much with that tack rag - i hadnt heard about those before you mentioned them Cyn.
- so i just cleaned it up with a dry rag
- masked the 3-4 white spot with some pen
- a bit of 0000 steelwool
- a light pass of tack rag
And there i went for a first layer of satin lacquer (in spray)
It is drying now, i supposed i could go for a second layer in a few - unless i ve done something stupid above, in which case it hopefully is possible to go back and fix.
Otherwise, i m hoping that this works, as i need this guitar in 2 days..
|
|
|
|
Post by strat80hm on Sept 23, 2015 22:09:51 GMT -5
After a couple of hours drying up, here s where it s at: 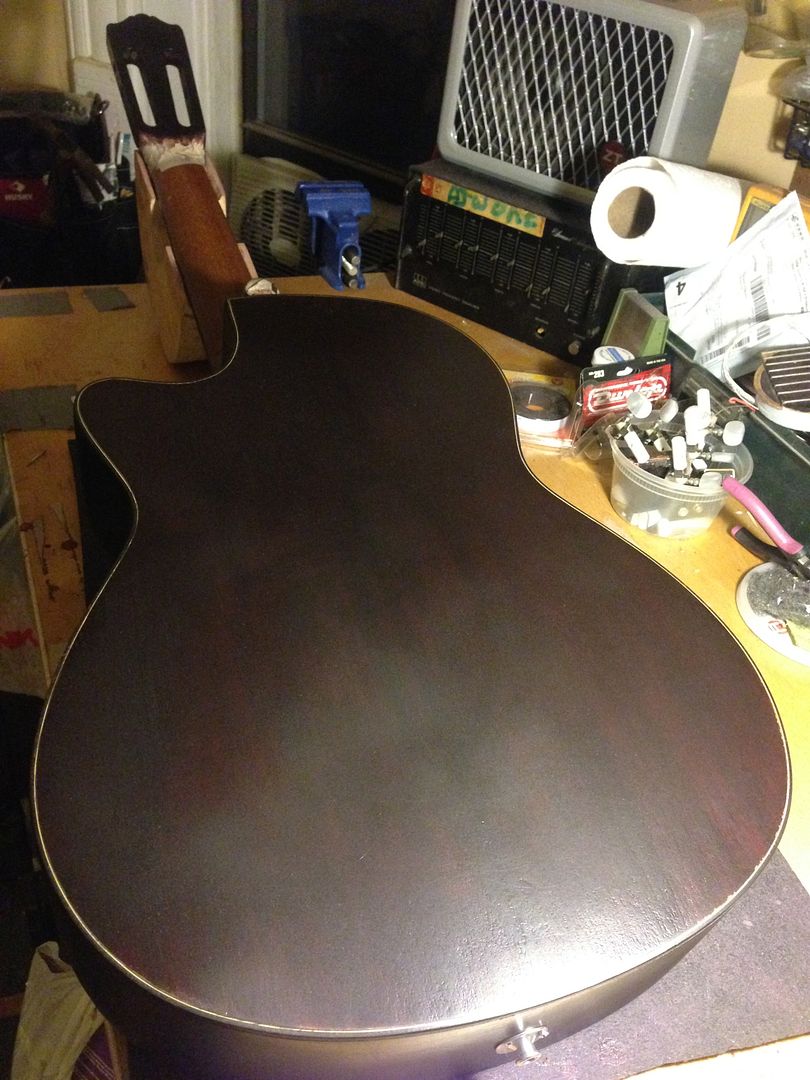 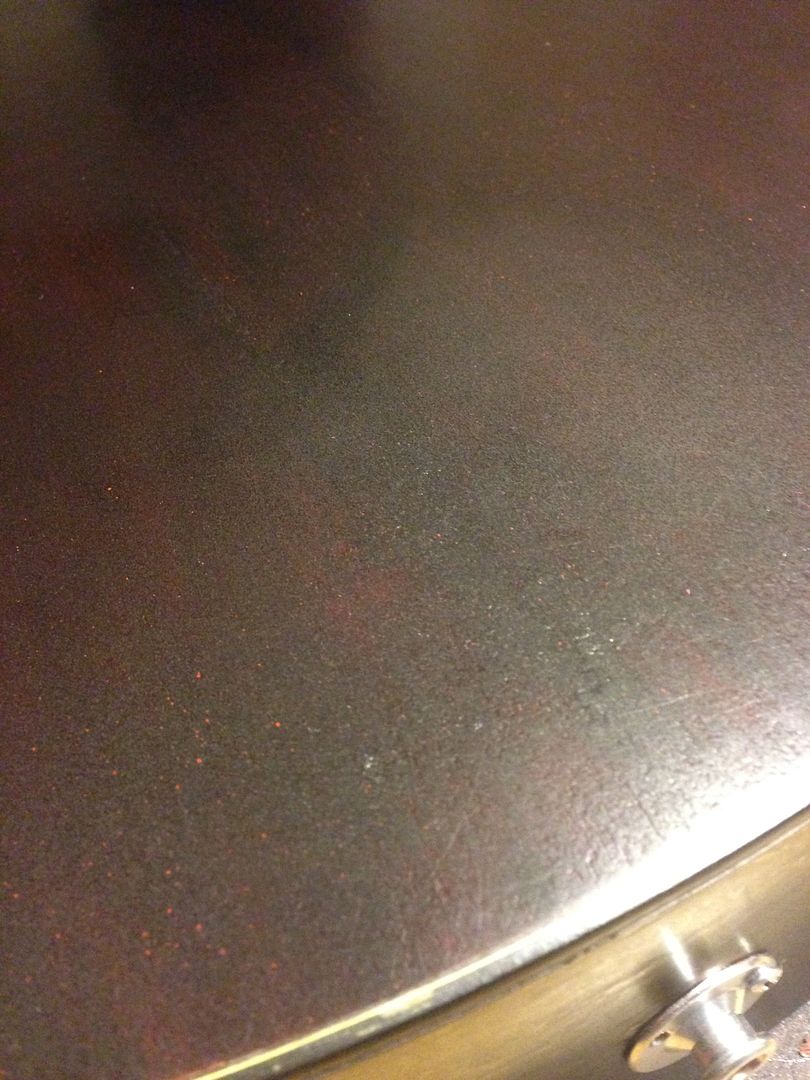 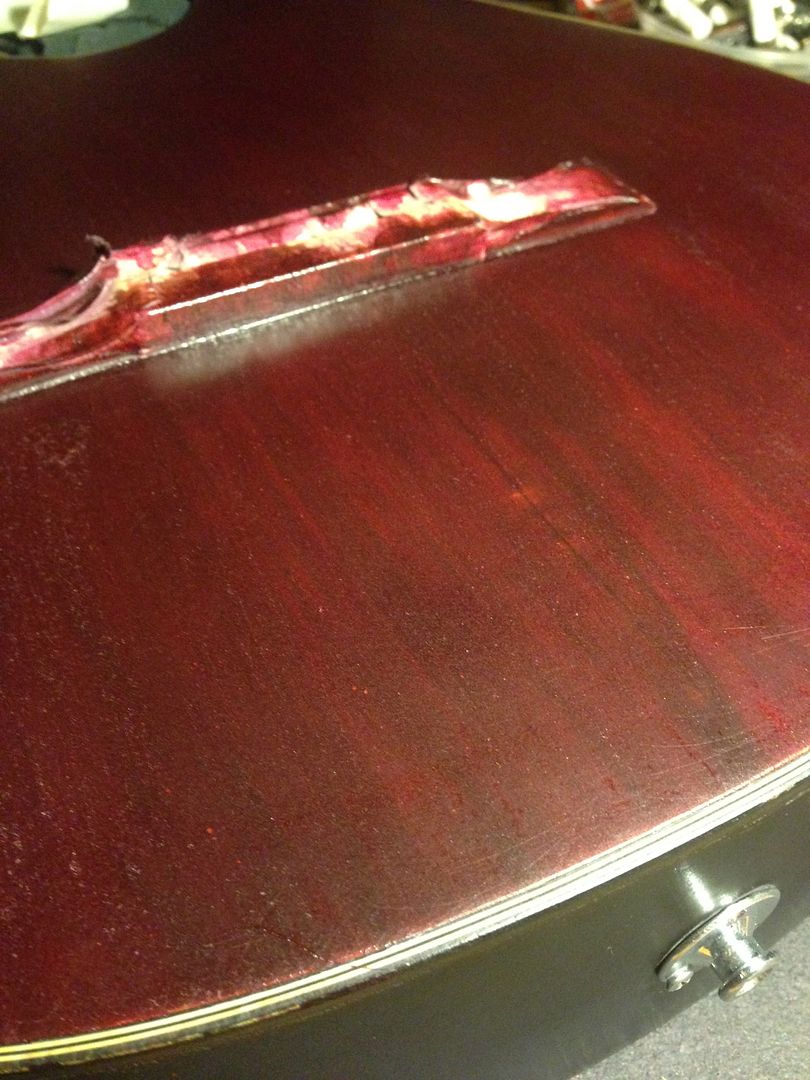 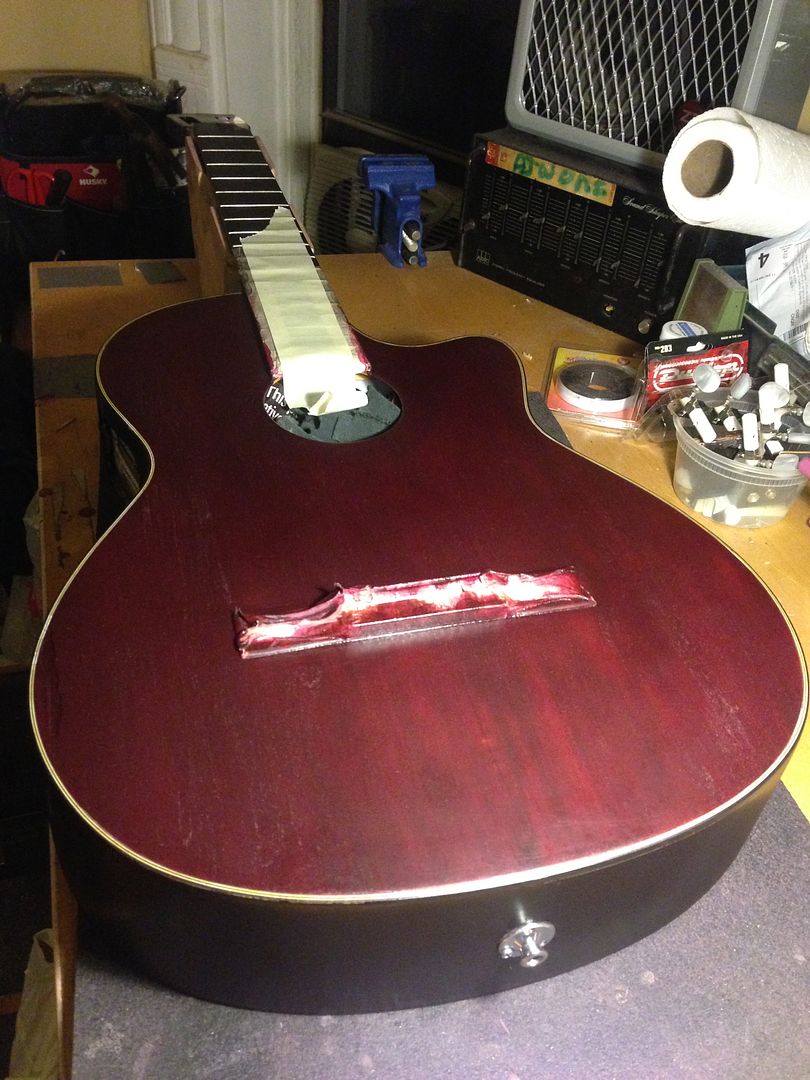 Looks pretty smooth overall, I suppose i should do a quick/light sanding (steelwool 0000) before going for another coat, though i can see a bunch of micro-scratches here and there - were not that obvious beforehand - did i mess up the 0000 sanding? Should i do it again or keep on clear-coating and hope for the best? I realize i forgot to clean up the whole thing with lacquer thinner (although i bought a bottle today..) before applying the lacquer. |
|
|
|
Post by strat80hm on Sept 24, 2015 1:08:40 GMT -5
|
|
Deleted
Deleted Member
Posts: 0
Likes:
|
Post by Deleted on Sept 24, 2015 2:05:25 GMT -5
Hey! that's great! Now the scar is barely seen. What you did with the help of Cyn could be reference for future readers  |
|
|
|
Post by cynical1 on Sept 24, 2015 8:57:03 GMT -5
Probably should have checked in before you got to the lacquer. Sorry. Pretty much anything that was there, spots, sand throughs, whatever, is now "encased in the amber" as it were, since the lacquer has hit the guitar. Since you were going for that "rustic" look, the spots are in keeping with the overall theme. For what it's worth, the odds are about 90:1 that anyone but you will see them. I always see the parts I don't like in a finish, where most people never even notice...and from the stage it's a damn sure bet no one will notice anything but the overall color.
To do what you did with this guitar takes years of practice to get perfect. The repair on the crack was impressive. I've seen more than a few attempts at what you did over the years that didn't come close to your fix. Working with shellac is almost a dead art. The purpose and execution of different finishes is also dying a slow death. This is why the true talent out there gets $300.00-$500.00 for a refinish. It's a lot of work that can be wasted with one misstep in the process.
Yeah, a tack rag is what you lightly run over the finish after you vacuum it off with the fuzzy brush. If any residue remains in your low spots, like sanding debris, that needs to be removed prior to the lacquer, and between each successive coat of lacquer. This is the down side of leaving the substrate "rough" with low spots and brushmarks. Take a lint free rag and rub the guitar down with some denatured alcohol and that should clear the crap out of the low spots.
You're probably going to want to get rid of all the shiny spots between coats. The lacquer will melt into the previous coats as you add them, but some 000 steel wool gently rubbed into the valleys should knock off the shine.
Now that you're into the lacquer, you might want to start looking at using wet or dry sandpaper with the sandpaper wet. I'd suggest using an 800 grit, as with the uneven surface you don't want to burn through the lacquer back into the shellac. Work small spots, keep the paper wet and change out frequently. Wipe the surface and check your work frequently to make sure you're not sanding too deep, and that you're actually removing material.
On the last coat, if possible, let the lacquer sit untouched for at least 15 days...30 is better...before you do any final sanding and steel wooling. You really want the lacquer to completely cure. I think I mentioned this, but until you can stick your nose right on the finish and not smell the solvent, it isn't completely cured. You can circumvent this if you have a friend with an auto body shop. Next time they bake a finish on a car give them $10.00 to stick your guitar in there and bake out.
It's looking a lot better than when you started. It certainly has the aged "worn from the road" look to it now.
And thanks for the pictures. They really do make it easy to follow the process.
Happy Trails
Cynical One
|
|
|
|
Post by strat80hm on Sept 24, 2015 21:51:08 GMT -5
|
|
|
|
Post by strat80hm on Sept 25, 2015 0:36:25 GMT -5
Oh that means that i should have waited a bit - especially since the guitar could do the shows without the lacquer.
Thanks for the guidance, support, monitoring, experience sharing and.. cheering haha
Well, i ve learned a lot:
- solid pigments was not the best idea (not sure why they actually showed up with the last coats, i tried to filter but it was too long with a coffee filter so i went on. Should have tried with some stockings.
- could have fake-painted wood lines before the shellac maybe
- should have sanded more professionally (200 320 400 steelwool 00 0000) before making decision about when to stop
- also should have stopped sanding just BEFORE it was too flat
- should have cleaned up with the lacquer thinner
- should have, should have...
I ll definitely follow your words more carefully on how to properly finish the finish.
Athough i must admit that this is not exactly the result i wanted - yet again, better... well, same old song.
Question: how easy to go backward - sand down or wipe out the lacquer maybe?
It seems that now i know a bit better and could obtain what i was after..
|
|
|
|
Post by strat80hm on Sept 25, 2015 0:37:57 GMT -5
Hey! that's great! Now the scar is barely seen. What you did with the help of Cyn could be reference for future readers Thanks Greek! If this tentative can help anyone to learn from my mistakes, this wont have been for nothing then cool |
|
|
|
Post by cynical1 on Sept 25, 2015 9:42:54 GMT -5
If you've only put the first few coats of lacquer on it's easy to get back to the shellac. Well, easy in the fact is that all you have to do is sand a lot.
I'm guessing the spots are debris from the sanded shellac. While lacquer will melt previous coats of lacquer, it doesn't do that with the shellac. That's why the shellac works so good as a sealer between lacquer and other finishes.
And yeah, the TransTint isn't cheap, but sometimes cheap becomes expensive in the long run. Solid pigments are more work then they're worth and the results are nowhere near as consistent as the TransTint.
And then there's all the sanding... Sadly, to get a professional result, there's no way around it. The more you do it the better you get at it, but I admit, of all the things that go into making a guitar, the sanding becomes the most tedious part. All you ever see on the Internet is the fun stuff. No one ever put up a 90 minute video on sanding a guitar finish for a damn good reason...it's boring as Hell. However, over the entire life of the guitar, a week of sanding is a small price to pay for a smooth clean finish over the next 20 years... I admit, when I do the first pass of rubbing compound on lacquer after sanding for a decade, there is a rush when you first see that puppy start to shine. And when you get that first mirror reflection off the guitar\bass in low light you tend to forget about the sore fingers and micro dust on everything you own.
What, specifically, don't you like about the finish now that you want to step back to?
Happy Trails
Cynical One
|
|
|
|
Post by strat80hm on Sept 25, 2015 11:57:10 GMT -5
Good to hear there s a way back in case - granted, sanding aint the funniest part.
How long to go back 2 layers worth of lacquer?
Easy to know when i m through (color of the dust?)
I think my job is a bit sloppy and i could get a more consistent color overall - then again, better vs good enough..
I m gonna keep on going with the headstock and do the shows first, will make a decision from then.
|
|
|
|
Post by cynical1 on Sept 25, 2015 20:39:49 GMT -5
Yeah, pretty much when you see the color of the dust change you're through the lacquer. I wouldn't be as concerned about getting through the lacquer as I would be about getting it flat. You can still add all the imperfections you want later, but you want to erase as much of the board as possible, as it were. Going back with the liquid dye versus the dry pigment will go a long way to making your color consistent. Make notes on the mix, that way if you want to go darker or lighter you know the benchmarks. It's funny, everyone always balks when you quote a refinish or custom paint job...until they try it themselves. No one appreciates the work involved until they get into it and realize it's not a point and shoot from a rattle can exercise. Honestly, if you toured the rest of the year and into the new one the shellac will be fine. Even if it catches a nick, so what, you're going back over it again anyways. You have learned a valuable lesson in all of this...it's easier to do it the right way once than to cheat and do it twice. Don't feel singled out, most of what I learned about this in the beginning was from doing things multiple times until I found the right way through. You'll get this. And if you're smart, you'll never do it again... Happy Trails Cynical One |
|
|
|
Post by strat80hm on Sept 27, 2015 21:59:08 GMT -5
Update: here what it looks like without the masking tape and with the stuff. Guitar did the shows fine, it felt good to have no crack threatening to get worse at any time while banging the thing. Visually in the end, i dont mind about the sloppy job, it looks fine enough on stage, that ll do it. I m not finished with the neck - i d like matte or maybe naked wood and make it a little rounder) - the bridge (dark like headstock), - and other stuff in progress.. 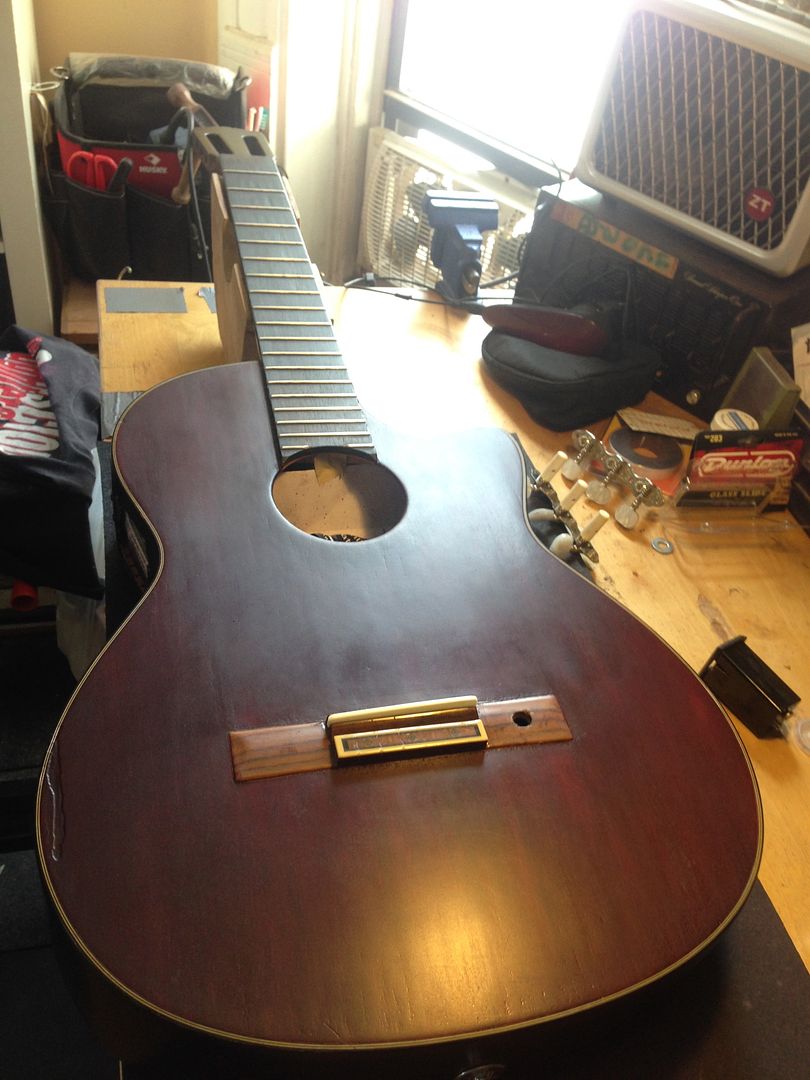 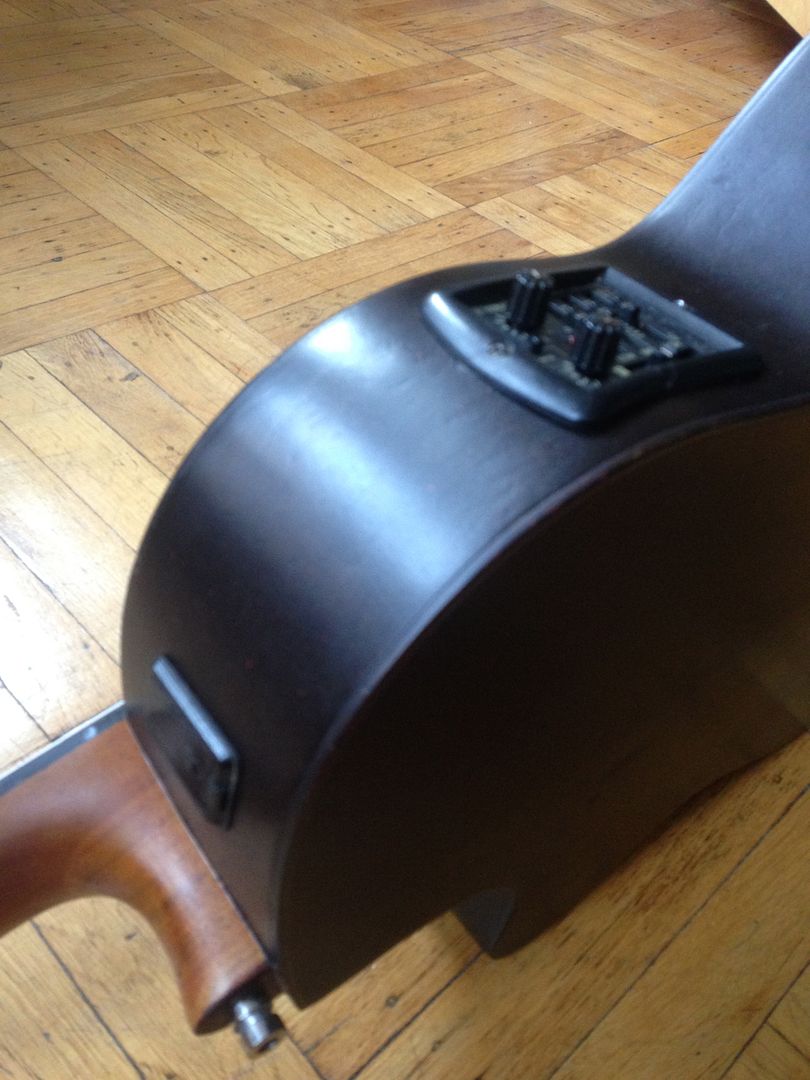 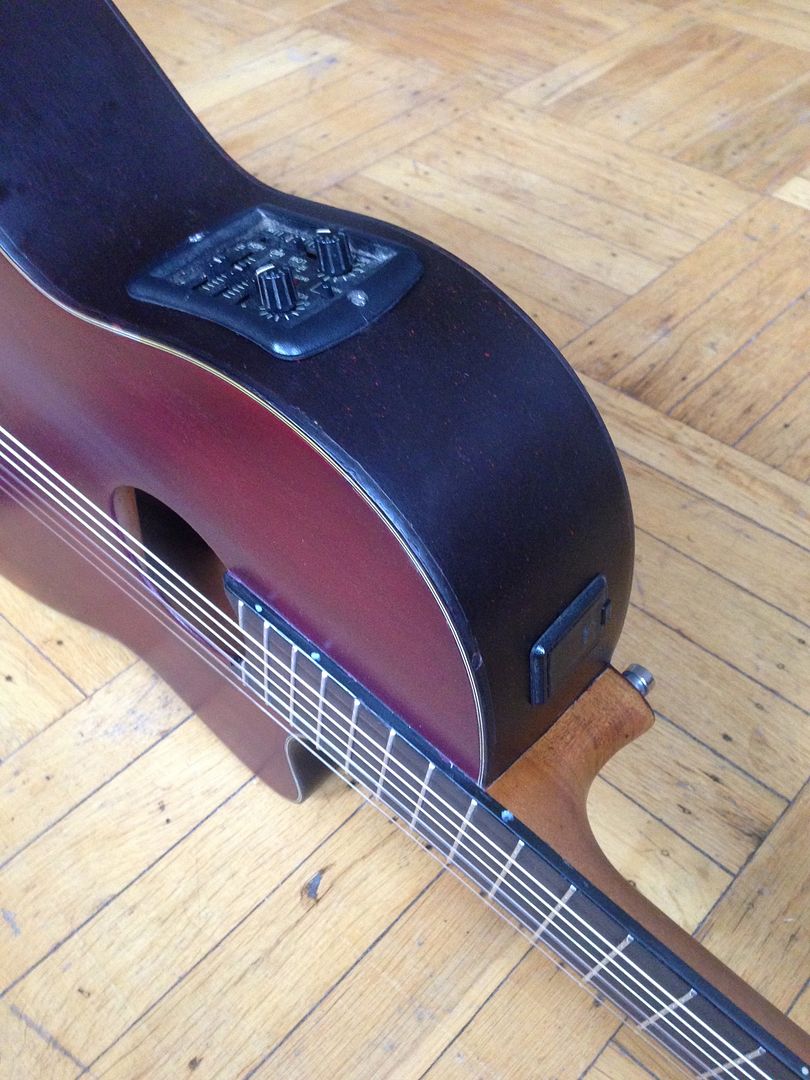 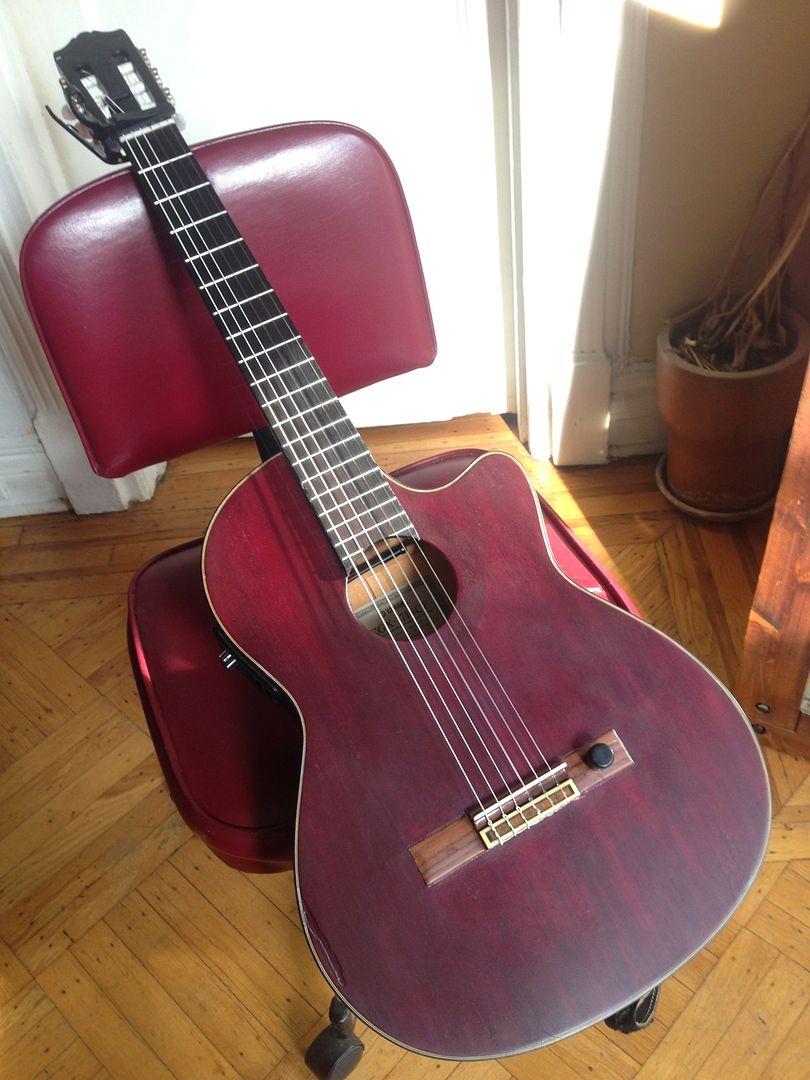 Yet i might choose to redo it all anyway: as you mentioned Cyn, the sound changed. I always plug it so it s not that obvious, yet you can better tell in acoustic, it s less bright, a tad muffled. Harder to get those higher harmonics around frets 4-3-2. I m guessing too many layers of shellac to get the right dark tint. It would be better to thin the shellac and color it much more, so that 2 or 3 thinner layers would be enough to get the dark red hopefully. Then add the golpeador - there was one initially so it was not a problem though. I doing a couple of more shows this week and will compare with other guitars at the store, will see from there. Definitely a learning curve Cyn haha |
|


