|
|
Post by ashcatlt on Nov 1, 2016 11:52:48 GMT -5
Probably it's because I buy cheap guitars, but I seem to be needing to do a lot of shimming lately.
My baritone has one of those Jaguar bridges and the break angle is nowhere near sharp enough to keep the low B in the saddle. I've always been pretty heavy handed, but I've mellowed a bit in my age, and I'm not usually using a pick, but the thing still pops out if I play with any enthusiasm at all. In fact, I've gone as far to pop it on purpose and then tune it up just so I could get something out of it.
But several of my Xaviers have the problem where once I've got the nut height reasonable, I can't get the action quite as low as I'd like because the saddle adjustment screws are all the way out (a great way to lose them!) and there's nowhere else to go. In fact,I've had this problem most of my life with most of my guitars - including a fender or two. I'm no shredder by any means, either.
So I'm looking at shimming up three or four necks around here, and reading the pros and cons of different materials and approaches, and I get to thinking - isn't the problem that the neck pocket is flat? Can we just shave it off somehow to be angled a bit? That would be better for every reason than trying to wedge something in there. I realize this is not adjustable or undoable, but it should only need to be done once, right?
In my case, the big problem making that happen will be a severe lack of woodworking tools and talent. If one wanted to do this, what would be the easy, idiot-proof way to accomplish it?
|
|
|
|
Post by reTrEaD on Nov 1, 2016 12:57:05 GMT -5
There are certainly others around here who are more knowledgeable but in my humble opinion, if a neck angle issue is to be resolved by shaving, it would seem the easier way would be to change the angle of the flat on the neck rather than the neck pocket. This would mean leaving the material at the end of the neck flat and shaving some farther away from the end of the neck.
But I defer in advance to the experts around here, like Cyn.
it stands to reason that the best transfer of energy would be intimate contact between the neck and body rather than introducing a shim.
Indeed. Hence baby steps should be employed on the first attempt. A change of one degree would result in over 1/4 inch of offset. But I reckon a better way to visualize the effect would be to look at the ratio of distance between the end of the neck and the nut vs the end of the neck and the length of the neck flat. If that's 5:1 then removing .050 inch from the neck flat away from the end and leaving the end of the neck flat as-is would result in .250 inch of drop at the nut. The greater the ratio, the greater the "magnification factor".
In short, a little means a lot.
Other than shimming which is inherently reversible, I don't think there is such an animal.
|
|
|
|
Post by b4nj0 on Nov 1, 2016 13:14:21 GMT -5
I need to do just this on a Tele. I reckon that these instruments are made from interchangeable parts and if there is a problem, after establishing that the neck is fine then you have to conclude that either the neck pocket needs work or a shim is called for. In this way the neck reserves the right to get comfortable in another body should it choose to do so at some stage which is not unlikely in my experience.
My approach will be to build up a sloping (shimmed) spacer to use as a routing jig and rout the neck pocket with a dremel end mill.
When I can pluck up the courage that is! A neck reset if you will, but I similarly defer to Cyn1.
Maybe a shim then! After all- it worked fine for Leo and many seem to shell out a lot to own a good old 'un only to discover a shim and they still seem to sound good.
|
|
|
|
Post by gitpiddler on Nov 1, 2016 14:46:09 GMT -5
I shaved the pockets on both my electrics. The blue Kramer was shimmed with bridge floating, now it is not. I recently shaved the yellow Tele's body around the neck end to raise the action, because I had shaved too much from the pocket years ago. Doing the same to the Kramer's body years ago had raised the action, and shaved the pocket to lower. Each instrument has taught me lessons that I have applied to the others.
|
|
|
|
Post by cynical1 on Nov 1, 2016 17:34:57 GMT -5
About 95% of all bolt-on neck guitars and basses could benefit from a full neck pocket shim. About 70% absolutely need one. If you missed it in the first sentence, let me reiterate: FULL NECK POCKET SHIM
Without beating this to death, and I'm as guilty of this over the years as anyone, a strip shim or Micro-Tilt at the base of the neck pocket will lead to that good old "ski jump" on the higher frets. You know the ones...nothing but fret buzz from the 17th fret up unless you jack up the action... A full pocket shim is the only good way to go.
That said, it's probably best to detail how to figure out the thickness of the shim you need. And yes, Virginia, there is a formula for this.
(XZ)/W
WTF, you say!
Here's what it means:
X: The length of neck pocket
Z: The necessary change in neck angle*
W: The measurement from the fret DIRECTLY above where the neck meets the body to the saddles
WTF, I hear you say, again!
OK, real world example. Last year I rescued an Epiphone Les Paul Junior for my nephew. As I hate the non-intonatable wrap around bridge on this model, I swapped it with an aftermarket model with intonatable saddles. This raised the action considerably. Here's how I figured the shim.
First thing is to raise your saddles about 1/2 way up to allow some fine tuning once the shim is in place.
To get X: Measure from the neck pocket from the edge of the body to the base of the neck pocket.
To get Z: Next, measure the action at the 12th fret. This dimension is then subtracted by what you'd like to see there. Normally, on the low E string you'd like to see right around 3/32" or 2.3mm (0.09375). If you want something different, just plug that in. I'll explain the "*" below.
To get W: Make sure you re-check the intonation on your guitar\bass before taking this measurement so it's good. On this guitar the body actually hit just short of the 16th fret. I used the 16th fret for my measurement anyway, because that's typically where it's supposed to be. I measured from the 16th fret to the D string saddle, as the D string was the one closest to the 24.75" scale length. YMMV.
So, here's what I did with all this stuff:
Using the formula (XZ)/W, where:
X = 2.875"
Z = .375" - OK, here's the * part. The actual height at the 12th fret on the low E string measures 9/32" or 7mm (.28125). Subtracting my desired action of .09375 from .28125 leaves me with .1875. Here's the trick: You DOUBLE this measurement for the formula, hence .1875 X 2 = .375.
W = 9.822"
So, in this case, (2.875 * .375) / 9.822 = .1097"
I fudged a tad and made the thickness .110". Remember, I said this new bridge raised the action alot. Typically, your shims will come in between .03"-.05"
Finally, shape the shim to fit the radius in the neck pocket routing, mark your screw hole pattern and drill out the shim to allow plenty of clearance for the neck screws. If it's as thick as this one was, a little nail polish to match the finish along the sides hides it nicely.
There are some cheap and dirty ways to make a shim, or you can build a fixture...which is what I did. Some 3/4" steel flatstock, hardware and finished wood pieces from the local home improvement store can leave you with a reliable adjustable fixture you can clamp into a vice for about $8.00. All you need is a hand sander.
The shim material would typically be maple. If the body is basswood or plywood I typically use basswood or poplar for the shim. 3" wide planed to 1/8" or 1/4" pieces are available at just about any lumber yard or home improvement store.
Stew-Mac and several other places on-line sell pre-made shims in standard thicknesses. By the time you pay shipping it's a wash on doing your own by the time you make the fixture, so use your "enthusiasm scale" to decide which way to go.
Well, that's enough "Math Can Be Fun" crap for me.
Happy Trails
Cynical One
|
|
|
|
Post by ashcatlt on Nov 3, 2016 12:14:44 GMT -5
So cyn, what I hear you saying is to just raise the neck and don't bother with tilt. That sure would be easier! I feel like it would take more adjustment to get the same effect at the bridge, but I haven't really done the math, and don't think it makes enough difference compared to the savings in dicking around. Thanks for that!
|
|
|
|
Post by cynical1 on Nov 3, 2016 12:34:33 GMT -5
So cyn, what I hear you saying is to just raise the neck and don't bother with tilt. If that's what your heard, then I must have said it wrong. The full pocket shim is like a wedge. Your desired thickness at one end, right next to paper at the other. The tilt HAS to be there, or you merely migrate the problem to a different elevation. This is so much easier to show you than to try and explain it.  The page I found this image on, The TundraMan Workshop, also has a Neck Angle Calculator...which would be a great place to slap a bookmark...along with a very good summary of the issue. Here's the link: www.tundraman.com/Guitars/NeckAngle/Done properly, the right shim will give you the most consistent action from nut to last fret you'd ever want. With the full neck pocket shim you won't have to worry about this scenario: 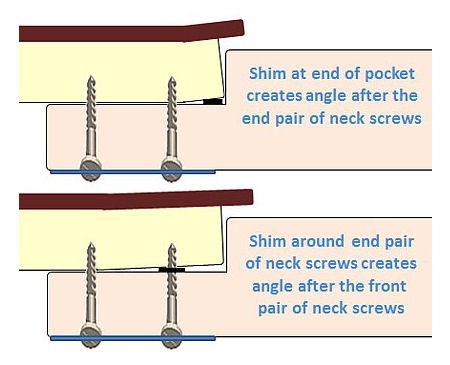 Does that make sense? Happy Trails Cynical One |
|
|
|
Post by b4nj0 on Nov 3, 2016 12:54:04 GMT -5
I like that theory, but does it take into account the tendency to strip the thread before the nominally 1.00" thick neck * actually bends over a similar distance? (*Not to mention the 8mm or so steel truss rod and tube if there is one.)
I still like the wedge shim better, if only for the superior wood to wood contact area. On the other hand, if you're going to make such a contrivance, I'd rather divert effort into re-working the neck pocket. In my case, it's so roughly routed it really needs some attention anyway. (There goes another armchair expert with no practical experience!)
|
|
|
|
Post by ashcatlt on Nov 3, 2016 13:31:23 GMT -5
Sort of. That picture doesn't show what happens if you just raise the neck and the bridge at the same time. Won't it look pretty much like the top picture except the breakover at the saddles will be tighter? Maybe I'm just looking for a way to avoid having to figure out how to make a wedge. |
|
|
|
Post by sumgai on Nov 3, 2016 15:11:31 GMT -5
ash,
Your surmisal is correct, raising both bridge and neck by the same amount (the neck angle itself is not changed) would indeed do no more than increase the string break-over angle if the original orientation between the two were indeed the same as the top picture... IOW, it was already nicely playable. In which case, why would someone monkey with the setup in the first place. (String break-over angle notwithstanding.)
c1 and I never have to discuss this kind of topic, it's as though we're long-lost twins - we agree totally here.
b4nj0, that image is so obviously an exaggeration, but you're correct, there are people out there who have no idea that maple will not bend at so steep an angle without cracking, and they'll believe this image to be The One Truth. My impression is, welcome to the world of the Internet Meme, where the saying of the day goes something like this:
If it's on the innerwebs, then it MUST be true!
Possibly for balsa wood, but maple? I think not.
However, if your neck pocket is truly as smooth as fishscales, then perhaps you do want to do some light sanding in there. But first, I'd try scraping out the primer/paint/buffing compound splatters that got past the (probably non-existent) masking that should've kept the pocket clean of such debris. Very careful application of a chisel is called for here. In fact, my tool of choice is an old mechanic's gasket scraper. Not so sharp as to slice through wood as easy as a normal chisel, but certainly capable of removing the kind of gunk I just described.
In fact, you may want to make a visual tutorial out of this process. Do try to keep a pictorial log of what you did, warts and all, and post it in the Gallery when done. Please. 
HTH
sumgai
|
|
|
|
Post by ashcatlt on Nov 3, 2016 17:42:22 GMT -5
In which case, why would someone monkey with the setup in the first place. (String break-over angle notwithstanding.) Well, my reasons were outline in the OP. In short: 1). Breakover angle IS NOT notwithstanding. The baritone is unplayable as is. I know you're familiar with the old Jag/JM problem where the strings sproinging out of the saddles? B) Many of my axes are close to just right, but one or more of the saddles are very low if not all the way down. Even when it's not all the way down, those screws get loose and adjustments get weird, and when they fall out on a stage or carpeted floor, you'll never see them again. So I like this idea of just lifting instead of messing around to make a wedge. Aside from the fact that it might leave a visible "gap" that you can only really see from behind the guitar, is there any good reason it can't work? |
|
|
|
Post by sumgai on Nov 3, 2016 19:35:16 GMT -5
ash,
To say it another way, if your string-to-fretboard distance is good as far as you're concerned, then yes, by all means, simply raise the neck straight up with a block, and adjust the bridge to accommodate.
As a matter of fact, I do happen to have a Jazzmaster, and I do have some personal knowledge about 'sproinging'. But then again, no one who's ever seen/heard me play would ever confuse your avatar for my playing style! 
sumgai
|
|
|
|
Post by ashcatlt on Nov 3, 2016 23:37:04 GMT -5
...no one who's ever seen/heard me play would ever confuse your avatar for my playing style! To be fair, I wasn't really playing my style that night. That was Big Black style. Funny, the picture I have with the blood on my Rick is from a Joy Division cover set! (I had to play drums and/on guitar at the same time) Both of those I was using a pick. Somehow I bleed much less when I play barehanded. I actually took the bari out of the house for Homegrown last year, but I didn't actually play a single note on purpose, so it wasn't an issue.  So anyway, while we're talking about necks... I have had this Xavier clone of a Thinline Tele around for several years. I bought it from GuitarFetish on clearance with a coupon so it was only like $115, but I can't play it in public because it's Capri Orange. I intended to refinish it, but... Last month they had a black one in the clearance section. It had a maple fretboard, so I almost passed on it, but then I remembered that the one I had at home had rosewood (because I thought ahead to refinishing), so I bought the thing. They announced a big sale a couple days later, but I still got it for $175 with shipping. The plan being to swap things around and then sell the orange one to cover at least some of the cost. So that's all great. I had replaced the pickups on the orange one, so I just went ahead and swapped neck, pickguard, bridge, even the jack. Even the strings! So now I can say that the orange one is brand new stock and standard except for the body itself. Except that for some reason the new neck went on the old body just fine (orange body, maple neck), but the old neck went on the new body way crooked! Like, I can't get all 4 screws into the holes at the same time. I kinda forced it, which caused one of the screws to find its own place to be. And it's still all wonky. I can just barely shove all the saddles over far enough to the left so that the high E stays on the neck. I know that I will have to just fill those holes and start over. I'm not looking forward to it, but I know it's coming.  The real question, though, is WTF!?! That neck fit on this body, and it fits on that body, and this neck fit on that body, but it doesn't fit on this one? Some things came up on that adventure, though. When I go to stick a screw back in a hole that it's already come out of once, I always turn it backwards until it drops into the thread so I don't end up chewing up what little wood is left to grab onto. Can't do that here, though, because the screw is already threaded into the body before it gets to the neck, and there is no way you can promise me that it's going to meet that neck hole at exactly the same everything to make that happen. Can't turn the screw backwards cause it'll just back itself out of the body. So I'd rather not ever do this even once let alone enough times to allow for trial and error. Though I'm thinking threaded inserts and machine screws would solve the issue, but... ...How important is that thing with the screws threaded throw the body? I feel like the four points of clamping should keep the neck wherever you put it as long as they have firm purchase on either side, right? And the wood-to-wood contact in the pocket itself must be a heck of a lot more important (probably a lot better?) than the wood-to-metal-to-wood of the screws in the body itself. So, like, if I just drill those body holes out a touch so that I can find the thread in the neck and maybe make up for a touch of slop in the pocket, or if I stick some machine screws through there for most of the same reasons, is everything going to suck? Will I lose every sustain I ever thought I had? Will real guitarists vomit when forced to play it? |
|
|
|
Post by b4nj0 on Nov 4, 2016 2:51:12 GMT -5
"In fact, you may want to make a visual tutorial out of this process. Do try to keep a pictorial log of what you did, warts and all, and post it in the Gallery when done. Please. :)"
Whoa! I'm still kicking those screenshots from GN1 to and fro. Don't load me up 'gai!
My saddles won't go low enough. The neck pocket surface looks like it was hacked out with a Bowie knife. What's to do? Smooth off the rough surface and at the same time shave a hair more off at the headstock end of the pocket. And keep it plane flat? With my skills? and my tools? Sheesh...
Trouble is the guitar sounds great as is. I'm actually tossing around the idea of a finished Warmoth body to go with the Warmoth neck that's currently on the no-name body.
But I'll keep it in mind and take photos of anything I do. Anyway, I'm on GFB territory now so...
|
|
|
|
Post by sumgai on Nov 4, 2016 16:42:50 GMT -5
Anyway, I'm on GFB territory now so...
Oh Gawd, you didn't...
Tell me you didn't invoke the Master Derailer, please....
You did, didn't you....
Oh blimey, we're in deep kimchee now. Just wait for it in 5.... 4.... 3.... 2....
|
|


