|
|
Post by frets on Feb 5, 2021 20:09:02 GMT -5
Hi Guys, This is a tip that came to me whilst thinking about Unreg, who was speaking of having a soldering iron that runs too hot. Now I solder everyday for at least 2-3 hours a day. I’ve gone through and burned out a number of brand name soldering stations and now have a disposable approach to buying this particular type of soldering iron that is extremely inexpensive, reliable and has a variable temperature that actually works. Plus it’s a clone of the famed 900 series - so easy to find tip replacements. I always have one I’m using and a new one in the drawer. Life expectancy is 6-8 months of everyday multi hour soldering sessions. Here it ‘tis. 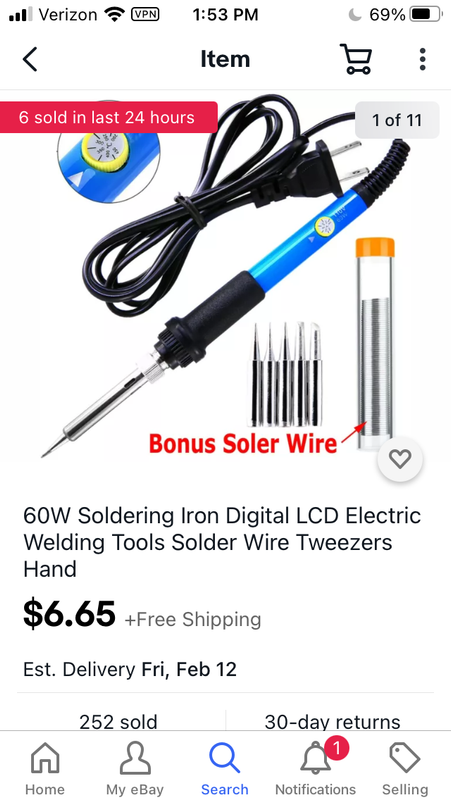 Now you soldering snobs can chuckle; but, I can solder with the best and this is my all time favorite model. Now the tips on it are absolute crap. I buy Hakko 900 tips for mine (which cost more than the soldering iron). These blue wands of wonder can be found on EBay or any of the Chinese vending sites. One can set it to solder your connections to lugs and then crank it to about 400 to do reliable solder grounds on the back of a pot Lickety Split!! Anyway, another tip from Cindi’s Bench!! |
|
|
|
Post by unreg on Feb 6, 2021 12:24:07 GMT -5
Wow! I recommend that soldering iron too! 😀 A great helpful tip frets!  Also, I recommend that everyone don’t make the same mistake I did. Don’t buy the Weller Medium-Duty 40Watt (up to 900°F) High-Performance Soldering Iron Kit. Though it’s a great soldering iron equipped with 3 LEDs that illuminate whatever surface you solder, a solder covered tip burns up after a short while. So, I’ve discovered, as the tip’s solder starts becoming discoloured, completely wipe the entire tip clean on a wet sponge 🧽. When the tip eventually loses its solder cover, unplug 🔌 the iron, use the sponge once again, let about a minute pass after unplugging (it may be beneficial to rinse the sponge during this minute), and tin the tip (it’s safe to tin now after the extreme heat has dissipated). Then I plug it in again and continue soldering. That’s a constant cycle until my soldering is finished. Now, it always ends with a newly tinned tip. Oh, if this makes any difference in my Weller review, I’m using: RadioShack’s .022” diameter Silver Bearing Rosin-Core Solder (Sn 62, Pb 36, Ag 2). |
|
|
|
Post by thetragichero on Feb 6, 2021 14:44:34 GMT -5
|
|
|
|
Post by frets on Feb 6, 2021 14:50:47 GMT -5
Trag, I have one of those also to change handles out for other soldering tasks. I would think working on amps you would need different handles.
|
|
|
|
Post by thetragichero on Feb 6, 2021 22:26:22 GMT -5
nah just like pointing with a pencil, precision-like
I've got a big 140/100w weller gun if i need to bond anything directly to them chassis but i had to learn the hard way that it was not a precision instrument. pcbs especially take finesse or else all sorts of solder pad lifting occurs. i always suggest folks practice pcb desoldering/soldering on an old vcr before sticking their grubby hands into a pcb amp
|
|
|
|
Post by thetragichero on Feb 6, 2021 22:28:00 GMT -5
i also prefer 60/40 solder to the lower-lead varieties. the whizzotech stuff frets turned me onto seems to work okay
|
|
|
|
Post by unreg on Feb 7, 2021 16:06:41 GMT -5
thetragichero, your SL335 Weller link returns a 404 Weller error page for me, currently... but, the link seemed to have worked for frets, so either Weller changed their website recently or I’m experiencing some sort of internet problem. Weller is a great company! 😀 It just seems my purchase was simply overall too much °F. Or less lead in solder causes drastic conundrums, I’m unsure of the problem... lack of experience. 🙂 (Though, I like the way less-leaded solder physically works.)
|
|
|
|
Post by thetragichero on Feb 7, 2021 20:23:57 GMT -5
lower wattage more likely to cause damage than higher wattage (to an extent) because you've got to have the iron on the components longer
|
|
|
|
Post by gumbo on Feb 8, 2021 5:13:29 GMT -5
FWIW, (and I do a LOT of soldering - no matter HOW you pronounce it)..I gave up using a tip cleaning sponge a long time ago ..in favo(u)r of those bronze(y)-looking dish-scourer things that they sell for tip cleaning....
...two things happened.. (actually three, if I think about it)
1. Cleaning the tip doesn't reduce the tip temperature so much, and you don't have to wait so long for it to recover
2. NOT Constantly-changing the tip temperature by the cleaning operation seems to allow the tip to last longer and stay more tinned
3. I don't buy so many tips !
I use a temp-controlled soldering station that sits on 460C, and I use Kester wire solder...either the Tin-Silver (3%)-Copper stuff or the K100LD stuff that I think uses Germanium instead of Silver...wire diameter is either 0.4 or 0.6mm
...and I am usually soldering 14 connections inside a 5/8" circle... ...and sometimes 19 in about a 1/2" circle... ..for the majority of the stuff I am constantly building....
...I pre-tin fine insulated conductors by using a sparing(!) application of Lead-Free Paste Solder in a syringe...also GREAT for Fluxing difficult things, because you can get in and out REAL quick with a fine soldering tip...particularly PCBs.
....all the above applies to the construction of new work.....if I have to repair something that was built using Lead solder, these days I get out my old little 40W iron with a reostat on its control box (sort of the Oz version of an old Radio Shack thing, Folks), and just crank it to whatever is required...a couple of months ago I was repairing a break in copper phone lines in a trench courtesy of my landlord putting an excavator bucket through my phone (and Internet) connection...worked wonderfully ! even running on a Nine-Mile extension cable from the nearest power source... :-0
Just my 2 (Oz) Cents worth....probably equal to 0.7 of one of yours...
HTH
g-f-b
|
|
|
|
Post by b4nj0 on Feb 8, 2021 6:20:21 GMT -5
Even after close on to fifty years of soldering (sodderring!) there are sone useful tips there which explain some of the difficulties I had just grown to accept. Cheers P.
e&oe ...
|
|
|
|
Post by reTrEaD on Feb 8, 2021 11:42:23 GMT -5
thetragichero, your SL335 Weller link returns a 404 Weller error page for me, currently... but, the link seemed to have worked for frets, so either Weller changed their website recently or I’m experiencing some sort of internet problem. Weller is a great company! 😀 It just seems my purchase was simply overall too much °F. Or less lead in solder causes drastic conundrums, I’m unsure of the problem... lack of experience. 🙂 (Though, I like the way less-leaded solder physically works.) Weller isn't such a great company when it comes to soldering equipment but they DID purchase Ungar (who made excellent irons). Their 'Modular' series is exactly the same the old Ungar 'Standard' series. They didn't continue making an equivalent to the 'Imperial' or 'Princess' series Ungar had. I reckon this is the same iron thetragichero was referring to, from a different vendor: 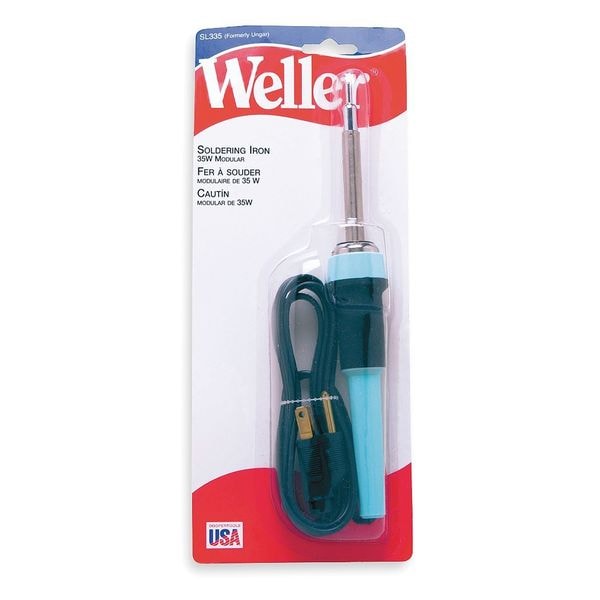 www.zoro.com/weller-modular-soldering-iron-sl335/i/G2788484/ www.zoro.com/weller-modular-soldering-iron-sl335/i/G2788484/Many of the other irons from Weller ... I consider them to be garbage. Instead of a screw-in or screw-on tip, the tip is basically a slug that's retained in the heater with a screw-on ring. This provides precious little area for direct contact to the heating element. The heat transfer becomes seriously compromised in a very short amount of time. Inferior: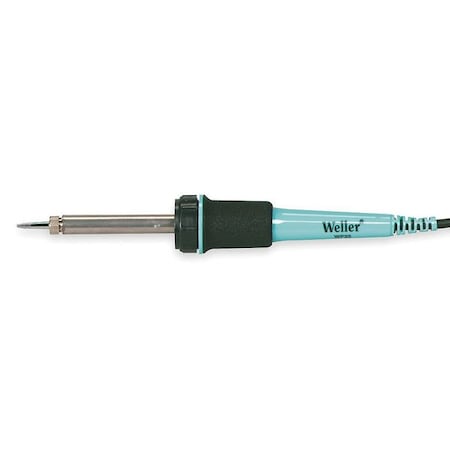 |
|
|
|
Post by unreg on Feb 8, 2021 15:55:21 GMT -5
Many of the other irons from Weller ... I consider them to be garbage. Instead of a screw-in or screw-on tip, the tip is basically a slug that's retained in the heater with a screw-on ring. This provides precious little area for direct contact to the heating element. The heat transfer becomes seriously compromised in a very short amount of time. Well, mine is different...
 One of the 3 tips slides in and is then secured with that little screw. That way the entire side of the tip’s base is in contact with the heating element.  It gets hot pretty quickly. Mine is a super nice iron; but, its 900°F max is a bit much for the guitar soldering. The wet sponge is super helpful also, bc it cools the tip down. But, thank you gumbo, your words are super helpful for people who don’t have a 900°F max soldering iron. Thank you reTrEaD for allowing me to see thetragichero’s iron! 👍😀 |
|
|
|
Post by reTrEaD on Feb 8, 2021 18:52:47 GMT -5
One of the 3 tips slides in and is then secured with that little screw. That way the entire side of the tip’s base is in contact with the heating element. That creates a long narrow contact patch on the opposite side from the screw. And some additional thermal transfer from the heater to the tip unit, via the screw itself. That's good (but not great). But it's WAY better than the system where the tip unit is retained only by a ring. its 900°F max is a bit much for the guitar soldering. The SL-335 Trag uses (I have that one and a few others) has a 33 watt heater rated at 800°F The heating element and tip is changed as easily as unscrewing and screwing a light bulb. The 23 watt heater in that series is rated at 700°F The 45 watt heater in that series is rated at 900°F The 50 watt heater in that series is rated at 1000°F
If I had a soldering iron that I was otherwise satisfied with but it was too hot, I think I'd build a box with a line cord, outlet (to which I'd plug in the iron), and a standard lamp dimmer. Maybe attach a chicken-head knob to the dimmer. Just a thought. |
|
|
|
Post by unreg on Feb 9, 2021 12:32:51 GMT -5
Excellent thoughts reTrEaD! If I had a soldering iron that I was otherwise satisfied with but it was too hot, I think I'd build a box with a line cord, outlet (to which I'd plug in the iron), and a standard lamp dimmer. Maybe attach a chicken-head knob to the dimmer. Just a thought. Those seem like simple instructions, but I don’t have necessary experience with electricity. My uncles own, or used to run, their construction companies, and so I’ll show your idea to the closest one. He’s retired now, but definitely knows electricity! Thank you so much! 😀 |
|
|
|
Post by gumbo on Feb 10, 2021 7:54:04 GMT -5
...or you could stick it in series with a light globe (bulb) and use the extra illumination to see what you're soldering...  |
|
|
|
Post by unreg on Feb 10, 2021 15:27:16 GMT -5
...or you could stick it in series with a light globe (bulb) and use the extra illumination to see what you're soldering... haha! 😂 [The three bright leds, one in each corner of the triangle handle, facing the soldering tip (you can see at least one of those leds in the picture) already illuminate what I’m soldering splendidly! 😀] |
|
|
|
Post by unreg on Feb 11, 2021 4:33:07 GMT -5
If I had a soldering iron that I was otherwise satisfied with but it was too hot, I think I'd build a box with a line cord, outlet (to which I'd plug in the iron), and a standard lamp dimmer. Maybe attach a chicken-head knob to the dimmer. Just a thought. Those seem like simple instructions, but I don’t have necessary experience with electricity. My uncles own, or used to run, their construction companies, and so I’ll show your idea to the closest one. He’s retired now, but definitely knows electricity! , you must have been joking again... My uncle wrote me back: “What you need is a rheostat or a potentiometer ( something to reduce the voltage). Dimmers or fan speed controls or now electronic, there is not a coil of wire that reduces the voltage by resistance. Research this by asking your phone how to reduce the the voltage on your soldering iron. Also go to utube and ask the same question. Then call me. ” Or, maybe you know of a standard old-fashioned lamp dimmer store? Going to research; posted this here to attempt to uncover your joke. 🙂 Maybe this wasn’t a joke; please forgive me if you were being serious. |
|
|
|
Post by reTrEaD on Feb 11, 2021 9:10:22 GMT -5
Maybe this wasn’t a joke; please forgive me if you were being serious. I was not joking. I forgive you. Using a rheostat would work. But it would also generate a bit of heat in the rheostat. A triac-based lamp dimmer, switches the power on and off at 2x the mains frequency. The reduction of power is accomplished by reducing the duty-cycle of each 'on' period. This results in far less heat being dissipated by the control device. |
|
|
|
Post by unreg on Feb 11, 2021 11:16:40 GMT -5
|
|
|
|
Post by davidofchatham on Sept 3, 2021 11:00:22 GMT -5
One of the 3 tips slides in and is then secured with that little screw. That way the entire side of the tip’s base is in contact with the heating element. That creates a long narrow contact patch on the opposite side from the screw. And some additional thermal transfer from the heater to the tip unit, via the screw itself. That's good (but not great). But it's WAY better than the system where the tip unit is retained only by a ring. I have what appears to be an older version of the Weller kit that unreg has. It doesn't have the LED headlights, but the tip is mounted the same way and the wattage is the same. (The iron's model number is 336B SP40L. It came with a stand and three tips as well.) I've been stymied by soldering in the past, though I think I successfully soldered a speaker cable plug once. Is this kind of iron sufficient for my future guitar wiring attempts, or should I be looking for something with temperature control to give myself a better chance? |
|
|
|
Post by unreg on Sept 3, 2021 15:01:19 GMT -5
That creates a long narrow contact patch on the opposite side from the screw. And some additional thermal transfer from the heater to the tip unit, via the screw itself. That's good (but not great). But it's WAY better than the system where the tip unit is retained only by a ring. I have what appears to be an older version of the Weller kit that unreg has. It doesn't have the LED headlights, but the tip is mounted the same way and the wattage is the same. (The iron's model number is 336B. It came with a stand and three tips as well.) I've been stymied by soldering in the past, though I think I successfully soldered a speaker cable plug once. Is this kind of iron sufficient for my future guitar wiring attempts, or should I be looking for something with temperature control to give myself a better chance? I’m totally unsure if your version of my soldering iron works the same… but, you can follow reTrEaD’s advice, above, to create your own temperature control, if you’d like to… it’s really helpful for me! 😀 guitarnuts2.proboards.com/thread/9417/triac-based-lamp-dimmer-unreg^At the bottom is an image of how my temp control turned out; that thread contains helpful info if you decide to take reTrEaD’s advice. The supplies can may be bought at Home Depot. EDIT: Now I’m remembering gumbo’s illuminating post in that thread. The triac-based lamp dimmers’ existence is perishing, so the most important piece may no longer be available at Home Depot. Sry. (I linked the triac dimmer I ended up using somewhere toward the end of that thread.) But, temperature control helped my soldering tremendously. FINAL-EDIT: That dimmer IS still available now. My link following is WEIRD on my phone, so if the two links in the post above my picture post in that thread don’t work, just search “Lutron Rotary Dimmer” (it currently has 19 reviews). |
|
|
|
Post by reTrEaD on Sept 4, 2021 6:52:47 GMT -5
I have what appears to be an older version of the Weller kit that unreg has. It doesn't have the LED headlights, but the tip is mounted the same way and the wattage is the same. (The iron's model number is 336B. It came with a stand and three tips as well.) I've been stymied by soldering in the past, though I think I successfully soldered a speaker cable plug once. Is this kind of iron sufficient for my future guitar wiring attempts, or should I be looking for something with temperature control to give myself a better chance? Are you sure it's the same power as the iron unreg posted about? That one is 40 watts and should be quite hot. I googled Weller 336B and that seems to be a 25 watt iron. In my opinion you'll be better off with a hotter iron, like 35 watts where you can bring the joint up to temperature quickly and get off before overheating the surrounding areas. Also, it will take forever to solder a wire to the case of a pot with a 25watt iron. Virtually insuring you'll murder the innards of the pot by the time you're done. I have a 45 watt heating element for my iron with a large chisel tip that I use for soldering to the back of pots. |
|
|
|
Post by ashcatlt on Sept 4, 2021 14:56:36 GMT -5
I bought this same soldering iron a while ago but in a cute little tackle box with some other useful stuff like solder wick and sucker, crappy electrical tape, halfway decent solder... I actually held off using it for a while mostly just to ring every dollar out of my previous one, but I recently busted it out and it certainly does seem to work. I don’t do anything near every day use, but I also do nothing like basic care and maintenance, so... |
|
|
|
Post by davidofchatham on Sept 5, 2021 14:57:57 GMT -5
I’m totally unsure if your version of my soldering iron works the same… but, you can follow reTrEaD’s advice, above, to create your own temperature control, if you’d like to… it’s really helpful for me! 😀 , thanks for the suggestion and updates. I'm not going to pursue this because I know that this is the kind of thing I would think about doing for around five years and finally give up on. I've already gotten way deeper than I meant to — first I wanted a treble bleed, then I wanted a bass cut control, then I realized it might be possible to do a volume cut switch ... and now I'm looking at multimeters and soldering irons and capacitor options .... 😬 Are you sure it's the same power as the iron unreg posted about? That one is 40 watts and should be quite hot. I googled Weller 336B and that seems to be a 25 watt iron. In my opinion you'll be better off with a hotter iron, like 35 watts where you can bring the joint up to temperature quickly and get off before overheating the surrounding areas. Also, it will take forever to solder a wire to the case of a pot with a 25watt iron. Virtually insuring you'll murder the innards of the pot by the time you're done. I have a 45 watt heating element for my iron with a large chisel tip that I use for soldering to the back of pots. , sorry, I got the wrong identifier off the soldering iron. For some reason I looked at the fine print and didn't notice the larger model number right under the brand name. It's actually the SP40L ( Amazon listing), which is 40W and has a max temperature rating of 900° F. I had a larger chisel tip, but it's been discarded or lost. Do I need to solder to the pot backs? Somewhere around here I've read about collecting grounds away from the pots, and I thought that in that case you only solder to the lugs. I'd rather not risk burning up the pots! |
|
|
|
Post by newey on Sept 5, 2021 15:59:05 GMT -5
Somewhere around here I've read about collecting grounds away from the pots, and I thought that in that case you only solder to the lugs. I'd rather not risk burning up the pots! You probably read that in several places around here. The idea is called "star-grounding" and will save you the potential grief of soldering to the backs of pots. But if you are going to solder to the pot shells, get on and off quickly with a hot iron, as reTrEaD suggested. |
|
|
|
Post by reTrEaD on Sept 5, 2021 16:25:16 GMT -5
Do I need to solder to the pot backs? No, you don't need to. Some people and some companies choose to use the case of pots as grounding points and solder to the backs of the pots. All I'm saying is that if you tried to do that with a 25w iron, you'd need to apply heat to the back of the pot for such a long period of time before it would get up to temperature that you'd almost certainly murder the innards of the pots. |
|
|
|
Post by unreg on Sept 8, 2021 15:56:21 GMT -5
I’m totally unsure if your version of my soldering iron works the same… but, you can follow reTrEaD’s advice, above, to create your own temperature control, if you’d like to… it’s really helpful for me! 😀 , thanks for the suggestion and updates. I'm not going to pursue this because I know that this is the kind of thing I would think about doing for around five years and finally give up on. I've already gotten way deeper than I meant to — first I wanted a treble bleed, then I wanted a bass cut control, then I realized it might be possible to do a volume cut switch ... and now I'm looking at multimeters and soldering irons and capacitor options .... 😬 I totally understand. 🙂 Just wanted to let you know that the build was super easy after I went through the pain of gathering the correct materials. When wiring electricity (like between dimmer and electrical outlets and wire to the wall), solder isn’t used… so the addition of wire pieces to tie it all together went quickly. (The dimmer I used only cost $6.) I’m sure instructions come with electrical outlets OR there are probably many yt videos to choose from. Home Depot also sells the boxes, pipe, covers, and the blank wall plate insert I used. tl;dr: It’s quite a simple process. || frets soldering iron suggestion at the top of this thread comes with a temp control. 🙂 Anyway, thank you. 😊 God bless your guitar efforts! 👍 |
|
|
|
Post by unreg on Sept 8, 2021 18:00:58 GMT -5
(To all) When wiring electricity (like between dimmer and electrical outlets and wire to the wall), solder isn’t used… so the addition of wire pieces to tie it all together went quickly. Important ideas to understand: 1.) When wiring house wiring (like an electrical outlet) 12 gauge wire is used. 2.) Electrical outlets usually can be connected to with stripped wire wrapped around a screw OR by pressing a stripped wire into a hole. The holes are less reliable so my uncle recommends using the screw to connect wire. 3.) 12 gauge wire is quite thick so it only allows one wrap around each screw. - Before wrapping a wire around a screw, take notice of the direction that the screw tightens. Make sure to wrap the wire in that tightening direction so that when tightening the screw, the wire strands don’t break up. 4.) The electrical boxes used in walls may come with many holes (bc in a wall, wires may be fed into them from any direction). - Hope Depot also sells Closure Plugs. A Closure Plug is a thin circular piece of metal that screws into one of these holes. Each bag contains multiple (4?) Closure Plugs. Note: My boxes use 3/4” Closure Plugs bc their holes are 3/4” in diameter. 3/4” is plenty of room for the simple wiring of this dimmer electricity reducer contraption. Caution: It is possible to buy boxes with larger holes. So be aware of listed measurements if you purchase the boxes, pipe, closure plugs. EDIT: While wiring the to-wall-plug cord, dimmer, electrical outlet, boxes, and adding the closure plugs and covers, it was entirely done WITHOUT connection to electricity. Obviously, be careful. 🙂 |
|
|
|
Post by gumbo on Sept 9, 2021 8:21:53 GMT -5
unreg... In Oz we can buy plastic electrical boxes which DON'T have any (open) holes in them...the 'holes' come with either already-fitted blanking plugs and/or the 'holes' are in fact knock-out pieces from the main structure of the box... .....I can't believe we are the only country to get this smart....have a look online where you are..there MUST be some things like that.. ...or bail up the next electrician's van you see waiting at the traffic lights...he's bound to have something like that in the back....  Cheers |
|
|
|
Post by newey on Sept 9, 2021 9:07:14 GMT -5
Yes, you can get electrical boxes with the knock-outs here in the States, either in metal or plastic. Building codes vary on the plastic stuff, some places still require house wiring to be run through metal conduit as opposed to using the Romex stuff.
|
|


 It gets hot pretty quickly. Mine is a super nice iron; but, its 900°F max is a bit much for the guitar soldering. The wet sponge is super helpful also, bc it cools the tip down. But, thank you


