|
|
Post by ssstonelover on Aug 5, 2021 16:32:36 GMT -5
I had a request to build a Strandberg-type guitar from a lefty (impossible to get although theoretically made by them!....). Naturally there is a lot that is different so I elected to start my learning with the best lefty Aliexpress kit I could find and study from it how to make a headless before starting on my own designs, while using the kit to make his (and make the needed numerous modifications). Tonight he picks it up. He wanted very simple electronics (SH with volume) so 95% of the work was reconfiguring the kit to fit this configuration and place pickups and the controls on a pickguard Strat-style. Body before and after: 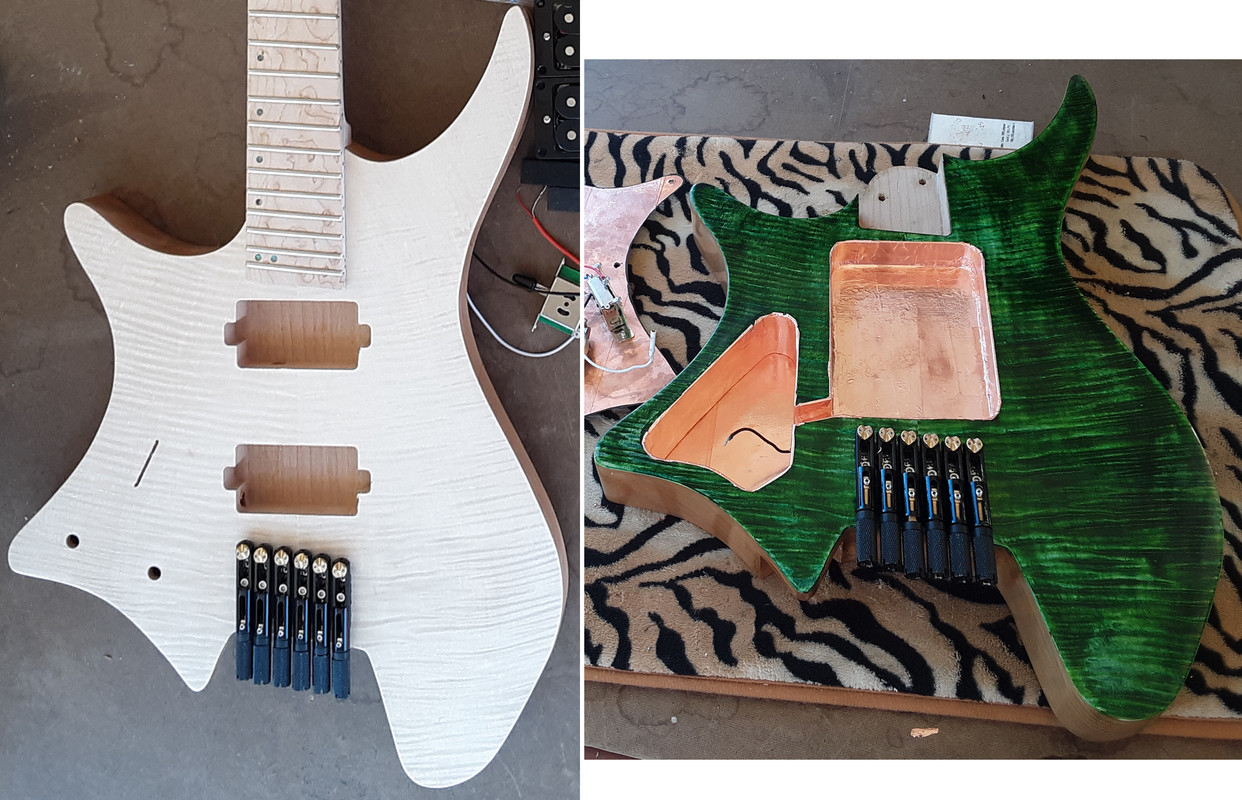 My templates and finished guitar:  Body closeup:  Backside:  Wire quick connects (easy to remove pickguard and disengage from the 1/4" jack and bridge ground:  Visualization mockup earlier in the process (for pot position):  Design sketch 1:1 scale (Illustrator using layers for each process such as pickguard, cavities, etc) used to make overlays, templates and check fit: 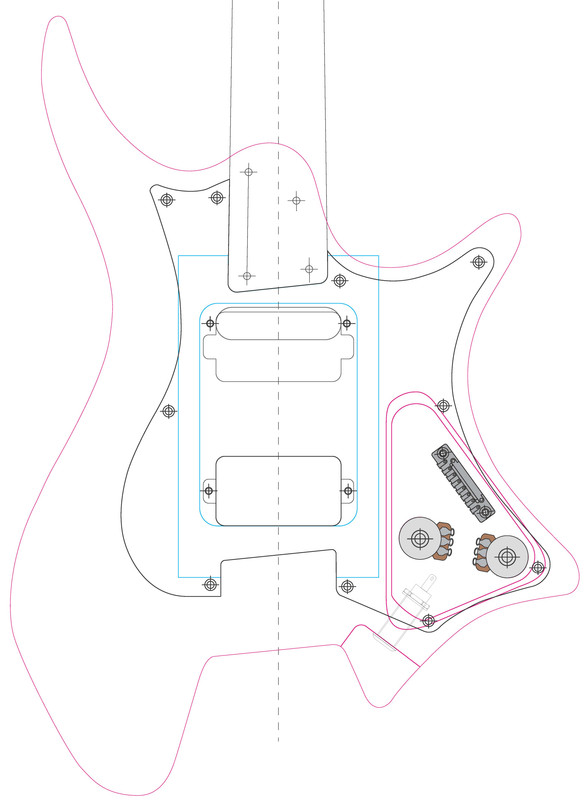 |
|
|
|
Post by frets on Aug 5, 2021 16:50:46 GMT -5
Oh I just love it!! It’s gorgeous!!
|
|
|
|
Post by ssstonelover on Aug 5, 2021 18:18:17 GMT -5
The tuners are pretty fiddly. 0.9 mm hex wrench for saddle height adjustment, 2 mm hex for intonation/length adjustment, 2.5 mm for headstock locks, and 1.5 mm hex for anti-twist when tightening the string tension....and for the saddle locks. If headless is ever going to make it big, it needs some simplification and added robustness. Too bad Leo Fender did not work on it! Maybe Trevor Wilkinson can come to the rescue, he generally has some good practical improvements in his designs.
The paint was a bear....
1 mm thick flame veneer top that was as wavy as ocean water (if scaled down). After dying the top green (multiple applications with varying success, green magic markers, etc.) and sanding it down, it seemed OK until I hit it with 2K paint which was absorbed into the porous areas and built on the non-porous sections. I had to take a break and let it dry, then do some moderate sanding, to then resume painting on a 'sealed' surface. I suppose a conventional sealer would have helped but I did not want to affect the color, and what I did, did work, though it took 1.5 days. Just a few minor spots since where paint has shrunk down as it outgassed which basically adds character instead of super thick armor plated paint LOL.
|
|
|
|
Post by thetragichero on Aug 5, 2021 19:01:56 GMT -5
may have to do a bit of level sanding before topcoat, but I've found epoxy works pretty well as a sealer if you can work quickly (an old credit card works pretty well)
|
|
|
|
Post by ssstonelover on Aug 6, 2021 0:27:32 GMT -5
Yes, Z-poxy finishing resin from LMI and other places would/could/should have worked well. I used it once on an acoustic with open grain and natural wood look. I'm guessing, not having tried it, that shellac, built up over some layers, could have acted as a sealer preventing the paint from wicking through (preventing the paint build I experienced). There are things that could have worked. I was a bit impatient, did not buy these or other grain fillers, so I fumbled and then had to do a recovery... Hopefully the lesson is learnt, sigh, just glad I did get though it....this time. On non-colored wood with transparent top coat, I've used Gluboost as a sealer and even as a grain filler. If you sand through, no big deal, just put a little more on. On dyed wood this was not an option, and made me tempt fate as I did. This is what I had to recover from. It's on both side of the top, though only visible on one side on the photo due to the light. The paint was hard enough to partially sand ~7 hours after the first coat to then apply the final coats (and heavy them up) keeping the top level so there were no runs.... pretty tricky and risky  The second time (for spraying) I was in the ballpark. Notice I'm not tipping the top from the horizontal, or if I do it's to put it on the bottom while I spray the back and sides lightly, before returning it front side up. Temps in the 90s helped too.  |
|
|
|
Post by newey on Aug 6, 2021 6:19:36 GMT -5
Beautiful work! And the body as it came from Ali Express surprises me, nice grain on the top.
Apart from mismatched allen wrench sizes, what are your thoughts on the quality of the kit you started with?
|
|
|
|
Post by ssstonelover on Aug 6, 2021 19:21:33 GMT -5
Pleasantly surprised quite honestly. I believe the body blank was CNCed, and there were only 3 goofs, and these are related to the left hand orientation for the main part 1. the nut slots were cut at a ~5 degree angle to accord with fan fretting, but the 5 degree was for a right hand neck.... I had plenty of nuts and modified one to the proper 'left hand' 5 degrees. A simple whoops moment of no import. 2. The volume pot hole (if a pot was placed inside) and the 1/4" output jack (if installed) had a bad interference fit which they tried to compensate for by a rather odd angle for mounting the jack. I corrected it by changing the geometry for the jack, plugging the hole, predrilling in the correct spot, and by also moving the volume hole. (picture attached). 3. the 3 way switch was located correctly, but the position of the countersinking (to keep the switch within ~4 mm of the top was off. No such issue on the RH version, so a machine language error in LH translation I believe. This was not a problem, as I removed this part of the top and made the controls pickguard mounted. If I had kept the top as it was, my router could have taken care of this.... 4. the parts are serviceable...and price-point orientated. I did not use any of the screws accordingly. The tuner assembly uses a simple bushing design (high friction) compared to aftermarket types with axial thrust bearings, so that will be added (when eBay delivers) Overall everything could be solved and was not a big headache, even if some issues took a little time and thought to work out. It was a totally worthwhile venture. The original electronics may have worked (pickups were not bad), but the client wanted Dimarzio so those went in along with a Bourns A500K pot Here is some details on issue 2: Position error (which would hamper proper operation) 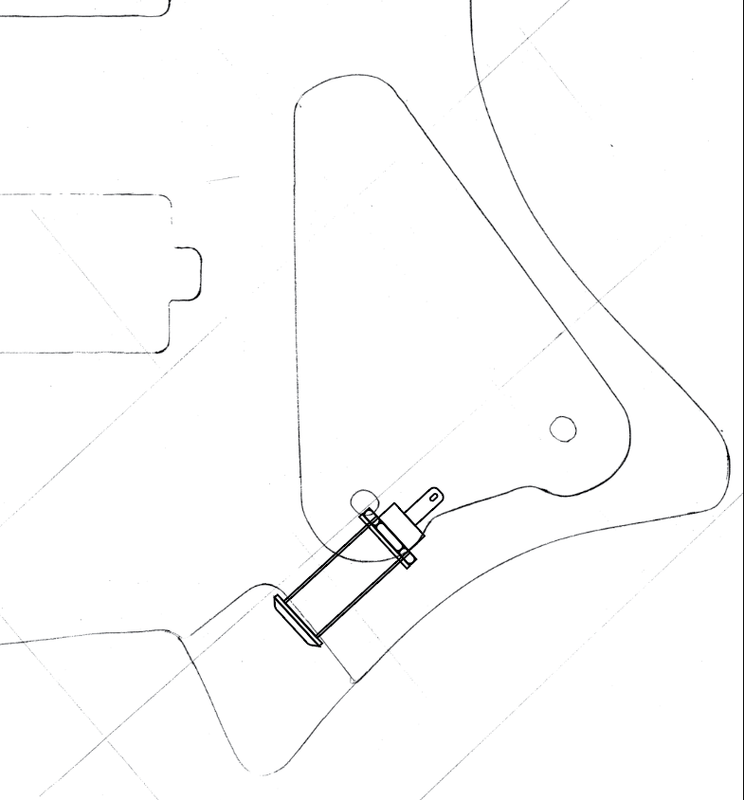 Prosthetic to fix issue (also see my design sketch in the original sketch)  issue 4: simple upgrade to aftermarket tuning ease...  |
|


