|
|
Post by lookbunnyrabbit on Nov 14, 2015 0:14:54 GMT -5
So the wire between the boost pot brown wire connection and what is now the empty lug of the S1 switch was unnecessary? Also, which is better, central ground to a pot or the copper shielding itself? Here it is all Crayola-ed up.  Thanks again John for all your help with this. I know I would never have gotten there without yours and everyones contributions. Thanks again John for all your help with this. I know I would never have gotten there without yours and everyones contributions. |
|
|
|
Post by JohnH on Nov 14, 2015 1:19:36 GMT -5
I think the boost pot is OK - it really is just at the output and relates only to signals coming from the module. It shouldn't be allowed to connect directly to the passive part of the wiring.
Grounding can be in accordance with your convenience; back of a pot, or a screw fixed to the shielding. Its all getting connected together.
Take another look at the S1 (now) tone pot ground. See how in my lash-up, I brought the ground around the pot lug with a new blue wire. Otherwise you can cut all signal with it.
And now we need a QA check on the outcome from someone else. What I showed is how I think it should best go, but we are somewhat into uncharted territory!
|
|
|
|
Post by lookbunnyrabbit on Nov 14, 2015 1:47:02 GMT -5
Theres just one annoyance I see, maybe. The Fender diagram uses a no-load tone pot, to keep the most high frequencies when you need them. You would now be using whatever is on your S1 switch-pot, which may well be 250k. Its not a huge deal unless you are struggling for extra high treble. Its a 250k. If I do I can always mod the pot.I think the boost pot is OK - it really is just at the output and relates only to signals coming from the module. It shouldn't be allowed to connect directly to the passive part of the wiring. Grounding can be in accordance with your convenience; back of a pot, or a screw fixed to the shielding. Its all getting connected together. OKTake another look at the S1 (now) tone pot ground. See how in my lash-up, I brought the ground around the pot lug with a new blue wire. Otherwise you can cut all signal with it. FIXEDAnd now we need a QA check on the outcome from someone else. What I showed is how I think it should best go, but we are somewhat into uncharted territory! "Brother this trip is going to make LSD feel like asprin."

|
|
|
|
Post by lookbunnyrabbit on Nov 16, 2015 18:05:02 GMT -5
Any takers ?  |
|
|
|
Post by JohnH on Nov 17, 2015 14:13:29 GMT -5
Any takers ? We were jut looking for an opinion from others on how the dummy coil is used in series with the full signal from the pickup switching, to connect to the power module. I think this is what it was doing in the Fender design, and I think we haven't messed up any features of the main switching here by doing this. |
|
|
|
Post by ashcatlt on Nov 18, 2015 16:22:24 GMT -5
I haven't actually worked out exactly what that S1 switching is doing, but I suspect that it's laying something else in parallel with whatever is coming in series via the dummy coil (as drawn most recently). That will not be the same as putting that in parallel with the other thing and then running that in series through the dummy coil. Noise cancelling should be mostly maintained, but there will be a noticeable difference in treble response. Frankly, though, I don't really care. I prefer to look at the pickups>SS>S1 part as one big module. It has two wires coming out of it. One is hot and one is ground. The dummy coil should go in series with that hot output - between the S1 and the Volume pot NOT between the SS and the S1.
Speaking of the Volume pot, we are using a suitable high-value pot here, no? The 50K pot from active module will kill all of your treble, and if you repurpose the No Load Tone control, it'll work mostly like tone control that is also a mute switch. This probably wants to be 250K at least, possibly even 500K. It'll still be a little darker than than what you'd get with no load, but...
The Tone control is not going to work anywhere near the same on this side of the low-Z capacitive active source as it would connected directly to the high-Z inductive source of the pickups. 250K is probably too big to make much difference over most of its travel, the cap probably wants to be much larger, and it'll end up as a shelving low pass over most of its range rather than the variable LPF that we're used to. I don't think it much affects the action of the LCR filter that follows it, but I worry any time we start mixing Ls and Cs.
Otherwise, assuming you haven't actually messed with the wiring of the SS and S1 aside from sticking the dummy coil in the middle of it, then it'll probably work fine unless the actual wiring colors of that active thing correspond to the original diagram rather than the table posted later, in which case you'll need to swap the yellow and green wires.
|
|
|
|
Post by JohnH on Nov 19, 2015 6:35:15 GMT -5
The low value volume pot, from the original Fender active circuit, is after the active boost module and never interfaces with the passive circuit. What was originally the passive 250k volume pot in the S1/superswitch circuit, has been changed to being the new passive tone pot, before the signal goes to the active stage. In this configuration, it is similar to the tone pot in the Fender circuit, except that that used a no-load tone pot, so we have a small potential treble loss which will be tested.
All the pickups are the same polarity, and the whole signal from them is fed through the dummy coil to reduce hum, and sometimes hopefully eliminate most of it.
So I'm still of the opinion that this will work, since I think it is using parts of the two circuits which themselves work, and does not impair them. My concern is only that I have never myself experimented with dummy coils, so cant vouch for exactly how well this will work or how it will sound.
|
|
|
|
Post by ashcatlt on Nov 19, 2015 12:25:38 GMT -5
This works. My comments yesterday were regarding bunny's most recent image, which is nowhere near the same thing. |
|
|
|
Post by lookbunnyrabbit on Nov 19, 2015 17:17:45 GMT -5
Ash, Please explain why mine is "nowhere the same thing" Im looking at it even now and cant spot anything I missed.
|
|
|
|
Post by ashcatlt on Nov 19, 2015 19:35:20 GMT -5
I guess it's just the connections to the V pot that are all wrong. You've got the top lug connected to the S1 when it should be the green wire from the preamp. This might cause feedback through the preamp(depending on what that switch is actually doing, I still don't care  ) but you won't hear it because... The wiper - where the green wire is going in your diagram - needs to connect to the Mid Boost pot's top (left most in the diagram) lug in order for anything to get to the output jack at all. (Though honestly, I don't know what I was looking at yesterday with the dummy coil between the two switches, your most recent image seems to be right on that part.) |
|
|
|
Post by lookbunnyrabbit on Nov 19, 2015 23:13:56 GMT -5
I hope I get what you are saying. Here it is with most of what I took away from what you said and revisiting John's mash-up.  |
|
|
|
Post by lookbunnyrabbit on Nov 20, 2015 9:36:53 GMT -5
Here is the resized switch for better viewing  |
|
|
|
Post by lookbunnyrabbit on Nov 20, 2015 10:02:12 GMT -5
Also I am concerned about where this red wire now goes.  |
|
|
|
Post by ashcatlt on Nov 20, 2015 11:51:25 GMT -5
It looks right to me now. That dashed red wire goes in the trash. You DO NOT want that pot connected to the switch. I still haven't bothered to try to figure out the switching. It was fine in the original scheme so as long as everything is exactly like the original - aside from the connections to the pots - you should be good.
|
|
|
|
Post by lookbunnyrabbit on Nov 20, 2015 19:25:40 GMT -5
Thanks again!
The only issue might be the lack of a RW middle. Im not sure that all the positions will sound correct.
Now all I have to do is pull out my "Make it fit wizard" and get all of that under a pickguard. Now if I can just find my PCB shrinker I will be in business.
|
|
|
|
Post by JohnH on Nov 20, 2015 21:11:33 GMT -5
Thanks again! The only issue might be the lack of a RW middle. Im not sure that all the positions will sound correct. Now all I have to do is pull out my "Make it fit wizard" and get all of that under a pickguard. Now if I can just find my PCB shrinker I will be in business. No worries about not having RW middle. With a dummy coil, it makes it much easier and was the key to having the Fender diagram working without complex switching. All the pickups make '+' hum, and the dummy coil always makes '-' hum. If you did have RW middle pickup, all sorts of extra switchery would be needed to flip and cut out the dummy coil in different positions, so it didn't do as much harm as good depending what it was connected to. None of that is relevant to tone. |
|
|
|
Post by lookbunnyrabbit on Dec 18, 2015 11:32:09 GMT -5
|
|
|
|
Post by ashcatlt on Dec 18, 2015 12:11:40 GMT -5
Ive been enjoying pneumonia for a bit now and Im just getting started on the wiring. Better you than me on both! Glad you're feeling better. I'm crossing my fingers hoping you get it all right first try cause it's going to be a real b  h to troubleshoot if you get it wrong. If you haven't already, measure and record the DC resistance through each of the pickups and the dummy coil. Wouldn't hurt to know the exact values of the pots too while you're at it. Those numbers could come in handy in the near future. |
|
|
|
Post by lookbunnyrabbit on Dec 18, 2015 12:30:26 GMT -5
Good call!
Ill record all the data this afternoon. Ill also try to trace all my current connections before I wire the pickups and mid-boost to make sure I have no shorts. Im working with cat-5 and I want to make sure I have no melt through shorts.(I hope that cat-5 is sufficient for the task?)
|
|
|
|
Post by lookbunnyrabbit on Dec 19, 2015 21:29:20 GMT -5
The data gathered. (pots and pickups disconnected)
Neck - 6.10k
Mid - 6.17k
Bridge - 6.03k
Dummy - 6.18k
Vol - 50.0k
Tone - 245k
Boost: (stated as 25k)
Low - 24.7k*
High - 51.8k^^
* denotes 27k ohm resistor in line for the mid-boost circuit.
^^ denotes 47k ohm resistor " "
|
|
|
|
Post by lookbunnyrabbit on Jan 8, 2016 22:18:52 GMT -5
|
|
|
|
Post by lookbunnyrabbit on Jan 11, 2016 12:09:01 GMT -5
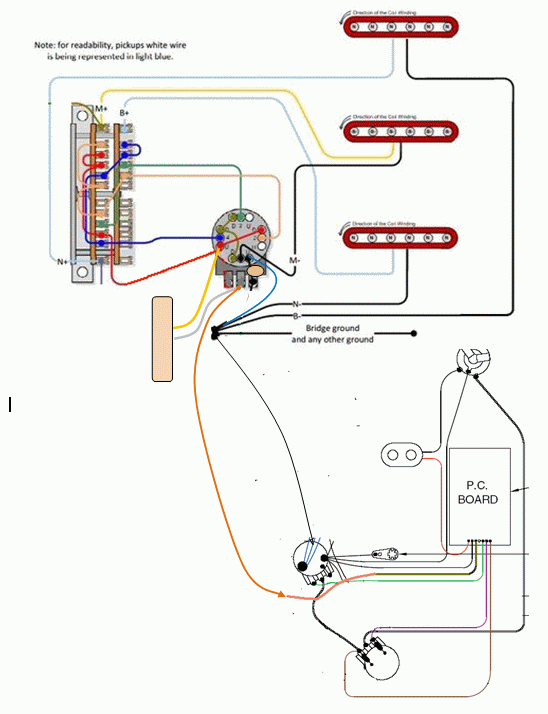
I dont know if I see something incorrect in the final drawing or not.
In my first post there is the Powerhouse Stratocaster wiring on the second picture. It shows the path to the middle lug of the tone pot as going from the common threw the dummy coil to the middle lug.
On the bottom picture from the same post you see the output to the middle lug on the tone pot as coming from N+ on that drawing.
On JohnH's Drawing we have the dummy coil coming off the red wire, then going to the middle lug of the tone/S1 switch.
Is it possible that this is what is causing the wiring to work incorrectly? Im sure Im most likely wrong as you guys are the pros here. Im just guessing at this point.
I have gone over each connection to make sure that it matches the final diagram at least 7 times now. I can find nothing out of place. I made sure that none of that small cat-5 had melted threw and shorted on the 5-way switch as well as to check for cold solder joints.
Is that red wire that the dummy coil is hooked to the common?
|
|
|
|
Post by lookbunnyrabbit on Jan 16, 2016 15:51:10 GMT -5
OK, I guess I give up on the old drawing and need to start a new one. I am in the process of trying to make it more readable. So far what I have on the drawing is the original switching on the Allen drawing. Where is the common on the 5-way the way its drawn? Also I had a question about the tone control and how it relates now that one of the tone pots has been relegated to boost control? With the extra section of the 5-way being unused, can that or should that be used for tone control?  |
|
|
|
Post by lookbunnyrabbit on Jan 17, 2016 14:19:08 GMT -5
Im sorry, did I offend or something?
|
|
|
|
Post by newey on Jan 17, 2016 22:22:03 GMT -5
Not at all, I didn't have an answer for you and I was hoping someone else would chime in. It sounds as if we need someone to re-vet the diagram and proceed from there. I wouldn't throw in the towel on the original scheme just yet.
As far as redrawing it for readability,that may help. The commons are where your N+, M+ and B+ are attached, the 4th commons is unused. As for tone controls, if you only have one master tone, there is no need for it to be switched by the 5-way.
|
|
|
|
Post by lookbunnyrabbit on Jan 18, 2016 12:46:45 GMT -5
Thanks for getting back to me. I though I fell into a hole somewhere. LOL
I think I am also asking the question wrong. I know where the common lugs are. I guess what I was asking is where is the common or out in that switching. What would normally be out to the volume.
The only known is that both diagrams work on their own. The David Allen diagram is how I wired my number 2 axe. I have also wired and owned a few powerhouse Stratocasters. The rub comes in because the DA drawing was designed for 3 pickups N-S-N
and the powerhouse wiring is N-N-N with a 4th that is south. Im not near smart enough to understand how that effects it the wiring of the 5-way and the S1 in relation to how its actually wired. I do get that the positions will be different with the S1 depressed because of the trailing 4th pickup. However, being a dummy coil I am guessing that the change wont really be heard.
After thinking about it. The Mid-boost should be able to be used stand-alone. with the boost pot and the 9v and ground being spoken for, it just leaves audio in and out. Could that not be thrown at the end of the circuit? That is why I was asking about the out or common of the drawling.
Sorry to be so impatient but this guitar has been on my bench since Oct and Im dying to see it work. I am super thankful for everyones help. I know I never could have got this far otherwise.
|
|
|
|
Post by ashcatlt on Jan 18, 2016 13:32:11 GMT -5
When did this forum stop displaying post numbers in the threads? It really made it easier to refer to specific posts without having to quote. Oh well...
The diagram in your post on Nov 19, 2015 at 10:13pm was correct as far as I could tell. I actually did eventually sort through the pickup selection (5-way and S-1 together) and it seemed to work as intended. I'm pretty sure that if it's not working as intended, then it's not actually wired like that diagram.
We might be able to figure out what went wrong with a meter and some math. You didn't post the DC resistance of the dummy coil. Did you measure it?
Also, how did you determine which way to wire the dummy coil? N/S is irrelevant because there's no magnet. All that matters is winding direction, and that could be anything, and is easily changed. If there's unexpected noise in all positions, it is very likely that the dummy coil is reversed and you just need to swap its wires. This will have no effect on pickup selections, just the noise.
|
|
|
|
Post by sumgai on Jan 18, 2016 15:27:34 GMT -5
When did this forum stop displaying post numbers in the threads? It really made it easier to refer to specific posts without having to quote. Oh well... Right about the time ProBoards instigated Version 5, believe it or don't. Been awhile now, to be sure. It used to be that you could easily select a post by clicking on the "Link to this post" button, but that's no longer an option. The way I do it now is to quote a message as if I were going to reply, and look at the first line in the quoted material, the one that starts "[quote source=...."That will tell you the post number, and you can copy that for future reference. Very much a kludge, true, but at least you can be sure of your exact reference. (Remember, sometimes a member will delete a post, thus boogering up a count like "four postings above".) HTH sumgai |
|
|
|
Post by lookbunnyrabbit on Jan 18, 2016 19:19:53 GMT -5
We might be able to figure out what went wrong with a meter and some math. You didn't post the DC resistance of the dummy coil. Did you measure it? Also, how did you determine which way to wire the dummy coil? N/S is irrelevant because there's no magnet. All that matters is winding direction, and that could be anything, and is easily changed. If there's unexpected noise in all positions, it is very likely that the dummy coil is reversed and you just need to swap its wires. This will have no effect on pickup selections, just the noise. No, like and idiot I didnt take a reading on the dummy coil. The only reason I figured it had a direction is that it has the two outer magnets. I also think I read somewhere that it was wound south. As to the wiring. I have check it over many times. no wire is out of place on it. I did note something wrong with the final drawing that is causing much of the noise. Its that red wire out of the vol pot that is hooked to the boost pot. Its feeding a loop in a sense. The boost pot takes no signal from the wiring. its simply to regulate the boost. There is only two wires that matter with the mid-boost. that is the yellow and green which are the input and output to the mid-boost. Purple and brown are for the boost pot and the red and black are power. So I take it from that it means that the mid-boost is really just stand-alone and could go anywhere in the chain after the switching. |
|
|
|
Post by ashcatlt on Jan 19, 2016 12:23:30 GMT -5
No, like and idiot I didnt take a reading on the dummy coil. The only reason I figured it had a direction is that it has the two outer magnets. I also think I read somewhere that it was wound south. Doesn't really matter. The measurements we need are going to have to be taken from before the preamp anyway. You can't measure across the end of the cable - through the nostril, as ChrisK used to say. Means you have to open 'er up anyway. Means you might as well just measure from the "switch side" of the dummy coil and then it won't be a part of the math. I'm not sure what you're calling a mid boost or a boost pot or whatever. The switching happens. The output from the switch goes through the dummy coil to the input of the active boost module. The Tone pot hangs off this connection in parallel. That active module has a set amount of gain. It takes what you put into it and multiplies it by some amount set at the factory. The output of this goes through a simple resistive divider Volume control. If the set gain of the active module is more than you want, you turn the resulting signal back down. From the Volume control it goes to the wonky RLC network of that Clapton mid thing. IDK exactly what's inside that circuit, but I do know that it's just a couple of passive components connected together as a module with two wires to connect it to the rest of the circuit. I'm not completely convinced that the order of those two wires matters, but in order for it to work as intended, it has to be wired as shown in the diagram. After that pot, it goes to the jack. |
|


 ) but you won't hear it because...


