|
|
Post by flateric on Dec 16, 2011 18:03:04 GMT -5
Hi guys, long time no see....  a request for help - I want a small circuit i can put inside my gecko bass which checks battery voltage (9v pp3 drives the SD Basslines pickups) I have a small red LED which lights when the jack plug is inserted, its a sort of reminder to tell me its still drawing current. I want the circuit to kick in when the battery voltage falls below about 7.5v, so the LED doesn't light up any more. This will indicate to me when the battery needs changing. Any ideas? |
|
|
|
Post by newey on Dec 16, 2011 23:31:33 GMT -5
Hey, eric, welcome back! I'm sure someone will come along with a better solution, just thinking off the top of my head here- and after several beers as well. How about if it cut out at 8V instead of 7.5? It would seem to me that you could get the LED to extinguish once the battery dropped below 8V by wiring three identical 2V LEDs in series, along with a 2V resistor. (3 X 2V) + 2V = 8V. The other two LEDs don't need to be visible, they could be buried in the cavity. The one that is visible should no longer be lit once the voltage drops below 8V- none of them will be lit at that point. (The LEDs should all be identical types.) Shouldn't really affect your battery life too much to add the extra LEDs. In fact, I don't think it would affect it at all, since the current to the three will be the same as for one, it would just dim the LEDs a bit. (I think, I could easily be wrong on this theory stuff. Insert large grain of salt here . . . ) Of course, you'd have to calculate the appropriate resistor for the 3 LEDs. It might be possible to get it down to 7.5V by manipulating the value of the resistor, not sure on that. But 8V is pretty close to 7.5V anyway. Or, 2 LEDs plus the resistor could give a cut-off at 6V? Anyway, that was my off-the-cuff thought, I'll now sit back and let someone give me a schooling on why that won't work.  |
|
|
|
Post by reTrEaD on Dec 16, 2011 23:52:06 GMT -5
I think you might be onto a cheap and dirty fix. But I wonder how many beers you've had and where one might find a 2V resistor.  Edit: Let's have another look. Stacking up leds or having a zener diode in series with one led could work. But it might take some experimentation to get this to work well. Let's say that we have a led and zener in series that total up to 7.5v And we choose a resistor to drop the additional voltage, limiting the current. 9 - 7.5 = 1.5v across the resistor. A 1500 ohm resistor will set the maximum current in the circuit to 1mA when the battery is new. What happens when the battery fades? I don't know how much current is necessary for the led to appear illuminated. When the battery is at 8v, we'll only have 0.5v across the resistor. Is this still enough current? idk. Looks like trial and error to get the values right. |
|
|
|
Post by flateric on Dec 17, 2011 4:03:26 GMT -5
i came across this www.reuk.co.uk/LM741-OpAmp-Voltage-Indicator.htmand a simpler one using a non transistor plus voltage divider and 2 less that might work. If i can work out using a bicolour led then i can have a green light when battery is ok changing to red when it gets below x volts. That would be really useful. |
|
|
|
Post by sumgai on Dec 17, 2011 4:41:17 GMT -5
♭eric, That circuit above requires an op-amp, and that's just yet another, and quicker, drain on your battery life. As 'Tread points out, you need to stay away from active components, unless you have a quick-change battery box on-board..... A bi-color LED is really two LEDs in one casing. For a Red/Greed LED, you'd apply a DC voltage in one direction to get Red, and apply the opposite polarity DC voltage to get Green. Alternating between the two polarities (an AC signal) would produce a third color, where the eye perceives (through natural persistance) a combination of the two, or in this case, Yellow. (The exact third color depends on how bright the two colors are separately, and the rate of change between the two polarities.) But the upshot here is, in order to achieve your desires, you'd need to "flip" the voltage going to the LED, and that requires yet more components. How complicated do you need this to be? A zener diode is the key here, but 'Tread doesn't quite have it, yet. Keep googling, I'm sure you'll find the right circuit. But if not, I'll pop one out for ya. (I now have a decent computer to work with again! But it's taking time to bring it up to spec. A few more days.....) HTH sumgai |
|
|
|
Post by flateric on Dec 17, 2011 8:05:53 GMT -5
This little chap works, put it onto vero with a trim pot set to just under 8V, the red light comes on when the voltage drops below the set level. Now I need a green LED to shine when the voltage is above 8V.  (EDITed by sumgai to shrink the image down to a manageable level) (EDITed by sumgai to shrink the image down to a manageable level) |
|
|
|
Post by thetragichero on Dec 17, 2011 10:58:36 GMT -5
what sort of battery drain do you have with that?
KISS (keep it simple stupid) is the key to this
i would delve deeper into the passive components these fellas have suggested
edit: did not intend to be harsh, but i worry about the leds in homebrew dirt boxes, let alone transistors and op amps inside your guitar!
|
|
|
|
Post by flateric on Dec 17, 2011 11:36:06 GMT -5
I already have an LED indicator in the active circuit of the bass. I can't measure battery drain on this one as I've only just put it together. I have the option of wiring it into a simple push-button switch that will then just check voltage and show red light if its below a certain level. Of course if you leave it so long the battery dies then there will be no light anyway, hence I'd like a bicolour LEd to show either green or red depending on battery state when i push the test button. The whole thing will be built into the ctrl cavity of the bass with a simple push button tucked away somewhere. This way I have no concerns about battery drain.
|
|
|
|
Post by JohnH on Dec 17, 2011 14:20:31 GMT -5
I think thats great, particularly if you have it on a switch so it takes no power itself until you use it.
Short of having a circuit like that, I have a simple gadget to plug into stomp boxes and guitars with internal batteries. Its just a stereo jack plg with two wires to ground and ring only. When its plugged into a guitar/box with the usual set-up where the battery negative is connected to the ring terminal of a stereo jack to engage power, you can then read voltage on a multimeter. Its not quite accurate because the reading is being taken through the devices circuitry, but its close enough and tends to read a bit low. If you know roughly what a new battery reads in this way, you can judge when it has become too run down.
John
|
|
|
|
Post by sumgai on Dec 17, 2011 14:54:55 GMT -5
♭eric,
Well, if battery life is not a concern, then what you want is a voltage comparator circuit. One chip will do it.
However, if you think the transistor circuit (above) works like you want, then by all means, go to it! ;D
If you can live with a separate green LED, then simply insert it, along with an appropriate valued resistor, into the emitter of the first transistor (essentially duplicating the resistor-LED combo to the right of that). In this manner, when one LED is active, the other is not. But it will be "on" all the time. Your 'test switch' would cure that problem, or you could use a higher value resistor and live with a dimmer LED.
HTH
sumgai
|
|
|
|
Post by flateric on Dec 17, 2011 21:11:11 GMT -5
great, thanks - so the 470R is just to limit the current drain f the LEd, right,? So when I put a green one in to Q1/E I should also add a similar resistor
|
|
|
|
Post by sumgai on Dec 18, 2011 3:29:12 GMT -5
great, thanks - so the 470R is just to limit the current drain draw of the LED, right,? So when I put a green one in to Q1/E I should also add a similar resistor Correct on all accounts. (Well, I did correct an error in your statement, but it was a choice of words, not an incorrect idea.) I should add, if you choose a different Green LED, you may end up with one that draws more current, or even less. In such a case, you'll need to compensate with a higher/lower value resistor, as needed. Pay attention to the spec of the thing to see how much current it's rated to draw - consider this the maximum value, and calculate accordingly. HTH sumgai |
|
|
|
Post by flateric on Dec 18, 2011 14:42:59 GMT -5
Gonna go this route too - sumgai's passive approach, often the best! www.rmvhf.org/wordpress/?page_id=889Just ordered some different value zeners. Any help on the maths would be appreciated! |
|
|
|
Post by flateric on Dec 19, 2011 10:20:49 GMT -5
More found... 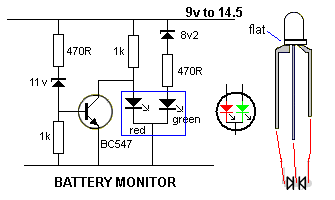 This is designed for 12V car battery. The LED produces orange when the red and green LEDs are illuminated. The following circuit turns on the red LED below 10.5v The orange LED illuminates between 10.5v and 11.6v. The green LED illuminates above 11.6v How do i work out the values needed for a 9V pp3 battery? |
|
|
|
Post by asmith on Dec 19, 2011 11:15:42 GMT -5
That looks to me like above the breakdown voltage (Vb) of Zener diode "8v2", current heads through the green LED.
Above the Vb of "11v," current activates the BJT transistor, and the red LED is bypassed.
When the voltage drops below the Vb of "11v," the transistor is switched off, and both LEDs are active, so you see orange.
When the voltage drops below the Vb of "8v2," no current can flow through the green LED, so you only see red.
If "11v" is exactly what it says on the tin and the Zener diode has a Vb of 11 volts, and similarly the Vb of "8v2" is 8.2 volts, then I suspect the figures for the actual operation of the circuit are properly adjusted for voltage divided through all the resistors. I don't know the resistance from Base to Emitter for BC547, because I am to googling datasheets what Joe Satriani is to Rogaine commercials.
To answer your question, you'd choose different Zener diodes.
|
|
|
|
Post by reTrEaD on Dec 19, 2011 11:20:28 GMT -5
How do i work out the values needed for a 9V pp3 battery? Green is achieved by turning on the transistor (stealing the current for the red led). So change the value of the zener diode in the base circuit so that Vz + 0.6 = green voltage The lowest orange voltage is determined by adding up the voltage on the green led + right hand zener + voltage on the resistor when the green led has just enough current to illuminate. I don't know the resistance from Base to Emitter for BC547, because I am to googling datasheets what Joe Satriani is to Rogaine commercials. lol @ JS vs Rogaine You won't find a spec for Rbe. The current vs voltage relationship looks like an exponential curve with the knee at about 0.6v. Below that voltage, there isn't much current. Above that, the current skyrockets. On second look, I think the easiest way to approach this would be to scale the zener voltages by subtraction. We don't need to know the voltage of the leds or the voltage across the resistor in series with the green led for our lowest "orange" voltage. Just subtract. Since the lower orange threshold is 10.5v, subtract the 8.2v on the zener. The remaining voltage is 2.3v. So pick the new lower threshold for orange and subtract 2.3v. That will be the voltage of the new zener. |
|
|
|
Post by flateric on Dec 19, 2011 13:05:54 GMT -5
Asmith, I kinda guessed how it operated and was anticipating someone would tell me which value Zener diodes I needed, not tell me I had to change 'em - I sorta worked that bit out! LOL.
OK, for the bass circuit, it's powered as prev mentioned by a PP3 9V battery.
I need green light above 7.5V, I need red light below 6V.
Hope that helps clarify what I'm trying to achieve. It's the values needed to change this from a 12V indicator to a 9V for my bass, sorry if I did not explain earlier.
|
|
|
|
Post by sumgai on Dec 19, 2011 13:21:18 GMT -5
Running further with reTread's notes... In essence, the transistor is being used as a switch, and that's easily explained by the shape of the curve showing emitter current - nearly nothing, or nearly everything. From that, we deduce that if the 11v Zener is not conducting, then there's no current flowing through the two resistors, thus the base is unpowered, leaving the transistor off. This allows current to flow through the 1K and then through the Red LED. Turning on the transistor (greater voltage than the 11v Zener threshold) allows it to shunt the voltage away from the LED. Yes, some current is flowing into the LED because it's in parallel with the transistor, but not enough to turn it on.
This is one of those famous three-legged dual-color LEDs. Not always easy to find, but perserverance should pay off.  But more lovely (in British jargon), you could use this in your previous circuit just as easily. Sure, we have only one active device here, instead of two, but we also have two Zeners, and the net effect is to complicate your idea. In reality, you want to know only if the battery is "under voltage" - you don't care if it's 'under voltage' or ' really under voltage', do you?  Go back and plug this "new" combo LED into your previous circuit, and I think you'll be happy. ;D HTH sumgai p.s. That 12v automotive checker? That's a Charge/Discharge indicator. It's meant to tell you if the battery is currently being charged, it's simply supplying voltage without being charged, or if it has been discharged below a certain point, and can no longer supply reliable power. Good idea, just not the right application for this job. |
|
|
|
Post by reTrEaD on Dec 19, 2011 13:30:51 GMT -5
Try it this way...
The zener on the left side determines the green voltage.
That was 11.6v for an 11v zener.
So just subtract 0.6v from the voltage you want, to determine the value of the zener on the left.
The zener on the right side determines the red voltage.
That was 10.5v for 8.2v zener.
So just subtract 2.3v from the voltage you want, to determine the value of the zener on the right.
|
|
|
|
Post by flateric on Dec 19, 2011 14:53:15 GMT -5
I have a packet full of 3 legged bicolour LED's to use up! I want to know when the battery is OK and also when its starting to be 'not ok' If green needs to be cut off at about 7.5, then the Zener on the left needs to be 6.9V, If the red needs to come on at 6V then the right zener needs to be 3.7V. Lets give that a try, thanks for bearing with me. I take it all the resistor values need to remain same. |
|
|
|
Post by reTrEaD on Dec 19, 2011 16:33:30 GMT -5
You won't need to change the resistor values, but you could.
Previously, the maximum current on the red led was about 8.5 mA, now it's about 6.5mA. I think that's still more than enough. If it isn't you could lower the value of the 1k resistor. Likewise lower the value of the 470 resistor on the right to increase the brightness of the green.
The less current wasted, the better. You might be able to increase these values and sacrifice a little brightness to lower the current.
|
|
|
|
Post by flateric on Dec 22, 2011 10:15:17 GMT -5
OK here's mark III,  uses a 6.2V zener and 2 general purpose NPN transistors like 2n3904 since I have a box load of them. Above 6.9V the green side of the bicolor LED lights up, belwo 6.9V the red side lights up. Fit a push-button switch between battery and circuit then u have a quick visual test between songs or gigs to check battery strength is ok. |
|
|
|
Post by reTrEaD on Dec 22, 2011 10:36:14 GMT -5
It doesn't look like it will work. You have the common cathode of the LED going to the battery (+). |
|
|
|
Post by flateric on Dec 22, 2011 11:01:50 GMT -5
|
|
|
|
Post by reTrEaD on Dec 22, 2011 12:39:29 GMT -5
Oh, that'll work.
You're drawing a tiny bit of current through the green led to switch on the transistor for the red led. But it's so small it shouldn't matter.
|
|


