Post by fobits on May 26, 2006 20:18:52 GMT -5
Until recently I had never owed a router, nor had I seen anybody use one. I had only the vaguest idea of the types of bits that were used and what they could do.
For those who are in a similar position, and are curious, here are some basic basics.
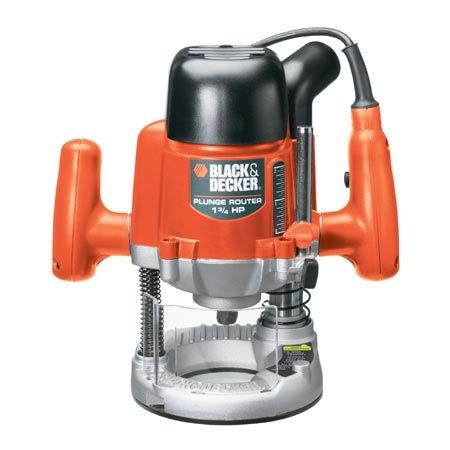
Here is a picture of my new toy, a bit better than my own photos It has a 1 3/4 hp motor, more than enough for this work, but in other respects it's a stripped-down model. It lacks some of the convenient features which are found on many other routers.
It's called a "plunge router" because the motor, and everything attached to it, can move up and down with a 2" range of movement. It has springs which lift it up to the top, but it also has a lever which can be pushed to lock it in any position
The chuck of a router, called the "collet", isn't adjustable like the one on an electric drill. The two standard sizes (in the US and Canada) are 1/4" and 1/2", and each type only uses bits which are made for it. Mine takes bits with a 1/4" shank.
There are a great variety of bits made for routers. They can cut joins, sculpt paneling and do all sorts of other jobs.
Here are two types which are more than just cutters. They are designed to be used with templates and are of special interest to those who route on guitars.
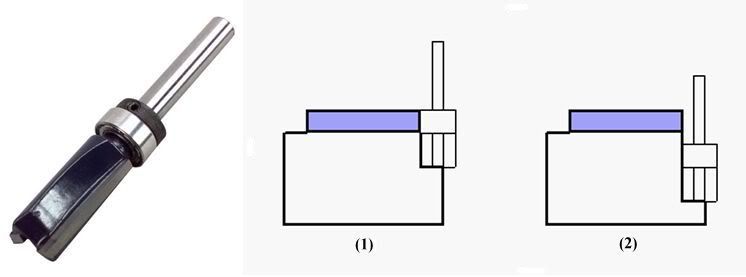
This type is called a "template bit". The important feature is the ball bearing which is on the shaft above the blade, and is exactly the same diameter.
The idea is that the ball bearing can roll along a guide or template, and the cut will extend straight down from it. The guide can be a surface that already exists or one you make yourself.
The drawings show one way to use it. A template is fastened to the top of the workpiece by using double-sided tape, clamps or whatever your ingenuity might suggest.
On the first cut (or the first few, depending on how much you take at a time) the ball bearing rolls along the template. The cut below is a perfect replica.
As you cut deeper, as shown in (2), the bearing is no longer on the template. Now it rolls along the wall that was made by previous cuts. The guide is no longer needed, but can be left in place so long as the bit can reach far enough.
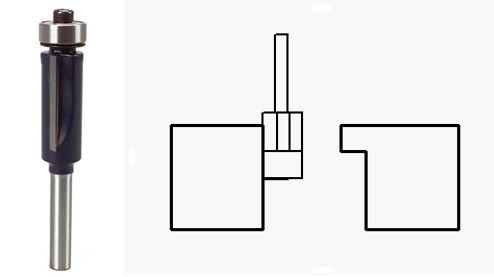
This type is called a "flush trim bit". The important difference is the location of the ball bearing. Here it's at the opposite end, out at the tip. This bit is used when the guide is on the opposite side of the wood which is being cut.
One job it could be used for is to remove the lip from a tremolo opening. In this case the guide would be the larger opening inside. The ball bearing would roll around the wall of the large opening and the blade would cleanly remove the lip.
This is just a small fraction of what they can do, but I thought that these bits are pretty cool, and I would pass the information along.
For those who are in a similar position, and are curious, here are some basic basics.
Here is a picture of my new toy, a bit better than my own photos
 It has a 1 3/4 hp motor, more than enough for this work, but in other respects it's a stripped-down model. It lacks some of the convenient features which are found on many other routers.
It's called a "plunge router" because the motor, and everything attached to it, can move up and down with a 2" range of movement. It has springs which lift it up to the top, but it also has a lever which can be pushed to lock it in any position
The chuck of a router, called the "collet", isn't adjustable like the one on an electric drill. The two standard sizes (in the US and Canada) are 1/4" and 1/2", and each type only uses bits which are made for it. Mine takes bits with a 1/4" shank.
There are a great variety of bits made for routers. They can cut joins, sculpt paneling and do all sorts of other jobs.
Here are two types which are more than just cutters. They are designed to be used with templates and are of special interest to those who route on guitars.
This type is called a "template bit". The important feature is the ball bearing which is on the shaft above the blade, and is exactly the same diameter.
The idea is that the ball bearing can roll along a guide or template, and the cut will extend straight down from it. The guide can be a surface that already exists or one you make yourself.
The drawings show one way to use it. A template is fastened to the top of the workpiece by using double-sided tape, clamps or whatever your ingenuity might suggest.
On the first cut (or the first few, depending on how much you take at a time) the ball bearing rolls along the template. The cut below is a perfect replica.
As you cut deeper, as shown in (2), the bearing is no longer on the template. Now it rolls along the wall that was made by previous cuts. The guide is no longer needed, but can be left in place so long as the bit can reach far enough.
This type is called a "flush trim bit". The important difference is the location of the ball bearing. Here it's at the opposite end, out at the tip. This bit is used when the guide is on the opposite side of the wood which is being cut.
One job it could be used for is to remove the lip from a tremolo opening. In this case the guide would be the larger opening inside. The ball bearing would roll around the wall of the large opening and the blade would cleanly remove the lip.
This is just a small fraction of what they can do, but I thought that these bits are pretty cool, and I would pass the information along.