|
|
Post by fenderbender on Nov 30, 2010 8:05:47 GMT -5
Today the rest of the parts I ordered for the HBD mod will be arriving and I suddenly find myself unsure as to whether I want to drill holes in the Epi LP. Don't know if this is due to the fact that once it's done, it's done and there is no turning back. Interestingly, I had no qualms about augering a hole in the Squier Strat. In that one's case I knew I could revert to "stock" appearance with a simple pickguard swap.
Anyway, have any of you felt the same way before tearing into something you really wanted to try?
Now back to hem, haw, twiddling fingers, pacing... ;D
|
|
|
|
Post by JohnH on Nov 30, 2010 14:59:21 GMT -5
We know what you mean! And the sad thing is that these mods dont usually add to the value of your guitar, so you have to justify it based on your own use - which you can (I cant stand playing an un modded LP!)
With your LP, take a lot of care to make sure you can deal with the thickness of the top - most pots and switches dont have long enough shafts to get through with a nut on the face, unless you rout the back a bit. If you are smart however, you will have gotten log-shaft pots!
When it comes to drill, work out a set up that will give you very good control. I mount my hand drill in a small drill press to keep it square. And spend alot of time thinking out excatly where each hole will go to leave room inside, and get the controls in a logical and pleasing pattern so it looks like it was designed. I stick a piece of tape over the hole position, so I can mark on it to drill through
Then, when you start wiring, make a card template of the hole layout and do the bulk of the wiring with controls on the card, well away from the guitar. You might prefer to do the thinking and layout, then the wiring, and not drill your holes until you are satisfied that its all going together. Theres even a lot of testing you can do before it goes into the ax.
John
|
|
|
|
Post by Double Yoi on Nov 30, 2010 16:31:37 GMT -5
I think all of us has had that feeling at one time or another, even the jedi masters in here, Newey, Sum, and Cyn1, had a first time and had that feeling. Wonder if they had the help they give to us? Maybe, maybe not?
I know that we have a wealth of information from the members here and I have never asked for help and not got dead on or ar logical responses. Experts, and not just the ones I've mentioned above, all willing to help you find the answers. Guitar freaks that will cheer you on and offer insight as you go, and in my case help you repair the mistakes.
I say do your set up like John H says, check it and recheck it. Get it the way YOU like it, and go for it. Good luck pal
|
|
|
|
Post by cynical1 on Nov 30, 2010 16:48:03 GMT -5
OK, first off, once you climb the ladder, test the board and spring...well...at this point it's a bit late to check if there's water in the pool...
What I would do, if it were me, is pull all your existing controls out of the guitar. Make a cardboard template of the cavity and double check that all your parts fit. Now is the time to move them and make your final checks.
Once all the pots and switches are located, put the template you have already drill your holes in back into the control cavity. Put some 3M blue masking tape over the finish side. This helps prevent issues when the drill passes through.
Now, grab the smallest drill bit you own and using your template drill from inside the cavity to the outside that you hopefully just taped.
These are your pilot holes. Now, grab the appropriate drill bit for your switch or pot, normally 3/8" for pots and 1/4" or 9/32" for micro switches. Check this, personally, as I don't really know what you've got there.
Now, since you have pilot holes in place, and your blue tape is still on the finish side of the body, it's just a matter of drilling the proper size hole going back into the cavity.
Pull the tape after the holes are done and carry on.
See, that didn't hurt.
And to be honest, I can drill holes in guitars all day. When I was younger I never thought about the potential damage, and as I got older I just got better at hiding my mistakes.
Once it's done you'll be itchin' to drill another one...
Happy Trails
Cynical One
|
|
|
|
Post by fenderbender on Nov 30, 2010 17:37:07 GMT -5
Ya know...once I heard the UPS guy drop the parts at the door (why do they never knock any more?) I just did it. I have read the HBD thread countless times now and paid careful attention to Runewalker's build tips. I pulled the old stuff out then took my handy 6" ruler (after some careful switch positioning) and went center to center on the neck volume and bridge tone. Next I took the measurement and found center and went 1/2" each way of that for the micro-toggles centerline. Bored the holes and used the box that today's parts came in for the template. Simply held it on the face side and used a mechanical pencil with the lead way out to trace the holes onto the box. Currently the wiring is going pretty well. Hope it stays that way.  Also, thanks for the encouragement! |
|
|
|
Post by cynical1 on Nov 30, 2010 18:53:43 GMT -5
Glad it's going well. 30 minutes of preparation saves years of "I shoulda".
You know, now that you've started this we're all going to be expecting pictures and sound clips...
Glad we could help and good luck with the rest of the mod.
HTC1
|
|
|
|
Post by jcgss77 on Nov 30, 2010 19:39:56 GMT -5
All I can add is that it only takes one successful modification to cross the line to the Nutz Zone. I still find myself, as you can tell from my various posts, second-guessing and trying to think EVERYTHING about ANYTHING with what I am working on.
Oh, whats that you say? What sense did that last sentence make?
My point exactly. Just gotta go and do it! Mess-ups will happen, and you most likely will turn any mistake into one more facet into the diamond you see laying there!
As a side note, if you want the delivery guys to knock on your front door, give delivery directions to your back door. No one wants to go around, those guys are in a hurry and don't want the chance of running into a dog, so they will knock on your front door to see if you are home and go around back as a last resort. Has worked like a charm for me.
|
|
|
|
Post by gfxbss on Nov 30, 2010 21:26:26 GMT -5
Glad to hear the drilling went well. Since I have actually gotten a legitimate setup as far as a shop goes, I haven't done any guitars of my own....
The tape and pilot hole are very important.... I can't tell you how many finishes I used to chip up....
Tyler
|
|
|
|
Post by newey on Nov 30, 2010 21:36:11 GMT -5
Up until a year or so ago, all of my project guitars were cheapies, so I never had any worries with drilling or modding. As I've moved forward, I now have a "good project" in the works, and it's going slow- for a lot of reasons, but partially due to my apprehension at screwing the thing up . . . So, fenderbender, I feel your pain.  |
|
|
|
Post by gfxbss on Nov 30, 2010 21:40:20 GMT -5
Well, I suppose that I only have cheap instruments.... I buy em cheap and mod em til I'm happy....
I have worked on other people's high end instruments before though....
Tyler
|
|
|
|
Post by fenderbender on Nov 30, 2010 23:38:42 GMT -5
Welp, got most of it done before my eyes started crossing from all the staring at the little bits and pieces. Think I'll finish it off tomorrow. It's a tight fit but here's what it looks like so far...  |
|
|
|
Post by 4real on Dec 1, 2010 4:04:10 GMT -5
That looks like a beautiful job of wiring there...really these things can take a long time if you check and check and check again. I take it you used a cardboard template as suggested...here's mine doing the Twenty-two dual... 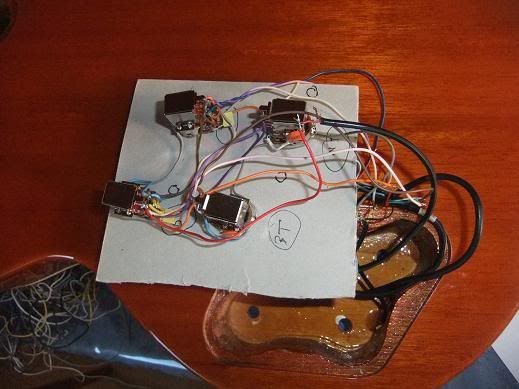 Slow and methodical will ensure a good neat and reliable job and getting it right...far more time effective than the frustration of installing the thing and trying to troubleshoot it... I even wire it so that it can be played and tested out of the guitar before installing everything. ... As for cold feet...yes, all the time...especially installing these khaler bridges and such...gets me everytime! My next project is another squier and had cold feet on that even in regards to drilling for switches (it has no pickguard). Any of this wood work always pays to check and mark and tape off everything and protect teh guitar from stray scratches and such...plenty of pacing and thinking of all the things that could go wrong can help in the prevention process. Still...it is an epiphone, and the mods look neat and will add to the value to you I suspect...so good for you for taking up the challenge and not chickening out...I chose a scheme of course that required no drilling...so...cluck cluck from me! |
|
|
|
Post by Double Yoi on Dec 1, 2010 5:17:18 GMT -5
Yeah man, you did a great job! Glad it's all going well for you.
|
|
|
|
Post by fenderbender on Dec 1, 2010 5:43:46 GMT -5
4real, Yeah, the template was a must have for this! I did take a gamble on cramming it all in before testing. I have since finished off wiring the three way and it all worked. Whew! Here are some various pictures along the way.Oh, I also decided a few days back to just get the Seymour Duncan's. After some serious internal debate I figured it would be easier to install them from the get go rather than after all this was smashed into that little cavity. They sound great and I have no regrets buying them. It also leaves me with two humbuckers for...something. Thanks for the compliments everyone! |
|
|
|
Post by JohnH on Dec 1, 2010 6:13:48 GMT -5
It worked? well done. That was quick!
J
|
|
|
|
Post by cynical1 on Dec 1, 2010 9:12:20 GMT -5
Looks very good.
+1 for the pictures and the clean install.
...so, whatz it sound like?
HTC1
|
|
|
|
Post by fenderbender on Dec 1, 2010 14:31:50 GMT -5
Sounds very interesting in some configurations. Especially on the gain channel. One setting there had me thinking my ex had dropped by (very snarly/growl-y).
Next on my list of stuff to get is a patch cord for guitar or amp to PC. I have a couple of the rotten machines that don't do much and one could certainly be used for that.
|
|
|
|
Post by JohnH on Dec 1, 2010 14:52:48 GMT -5
Thats great. We look forward to hearing more about what you think of it, and hearing some sound samples. No hurry, but it would be great if you can put some comments on the schematic thread, so others can see them.
Also, since you did this on an LP, can you post a link to the parts that you got and did they work OK through the thickness of the top?
On making sound clips, theres several simple ways with a standard pc and minimal extra gear - so sing out if you need advice on that.
Your build looks neat - I like the way you placed the switches.
John
|
|
|
|
Post by gfxbss on Dec 1, 2010 22:36:09 GMT -5
FB,
Looks great, very clean wiring job, and thanks for the pics!
|
|


