Post by sonosonny on Jul 14, 2011 23:33:54 GMT -5
Rune and I have been intrigued by the machine screw/neck insert process for attaching neck/body for quite some time. When he first mentioned it, I was not going for it. Since then I have researched it, installed the inserts and have heard the difference and felt (play-stability) the difference and am now a believer. A number of high end guitar makers are using this process on all of their custom guitars now.
I do not have a drill press, so this was Rune’s idea to perfectly line up the drilled body/neck holes for the neck inserts and machine screws. I have done this to 4 guitars already and Rune is in line with a couple as well. Each installation was completely successful.
I highly recommend you start on that dead sounding glue hog in the closet. I have done this on 4 guitars already (working up to my faves) with excellent results on each one. Do a pre installation test and get to know the guitar’s “tone/lack of tone” for comparison after the “inserts are installed”. I would not start on your finest bolt on. I did not start on my faves/most expensive guitars first. I am glad I went with the “budget” bolt ons to get my technique and installation confidence locked in. Hopefully you already have some neck installation experience. This experience will help.
I know some wood screw purists will bash this, but all I can say is “ I like it and I am installing the neck inserts on every bolt on that I own”. If Rune goes the full route, I will be busy with “insertion” for both our herds for a while.
Directions
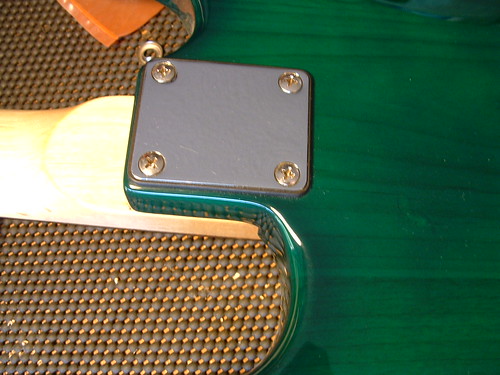
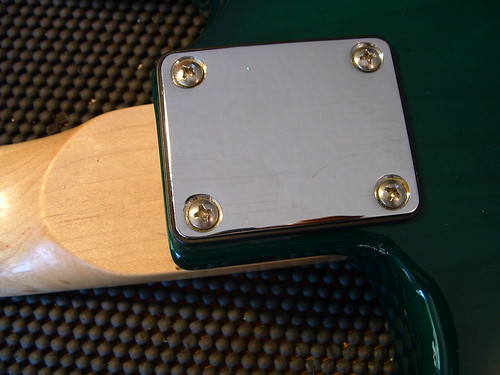
Neck Plate prior to any work
Loosen or remove the strings, your choice. If you leave them on, remove them from the tuners and blue tape them together. You will probably want to install new strings anyway.
Make a couple of orientation pencil lines where the body joins the neck back and sides The temp marks are helpful when lining the neck back up to the body later. At least you will have a reference point and they can be easily removed. Last thing you need is a misaligned neck/body.
Remove the neck. Remove all 4 woodscrews and the neck plate from the body.
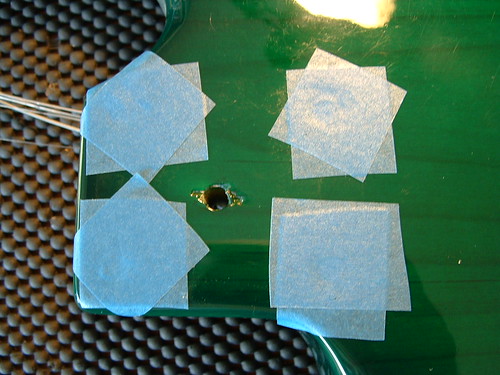
Tape off (blue painters tape) all four empty body screw holes. The tape helps and usually eliminates any chipping of the body when the new holes are drilled for the machine screws. Also it will help in not marring the finish with the temp neck mounting ferrules.
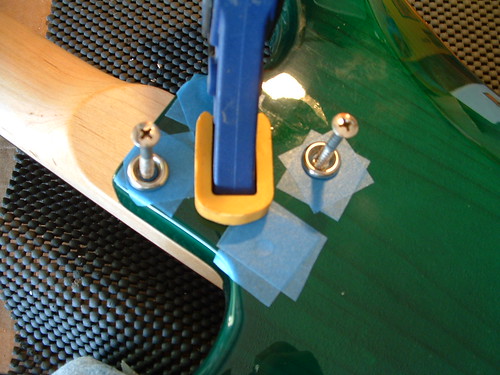
Realign the body and neck using the pencil marks. Clamp the neck to the body. Use two neck mounting ferrules (like on guitars that do not use a neck plate) and two of the original wood screws on two opposite corners (think one half of an “X” top/bottom) to re-install the neck. Neck/Body should go back together exactly aligned as with the original four wood screws.
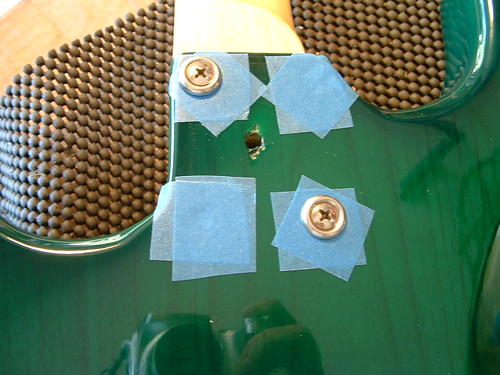
You can check the neck/body alignment with some spare strings or any type of string. Just run the strings through the Low E and High E nut, down to the bridge. Make sure you have consistent string to fret relationships on both the high and low E strings. Extra checking on perfect body/neck alignment, in this step, is a good thing.
The neck should be very stable (two temp woodscrews) for the next step of drilling the two holes for two machine screws and neck inserts. If it is not, check alignment and screw tightness.
My inserts require a ¼” drill bit. My machine screws are 1 ¾” in length. Inserts and Screws use 8/32 threads and are both stainless steel.
Mark your bit from the tip to 1 ¾” with blue tape. This the maximum depth you will drill.
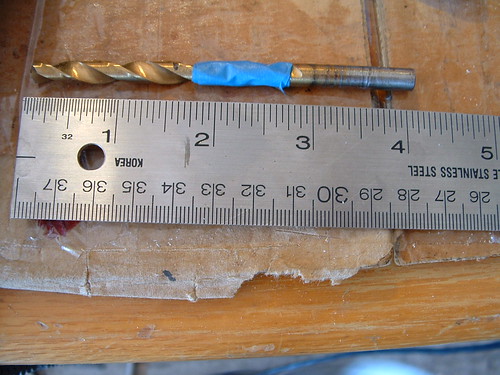
This is the depth required for the screws running through the body, into the neck inserts. 1 ½” screws might work for you as well.
I like to double blue tape the open holes. Try to get your drill bit straight/perpendicular into the body holes. The original neck wood screw holes will act as an excellent drill bit guide. Clean out the drill hole as needed during drilling. The drilling goes pretty fast through the body. When you clear the body and start drilling into the neck, start to closely observe the blue tape marker on the bit. Stop when you hit the 1 ¾” blue tape marker. We do not want a hole through the neck fingerboard ! When you have reached the 1 ¾” marker, pull out the drill and clean up. Repeat process for the other open body screw hole.
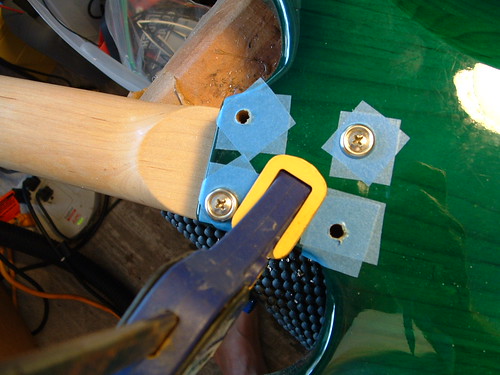
Remove the “temp” wood screws/neck ferrules and separate the neck and body.
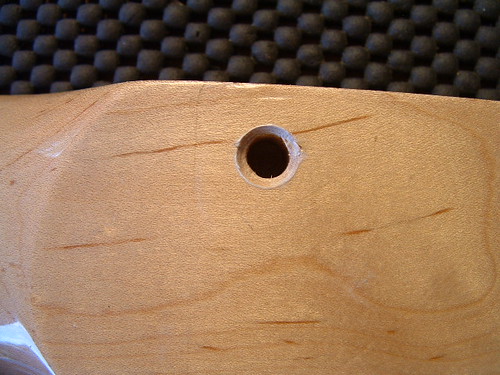
Clamp the neck to a safe flat surface with the two new screw holes facing up . Clean out the two new 1/4” neck holes of sawdust (shop vac works great). I suggest chamfering the top edge of the new neck holes due to the inserts pushing/splintering the wood away on the top edge of the hole on installation (I may have to clarify this depending on the responses).
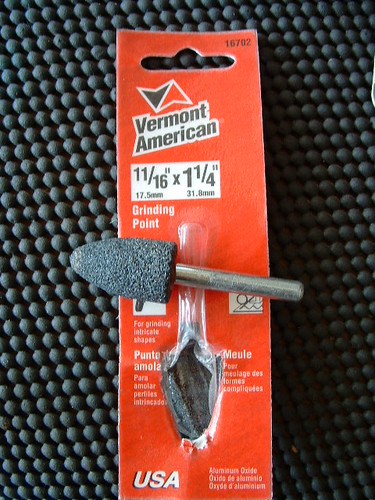
My Ryob1 1/2" chamfer bit has 5 large cutting blades and gets the job done but it looks a bit rough to me. I am looking for a smoother bit for a smoother cut for the chamfer/countersink.
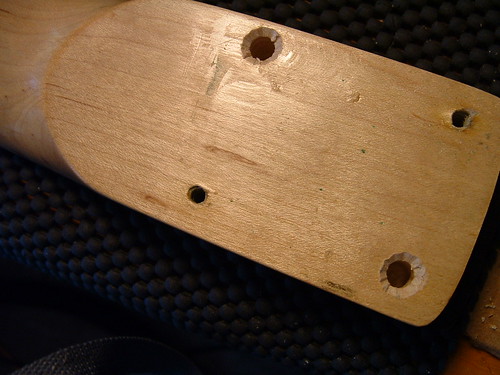
Put a bit of beeswax or bar soap on the outer threads of the inserts for an easier installation . My inserts have 4 mm hex holes for installation with a 4 mm hex wrench. Align the inserts perpendicular to the neck and install them. The new ¼” hole will somewhat act as a guide for the inserts.
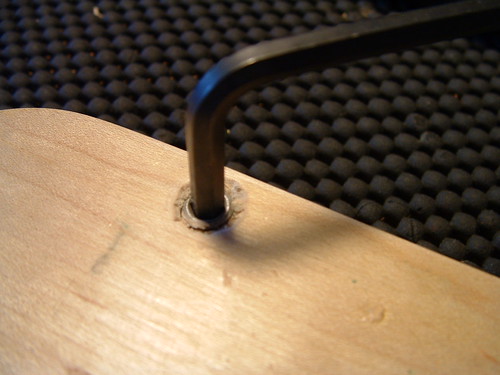
Screw the inserts to where they are “Below” the neck surface. This is important. If you did not chamfer the holes, you will need to clean up/sand the small splinters on the hole edge. You may want to remove the insert to do this then reinstall them.
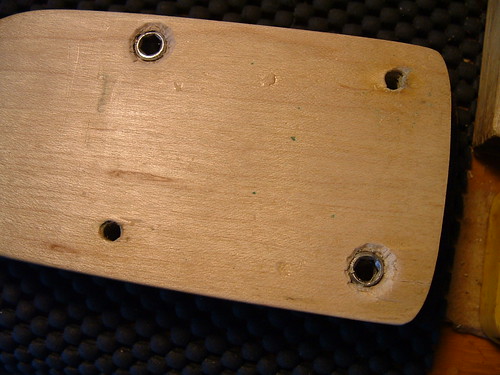
Reinstall the neck using the two new inserts, machine screws and the neck ferrules so we can drill the last two holes. Half way there….The machine screws should connect smoothly with the new inserts. I initially tighten the screws by hand till I feel them bite perfecting into the insert.
Tighten firmly as you would a wood screw.
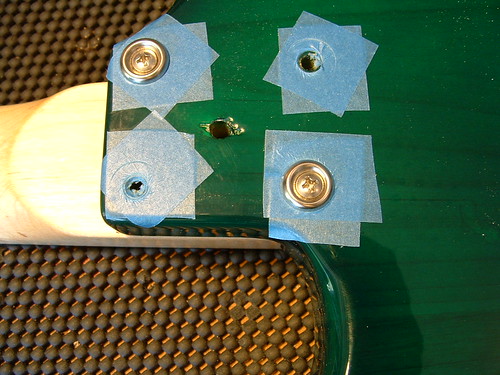
Check your neck/body alignment again as before. It should be exactly aligned as when you were using the two temp wood screws and the previous original four neck wood screws.
The remaining two non-drilled holes (first two temp wood screw holes) should still have their blue tape on them.
Repeat the 1 ¾” drilling process through the body/neck for the last two holes.
Watch that 1 ¾” drill marker. Removed the two new machine screws/ferrules, separate the neck/body, and observe the last two new 1/4" holes in the neck awaiting inserts.
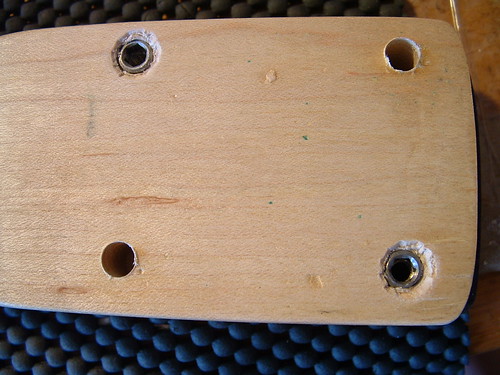
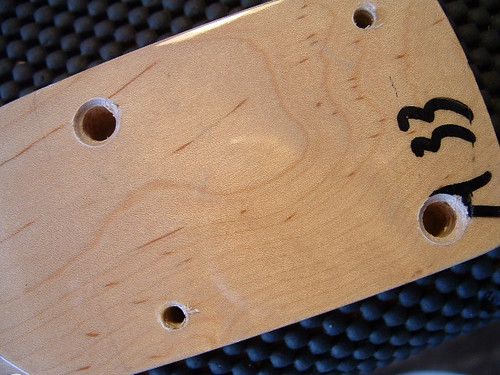
Last two neck holes chamfered with blue tape for chip resistance.
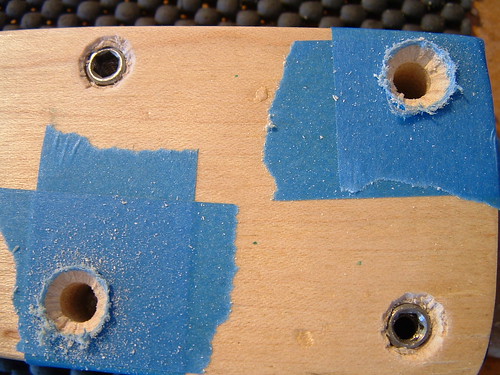
Repeat the installation process for the last two neck inserts as before.
Pic of clean body holes and neck with all 4 inserts installed.
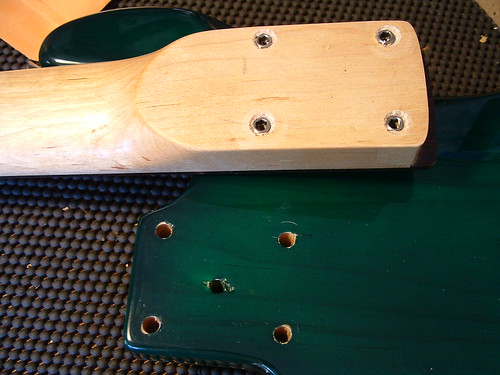
Fully install the four machine screws into the inserts with original neck plate.
All screws should install smoothly and very tightly..
** DO NOT OVERTIGHTEN** I have read that you can compress your neck pocket by OVERTIGHTENING the machine screws. Since these are stainless steel, you should be able to tighten them very tightly by hand with a screwdriver. I do not recommend using a drill to tighten, nor any air impact tools…hmmm.
Wish I could give you a torque value recommendation. Supposedly, the inserts and machine screws provide over 500 lbs. of clamping pressure per screw when properly tightened. Again, hand tight with a phillips screwdriver - do not over tighten.
Install your strings, check the bridge (no buzzes) and make any temporary adjustments to your personal tastes. Your neck will have to “acclimate to the new connection” for a few days before you can perform a final intonation, adjustment of the truss rod, bridge fine tuning etc.
Your guitar should look stock but it will sound a lot better than stock.
I installed the inserts on a glue hog plywood Squier and I found that the tonal upgrade is quite striking. It is getting a much more focused and tighter bass (no mush, no flub, no feebleness), treble seems more solid as well. I think a bit more overall sustain and thicker /meatier tone to boot. There is no “thin” sound at all. Neck feels solid as a rock. Tuning is more stable.
I will not say that this process makes a bolt on sound like a set neck... Some will say you cannot hear the difference…. I can.
Others that have heard the before and after tones on the guitars can also can hear a difference. The overall tone of the guitar seems to me to be more responsive and clear. The guitar seems to have merged the neck and body into one…. Oh brother !
If by some chance you completely crash and burn on the install, you can always plug all the neck/body holes with hardwood dowels/glue and return to the wood screws. Which in my estimation is more difficult than installing the inserts.
Highly recommend you start on that dead sounding glue hog/yard sale 6 stringer in the closet. I have done this on 4 guitars already (working up to my faves) with excellent results on each one. I would not start on your finest bolt on from the beginning. I did not and I am glad I went with the “budget” bolt-ons to get my technique and installation confidence locked in.
My source for the 8/32” stainless steel inserts with 4 mm hex hole for installation -
www.mcfeelys.com/product/3603-STS/8-32-Steel-Threaded-Inserts
My source for the 1 ¾” by 8/32 thread stainless steel oval head Phillips machine screws (they also sell 1 ½” 8/32 screws as well)
www.mcmaster.com/#91802a204/=d6ipxq
Comparative sound clips will be posted soon.
Son-O-Sonny
I do not have a drill press, so this was Rune’s idea to perfectly line up the drilled body/neck holes for the neck inserts and machine screws. I have done this to 4 guitars already and Rune is in line with a couple as well. Each installation was completely successful.
I highly recommend you start on that dead sounding glue hog in the closet. I have done this on 4 guitars already (working up to my faves) with excellent results on each one. Do a pre installation test and get to know the guitar’s “tone/lack of tone” for comparison after the “inserts are installed”. I would not start on your finest bolt on. I did not start on my faves/most expensive guitars first. I am glad I went with the “budget” bolt ons to get my technique and installation confidence locked in. Hopefully you already have some neck installation experience. This experience will help.
I know some wood screw purists will bash this, but all I can say is “ I like it and I am installing the neck inserts on every bolt on that I own”. If Rune goes the full route, I will be busy with “insertion” for both our herds for a while.
Directions
Neck Plate prior to any work

Loosen or remove the strings, your choice. If you leave them on, remove them from the tuners and blue tape them together. You will probably want to install new strings anyway.
Make a couple of orientation pencil lines where the body joins the neck back and sides The temp marks are helpful when lining the neck back up to the body later. At least you will have a reference point and they can be easily removed. Last thing you need is a misaligned neck/body.
Remove the neck. Remove all 4 woodscrews and the neck plate from the body.
Tape off (blue painters tape) all four empty body screw holes. The tape helps and usually eliminates any chipping of the body when the new holes are drilled for the machine screws. Also it will help in not marring the finish with the temp neck mounting ferrules.

Realign the body and neck using the pencil marks. Clamp the neck to the body. Use two neck mounting ferrules (like on guitars that do not use a neck plate) and two of the original wood screws on two opposite corners (think one half of an “X” top/bottom) to re-install the neck. Neck/Body should go back together exactly aligned as with the original four wood screws.


You can check the neck/body alignment with some spare strings or any type of string. Just run the strings through the Low E and High E nut, down to the bridge. Make sure you have consistent string to fret relationships on both the high and low E strings. Extra checking on perfect body/neck alignment, in this step, is a good thing.
The neck should be very stable (two temp woodscrews) for the next step of drilling the two holes for two machine screws and neck inserts. If it is not, check alignment and screw tightness.
My inserts require a ¼” drill bit. My machine screws are 1 ¾” in length. Inserts and Screws use 8/32 threads and are both stainless steel.
Mark your bit from the tip to 1 ¾” with blue tape. This the maximum depth you will drill.

This is the depth required for the screws running through the body, into the neck inserts. 1 ½” screws might work for you as well.
I like to double blue tape the open holes. Try to get your drill bit straight/perpendicular into the body holes. The original neck wood screw holes will act as an excellent drill bit guide. Clean out the drill hole as needed during drilling. The drilling goes pretty fast through the body. When you clear the body and start drilling into the neck, start to closely observe the blue tape marker on the bit. Stop when you hit the 1 ¾” blue tape marker. We do not want a hole through the neck fingerboard ! When you have reached the 1 ¾” marker, pull out the drill and clean up. Repeat process for the other open body screw hole.

Remove the “temp” wood screws/neck ferrules and separate the neck and body.
Clamp the neck to a safe flat surface with the two new screw holes facing up . Clean out the two new 1/4” neck holes of sawdust (shop vac works great). I suggest chamfering the top edge of the new neck holes due to the inserts pushing/splintering the wood away on the top edge of the hole on installation (I may have to clarify this depending on the responses).
My Ryob1 1/2" chamfer bit has 5 large cutting blades and gets the job done but it looks a bit rough to me. I am looking for a smoother bit for a smoother cut for the chamfer/countersink.

Put a bit of beeswax or bar soap on the outer threads of the inserts for an easier installation . My inserts have 4 mm hex holes for installation with a 4 mm hex wrench. Align the inserts perpendicular to the neck and install them. The new ¼” hole will somewhat act as a guide for the inserts.

Screw the inserts to where they are “Below” the neck surface. This is important. If you did not chamfer the holes, you will need to clean up/sand the small splinters on the hole edge. You may want to remove the insert to do this then reinstall them.

Reinstall the neck using the two new inserts, machine screws and the neck ferrules so we can drill the last two holes. Half way there….The machine screws should connect smoothly with the new inserts. I initially tighten the screws by hand till I feel them bite perfecting into the insert.
Tighten firmly as you would a wood screw.

Check your neck/body alignment again as before. It should be exactly aligned as when you were using the two temp wood screws and the previous original four neck wood screws.
The remaining two non-drilled holes (first two temp wood screw holes) should still have their blue tape on them.
Repeat the 1 ¾” drilling process through the body/neck for the last two holes.
Watch that 1 ¾” drill marker. Removed the two new machine screws/ferrules, separate the neck/body, and observe the last two new 1/4" holes in the neck awaiting inserts.

Last two neck holes chamfered with blue tape for chip resistance.

Repeat the installation process for the last two neck inserts as before.
Pic of clean body holes and neck with all 4 inserts installed.

Fully install the four machine screws into the inserts with original neck plate.
All screws should install smoothly and very tightly..
** DO NOT OVERTIGHTEN** I have read that you can compress your neck pocket by OVERTIGHTENING the machine screws. Since these are stainless steel, you should be able to tighten them very tightly by hand with a screwdriver. I do not recommend using a drill to tighten, nor any air impact tools…hmmm.
Wish I could give you a torque value recommendation. Supposedly, the inserts and machine screws provide over 500 lbs. of clamping pressure per screw when properly tightened. Again, hand tight with a phillips screwdriver - do not over tighten.

Install your strings, check the bridge (no buzzes) and make any temporary adjustments to your personal tastes. Your neck will have to “acclimate to the new connection” for a few days before you can perform a final intonation, adjustment of the truss rod, bridge fine tuning etc.
Your guitar should look stock but it will sound a lot better than stock.
I installed the inserts on a glue hog plywood Squier and I found that the tonal upgrade is quite striking. It is getting a much more focused and tighter bass (no mush, no flub, no feebleness), treble seems more solid as well. I think a bit more overall sustain and thicker /meatier tone to boot. There is no “thin” sound at all. Neck feels solid as a rock. Tuning is more stable.
I will not say that this process makes a bolt on sound like a set neck... Some will say you cannot hear the difference…. I can.
Others that have heard the before and after tones on the guitars can also can hear a difference. The overall tone of the guitar seems to me to be more responsive and clear. The guitar seems to have merged the neck and body into one…. Oh brother !
If by some chance you completely crash and burn on the install, you can always plug all the neck/body holes with hardwood dowels/glue and return to the wood screws. Which in my estimation is more difficult than installing the inserts.
Highly recommend you start on that dead sounding glue hog/yard sale 6 stringer in the closet. I have done this on 4 guitars already (working up to my faves) with excellent results on each one. I would not start on your finest bolt on from the beginning. I did not and I am glad I went with the “budget” bolt-ons to get my technique and installation confidence locked in.
My source for the 8/32” stainless steel inserts with 4 mm hex hole for installation -
www.mcfeelys.com/product/3603-STS/8-32-Steel-Threaded-Inserts
My source for the 1 ¾” by 8/32 thread stainless steel oval head Phillips machine screws (they also sell 1 ½” 8/32 screws as well)
www.mcmaster.com/#91802a204/=d6ipxq
Comparative sound clips will be posted soon.
Son-O-Sonny


