ms960
Rookie Solder Flinger

Posts: 19
Likes: 0
|
Post by ms960 on Apr 22, 2006 7:23:07 GMT -5
Professed newbie, and thanks for your indulgence. I'm wiring my first guitar, and have a question about grounding the wires than need to be grounded. First, here's the wiring diagram I'm following:  My question is essentially this, how do I ground all the wires that need grounding? Do I solder them to the back of the tone or volume pot, and run a wire from that pot to the bridge or tremolo to ground it? Or do I just leave them hanging (which I doubt)? Confused. Appreciate the help! Thanks |
|
|
|
Post by jhng on Apr 22, 2006 11:40:26 GMT -5
Hi there, Traditionally they are all soldered to the back of a pot (including the little wire that comes from the tremelo), with a further wire going from the back of the pot to the ground side of the jack plug. However, there are "other ways" that will limit the amount of hum that the wiring circuit picks up such as "star grounding". There is a very helpful explanation of star grounding on the original Guitarnuts site under the "Quieting the Beast" mod. guitarnuts2.proboards.com/page/gn1-pagesIn fact, as a "professed newbie" you should read everything on the site! It is all excellent and will provide a good background in lots of aspects of guitar wiring. Hastings |
|
|
|
Post by sumgai on Apr 22, 2006 12:46:33 GMT -5
ms, Hastings is correct, the original GuitarNuts site should be mandatory reading for anyone who has a guitar in one hand and a soldering iron in the other!  Take your time with it, don't get obsessed with every little detail, and realize that the site speaks to a large number of different-thinking people. Come to that, so does this offshoot, GuitarNutzJr. ;D When you've got questions about something over there, we'll be more than happy to answer them here. In the meantime, that site can be hard to navigate for a newbie looking for a specific item. Here's the direct link to what we're talking about at the moment: Quieting the BeastIn the schematic you posted, I note one thing with which I take exception. The tone control's incoming terminal (the center or 'wiper" terminal), the wire goes directly to the selector switch. While that's necessary in a multiple tone control setup, it is my preference (as shown by myriad other guitar designers and builders) to instead place that wire onto the volume control's center (wiper) terminal. This positions the tone pot after the volume, giving the volume pot a better chance of retaining tone when it's turned down a little bit. I'm not saying that the drawing is flat-out wrong, it is electrically correct. But there are certain aural aspects to each method, so you might consider looking at how others do it first, before you button up the finished product. HTH sumgai |
|
ms960
Rookie Solder Flinger
Posts: 19
Likes: 0
|
Post by ms960 on Apr 22, 2006 14:34:34 GMT -5
First, thanks for the assistance and help. Hi there, Traditionally they are all soldered to the back of a pot (including the little wire that comes from the tremelo), with a further wire going from the back of the pot to the ground side of the jack plug. So if I were to just run all the ground wires to the back of a pot, I should be good? Right now I want to do this as simply as possibly, since it's my first attempt. I'm not currently worried about getting rid of every last bit of noise. I know there is tons of stuff at GuitarNuts, and I will definitely go read as much as I can at that site. Seems like a great site, but a lot seems over my head right now. Thanks everyone. |
|
ms960
Rookie Solder Flinger
Posts: 19
Likes: 0
|
Post by ms960 on Apr 22, 2006 15:34:38 GMT -5
I found another diagram that makes more sense. I got huge amount of noise with the first diagram I posted. The only problem I'm having now, is that when I turn the tone up, I get a lot of noise. There is no noise when the tone is turned down, however. Any thoughts on why that might be occuring?  Again, thanks very much! |
|
|
|
Post by sumgai on Apr 22, 2006 20:15:29 GMT -5
ms, Yes, soldering all of the ground wires to the back of the vol pot is standard proceudre. Unless you use a huge soldering gun (like a Weller 100 watt jobbie), then you shouldn't be able to hurt the pot itself. Photos abound on both this site, our Father site, and all over the net. When you spot one with mucho wires stuck onto the back of the vol pot, that's what we're talking about. Many illustrations are also abroad on the web, most notably those accompanying the "QtB" article linked above. They show quite well what we're speaking of here, the mounting of numerous ground leads to one central location. (But drawn illustrations don't show you a proper solder joint!) The diagrams you've presented are identical in every way, except that the latter one gave values for the pots and the cap. (OK, the two connections on the tone pot are reversed, whoopee ding ding. Makes no difference.) If you got noise with the first one where you didn't with the second, then your previous job had a wiring error which you corrected in the second incarnation. But didn't you notice that they are both the same thing, when you were rooting around in there? The "tone pot down = less noise (hum?)" is indicative of the "Beast needing Quieting". You've said that you aren't worried about noise right now, that you want to keep it simple. Sorry, but in this case, your two desires are mutually exclusive.  If you don't like the hum/noise, then you'd better get started with that foil.... At least, without having the unit in my hands, that's the best "remote" diagnosis I can make at this time. Hope it helps.  sumgai |
|
ms960
Rookie Solder Flinger
Posts: 19
Likes: 0
|
Post by ms960 on Apr 22, 2006 20:24:36 GMT -5
Sumgai,
Thanks for the help. No, to be honest, I couldn't tell that the two diagrams were identical, but my knowledge of electronics is close to zilch. I hope to correct that as soon as possible.
Before I rewired this guitar, the noise was much less than compared to how it is now, so I was just assuming that there was an obvious mistake that someone could identify for me.
I'll shut up now and start reading.
Again,
Thanks
|
|
|
|
Post by sumgai on Apr 22, 2006 21:15:11 GMT -5
Sumgai, Thanks for the help. No, to be honest, I couldn't tell that the two diagrams were identical, but my knowledge of electronics is close to zilch. I hope to correct that as soon as possible. Before I rewired this guitar, the noise was much less than compared to how it is now, so I was just assuming that there was an obvious mistake that someone could identify for me. I'll shut up now and start reading. Again, Thanks You're welcome. And don't get us wrong, we're not picking on you here. ;D It's just that experience has shown us that if you execute Plan A before you move on to Plan B, then things tend to work out much more nicely. One other thing.... you don't really need to know squat about electronics, per se (though it'll help), but you do need two vital things to get around in this hobby - patience and visual acuity. In fact, the first and still the best troubleshooting aid you have is your eyeballs. Close visual inspection is your friend when looking for the reason behind bad results. But just glancing at things doesn't cut mustard, you also have to have the patience to sit there and double, even triple check everything you see against your source information (a drawing, another ax right beside yours, whatever). That's the key, my friend. Once you've gotten that part down pat, the rest will become a whole lot easier, trust me. sumgai |
|
ms960
Rookie Solder Flinger
Posts: 19
Likes: 0
|
Post by ms960 on Apr 24, 2006 12:28:40 GMT -5
In the following picture taking from the "Quieting the Beast" portion of the Guitarnuts web site, it says "As you can see..." it talks about not using the 0.33mfd, 400V capacitor. It says you can "just tie all of the grounds together on the volume pot shell." If I chose to do that, do I elimate the need for the ring terminal around the threaded pot shaft? What other changes would eliminating the capacitor require? Thanks!  |
|
|
|
Post by pollyshero on Apr 24, 2006 16:51:30 GMT -5
Yes - you can eliminate the cap and solder the grounds to the back of the volume pot. But you'll need a lot of heat to get the solder flowing: the case of the pot plus all those ground wires will suck up heat faster than bounty sucks up dog pee. In the end you'll probably wind up with a questionable solder joint that's messy, and it will look like butt. If you choose to eliminate the cap, I recommend you still use the ring terminals - To do it, you do just that: uh.. That is: Take two ring terminals and instead of soldering the cap between them, solder in a suitable length of insulated wire - preferably 1 or 2 gauge sizes larger than all the other wiring. 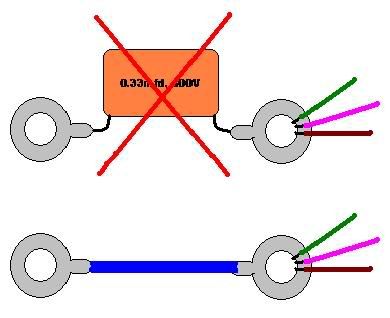 Doing this will keep things tidier in the control cavity, plus make it a whole lot easier to swap out the volume pot if needed in the future. All other wiring is performed as in the article. Good luck! |
|
ms960
Rookie Solder Flinger
Posts: 19
Likes: 0
|
Post by ms960 on Apr 24, 2006 20:46:42 GMT -5
Yes - you can eliminate the cap and solder the grounds to the back of the volume pot. But you'll need a lot of heat to get the solder flowing: the case of the pot plus all those ground wires will suck up heat faster than bounty sucks up dog pee. In the end you'll probably wind up with a questionable solder joint that's messy, and it will look like butt. If you choose to eliminate the cap, I recommend you still use the ring terminals - To do it, you do just that: uh.. That is: Take two ring terminals and instead of soldering the cap between them, solder in a suitable length of insulated wire - preferably 1 or 2 gauge sizes larger than all the other wiring. Doing this will keep things tidier in the control cavity, plus make it a whole lot easier to swap out the volume pot if needed in the future. All other wiring is performed as in the article. Good luck! Okay, I did exactly what you suggested, but I'm getting HUGE amount of noise, any switch position, any amount of volume or tone. I ran all the grounds to a ring terminal, connected that ring terminal to a second one, which I soldered to the back of the volume pot. No ring terminal over the threads of my volume pot. Perhaps my wires to the input jack are switched? I'll change them and see what happens. |
|
ms960
Rookie Solder Flinger
Posts: 19
Likes: 0
|
Post by ms960 on Apr 24, 2006 20:55:05 GMT -5
I switched the wires going to my output jack, and the noise dropped a lot, but still getting humming. I'm tempted to just put my old pickguard assembly back in the guitar and remove all the shielding -- there was almost no noise coming out of that. And the tone control doesn't seem to be working. I'm past frustrated now.
|
|
|
|
Post by pollyshero on Apr 25, 2006 9:22:36 GMT -5
WELCOME TO THE CLUB!!!! First: I'm currently unemployed so I have time on my hands. This might get a little long winded and preachy, but if you'll just bear with... If you're frustrated the best thing is to give it a rest. Put the axe aside, clean up your work bench, turn off the light, and take a little vaca from the problem. 2 or 3 days of NO involvement with the project. Try not to think about it. You will, of course - but try not to. After the break - Get out ALL the wiring diagrams/schematics/drawings that you used the first time. Study them, and find the one that makes the most sense to you. Once you've got one you can easily look at and say "O.K., that makes sense..", shred all the others or put them away in a drawer where you won't be tempted to look at them. Now get the guitar, diagram, and a notepad and pencil laid out. NO TOOLS, COFFEE CUPS, BEER CANS, SPIT CANS, OR SPARE PARTS ON THE BENCH! Just the guit/diagram/notetaking materials. Once again (I know... you've already done it 100 times - but do it again!), trace every wire to every connection point. Examine every solder joint carefully. Make a note of every mistake/problem you find (you'll be tempted to break out the soldering iron and "fix it now". DON'T). Study, and take notes. Once you're satisfied that the wiring is correct, or that you've found all the glitches, go take a nap or have a sammitch. After siesta or chow: Do you have a list from before? Take a look at it and prioritize the needed repairs in order of diffulty of the task: hardest to repair first, easy fixes last. Then decide what tools/materials you need to correct all the fubars on the list. Gather ONLY THOSE TOOLS YOU NEED. Keep the workbench as free from crap as you can - too many tools = having to root around for what you need, thus interrupting your train of thought which can lead to fatigue and frustration. With tools/guit/diagram/notes at hand, begin your repairs. Do the hard ones first since you're fresh from your nap right now. Work through each item on your list and cross it off as you go. If you start to get frustrated, TAKE A BREAK. Take your time - ENJOY (this is supposed to be fun!). Once all the repairs have been made, it's time to tidy up. Set the tools aside and clean up any mess you've made. Now, take another break (again? yes. don't argue. just do it. 10 or 20 minutes ought to do it. and by the way: when I say a break - I mean A BREAK - leave the work area completely. take out the trash or something. go wherever you can't see the project.) Now go back and do it all again - your goal is to wind up with no list of glitches. Once you're 100% satisfied that the wiring is correct, use the same approach as above to identify any problems in the shielding (if you've shielded). Work slowly and methodically until you're certain that everything is done per the instructions you have. Satisfied? Good. Put 'er together and string 'er up, plug 'er in and fire it up. Do everythingyou can to IDENTIFY SYMPTOMS OF PROBLEMS. If something doesn't work, make a note of it, but DON'T unplug yet - keep noodling: twist knobs, flip switches, shake cords to find any other symptoms of fubar. If everything works fine - CONGRATS! You're a champ. If not, use the approach above to correct the problems. Already done all that, but it still don't work? Start checking component parts (switches/jacks/pots/pups) for mechanical failure. Replace any bad components. Already done all that, but it still don't work? Pray to the deity of your choice for divine intervention. But if you work carefully and methodically, taking breaks when you get confused or frustrated, never moving forward until the problem you're working on right now is fixed, then you probably won't have to do all the above more than 3 times at worst. Soon enough, you'll start getting it right the first time about 95% of the time. I see in your post that you asked about "grounding", but you never specified whether or not you shielded the guitar. If not, then I'd suggest "Quieting the Beast". Keep in mind that "quieting the beast" is intended to REDUCE EXTRANEOUS NOISE. All circuits will hum a little when current flows through them, no matter how well shielded. The noise you hear may well be the "natural" hum of the circuit, minus a goodly portion or even all extraneous interference. In some cases people get lucky with this mod and it eliminates the hum entirely, but that is not my experience. I performed the mod on a guitar equipped with Fender Noisless Hots, and it STILL hums a bit - even though I know the wiring is correct and all mechanical parts are in good working order. But the difference between fore and aft was noticeable and worth the effort. Also keep in mind that the guitar and its wiring is only one factor when considering hum. If you're 100% certain you got it right and the noise level is still untolerable, start looking at the signal chain. Cords (Wal-Mart or George L's?), effects (Spanking new Boss, or vintage Electro Harmonics?), amps (First Act, or Matchless?). If they're all good to go, then there's wiring/environmental conditions (poor house wiring, flourescents, TV/CRT, appliances, etc.) that can all impact the amount of hum you're going to hear. If you HAVE shielded per QTB instructions and used the shielded audio cable, ensure that: A) The ground wire AND the braided shield are soldered at the output jack. B) ONLY the ground wire is soldered at the volume pot, and that no part of the braided shield is making contact with any other point in the circuit or shielding (That particular problem eluded me for a week once, even though I "verified" that it was correct many times!). Fix the problems you can. Live with, or compromise on the ones you can't. "Breathe, my pasty faced friend. BREATHE..." GOOD LUCK PH |
|
ms960
Rookie Solder Flinger
Posts: 19
Likes: 0
|
Post by ms960 on Apr 25, 2006 9:41:37 GMT -5
Thanks very much for your help! I do appreciate the assistance! I see in your post that you asked about grounding, but you never specified whether or not you shielded the guitar. Yes, I did follow the QTB instructions. My only deviation was to not use the .33mfd, 400V capacitor. I instead soldered the ground wires to one ring terminal, ran a wire from that ring terminal to a second ring terminal which I soldered to the back of the volume pot. I completely shielded the back of the pickguard and the inside of the body cavity. I ran a wire from the tremolo claw to a ring terminal, which I screwed through the shielding in the body cavity. I ran foil from inside the body cavity onto the face of the body so it would contact the foil on the back of the pickguard. I think I did a decent job of following the QTB instructions (minus the cap). If you HAVE shielded per QTB instructions and used the shielded audio cable, ensure that: A) The ground wire AND the braided shield are soldered at the output jack. B) ONLY the ground wire is soldered at the volume pot, and that no part of the braided shield is making contact with any other point in the circuit or shielding (That particular problem eluded me for a week once, even though I "verified" that it was correct many times!). This may be the other small deviation I made: I did not use shielded audio cable to connect to the output jack, just plain 22 guage wire. How big a difference will this make? I'm wondering if there are other problems. I pulled out my dual humbucker guitar and plugged it into the amp, and got the same noise. I moved the amp out of my office/den/computer room/storage room/junk room to my family room (thinking that the computer monitor was the culprit). I got the same noise from both guitars. I have no effects plugged in. When I get home today, I'll move the amp somewhere else in the house and see if the noise isn't really coming from the amp. Do amps generate noise beyond what comes from a guitar? I have a second guitar cable that I can try as well. The fact that I get noise from my humbucker guitar tells me that maybe I did my wiring right. I'll report back this evening. Again, thanks very much for helping a newbie! |
|
|
|
Post by UnklMickey on Apr 25, 2006 9:51:12 GMT -5
... This might get a little long winded and preachy, ... yep, it did. but worth reading, anyway! +1 unk |
|
ms960
Rookie Solder Flinger
Posts: 19
Likes: 0
|
Post by ms960 on Apr 25, 2006 9:53:26 GMT -5
... This might get a little long winded and preachy, ... yep, it did. but worth reading, anyway! +1 unk Definitely worth reading! |
|
|
|
Post by Mini-Strat_Maine on Apr 25, 2006 10:07:22 GMT -5
If you're frustrated the best thing is to give it a rest. Put the axe aside, clean up your work bench, turn off the light, And the soldering iron!  |
|
|
|
Post by pollyshero on Apr 25, 2006 10:32:23 GMT -5
...I did not use shielded audio cable to connect to the output jack, just plain 22 guage wire. How big a difference will this make? Hmmm... I believe it would depend on how much "outside" interference is involved, but can't say for sure. I just used the shielded cable 'cause that's what the plan called for. (for me) The only way to tell if it would make an appreciable difference would be to try it both ways and see. |
|
|
|
Post by pollyshero on Apr 25, 2006 10:35:31 GMT -5
but worth reading, anyway! +1 unk Thanks unk! |
|
|
|
Post by pollyshero on Apr 25, 2006 10:37:04 GMT -5
If you're frustrated the best thing is to give it a rest. Put the axe aside, clean up your work bench, turn off the light, And the soldering iron! Fire Marshall MSM says: BOW TO THE GODS OF SAFETY OR PERISH IN FLAMES!! LoL! |
|
|
|
Post by Mini-Strat_Maine on Apr 25, 2006 12:15:10 GMT -5
Fire Marshall MSM says: BOW TO THE GODS OF SAFETY OR PERISH IN FLAMES!! Hee, hee! Good one! Except now I have another Sixties song stuck in my head. ( www.godofhellfire.co.uk) I got a new axe, too.  We can crank up the "best wood and metal" debate all over again. ;D |
|
|
|
Post by sumgai on Apr 25, 2006 17:11:42 GMT -5
Ah, we see what a pristine world PH lives in. Indeed, even privileged, one might say.
PH, you forgot to state unequivocally, NO CATS!
But even with that, you get a +1 for something that will be very oft quoted on this forum, and well into the future, if I have anything to say about it. ;D
sumgai
|
|
|
|
Post by pollyshero on Apr 25, 2006 18:06:42 GMT -5
ME-YOW! Is that singed fur I smell??
sumgai,
You've been very active & from your posts it's evident that you've got a lot of useful info in that bag over your head - hey, wait, CATS - BAGS.... Oh, never mind.
Anyway, thanks for the contributions. I exalt thee! +1
PH
|
|
ms960
Rookie Solder Flinger
Posts: 19
Likes: 0
|
Post by ms960 on Apr 25, 2006 20:42:37 GMT -5
Eureka! It works. I found out that a lot of the problem I was having was noise picked up by either the guitar or amp from the environment, or house wiring. It took me a while, but I finally found an outlet in the house where the amp by itself wasn't pickup up much noise. I finished up the guitar and plugged it in, and it was virtually noiseless! At higher volumes there was just a little bit of noise, but that too could have been coming from other than the guitar.
So...in short, I've got a quiet Strat. Thanks to everyone here for your help and assistance! This being my first project, and it being a success, I'm inspired to try again soon!
|
|
|
|
Post by sumgai on Apr 26, 2006 0:23:18 GMT -5
ms, GOOD DEAL! Aaaahh..... That's the way, uh huh, uh huh We like it, uh huh, uh hun! That's they way, uh huh, uh huh We like it, uh huh, uh hun! Kinda catching, isn't it? ;D Have no fear, you'll be helping the next batch of newbies with mucho experience! (Now you all know why I stay secluded and hidden like I do - I just know that some brickbats are gonna be thrown my way for that little verse!  ) sumgai |
|
|
|
Post by sumgai on Apr 26, 2006 0:36:26 GMT -5
PH, Why, thank you, kind sir (or the gender of your choice). Lest you all think that I don't speak from experience on this particular topic, let me link you to the Big Kahuna of this outfit, located in her normal chair (what used to be my chair). I get this look all the time from her. Oh, and while this isn't the Coffee Shop (hmmm....), I should also mention that her name is Shadow. I'm sure you can guess why. The Bosssumgai |
|


 Take your time with it, don't get obsessed with every little detail, and realize that the site speaks to a large number of different-thinking people. Come to that, so does this offshoot, GuitarNutzJr. ;D When you've got questions about something over there, we'll be more than happy to answer them here.
 If you don't like the hum/noise, then you'd better get started with that foil....

 )
)