|
|
Post by ssstonelover on Dec 22, 2022 20:53:37 GMT -5
I made some more templates to increase my Strat pickguard collection to include SSS, lipsticks, HSH, P-90s,and mini HBs. They are all 'interchangeable' in that I can now cut 3, 4 or compact 3 pot holes, mix pickup types, etc., simply by changing out which template is used while the work is being worked by the router set up. In theory I could make a HB/lipstick/mini with knobs, or P90/SC/HB with 4 knobs by some deft swaps during the processing.... plus any other combination available in the templates. 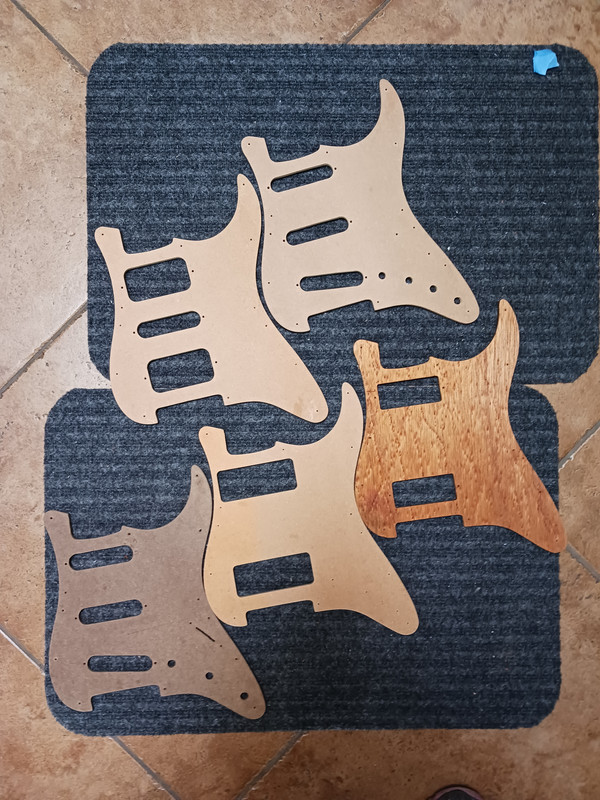 |
|
|
|
Post by cynical1 on Dec 23, 2022 11:19:54 GMT -5
Very nice. Accurate templates are certainly the key. Those look nice and clean. Kudos.
One thing that always burned me starting out was the location of the mounting holes. I'm sure it's better now with CNC, but back in the 70's it was a "horseshoes and hand grenades" tolerance used at Uncle Leo's place... I sent them without mounting holes for awhile. Then I started offering an option where if they sent their pickguard to me, I'd drill and countersink for free. Made a happier customer, allowed me to color and epoxy the countersink...and gave me a chance to build up a library of templates reflecting the free expressions in QC exercised at Fender at the time...
This sort of takes me back to a time when I had hair...and it was brown then, too... I found an old book press at a flea market and used it to make pickguards. Soak thin birch plywood in a wood hardener, when dry apply exotic veneer of your choice and leave in book press overnight. Trim, apply color to the thin sides, marine epoxy everything...shield and ship... You can get tricky with different wood, marquetry, lights (seriously...sold more than a few in the 80's...) and epoxy dyes with burl woods... Makes me wonder where that old press got off to now...
I have to ask...what does a custom pickguard go for these days? Ballparks are accepted.
HTC1
|
|
|
|
Post by ssstonelover on Dec 23, 2022 16:58:50 GMT -5
Hi cynical1, I have observed the pickguard screw locations improving greatly in the last number of years. I think even the Chinese companies got tired of customers returning guards and wanting their money back! And they likely got 'primary source' blueprints for their CNCs. In prior years I had some guitars whose preexisting holes I had to plug up, before installing a new guard and drilling fresh holes. I agree that was aggravating work. In this case I took a stack of somewhere between 3-5 premade guards I trusted, from different sources, and fixed them together all aligned, then used my drill press to go down straight and even into the template. Any deviation is averaged out that way, though it was minor to start with. As far as the outer perimeter there was some small difference, so the new perimeter is basically the largest 'combined' one, but we are talking of 1 mm at most and only in select locations like the inner curve on the lower horn if memory serves. I did it all by simple shop machines such as using routers, band saws, and drill presses. I'd love a CNC but then I'd also need a good program such as Solidworks ($$). I do my layout work on an old Adobe Illustrator program on my oldest computer (still runs) and then print out and glue to template pieces and then work to maintain tolerances and exact locations +/- about 0.1mm though this is not always possible or necessary. I'm sure my average is more like 0.3~0.5mm who who really knows. So far I experimented around with some wood laminate for pickguards, but the machining needs to be pretty good to avoid splits and tears at the edges. My workshop is now in a place to do that, but was not before. I do this mostly for me, though I am open to sell stuff. I did get some info for you from some commercial vendors: Dragonfire Looks like somewhere between $75 and $100 if you get fancy as they do have quite a number of choices. WD Pickguards Looks like they like you to call, but they do have a lot of possible variation, though it seems to be less than Dragonfire. Prices somewhat similar IKNmusic I did not price these as the menus are less intuitive/friendly,but they have a lot there VanDykeHarms This is a classic wooden pickguard, About $100 US, maybe pretty similar to what you used to offer. Hope that helps |
|
|
|
Post by thetragichero on Dec 23, 2022 20:21:58 GMT -5
I have to ask...what does a custom pickguard go for these days? Ballparks are accepted. low end 50 bucks. I've seen some folks pay HUNDREDS for vintage-correct-style tortoise shell.... most of my instruments cost me less lol |
|
|
|
Post by newey on Dec 23, 2022 21:15:06 GMT -5
We should be clear on what we mean by "custom". Dragonfire, Warmoth and others have menus of options to choose from, all sorts of pickup configurations, pot number/locations, and so forth. But it's not "custom" in the sense of "Here's what I want, please make one for me". I believe Warmoth will work from a tracing one sends them for oddball shapes, etc., but the cost goes up considerably. And the material choices are generally limited to plastic. So, I'm sure there is a market for more "bespoke" guards And, I'd want ssstonelover to make mine  Beautiful work! One thing I have always thought would be cool would be to have a Strat body routed such that the pickguard would sit flush down in the body, using a pickguard without a chamfered side, so it would fit in like a hatch, sort of. You'd rout a little "ledge" along the inside of the cavity so the guard would sit flat. To me, that would be adding some "wow" to it. I've never googled it but it's probably been done before. |
|
|
|
Post by b4nj0 on Dec 24, 2022 5:07:25 GMT -5
Flush routing- good call. I commisioned that for the "trem" cover plate on a one piece Hawaiian Koa Schecter S-type (that I've owned since 1980) about 8-10 years ago. It's the one wired with the Mike Richardson circuit. The flush rout makes such good sense that I inevitably started to eye up the neck retention plate! I have a Warmoth cellulose shell effect in that recess which matches the scratchplate. I always felt that Leo dropped off with that one looking at Gibsons.
And regarding the hand made pickguards- yes respect due SSSTL; I made brass S-type guards for a Columbus S-type copy, and it took at least three attempts before I got to one that was even marginally respectable, and I was a sheet metal worker too!
Edit; that was way back in the 1970s when brass was de-rigueur!
でつ e&oe ...
|
|
|
|
Post by newey on Dec 24, 2022 6:12:31 GMT -5
I commisioned that for the "trem" cover plate "What has been is what will be, and what has been done is what will be done, and there is nothing new under the sun." -Ecclesiates 1:9 |
|
|
|
Post by cynical1 on Dec 24, 2022 10:09:08 GMT -5
So far I experimented around with some wood laminate for pickguards, but the machining needs to be pretty good to avoid splits and tears at the edges. Wood hardener works like magic on birch plywood. It's basically a plasticizing agent...and if you use a vuccuum bag with it you'll bet great penetration to eliminate the chipping and tearing. Well, I don't have any pictures, but I started doing something similar to that on bass pickup conversions for myself. I pulled the P-Bass pickup for a set of J-Bass pickups. It's easier with CNC, but you can route a shallow "bathtub" on the top of a body, then fill it with whatever suits you. I liked checkerboards of contrasting wood. I always wanted to do an Escher Frog version of it, but my scroll saw skills suck. You can also use dyed epoxy resin to fill in gaps on burl or wormwood. I have a fretless project that I'm going to do something along these lines. I'll find a camera this time... HTC1 |
|
|
|
Post by ssstonelover on Dec 24, 2022 14:11:14 GMT -5
I'd want ssstonelover to make mine Beautiful work! One thing I have always thought would be cool would be to have a Strat body routed such that the pickguard would sit flush down in the body. Well, Newey, quite flattering...and that is the way I do rear cavity covers, but mainly that is simple black plastic with simple convex curves, and even then it's a bunch of fitting/and final sanding trials to get to fit reasonably snuggly and with minimal gapping. The way I do it requires 3 templates generally speaking though sometimes I can get away with 2. Something like a Strat guard recessed in with all its concave curves is a little trickier (at least without CNC!) though it could be done with enough patience using bandsaw, routers and files to get a well matching template set w/minimal gapping but reasonably snug fit. Kind of need to do the body at the same time and tooling for ultimate control. This picture gives an idea.  From a simple concept you can spinning out variations using the 'master' (the lip perimeter)  |
|
|
|
Post by ssstonelover on Dec 24, 2022 14:32:06 GMT -5
Wood hardener works like magic on birch plywood. It's basically a plasticizing agent...and if you use a vacuums bag with it you'll bet great penetration to eliminate the chipping and tearing. You can also use dyed epoxy resin to fill in gaps on burl or wormwood Yup, I have some thin superglues for deep soaking or certainly I could get a vacuum system and something like the "cactus juice stabilizing resin".... or do the sawdust and superglue trick for final chip outs. I have no real call for a vacuum system (yet) otherwise, so I'd like to avoid that cost (and shop clutter) generally speaking. What is your preferred wood hardener for this purpose? |
|
|
|
Post by cynical1 on Dec 25, 2022 21:56:27 GMT -5
What is your preferred wood hardener for this purpose? Minwax Wood Hardener, for the money, is as far as you have to look. It's super thin and wicks into soft wood quite well. Always transfer from the can to a glass or metal container...don't ask me why I know this... It contains 3% methonol and 72% acetone, so use a respirator or very well ventilated space. Another thing, it runs everywhere if you put it on too heavy...like mercury on glass... Multiple light coats continually until it stop wicking in...then walk away for 24 hours. It levels very smooth and a light sanding to remove dust after it cures is about it. The first time I used this was on a respray for a customer. He had a Kramer (don't remember model) that he wanted repainted to some unGodly 80's color. I didn't know what it was made out of when I took it, but it turned out to be plywood. The customer was none too happy, but decided to go ahead with the respray. The stripper and 3M pads had turned the exposed edges into a suede-like texture. I asked around and someone suggested wood hardener. Long story short, a little sanding, wood hardener, a couple coats of sanding primer and lacquer and done. Did the same thing on Project #1. Everything in this shot is plywood, except the neck pocket and a 3" portion down the center to where the bridge locates.  You can use a cyanoacrylate adhesive or thinned epoxy, but this stuff penetrates best. HTC1 |
|
|
|
Post by ssstonelover on Dec 26, 2022 4:06:58 GMT -5
Thanks HTC1,
I'll look for Minwax Wood Hardener at my local big box, and thanks for the storage and use suggestions too.
|
|
|
|
Post by cynical1 on Dec 26, 2022 9:31:05 GMT -5
Every once in a while I clarify this one. HTC1 = Happy Trails, Cynical OneI started that a while ago after a long post...I had 4 keystrokes left in me...and thought signing off with just " Happ" was anticlimactic. Happy Trails Cynical One |
|


 Beautiful work!