ba3844
Apprentice Shielder

Posts: 35
Likes: 0
|
Post by ba3844 on Mar 9, 2008 23:38:57 GMT -5
I plan on using this diagram as my base starting point. Then I would like to add in a mini on-on switch for the bridge HB, and instead use no-load blenders at BOTH tone pot locations. So that I hope to be able to switch to just my HB and have no load on it for more output...sort of that "brown sound"..EVH tone . Question is: will this work or is there an easier diagram to use? I MUST still be able to switch back to the 5way and be able to blend in bridge and neck..to use all pickups. www.acmeguitarworks.com/pdf/W...at_Blender.pdf |
|
|
|
Post by pete12345 on Mar 10, 2008 4:19:38 GMT -5
The link seems to be broken- all I get is a picture of the back of a pickguard. However, this one: www.acmeguitarworks.com/pdf/WiringDiagram_Strat_Blender.pdflooks quite interesting It blends in the neck pickup in the bridge and bridge/middle positions, and the bridge pickup in the neck and neck/middle positions. Sure looks like what you want to do, and you don't need any new parts. Pete |
|
omni
Rookie Solder Flinger

Posts: 15 
Likes: 0
|
Post by omni on Mar 10, 2008 10:49:53 GMT -5
|
|
ba3844
Apprentice Shielder
Posts: 35
Likes: 0
|
Post by ba3844 on Mar 10, 2008 15:53:22 GMT -5
I really like this diagram.... but when I just play straight bridge will I still have full power from that bridge humbucker or will the neck rob some of it away. Thats why I thought of installing a mini on-on switch for the bridge and then still be able to switch one side straight bridge to the volume with a no-load blender off of it and then be able to switch over to the other side of the mini on-on and send the bridge through the 5way so that I can then use the other no-load blender for my neck/bridge blending with the use of my middle pickup also. www.acmeguitarworks.com/pdf/WiringDiagram_Strat_Blender.pdf |
|
|
|
Post by newey on Mar 10, 2008 16:36:50 GMT -5
Ba- Now you've got me confused as to what you're trying to do. If you add a mini-switch which selects between "Bridge direct out w/ Vol" and "bridge to 5 way switch", what is the blender control on that circuit going to be blending with the bridge pup? You have a separate blend pot to blend the neck and bridge when you've got the 5-way switch selected, so what is the blend pot on the bridge pickup doing?  The Acme diagram you refer to just has the one blend pot, I'm not sure where you're going with the other one. Also, if your goal is to have the option of a direct signal path from the bridge HB (direct, that is, excepting the Vol control), using even a "no-load" pot will involve adding some amount of resistance into the signal path nonetheless, thereby defeating your purpose to some extent.. If your goal is to have a setting whereby the bridge HB is direct out, with the 5-way switch and the other pickups totally bypassed, I believe this can be done, but I'm not sure that's exactly what you want. |
|
ba3844
Apprentice Shielder
Posts: 35
Likes: 0
|
Post by ba3844 on Mar 10, 2008 16:49:16 GMT -5
I want a direct path for my bridge HB so I can have the most power from it. I thought having a no-load blender in place as my master tone I would be able to minimize resistance when playing straight bridge....but if you say the resistance is really going to be minimal anyway then I will just keep the pot 250k as my master tone and my second tone pot the 250k no-load blender.
I do have a newbie question about soldering it all up on the volume pot though....when I solder the lead from the 5way to the volume pot, will I also solder the bridge direct side of the mini switch directly to the same lug on the volume pot?
|
|
ba3844
Apprentice Shielder
Posts: 35
Likes: 0
|
Post by ba3844 on Mar 10, 2008 17:02:55 GMT -5
The easiest way to describe the setup would be :
bridge wired to mini switch, one side of mini switch to the bridge position of the 5way and the other side of the mini switch directly to the volume pot.
The 5way will have the neck and bridge wired to the no-load blender just like in the ACME diagram.
I will keep the master tone as the ACME diagram shows just to avoid any complications when it is all done.
I will be using a GFS Fat PAF at the bridge and 2 single coils for mid & neck.
My biggest question I have is will there be any problems wiring the 5way to the same lug on the volume pot as my direct bridge from the mini switch... can that cause any kind of power loss from having the 5way soldered on the same lug?
|
|
|
|
Post by newey on Mar 10, 2008 22:24:18 GMT -5
Okay, so basically you'll have the mini switch cut out the 5 way completely and run the bridge straight out to the volume pot, and there's only one blend control, right? I believe that's doable provided the mini-toggle is of the DP variety. As far as whether the 5 way hanging from the volume is a problem, I don't know- I suspect it's okay but I'll leave that to the pros around here, I don't have a great deal of confidence in that statement.  With either a tone and/or blend pot, I believe it will add some resistance to the circuit simply by being there, whether turned to the "no-load" position or not. The point of the EVH thing is a direct signal path, with only a Vol control between the pup and the output. Whether that, in fact, makes enough of a difference to sacrifice your tone control is a decision for your ears alone to make. If you have a diagram of some sort (apart from the Acme one) to show what you plan to do, it would be helpful. |
|
ba3844
Apprentice Shielder
Posts: 35
Likes: 0
|
Post by ba3844 on Mar 10, 2008 23:12:55 GMT -5
I do have a diagram sketched out but I am at a loss as to how to insert it in the post. The insert image tab in the "add tags" has me confused...I am a newbie what can I say.
You do seem to understand now the way I am trying to wiring the guitar...that is further than I have gotten lately.
|
|
|
|
Post by newey on Mar 11, 2008 5:19:31 GMT -5
Ba: Just treat your diagram as you would any picture, and follow the instructions for posting pix HereRemember to downsize your image to "Board size" before posting it to avoid it blowing off the side of the page. If you use Photobucket, you can just copy the IMG tagging right off that site. |
|
ba3844
Apprentice Shielder
Posts: 35
Likes: 0
|
Post by ba3844 on Mar 11, 2008 17:32:58 GMT -5
Here is my diagram..I hope it works. And thanks for the info on how to post diagrams.  |
|
|
|
Post by newey on Mar 11, 2008 18:47:22 GMT -5
Ba-
That won't do it. You show the switch as incorporating the Vol and tone controls in either position, so you won't really get any kind of "direct out". In fact the switch is really superfluous in this diagram, you're not going to get a huge difference in your bridge HB sound in either position.
Also, you don't show grounds in your diagram in several places, I didn't know if that was purposeful for clarity or what.
I believe you are going to have to move the tone control elsewhere in this scheme in order to do what you're trying to achieve. How and where, well that I'll leave to someone more experienced.
|
|
ba3844
Apprentice Shielder
Posts: 35
Likes: 0
|
Post by ba3844 on Mar 11, 2008 21:42:57 GMT -5
I guess I can eliminate the switch all together and go with the ACME diagram, .... I was just hoping to get the most output from
my bridge humbucker in a direct type of setup. 1 volume 2 tones and a switch is all I would want to install on the pickguard, so if adding more switches or knobs is the answer then I will scratch my modification to the ACME diagram.
Thanks very much for all your help.
|
|
|
|
Post by newey on Mar 11, 2008 21:55:14 GMT -5
Ba-
I wouldn't give up on your idea so easily just yet. Your diagram shows a double pole switch, and you're only using half of it- I'm pretty sure you can do this without another switch. What you want to do is bypass the tone control on the "bridge only" side of the switch, so that the tone control is only operational when you're on the 5-way- if you wait a bit someone will weigh in with a way to do that.
|
|
ba3844
Apprentice Shielder
Posts: 35
Likes: 0
|
Post by ba3844 on Mar 11, 2008 22:18:46 GMT -5
Yeah.. you're right. I will sit it out, I'm still in the process of doing the whole EVH stripe thing anyhow.
And I really want that HB direct if it can be.
|
|
|
|
Post by pete12345 on Mar 12, 2008 11:35:32 GMT -5
Don't give up yet, you only need to move one connection. The bottom terminal of the switch is currently connected to the volume control. Just move it so it connects directly to the jack tip. This will effectively take the bridge pickup out of the rest of the circuit and join it directly to the output, bypassing the volume and tone controls.
You also have an unused pole on the DPDT switch. If you wanted you could connect the 5 way to the volume pot through this (upper and middle terminals), instead of directly. This way, switching on the bridge with the DPDT would also switch off the middle and neck, giving you an instant 'lead' setting of bridge only.
Pete
|
|
|
|
Post by sumgai on Mar 12, 2008 12:30:16 GMT -5
Pete, Nope, sorry, that won't do it either.  You've just put the bridge pup directly to the jack, but you didn't remove the volume pot, etc. Those components are now in parallel, and indeed, they are still able to rob some of the tone from the bridge HB. Granted, it's an almighty small amount of tone to be robbed (and that's providing that one grants that a humbucker has any tone to begin with!  ), but nonetheless, there will be an interaction, and it will be detrimental (under the terms of ba's desires). This won't work either, for the reasons pointed out above - the volume pot is still in parallel with the bridge pup. How about trying this: Instead of moving the wire from the lower terminal of the switch to the jack, just connect it to the lower terminal of the switch's second (unused) pole. Run the wiper of the volume pot to the upper terminal, and the jack's hot terminal to the center (common) of the switch's second pole. Presto! Instant total isolation! HTH sumgai |
|
ba3844
Apprentice Shielder
Posts: 35
Likes: 0
|
Post by ba3844 on Mar 15, 2008 18:02:08 GMT -5
Thanks for all the responses......and excuse me for sounding stupid but I don't know what the wiper is on the volume pot? But I will take a stab at it with this other version of what I think you are sayin Sumgai. Will this allow me to switch over to my 5 way and still get my HB on the blender? And if just a "little" bit of power is lost when only the HB is on , I can live with that. |
|
ba3844
Apprentice Shielder
Posts: 35
Likes: 0
|
Post by ba3844 on Mar 15, 2008 18:03:57 GMT -5
Oopps...wrong diagram , here is the revised one I meant to send  |
|
|
|
Post by sumgai on Mar 15, 2008 18:29:41 GMT -5
ba, No, that's not quite it. Nice try, though.  A pot's "wiper" is the center terminal - it connects internally to a small piece of metal that is a mechanical part of the shaft, (but is electrically insulated from the shaft).... as you rotate the shaft, the piece of metal is moved along the circular track of resistance material. Another way of expressing that is to say, it is "wiped" along the track, hence..... wiper. Where you show that dashed wire going from the switch up to the pot's hot lead (same place as where the 5-way switch connects), move that wire to the center terminal (the wiper). Now eliminate the solid wire going from the wiper down to the jack's TIP connection. That line will be replaced, electrically, by the switch, when it's in the up position. When the switch is down, only the bridge is connected to the jack's TIP - all other components are out of the circuit. At that point, no robbing of tone is possible! HTH sumgai |
|
ba3844
Apprentice Shielder
Posts: 35
Likes: 0
|
Post by ba3844 on Mar 15, 2008 19:02:01 GMT -5
Is this the way you are suggesting? And if so...it looks like I loose volume control when just the HB is selected? And if that is the case...would that mean the HB would have "full" volume always, just wondering what the HB would sound like without a volume pot??? 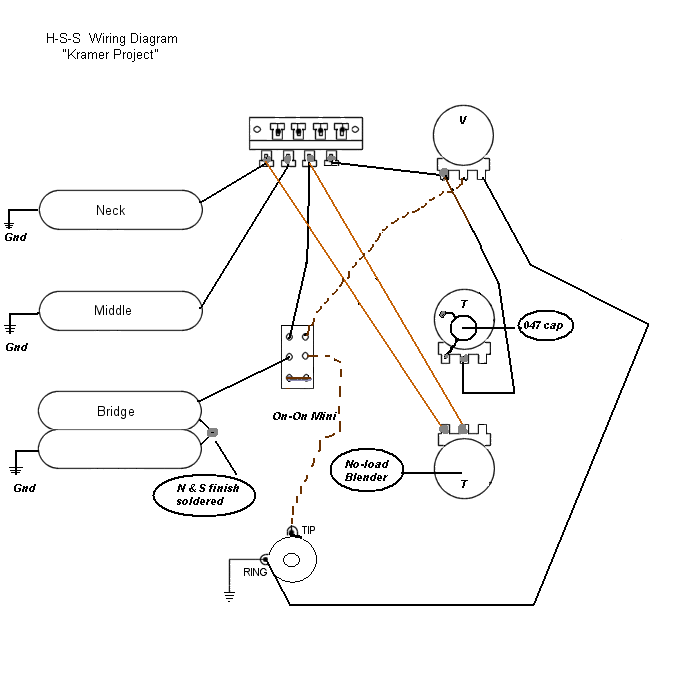 |
|
|
|
Post by sumgai on Mar 15, 2008 21:56:29 GMT -5
ba, Yes, that's the culprit!  True, you no longer have any control over either volume or tone, but I did think that was what you wanted - full signal, full speed ahead! To answer your question, yes, any control, be it a pot or a capacitor (or a coil, such as another pickup....), all of these things have an effect on what the pickup sounds like. If you are not happy with the ballz-out configuration above, then you can make the following changes: 1) restore the volume wiper connection to the jack TIP (yes, the one I told you to remove, in my last post ); 2) connect the volume hot terminal to the DPDT switch Pole #2 center (you had it there before, and then I told you to move it ); and 3) disconnect the 5-way switch from the volume hot terminal, and put it on the uppermost terminal of the DPDT switch, Pole #2 What you now have is either the bridge by itself or the resultant selection of the 5-way switch being fed to the volume and tone controls. BTW, your diagram-fu is strong, keep it up! ;D HTH sumgai |
|
ba3844
Apprentice Shielder
Posts: 35
Likes: 0
|
Post by ba3844 on Mar 15, 2008 22:23:36 GMT -5
Here is a redrawn one...you mean like this ?? So with "this" diagram I now have volume for the HB as well as the master tone pot ?? Interesting ! The other diagram with full ballz out power is what I will probably use, its more what I am looking for as a selection to jam with, and with that you say my HB will be at its peak...I like that. 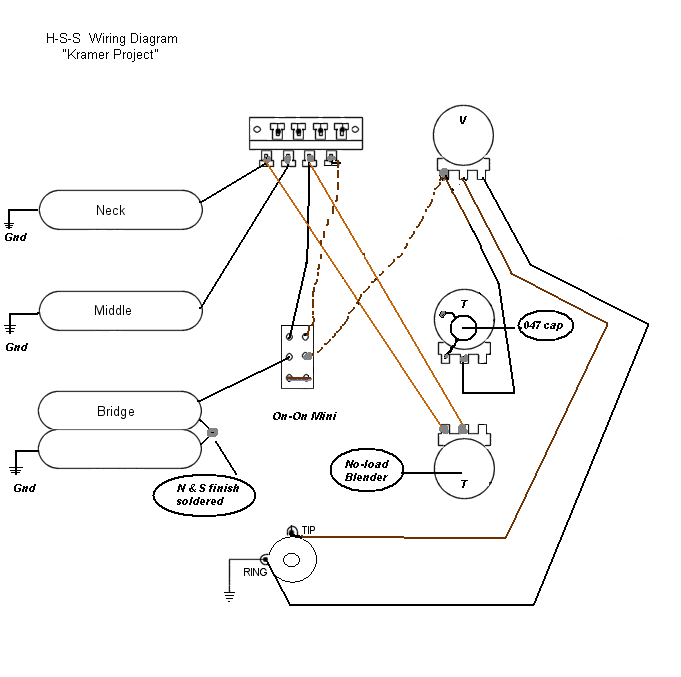 |
|
|
|
Post by sumgai on Mar 16, 2008 2:16:08 GMT -5
ba, Yeppers, this last diagram is the shiznitz, fo shizzle! ;D Either way, you should be able to get a very noticible change in tones, when you flip to bridge only. But for the best deal in town, I'd put the value of both volume and tone pots at 500K, and I'd probably reduce the value of that cap down to 0.03, or even 0.02 µf. (More commonly found values might be 0.033 or 0.022µf.) That way, you'll lose the least amount of tone when everything is turned up, whether it be just the bridge pup, or any combination of the other pickups too. You are aware of how to easily experiment for the capacitor value, aren't you? It's a bit ugly looking, but it sure beats having to de-string, un-screw, un-solder, change values, and re-do everything back up again, just for a few minutes of testing. (Although, one should give things a chance, like in a real practice/gig scenario.) HTH sumgai |
|
ba3844
Apprentice Shielder
Posts: 35
Likes: 0
|
Post by ba3844 on Mar 16, 2008 9:52:59 GMT -5
A huge thanks to you Sumgai. I now have finally got the diagrams to use. I have 250 pots that I will take your advice and swap for 500k. And I will swap the idea of .047 orange drop cap for a .022.
Not at all understanding how to "experiment" with tone caps without having to de- everything.
Thanks again for sharing your knowledge, this Kramer project I am doing is with my 13 year old son..its actually his guitar and he gives thanks too.
|
|
|
|
Post by sumgai on Mar 16, 2008 12:52:41 GMT -5
ba, With a Strat-style guitar, it's a lot of work to take everything off, change the capacitor, and put it all back together. Instead, while the guitar is apart, you can remove the capacitor, solder on some long wires where the capacitor was located, and let them hang outside of the guitar. When you screw down the pickguard, these wires will be pinched between the 'guard and the body, so don't tighten the screws very much.... just enough to hold things in place. Now you can wrap the two wires to the legs of the capacitor, and play to test for how you like the sound. Change the capacitor as you wish, no problem. Soldering is not required, but if you decide to carry the guitar to another location (jam/gig/?), then be careful that the capacitor doesn't get bumped, or pulled off, or the two wires shorted together. When you're finally satisfied with your choice, simply take out the two long wires, and solder the chosen capacitor into the circuit permanently. All done! ;D HTH sumgai |
|
ba3844
Apprentice Shielder
Posts: 35
Likes: 0
|
Post by ba3844 on Mar 16, 2008 13:17:42 GMT -5
That will be simple enough....thanks again for your expertise.
|
|


 ), but nonetheless, there will be an interaction, and it will be detrimental (under the terms of ba's desires).
