|
|
Post by pollyshero on May 7, 2006 0:34:28 GMT -5
Fellow GNuts, Some of you are aware of my affinity for Korean pre-XT Hamers. The latest addition to the harem was acquired "accidentally" off ebay when I underestimated 6 other bidders and their desire to own her:  Mahog body & neck, "tiger" maple top - very nice. The pic doesn't do it justice. The pups are Duncan Designed, but curiously not labled so on the front like all the others you see - I had to pull one to find out. I hardly believed that they weren't genuine Seymour Duncan or Dimarzio - they really put out & have a clarity that I don't usually hear in the offshore made DD's. Nice growly sound. Anyway - since this is the Luthiery & Repair section here's the fly in the ointment: SURPRISE! What the seller failed to mention is the cracked neck... Extending from the nut, where the rosewood meets the mahog, to just about the second fret, there's a hairline crack all the way through the width of the neck. Hard to see in the pics, but it's just above the green line... 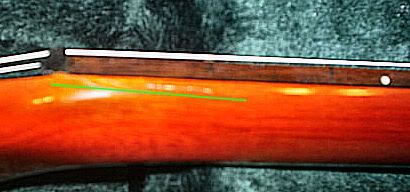 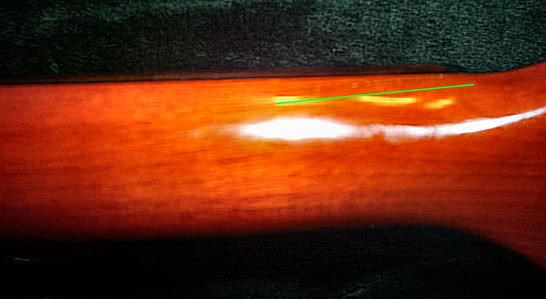 Right now string tension is compressing the joint & all is holding together, but I removed the strings & applied a little rearward pressure to the headstock & sure enuff, it seperates a bit (a TINY bit). Hard to tell what effect (if any) this is having on tuning 'cause it came with brand new strings, plus whoever strung it did a shoddy job & I was getting lots of slippage. So far all I've done to "correct" it was to rewind the strings on the posts properly & already there's an improvement. Before it was almost impossible to stay in tune for more than a few chords & bends, but now it seems about "normal", allowing for new string break-in. Intonation seems correct, and the action is good - a little high for my tastes maybe, but no fret-buzz. I intend to just play it as is for a while & see what happens - will it stay in tune & all that (I've only had it 2 days!). But I predict that at some point I'll convince myself to repair the break, & what I'm wondering is how am I going to get enough glue in that joint to be certain that it was worth the effort? I've heard a lot about "penetrating" glues (like Hot Stuff), but I'm not sure it's going to do the job. Even if I chose to inject adhesive with a syringe, I'd have to seperate the joint to get a needle in there, and I'm afraid that I might wind up with a bona-fide fracture instead of the hairline crack I've got now. Any thoughts? Thanks in advance. PH |
|
|
|
Post by Runewalker on May 7, 2006 10:26:47 GMT -5
PH:
Sometimes the Ebay thing has risks, I have been there and "feel your pain." On the whole I have come out ahead, but sometimes.....
That is a beautiful bod, and I share your esthetics on those DC/LP Hamers, Albeit I of course want more control holes for mods.
Is the crack in the neck blank or the line between the fretboard and neck wood? If between the fretboard and neck it sounds like separation opposed to a crack which connotes wood failure, stress or some sort of jolt event.
If it is a separation issue, and I have not done this repair, only read about it, the most thorough way to repair it is to remove the entire fretboard, clean the glue shards and reglue/clamp. Some here will probably suggest that is overkill.
So the other way it so somehow get glue into a tight split. Oooo, that sounds bad, or good. Yes the syringe apprach will work assumeing you can open it up enough to get the needle in., and as you suggest that risks extending the damage. If you open the fissure, you also risk damaging the back finish, which is probably poly, and harder to repair than Nitro.
Another way I have seen pictorially from Erlwine in to drill a hole or holes into the fretboard itself. He then places a nozzle into the hole(s), and shoots glue under pressure into the hole(s) and the glue is forced into the crack. He then clamps it and runs a kind of string contraption that pulls the headstock up, using leverage to close that hole even more. If you could get the glue in there thoroughly the repair would definitely stablize the crack.
The issue with that approach is repairing the hole(s) in the fretboard. The approach I have read about, not seen, is to fill the holes with dowels but below the surface, then put a rosewood veneer plug like an inlay. Sometimes rather than inlaying a hole, you will see taking out a section from fret to fret and hand inlaying a strip, as the edges are easier to hide than a hole repair. That also presumes finding a piece of rosewood that matches grain and color.
I'm sure there are other approaches, but those are the ones I am aware of.
If you decide it is worth it to have a pro with the proper tools do the repair, Erelwine's cousin is just down he road from you in Austin. Pricey but superb. He developed the travel guitar Chaquita which was sold for years in Guitar Player ads, customs for Billy Gibbons and other luminaries, etc.
|
|
|
|
Post by pollyshero on May 7, 2006 12:17:14 GMT -5
Thanks for the input Rune.
I almost wish it were the fretboard seperating, but alas, the crack is in the neck blank itself...
I have Erlewine's excellent book on repair & setup, but unfortunately it's currently in storage (I'm STILL sleeping on a friend's couch after the move back home!). Several ideas involving drilling have skated through my head & I guess eventually one of them will come into play after I get my own place and get my tools delivered.
In the meantime, any and all other ideas are welcome. Some may wonder why I'm even bothering on such a "cheap" instrument, but believe me - it'll be worth the effort. Considering I got her for less than $200 - this is still a well-made guitar & sounds great.
Later,
PH
|
|
|
|
Post by Runewalker on May 7, 2006 12:44:53 GMT -5
Cheap?
My bias in instrument we play is to put the effor into dialing in their playability and sound. So finding a serviceable or even great chassis, then customizing to preferrence is the guitarists/customizer art. If it was a collectible then that is a whole other world, where frequent the instrument is never even played.
I this hamer's case it is a great chassis upon which to render our "art." I've seen a number of LPs cracked at or near the same place, professionally repaired and stable as rock -- good for decades of superb playing.
While overstated, it is almost a relief when a playing build gets its first nick, then I can't stop being so prissy about caring for her and just saw, whack and hammer her when she is played, making her my b.....
So this is defitely worth the repair. The Erlewine I am speaking of is not the famous auther, Dan, but his cousin, Mark. He has been in town since about 1972 and is a repairer and custom luthier, not an author.
Company Name: Erlewine Guitars
Phone Number: (512) 302-1225
Address: 4402 Burnet Rd
City: Austin, TX 78756
I have even read about luthiers finishing a crack and busting all the way open to get a complete glue and clamp coverage. Pretty radical for this fix.
RW
|
|
|
|
Post by sumgai on May 7, 2006 22:55:12 GMT -5
$0.02, coming right up!
I can see the crack above your colored line, and sad to say, yes, this is a major stress crack. Worse, it won't go away on it's own, you need to do something about it before it gets too much worse.
Plan A) drill very small holes in each side, at both ends. Go as deep as you feel comfortable, but at least 1/2 inch. Glue in dowels. This will stop the crack from spreading at the outermost reaches (the surface of the wood). It won't stop the internal spreading, but it will slow that down to where it effectively stops. Don't try to drill all the way through, unless you are nuts-on sure that the crack is locatable from both sides. This is also why you don't need to go too far inwards, you will likely not be right on the crack line anyway. Drilling oversize and searching for that crack line is too risky, and much harder to dress back up when you're finished.
Plan B) Use a moto tool of some sort to saw a thin expansion of each crack, as far inwards as you can reach. Fill the cuts with tapered wedges. Drill small holes at the ends as above, and fill.
Now for the finishing touch. I can't see accurately what your color scheme is, but I'm going to assume that the neck is the same color as the body. Underneath one of the pickup rings, or underneath the control cavity plate, whittle out small pieces of wood to use for covering your holes/trenches. Glue them in place with the wood glue of your choice. Make them deep enough to accept glue on the sides as well as the back. This means that you don't make the dowels/wedges flush with the neck surface, in anticipation of this step.
Plan C) Take the ax to a qualified repairman, and be done with it. I don't say this for the sake of value, but for the sake of making a case about your eBay purchase being misrepresented. You have rights, if you used eBay's normal purchasing procedures, and hopefully you used PayPal, which really covers your butt. However, you can't make any claims against the seller unless you have at least an estimate from a qualified person as to the reasonable cost of repairs - IOW, you can't do it yourself, and claim reimbursement. But of course, how far you take this is strictly up to you, I'm not advising you to actually do anything you don't already want to do, I'm just reminding you of some of the "gotcha" requirements, that's all. ;D
Good luck!
sumgai
|
|
|
|
Post by Runewalker on May 8, 2006 9:41:52 GMT -5
The doweling idea concerns me a bit. There is no turning back from that one.
SG brings up a good point though on obtaining an estimate, and going back through PayPal. If the seller put language like, no returns, sold as is, etc., it may be moot.
The repair from someone who is properly tooled may not be to expensive and worth it.
Another luthier with a good rep, also down the road from you is Rob Hacker at Austin Custom Shop Guitar, around the corner from Ray Henig's where SRV bought, well really traded, for famous Number One.
Scary name (hacker) to take your guitar to, but I have seen his work on a similar repair as yours and it was top notch.
|
|
|
|
Post by sumgai on May 8, 2006 17:13:03 GMT -5
Rune, I too am concerned with any operation that penetrates into material, no matter where. Even just for cosmetics, it's like you said, there's no "oopsie" button.  But the consideration that has to be made is, what will likely happen if the crack is left alone. I'm sure you'll agree, there's the rub. As for the "no returns, as-is, where-is, all sales final" bit, that doesn't protect a seller against charges of misrepresentation or outright fraud. PH still has a chance in that direction, if he moves on it in a timely fashion. (And if he wants to.) sumgai |
|
|
|
Post by Runewalker on May 9, 2006 0:49:28 GMT -5
.... But the consideration that has to be made is, what will likely happen if the crack is left alone. I'm sure you'll agree, there's the rub.
As for the "no returns, as-is, where-is, all sales final" bit, that doesn't protect a seller against charges of misrepresentation or outright fraud. PH still has a chance in that direction, if he moves on it in a timely fashion. (And if he wants to.)
sumgaiThe issue of it getting worse depend on how it happened. I suspect a headstock jolt in the oposite direct of the sting pull. If it were string pull sourced damage you would expect the cracking at the back of the neck where the headstock angle shifts. So if it is a jolt, string pull is assisting in keeping it from getting worse. The more I think about it the more it makes sense to follow your suggestion to get a qualified repair estimate, make up your mind about having a pro do it at a price you can accept, an pursue redress through PayPal. I believe there is an "insurance" add-on to payPal payments that protect the transaction. Makes me realize I should elect that more frequently than I do. This guitar is salvageable and when fixed and modded will no doubt give many hours of pleasure. But our well meaning advice should definitely be corroborated before attacking it yourself. Here's what the dude at Frets.com says about this type of crack, but it not helpful in telling how to open it up enough to get the glue thoroughly in the crack surfaces. www.frets.com/FRETSPages/Luthier/Technique/Structural/BrokenHeadstocks/NeckCrack/neckcrack.html |
|
|
|
Post by pollyshero on May 9, 2006 22:57:47 GMT -5
Thank you both for the ideas and advice. I won't pretend I wasn't a bit chapped when the axe arrived in the condition it did, but what really rankled was the fact that I WANTED this guitar - even as it was (I'm not sure you understand, but then again maybe you understand perfectly well). I contacted the seller and though it's been a while he replied just last night and offered a full refund plus shipping at his own expense. I was sufficiently touched that I forgave him (well... sort of...) and let him off the hook. I'm not sure I would have been so generous had the situation been reveresed 'cause I blasted him pretty good. But he made the offer & I believe it was sincere. I'm perfectly aware that he may have played me like a violin, but what the hey: I got a new guitar! And back to the guitar: that link to frets.com almost makes me wish mine was as bad off - then I could just slap some glue in & clamp it up & quit crying. Alas, the break on mine is still "hairline" & I'm determined to keep it that way. By the way, the location, angle, and length of the break on that neck is nearly identical to the one on mine. Considering a combination of your suggestions plus a few from outside sources and a few synapse misfires in my own head, here is what I currently intend to try. Keep in mind it's perfectly OK for me to think about this 'cause I ain't got any tools to actually do this anytime soon: There's gonna be a cooling off period! Instead of drilling into the face of the fretboard or the side of the neck itself, I want to remove the nut and drill a small-bore hole lengthwise at the angle of the crack, using the crack itself as the guide. By small bore I mean no more than 1/16" (or whatever's closest to a large gauge hypodermic needle) on either side of the truss-rod channel. I'd want a snug fit around the needle. I'd bottom the needle out in the hole & inject Hot Stuff (or a similar light bodied adhesive) until it oozes out the sides of the crack & then continue injecting while drawing the needle slowly out, all the while letting the "ooze" tell me enuff's enuff. Then clamp, cleanup, and cross fingers! 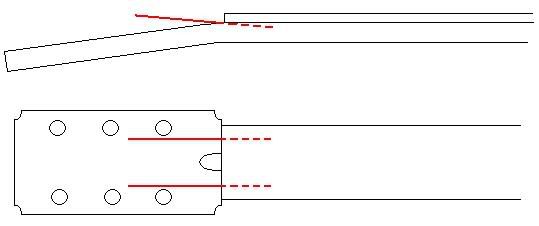 If needed, I could go back later & rebore the holes & fill them again with a dowel, but I'm pretty sure the structural integrity regained by joing the neck back together would be a suitable offset. Right now in my mind this'll work like a charm. If it still looks good later, or unless you're able to shoot enough holes in it I think I'm actually gonna do it. If I do I'll take pics & post them & let you know how it worked out. Once again, thanks for your input - IT HELPED! PH |
|
|
|
Post by Runewalker on May 10, 2006 0:02:01 GMT -5
Does the crack extend visibly to the headstock>
Your approach seems reasonable from this end. I would think the key objective is to ensure that all internal hidden surfaces receive glue contact. Hard to ascertain without ClarkKents X-ray vision.
So when you obtain that 10cc syringe and about a 16 or bigger needle, you will insert in your guide holes and then need to plug the air escape portal between the needle and the guilde or access holes.
Hopefully that will produce enough hydrolic pressure to 'ooze' it ou the crack. Even then, though, blocking the ooze path will make it more likely the glue goes higher into the crevices of the crack. You will want also to plug the other access hole when pressureizing the opposing access hole. Should be a simple operation with 4 hands.
How to plug the ooze outlets to fully pressurize the crack? Not sure, Saran wrap and rubber bands? Clay? Same notion you mentioned on a tight fit with the hole and needle diameters.
I suspect Titebond would give adequate flow and bonds wood fiber really well, plus give some work time.
Since you are going pretty low tech (drill,syringes,glue and clamps) you may not have to wait long for a repair.
Let us know how things turned out.
You stomach must have dropped when you discovered the crack.
|
|
|
|
Post by pollyshero on May 10, 2006 22:00:08 GMT -5
I actually thought making the seal "airtight" with a dab of epoxy - just enough to close the gap, but not enough that I couldn't break it by wiggling the hypo with a pair of pliers. Hmm...
From what I can plainly see, the crack begins just under the nut - right about where the fretboard ends. I'm almost certain (fingers crossed!) that the headstock itself is unaffected. Excellent point about plugging the other access hole. I plumb forgot all about it! Now that you mention it I'm thinking of how I could do it but when I write out the explanation it looks like I'm ready for the looney bin...
Also another excellent point: while a thin-bodied super glue would flow quite well, I wouldn't have much time to change the process if I needed to, or "take it back" if I got ahead of myself. With a big enough hypo, TB or even Elmer's white would flow quite nicely + fill any tiny voids the other wouldn't. I think you're right & it will probably result in a superior bond.
As for my stomach - let's just say my toes had company for a few seconds!
THANKS for the things to think about & keep 'em coming. I knew I came to the right place.
I think this is a go: I just signed a lease today & my stuff gets delivered next week. I expect to have a report by month's end.
Later,
PH
|
|
|
|
Post by sumgai on May 12, 2006 1:46:31 GMT -5
PH, Well, if the crack is as you say, very close to the one on the FRETS website, then why don't you take a page from his book, and force the crack to widen up for you, thus letting you insert the glue without any drilling. To me, removing meat (wood) to insert a needle is removing something that won't be put back, and that's not a good thing. I'd sooner see you drill at an angle to the crack, through to well beyond the other side, and insert a pair of steel pins for strength. But cosmetically, that's a different headache to clean up, so I'd understand if you didn't like this idea. BTW, nice of the seller to make the offer. My intuition is that you could have played him right back for the cost of the repairs, even if you intend to do them yourself. What'd you pay for this crowning glory?  sumgai |
|
|
|
Post by Runewalker on May 12, 2006 18:01:50 GMT -5
I thought about that but did not get the impression the end of the crack was visible at the headstock.
You could rig countervailing clamp forces that gently stress the headstock with a fulcrum at the headstock angle to open the thing up fully. A number of the luthier stuff I have read emphasize finishing the job the drunken orgy started, in order to get better glue surface coverage and ensure clamping placement and uniformity.
Admitedly it would be scary to break something that is not fully broken.
|
|
|
|
Post by pollyshero on May 12, 2006 19:33:03 GMT -5
I'm not willing to force it because as of now, I'm dealing with a CRACK as opposed to a BREAK. I'd like to keep it that way. I said before that I removed the strings & applied pressure to the headstock & the crack separated? I should clarify - the crack separated enough to MAYBE be able to slide a shim the thickness of a piece of paper in the widest part. Admittedly, I didn't apply a lot of pressure, but I didn't want to see it get any worse than it was. I have read of instances where it's suitable, even preferable, to "finish the job" and complete a break in a neck and then repair it from there, but I don't believe this is one of those cases.
My scheme does seem a little hairbrained and involved, and I won't recommend it to anyone unless I try it and it works (and maybe not even then). I may fail, but then again I may succeed. Both you and Rune have given me much food for thought - I'm not sure I'dve come up with this idea without other ideas to bounce it off of. My decision to drill as I've described was selfishly and purely based on cosmetics and the fact that I didn't want to go to the trouble of trying to match a rosewood patch (actually, my FIRST idea was to drill a countersink in the fret board and use screws to draw the neck together). - That and that I don't want to make the crack any worse than it is.
I paid $180 + shipping for the privilege of learning how to repair this beast. That's a lot cheaper than some of these luthierie "schools". You're probably right about my being able to play the other side of the net, but I was honestly more concerned with the misrepresentation than I was was about the actual damage. Seeing as how he offered to be more than fair to make things right (as far as the ebay realm is concerned) I decided to let him off the hook. I may be a sap, but hell... I got enough going on as it is.
PH
|
|
|
|
Post by UnklMickey on May 12, 2006 20:05:43 GMT -5
i thought Rune was spending so much time here 'cause the title was broke-back.
oh, broken neck. okay, that i don't mind seeing.
.:lol:.
U.D.,
that sounds about the right plan.
here's a thought for "the long-way-round" if that doesn't take.
you mentioned countersinking screws in the fretboard.
if it does come to that, Rune's suggestion of taking off the entire fretboard makes lots of sense.
countersink the screws in the flat of the neck, then they get covered by the fretboard.
granted, since the crack is not very far below the flat, it will take some screws with lots of area on the head, to prevent pulling through.
and of course, if you're lucky, your less invasive approach will work.
we'll be hoping for that.
unk
|
|
|
|
Post by Runewalker on May 12, 2006 23:04:27 GMT -5
i thought Rune was spending so much time here 'cause the title was broke-back.
oh, broken neck. okay, that i don't mind seeing.
.:lol:.
unk Now Unky, you know from dealing with me that I'm more the pitcher than the catcher, and while I love you very much, your'e gonna be Yogi Berra to my Whitey Ford. Now that we have that straight, or the opposite thereof, The main thing I am concerned about UD about your approach is covering all the hidden surfaces with glue. Even in your less invasive approach if you could put a 2X4 on the back of the neck then clamp it with pads to protect the finish at the heel and the headstock, with a fulcrum at the bend in the neck angle, you could just put slight pressure to open the fissure a bit --- not enought to "finish the job" but enough to enable the glue to fully distribute under pressure. A partial job will be both prone to failure and very difficult to undo for a subsequent repair. RW |
|
|
|
Post by Runewalker on May 14, 2006 0:14:33 GMT -5
Sorry about Unk's diversion UD, but you know us Texans don't start fights, we just finish them. Since you have already done a mini=stress test on opening the crack, let me propose a controlled way to open that crack with out 'bustin'' it completely. With two clamps, C or those nifty gun handle Stanleys or knock offs, establish an anchor near the bod, and a fulcrum where the hairline starts. Then use another clamp to slowly and gently apply pressure to the headstock to open that crack slightly enough soak the innards with your big syringe full of titebond.  Would that exacerbate your fear of making it worse? |
|
zap
Rookie Solder Flinger

Posts: 5
Likes: 0
|
Post by zap on May 14, 2006 0:35:32 GMT -5
I've actually repaired several cracks exactly like this with no problems. Believe it or not, it's not that big of a deal. I've had great success with hot hide glue, regular wood glue, and LMII's instrument makers glue. For a repair like you got there I would open it up a little and just squeeze plenty of wood glue in there using either the bottle tip or a plastic/metal syringe(depending how tight the crack is) either inserted or held right up to the edge of the crack. You'll see the glue pour in and spread itself. The key here is the pressure shooting the glue into the crack. Shoot the glue in as close to the bottom of the crack as possible and work back. Then for good measure, you can pack the glue in on the edges by rubbing back and forth over and over adding more glue and packing it in like when repairing a top crack in an acoustic top. Any glue you shot in there will now be forced further in by doing this. Wood glue will give you plenty of working time, a good bond, easy clean up with a damp cloth, and will not harm the finish. I would absolutely not put cyanoacrylate in there. LMII makes a good glue for this, but Tightbond and Elmers is just as good. Basically pack in carpenters wood glue, clamp firmly but not too tight, and clean up the excess! Check with your local luthier, I'll bet this is what he/she'll do. Hope this helps.
|
|
zap
Rookie Solder Flinger
Posts: 5
Likes: 0
|
Post by zap on May 14, 2006 0:48:11 GMT -5
One other thought to add to what Runewalker was suggesting, if the crack extends far enough back, you may be able to pull the first fret and drill a few tiny holes in the bottom of the fret slot to reach the depths of the crack with your syringe.
|
|
|
|
Post by UnklMickey on May 15, 2006 6:39:00 GMT -5
...I love you very much... yeah, i love you too. but if you start talking about selecting China patterns, i'm outta here. unk |
|
|
|
Post by sumgai on May 16, 2006 14:59:48 GMT -5
Rune,
Boy, you ain't ever gonna make it as an engineer! Don't you know, the first rule of the Engineer's Code is "If it ain't broke, fix it!"
;D
sumgai
|
|
|
|
Post by pollyshero on May 16, 2006 21:28:18 GMT -5
Or - "If it ain't broke, fix it 'till it is."
And my personal fave - "If it ain't broke, you're not trying hard enough."
|
|
|
|
Post by Runewalker on May 16, 2006 21:35:22 GMT -5
Or - "If it ain't broke, fix it 'till it is." And my personal fave - "If it ain't broke, you're not trying hard enough." Or for SG and Unk, my favorite, "if it's too loud, you're too old." |
|
|
|
Post by sumgai on May 16, 2006 22:38:49 GMT -5
(Hangs head in shame at having no viable comeback.  ) unsigned |
|
oldhairy
Rookie Solder Flinger
Posts: 5
Likes: 0
|
Post by oldhairy on Jul 22, 2006 10:07:51 GMT -5
If you are worried about drilling holes in the fret board itself, pop out a couple of frets and drill the hole along the fret slot. Then force glue into the crack through the holes.
Opening and closing the crack by stressing the fracture is a dangerous method, but you have to get glue into the fracture or there's no sense attempting to do the repair. If you can't get glue into the wood you won't be fixing anything.
Personally, I wouldn't use any of the alpha-cyano acrylate glues (instant.. crazy...etc) for this repair. It will take time to work the glue around in the crack and C/A glues, even the slow ones won't give you enough time before they 'kick off'.
A good wood glue, something with heatable properties or a hide glue if you are fast would be my choice.
Get some glue into the crack, clamp (make some kind of caul for both sides of the neck. Don't put the clamps directly on the f/b or the back of the neck), clean up any squish out and set it aside to dry at least overnight.
If you don't get any squish out of glue, you haven't got enough glue in the crack.
Good luck.
|
|


 But the consideration that has to be made is, what will likely happen if the crack is left alone. I'm sure you'll agree, there's the rub.


 )
)