Post by markd on Apr 8, 2007 19:49:34 GMT -5
Righteous Rotary Strat by markd
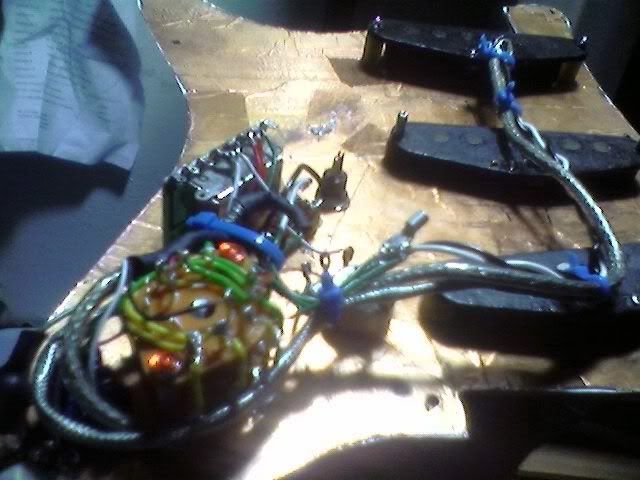
This is a guitar mod I recently designed and performed on my MIM Fender Standard Stratocaster. (3 single coil pickups) It is inspired by the John Atchley Strat Lovers’ Strat mod but with some additional combinations and using a rotary switch. It does NOT alter the stock look of the Strat.
I’ve been very pleased with it.
What I wanted
• The five stock selections for the three single-coil pickups.
• The “missing” two parallel combinations.
• All four possible series combinations of the three single-coil pickups.
• The ability to reverse the phase of the neck pickup.
What I did NOT want
• To alter the stock appearance of my Strat.
• ANY dead switch settings.
What I was willing to give up
• One of the tone controls. (I wired the remaining tone control to be a master tone control. I prefer it this way anyway.)
The Mod - Overview
The mod consists of several parts.
• Perform the “Quieting the Beast”-type shielding, star-grounding, etc. Please see the GuitarNuts site for details. Shielding is done first. The grounding is done later in conjunction with the rest of the mods.
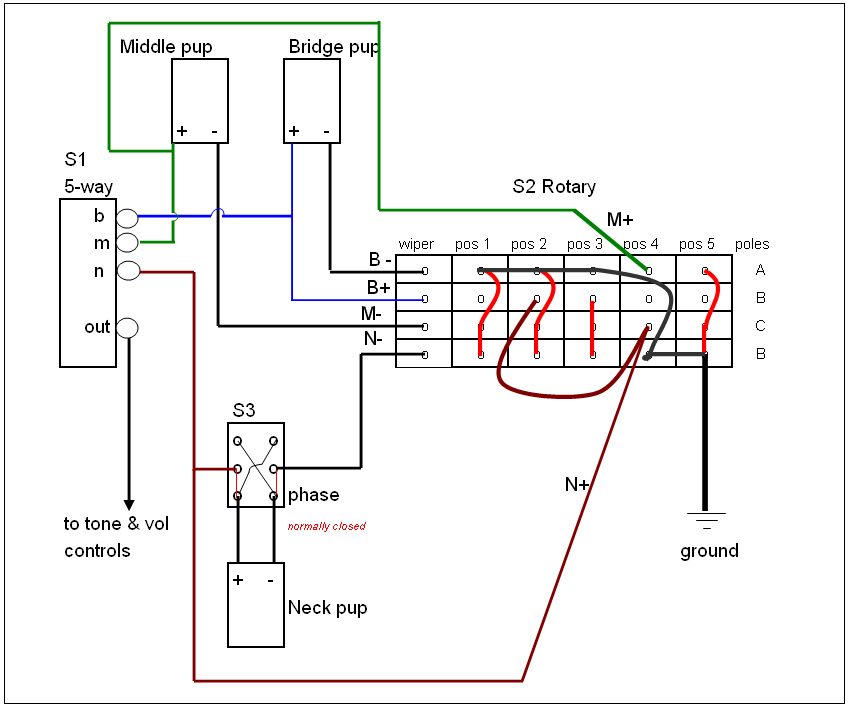
• Remove the neck tone pot and replace it with a four-pole five-position PRS-type rotary switch (I used StewMac item# 3512) This switch is the heart of the mod and will henceforth be referred to as S2. (S1 being the stock 5-way selector) This switch will alter the behavior of the 5-way depending on which position is selected. Stick the tone knob back on this switch.
• Rewire the remaining tone pot to be a master tone. At this point you can also change the cap to a different value according to your preference. I changed from a 0.022 uF to a 0.015 uF to make it a little less muddy and a tad brighter.
• Replace one of the remaining pots (either the master tone or the volume pot according to your preference) with a push-pull pot. The push-pull switch here will be referred to as S3 and will be used to control the neck pickup phasing.
The S2 Rotary Switch
This is a 4-pole, 5-position rotary switch. If you haven’t dealt with these rotary switches before, think of them as four 5-way switches ganged together. Your stock 5-way can be described as a 2-pole, 5-position knife-type rotary switch. (Technically, it’s a three position with intermediate make-before-break détentes.) Your stock 5-way uses one pole for the pickup selection and the other for the tone selection.
For S-2, each pole consists of a main lug which attaches to a wiper and five additional lugs corresponding to the five positions. Thus when the switch is in position #1, the wiper makes electrical contact with lug #1 and only lug #1. When in position #2 the wiper makes electrical contact with lug #2 and only lug #2, etc. When the switch is in a given position, the whole switch is in that position. The four individual switches move together as a unit.
You get the idea. If not, hold the switch in your hand and twist the knob. Observe how the wipers move across the contacts. This will quickly make it obvious how it works.
The StewMac item# 3512 rotary switch is what I used. It has a knurled shaft so you can use it with the Strat tone knob, although it was a tight fit. It looks like this:
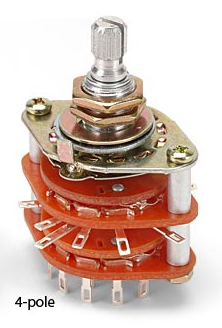
Note: I recommend you pre-wire the S2 with all of the internal connections prior to installation into the guitar. Keep your wiring neat and minimalist as it is kind of a cramped fit anyway. You can gently bend the lugs back a bit as needed to give yourself a little more clearance.
Wiring S2
Here’s the basic idea. Please see the wiring diagram and the table below for the summary. Then read this section again.
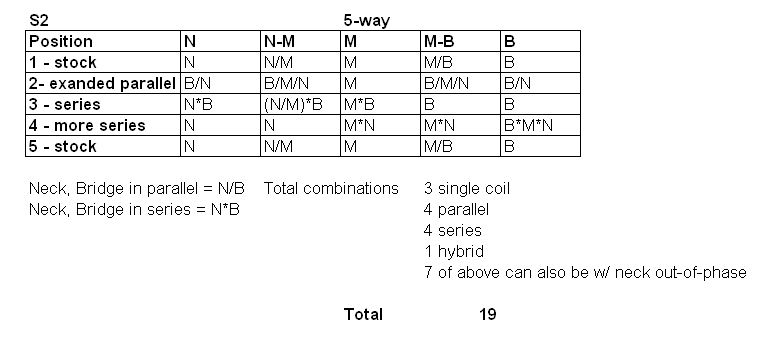
When the rotary switch (S2) is set to position 1, we want the 5-way to behave completely normally, giving us the 5 stock settings. We do this simply by grounding the negative leads of all of the pickups.
S2, position 2 is just like position 1 except in this position the positive leads of the neck and bridge pickups are tied together. Thus when either is selected with S1, BOTH are selected. This gives us the bridge/neck combination (parallel) as well as all three pickups in parallel. This is how G&L (S-500, Comanche), for example achieves this same goal.
We now have all possible purely parallel in-phase combinations.
S2, position 3 is where we go after the most important series combinations. This works like the SW2 push-pull switch in the Strat Lovers’ Strat. We get these new combinations by lifting the negative leads of the neck and middle pickups away from ground and tying them instead to the positive bridge lead. This puts the bridge in series with whatever else is selected. (However, if the bridge itself is also selected, it causes the other pickup to be shunted out of the circuit.) This give us the bridge*neck, bridge*middle (series) combinations plus – as a by-product, the bridge in series with the neck/middle (parallel) combination.
S2, position 4, completes the remaining series combinations. We do this by stringing the three pickups together in series. We ground the negative lead of the neck, tie the positive of the neck to the negative of the middle, tie the positive of the middle to the negative of the bridge. This gives us all three pickups in series when the bridge pickup is selected on the 5-way (S1), the neck*middle series combinations in the next two settings and the neck alone in the final two.
We now have all possible purely series in-phase combinations.
S2 has one more position, but I’ve already achieved all of my objectives. Therefore, I wired this position to be identical to position 1. Here again, S1 works in the stock fashion.
The S3 Phase Switch
This allows us to reverse the phase of the neck pickup. We can do this independently of whatever pickup combination is selected. Obviously, this only makes sense to do when the neck pickup is selected in combination with at least one other pickup.
This is very simple and is exactly like the Strat Lovers’ Strat SW3 phase push-pull switch. All it does is effectively swap the positive and negative leads of the neck pickup. The wiring diagram below should make it apparent how this is wired.
Master Tone Control
Last but not least is the master tone control. This is also very simple. In the master tone configuration, the tone half of the 5-way switch is no longer needed. Simply hardwire the output of the pickup half of the S1 switch to the tone pot input terminal.
The S1 pickup output is where the S1 connects to the volume control.
The input of the tone pot is as before; it is where the S1 connected to the tone pot.
The ground side of the tone pot is also as before. One lead of the tone cap connects to the ground lug of the tone pot, the other lead of the cap connects to ground.
Now what was the stock middle tone pot is the master tone control. Now you also have tone control in the bridge position and you do NOT have two tone controls for the middle-neck position. I consider both of these to be good things.
Next are the Diagram and the Switching Table.
Conclusion
You will want to experiment with the settings and become familiar with them. This mod allows you to get a couple Tele-style sounds as well as thick humbucker-type sounds and also some weird, nasal ones. Many of these selections also have the advantage of being hum-canceling. That said, there will also be some selections that frankly aren’t all that useful. Also, keep in mind that putting pickups in series makes the sound hotter while putting the neck out of phase makes it quieter. Therefore, be prepared to adjust the volume when you switch between these types of settings.
I hope you enjoy this mod should you decide to try it out. With 19 possibilities rather than the standard 5, you could find that your old Strat suddenly has become way more versatile. Have fun with this!
markd
Apr 2007
This is a guitar mod I recently designed and performed on my MIM Fender Standard Stratocaster. (3 single coil pickups) It is inspired by the John Atchley Strat Lovers’ Strat mod but with some additional combinations and using a rotary switch. It does NOT alter the stock look of the Strat.
I’ve been very pleased with it.
What I wanted
• The five stock selections for the three single-coil pickups.
• The “missing” two parallel combinations.
• All four possible series combinations of the three single-coil pickups.
• The ability to reverse the phase of the neck pickup.
What I did NOT want
• To alter the stock appearance of my Strat.
• ANY dead switch settings.
What I was willing to give up
• One of the tone controls. (I wired the remaining tone control to be a master tone control. I prefer it this way anyway.)
The Mod - Overview
The mod consists of several parts.
• Perform the “Quieting the Beast”-type shielding, star-grounding, etc. Please see the GuitarNuts site for details. Shielding is done first. The grounding is done later in conjunction with the rest of the mods.
• Remove the neck tone pot and replace it with a four-pole five-position PRS-type rotary switch (I used StewMac item# 3512) This switch is the heart of the mod and will henceforth be referred to as S2. (S1 being the stock 5-way selector) This switch will alter the behavior of the 5-way depending on which position is selected. Stick the tone knob back on this switch.
• Rewire the remaining tone pot to be a master tone. At this point you can also change the cap to a different value according to your preference. I changed from a 0.022 uF to a 0.015 uF to make it a little less muddy and a tad brighter.
• Replace one of the remaining pots (either the master tone or the volume pot according to your preference) with a push-pull pot. The push-pull switch here will be referred to as S3 and will be used to control the neck pickup phasing.
The S2 Rotary Switch
This is a 4-pole, 5-position rotary switch. If you haven’t dealt with these rotary switches before, think of them as four 5-way switches ganged together. Your stock 5-way can be described as a 2-pole, 5-position knife-type rotary switch. (Technically, it’s a three position with intermediate make-before-break détentes.) Your stock 5-way uses one pole for the pickup selection and the other for the tone selection.
For S-2, each pole consists of a main lug which attaches to a wiper and five additional lugs corresponding to the five positions. Thus when the switch is in position #1, the wiper makes electrical contact with lug #1 and only lug #1. When in position #2 the wiper makes electrical contact with lug #2 and only lug #2, etc. When the switch is in a given position, the whole switch is in that position. The four individual switches move together as a unit.
You get the idea. If not, hold the switch in your hand and twist the knob. Observe how the wipers move across the contacts. This will quickly make it obvious how it works.
The StewMac item# 3512 rotary switch is what I used. It has a knurled shaft so you can use it with the Strat tone knob, although it was a tight fit. It looks like this:
Note: I recommend you pre-wire the S2 with all of the internal connections prior to installation into the guitar. Keep your wiring neat and minimalist as it is kind of a cramped fit anyway. You can gently bend the lugs back a bit as needed to give yourself a little more clearance.
Wiring S2
Here’s the basic idea. Please see the wiring diagram and the table below for the summary. Then read this section again.
When the rotary switch (S2) is set to position 1, we want the 5-way to behave completely normally, giving us the 5 stock settings. We do this simply by grounding the negative leads of all of the pickups.
S2, position 2 is just like position 1 except in this position the positive leads of the neck and bridge pickups are tied together. Thus when either is selected with S1, BOTH are selected. This gives us the bridge/neck combination (parallel) as well as all three pickups in parallel. This is how G&L (S-500, Comanche), for example achieves this same goal.
We now have all possible purely parallel in-phase combinations.
S2, position 3 is where we go after the most important series combinations. This works like the SW2 push-pull switch in the Strat Lovers’ Strat. We get these new combinations by lifting the negative leads of the neck and middle pickups away from ground and tying them instead to the positive bridge lead. This puts the bridge in series with whatever else is selected. (However, if the bridge itself is also selected, it causes the other pickup to be shunted out of the circuit.) This give us the bridge*neck, bridge*middle (series) combinations plus – as a by-product, the bridge in series with the neck/middle (parallel) combination.
S2, position 4, completes the remaining series combinations. We do this by stringing the three pickups together in series. We ground the negative lead of the neck, tie the positive of the neck to the negative of the middle, tie the positive of the middle to the negative of the bridge. This gives us all three pickups in series when the bridge pickup is selected on the 5-way (S1), the neck*middle series combinations in the next two settings and the neck alone in the final two.
We now have all possible purely series in-phase combinations.
S2 has one more position, but I’ve already achieved all of my objectives. Therefore, I wired this position to be identical to position 1. Here again, S1 works in the stock fashion.
The S3 Phase Switch
This allows us to reverse the phase of the neck pickup. We can do this independently of whatever pickup combination is selected. Obviously, this only makes sense to do when the neck pickup is selected in combination with at least one other pickup.
This is very simple and is exactly like the Strat Lovers’ Strat SW3 phase push-pull switch. All it does is effectively swap the positive and negative leads of the neck pickup. The wiring diagram below should make it apparent how this is wired.
Master Tone Control
Last but not least is the master tone control. This is also very simple. In the master tone configuration, the tone half of the 5-way switch is no longer needed. Simply hardwire the output of the pickup half of the S1 switch to the tone pot input terminal.
The S1 pickup output is where the S1 connects to the volume control.
The input of the tone pot is as before; it is where the S1 connected to the tone pot.
The ground side of the tone pot is also as before. One lead of the tone cap connects to the ground lug of the tone pot, the other lead of the cap connects to ground.
Now what was the stock middle tone pot is the master tone control. Now you also have tone control in the bridge position and you do NOT have two tone controls for the middle-neck position. I consider both of these to be good things.
Next are the Diagram and the Switching Table.
Conclusion
You will want to experiment with the settings and become familiar with them. This mod allows you to get a couple Tele-style sounds as well as thick humbucker-type sounds and also some weird, nasal ones. Many of these selections also have the advantage of being hum-canceling. That said, there will also be some selections that frankly aren’t all that useful. Also, keep in mind that putting pickups in series makes the sound hotter while putting the neck out of phase makes it quieter. Therefore, be prepared to adjust the volume when you switch between these types of settings.
I hope you enjoy this mod should you decide to try it out. With 19 possibilities rather than the standard 5, you could find that your old Strat suddenly has become way more versatile. Have fun with this!
markd
Apr 2007