~Maxx
Meter Reader 1st Class

Posts: 67
Likes: 0
|
Post by ~Maxx on Mar 23, 2011 8:58:12 GMT -5
Hi folks. Hope nobody minds me starting a new thread on this. I have a thread going below where we were mostly discussing the application of the Free-Way switch in this project, but figured I'd start something fresh to document the entire process of this "rebuild". I've always regretted not documenting the remodel of my '97 Strat, so hopefully this will make up for it in my mind... Anyway... I'll have some initial pics posted below, but I'll start off with a good explanation of how this project came about and what my end goals are. Some of this will be info rehashed from the other thread (located here if anyone's interested), so I'll apologize in advance for the repetition. I've typed up a fairly enormous essay detailing the entire process I've been through so far. But I've decided to break the details up into separate posts in order to cut down on the monotony factor. This first post will just get into why I'm doing this particular project and sum up the basics of what I've done so far. I'll also include a "to-do" list, which I'll update as I go along with things... Mission Statement:So as I mentioned above - I did a rebuild of a '97 American Strat Deluxe. After a bit of trial and error I've finally got everything pretty much the way I want it on that guitar. The only things left are to tear it all down and do the tung oil finish on the body and back of the neck, and put in the full cavity shielding. I've been planning to to that sometime this spring when the weather gets decent (as I'll have to work outside  ). Since that Strat is the only decently playable guitar I have available at the time, I figured I'd better put something together that would get me by until the body work is done. Originally the idea was to just slap something together - quick and dirty. But then I decided that this might be a good opportunity to experiment a bit - learn some more about some different wiring concepts, and try some things that I wouldn't dare attempt on a guitar I cared about. I had a Strat-style body from a super cheap Harmony guitar I owned in the early 1990's, and an old 22 fret Kramer neck from God-knows-where. I had no qualms about drilling, routing, filing, or gouging these parts to whatever end was necessary. Ultimately I'd like to think that I can get all the wiring and hardware sorted out so that it works well for me and my needs, after which I can transfer this whole setup to a new body and neck. Maybe even keep the old wood around as a frankenstrat so I can toy with new things without having to sacrifice a guitar. We shall see... So Far, So Good(?):What I've done up to this point... - Repainted neck and headstock black. Clear coated with satin finish.
- "Ebonized" rosewood fretboard with black saddle dye from StewMac.
- Hand-filed nut slot and installed LSR roller nut.
- Replaced stock Kramer tuners with Wilkinson-style locking tuners.
- Installed replacement vintage tremolo.
- Ground sustain block down to accommodate for thinner body.
- Routed out neck joint to correct scale length.
- Replaced neck plate with black neck bolt ferrules.
- Routed new switch cavity near lower horn.
- Installed electronics incorporating 4 Lace Sensor pickups (Gold neck, Gold mid, & Red/Gold Dually bridge), the 6-position Free-Way switch (for series/parallel switching), active eq/boost circuit, and two push/pull pots on master vol. and master tone (one wired for mid pickup "on", the other for active circuit bypass).
- Installed string trees.
- Shimmed LSR nut.
- Restrung, and set action, neck bow, intonation, pickup height, and floated trem.
- Got lazy and velcro'd 9v battery to back of guitar

To-Do List:I'll try to update and cross things off here as I progress... Replace Gold with Silver Lace Sensor in bridge position. (Done as of 1/12/2012)
Install gold Lace Sensor from bridge in neck position for Gold/Gold dually. (Done as of 1/12/2012)
Take mid pickup off of Free-Way switch and route directly through push/pull pot for on/off. (Done as of 1/12/2012)
Replace 250k push/pull pots with 500k. (Done as of 1/12/2012)
- Experiment with inline capacitors for single coil positions.
- Install battery compartment for active circuitry.
- Install recessed bypass switch for active circuit to back of body. (Added 1/12/2012)
Replace Wilkinson style tuners with Sperzel type. (Done as of 1/12/2012)
- Replace roller string trees with retainer bar behind LSR nut. (Added 1/12/2012)
- Install trem stabilizer.
- Replace body and neck.
Pics: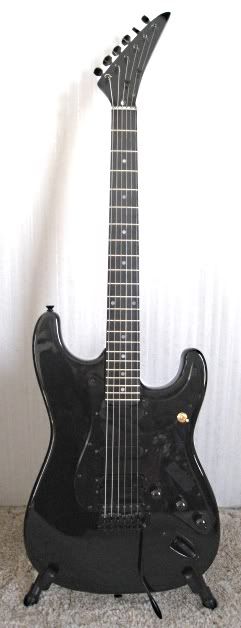 Full body shot. That gold Free-Way switch looks like a dieing sun on this guitar. 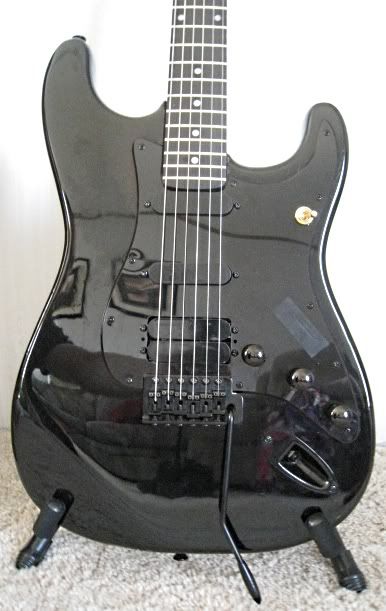 Closer view of the body with 4 Lace Sensors (all painted black  , and the Free-Way switch. Dig the masterful patch job I did to cover the old 5-way slot? 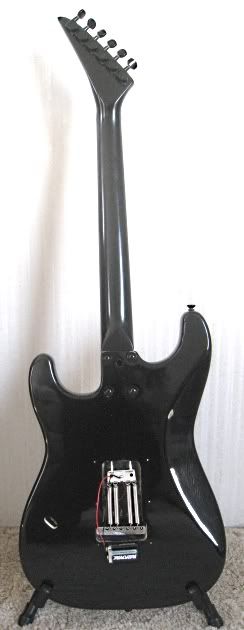 Full back shot. 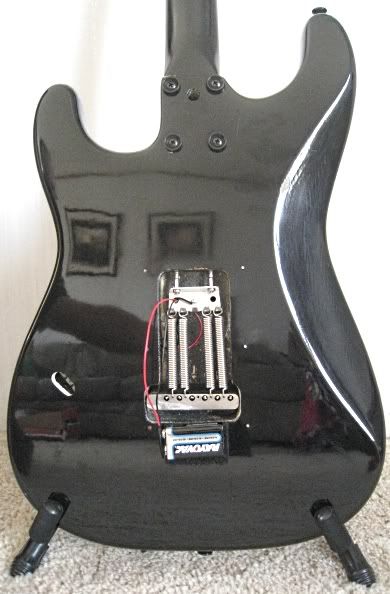 Closer view showing my lazy battery mounting method, and the ground-down sustain block. You can also see the small hole I routed through the back so I could adjust the eq. In the following posts I'll cover several topics in more detail. I hope (for everyone else's sake) that breaking the following sections up into separate posts will make them easier to digest, and more convenient to respond to... |
|
~Maxx
Meter Reader 1st Class
Posts: 67
Likes: 0
|
Post by ~Maxx on Mar 23, 2011 9:00:10 GMT -5
Initial Prep And Hardware:First off I decided to try a home installation of an LSR nut, as I have one on my Strat (replaced the factory Wilkinson roller with an adapter piece) that I really like. Filing the slot out by hand was time consuming, and a bit tedious, but not overly difficult. Though I believe that next time I'll track down a mill or router that I can use to save some time. Once that was done I figured I'd better check the scale length since the body and neck were mis-matched. Sure enough it was 1/4" long on the bridge side. This brought the neck joint to maybe 3/16" from the pickup cavity. Very close indeed. I had to be very careful shaving out the pick-guard to accommodate for that! The next thing I did was drop in the replacement vintage tremolo I ordered to make sure it fit properly. Due to (or perhaps in spite of?) this guitars obvious shortcomings in the way of primary tone I opted for a solid steel sustain block, hoping that would help a bit. I've always blocked my tremolos in favor of tone, so one of my goals this time around was to give a floating trem a fair try. After putting in the new trem and making sure the screw holes and cavity lined up properly, I noticed a serious issue. The body of this guitar was so much thinner than a standard Strat-style that the block stuck out 1/8" beyond the back surface of the guitar!  It took a bit of doing with a borrowed hand grinder, but I managed to shave nearly 1/4" off the block so that the springs will sit just below the surface and allow for a cavity cover. A couple of other things I went ahead and did included sanding down the back of the neck and the headstock and repainting them to match the body. I finished with a satin clear-coat for a bit less "sticky" factor. I also dyed the rosewood fretboard black. As you'll soon see I have an almost disturbing obsession with the absence of color (especially for a blues/rock 'n roll guy). I also installed a set of Wilkinson-style "physical lock" tuners. I have to say that I've rarely felt as if I've so hopelessly and stupidly wasted my money. They are a complete pain, and I'll be replacing them with some Sperzel type tuners in the very near future. After stringing up for an initial trial I wound up putting in a set of string trees. Apparently the staggered posts on the tuners aren't enough to get the last 3 strings to lay over the nut properly. Unfortunately this has made the LSR nut much less effective. But I'm considering it a temporary situation. Lastly I noticed a couple of the frets were starting to lift just a tad on the high E side, so I wound up shimming the LSR nut when I set the action. At least it wasn't an issue with the filing I did. Now for a couple of pics... 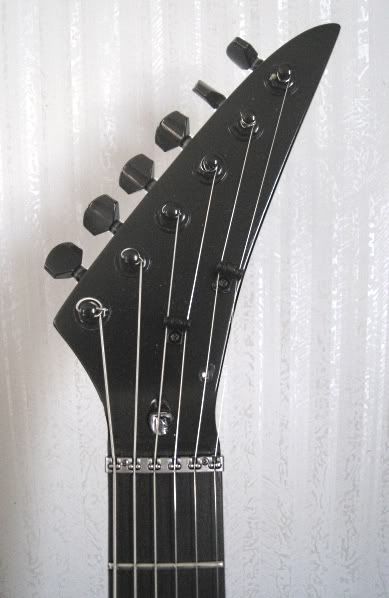 Here you can see the LSR nut, and the quickly-installed string trees. 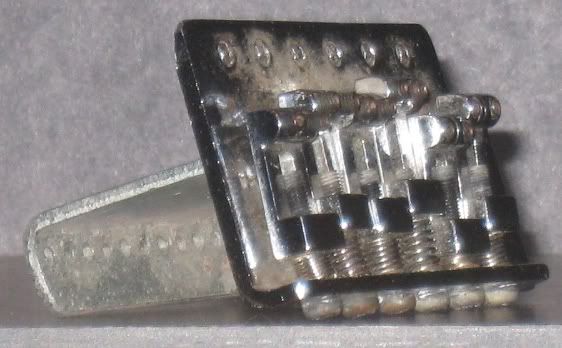 Here's a shot of the old trem. You can see - by the useless piece of bent metal where the sustain block should be - the reason I chose to replace it. That and the whole "black" thing... 
|
|
~Maxx
Meter Reader 1st Class
Posts: 67
Likes: 0
|
Post by ~Maxx on Mar 23, 2011 9:02:41 GMT -5
Electronics:When it came to the electronics I had a vague idea of what I wanted, but wasn't really sure how I wanted to accomplish it. Years ago when this Harmony Strat was operational and being played regularly I modified it to house a humbucker in the bridge position, and ditched the 5-way switch in favor of 8 DPDT switches that handled series/parallel and phase reversal functions across all four coils. I liked the flexibility - but there were several useless positions, and switching was somewhat complicated and unintuitive. So I decided I'd try to streamline a bit and filter down to what was useful to me. I made a quick and easy decision to drop the phase switches. They were fun to play with, but I never really found a practical use for them. Maybe on another guitar someday. The next thing I did was to set a goal for myself to scale back to no more than two visible toggle switches, and two push/pull knobs. I struggled with this for a bit before I realized that it just wasn't going to happen. Then I remembered a nifty little gadget I saw at StewMac's website. The Free-Way Switch. You can read our discussion of it in detail at my other thread via the link above. So far it has worked out fairly well for me. Though I'm hardly done tweaking the wiring of this guitar. I'll post an image below of the switching options I get with the Free-Way. The pickups I went with for this project included a set of three Gold Lace Sensors that I had removed from the Strat I had rebuilt earlier, and an additional Red Lace Sensor I had in my tool box. My initial plan was to create a Red/Gold Dually-type humbucker at the bridge and use the other two Golds for the neck and mid positions. Now that I have things wired up, however, I realize that the Red is just too hot to be paired with the Gold in the bridge position. I've ordered a Silver that I'll try, leaving me the opportunity to put a Gold/Gold double coil in the neck position. The Red/Silver pair is one of Lace's official Dually combination's, so I'm assuming it will work out better. As far as the overall sound of the Lace Sensors goes - I really wasn't happy with them in my Strat (which is why I pulled them!). They do have a very crisp sound and a lot of good tonal qualities, but they just didn't seem to respond the way I wanted them to. I was going for a more traditional blues sound in that guitar though, and since this project was going to wind up being a more rock-oriented endeavor I thought I'd give them another shot. And I'm truly glad that I did. Their clarity lends itself well to the distortions and heavier overdrives of rock-oriented sounds. Even for the clean channels their slight lack of character has proven to be a non-issue. I'm quite happy with them in this setting, and am looking forward to installing the Silver when it arrives. One last thing I opted for in the way of wiring was an active circuit. I was in a band many years ago with a fellow who had a set of EMG's in his Jackson. I don't think I liked a single sound that came out of his amp. Clear as a bell, but absolutely lifeless. Besides - who wants to worry about weather or not their battery has enough juice before they sit down to play? That experience sort of turned me off to the whole "active" concept. Being tempered with a bit more wisdom these days, I realize that everything has it's place and time. So I thought I'd give active another shot. I had read that Lace Sensors tend to meld well with the active sound anyway (makes sense actually). I ordered an inexpensive active eq circuit from GuitarFetish.com. The circuit board is mounted to a potentiometer so that the amount of signal boost can be adjusted, and I could wire it all up to one of my push/pull pots so it could be bypassed at will. My initial impressions, after having installed and toyed with it a bit, are fairly mixed. The eq seems to be pretty much useless so far, and I've settled on keeping it flat and just using the circuit as an adjustable boost. I may change my tune on this once I get the overall wiring locked down though. As far as sound it does seem to fit well with the Lace Sensors. Something else I'm keeping in mind is that since I don't play in a regular band these days I tend to find myself in situations where quick adjustments are necessary during jams or open stages. It makes more sense to have this built in to my axe than having to lug around a pedal, or relay on different amp channels (especially when I'm not always using my own amp, but someone else's). We'll see how the whole thing works out though. It was quite a tedious task getting all of this crammed into the cavity and keeping it halfway coherent. But I managed in the end. I did wind up making the decision to move the Free-Way switch up near the bottom horn near the neck pickup (I'm a big Nuno Bettencourt fan, so I thought I'd try it his way). I'm glad I did too. I think it makes the slightly more complicated operation of the Free-Way a bit easier to deal with. I mounted it at a slight angle, which seems fairly comfortable for me so far. Other than that the only thing I added was an "on" switch for the mid pickup, via the push/pull tone pot. Since the Free-Way is designed for a dual humbucker setup, the only real option I have is to treat the mid and neck single coils like a humbucker, giving me the option of the neck alone, or the neck/mid in series. I needed a direct on switch for that mid to emulate positions 2 and 4 on a 5-way. Here are a few images that will help paint a good solid picture of the current wiring I'm using and where I can (and am trying to) go with it... 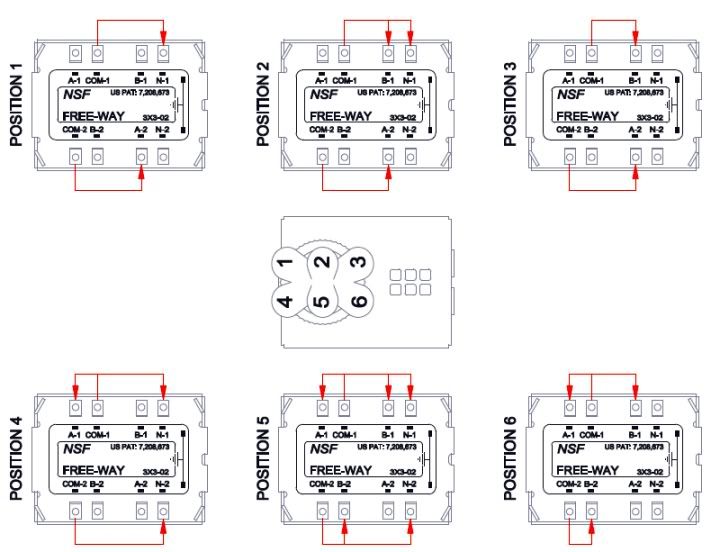 This is the switch logic, or signal path for the Free-Way switch. 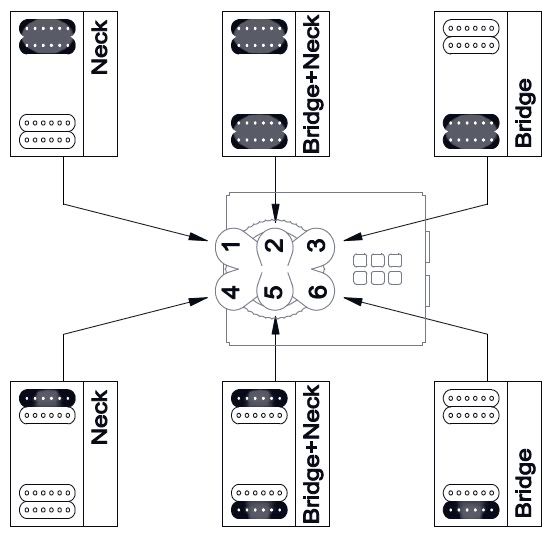 This image shows the switching options available with the schematic I'm currently using. Just imagine that the bottom neck coil is actually the mid pup. 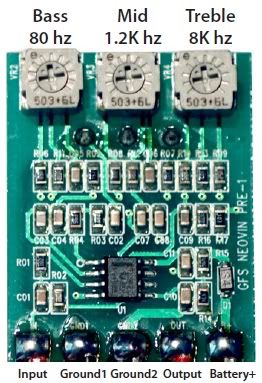 Here's a shot of the bottom of the active eq circuit board. You can see where the connections are each soldered, and where the different frequency ranges are adjusted.  And here we have the suggested pot arrangement, and an image of the top of the board with the 1 Meg pot mounted.
|
|
~Maxx
Meter Reader 1st Class
Posts: 67
Likes: 0
|
Post by ~Maxx on Mar 23, 2011 9:03:58 GMT -5
Phase 1 Initial Impressions:
Now that I have everything put together and playable I can start to assess what needs to be tweaked to get maximum usage out of all the options. As I mentioned above, the Red Lace Sensor is too hot. There is only a minute audible difference between the Red in single coil mode and the Red/Gold series option. I checked out the Lace Website and noticed that they sell a Red/Silver Dually, and liked the initial description of the Silver. So I've got one on the way. I'm thinking the addition of the Silver should make for a nicely diverse split coil humbucker with the Red, while melding well with the sounds produced by the Golds. Another significant issue is the age-old question of capacitance. I used 250k pots because that's what I had in my tool box at the time. And while the single coil positions sound excellent, things get fairly muddy when I switch to series wiring. It's really not bad in the bridge humbucker position (but that may be because of the comparatively low output of the Gold coil), but the neck humbucking position is fairly useless. I can tell that it's going to be a big issue all the way around. I ran across a short, undetailed blurb on another forum that suggested I might be able to use 500k pots and install inline capacitors for the single coil positions. This sounds like a viable option if I can fiddle around with different cap. values and find just the right one. Outside of that everything seems to be running smoothly. I've had it out to a couple of private jam sessions with some friends, and it has performed well despite the limitations I mentioned above. The Free-Way switch definitely takes some getting used to, but it is absolutely usable and has held up well so far. I seem to have done a decent enough job floating my first vintage trem as well. Though the addition of the string trees has caused some slight tuning problems. I'm trying not to stress about it too much though, as there's really nothing I can do about it at this point.
And that pretty much covers it all so far. I'll post an update in the near future when I make some more progress. In the mean time feel free to drop comments or questions. I'll be monitoring the thread. Thanks!
|
|
|
|
Post by cynical1 on Mar 23, 2011 9:59:21 GMT -5
The only things left are to tear it all down and do the tung oil finish on the body and back of the neck... [soapbox] These are the the words that makes me cringe... I've said it before...Warmouth has said it before...in their warranty (as in, if you oil it and it warps...then it sucks to be you)...and I'm gonna say it again... Using oil on a neck for anything but a fretboard that won't take a hard finish is just setting yourself up for problems later. Let me elaborate. The purpose of any finish on wood is to protect it from dirt, moisture, sweat, the elements and critters that like to eat your wood. Shellac, lacquer, varnish, poly (which is really just a varnish anyway) all do a very respectable job and don't generally require constant re-coating and\or attention. Oil, be it tung, linseed or Dr. Feldergarbs Unobtanium Mystery Oil will always require attention and do a marginal job at best in protecting your wood. Ask yourself why you're always re-oiling a rosewood fretboard...because oil doesn't last. [/soapbox] If you're looking for a fast finish for the back of your neck, in regards to application and playing, the best thing you can do is take a satin poly, cut it 50\50 with mineral spirits and wipe it on. 4-6 coats of this stuff scuffed lightly and evenly between coats with a fine abrasive pad and finally rubbed with a 0000 3M pad will give you the fastest neck you ever saw. I've done dozens of necks this way and NEVER got one back because it failed or was too slow. If you want a gloss on the headstock just tape off the back of the neck and do the same process with a gloss poly. Go a little lower off the headstock slightly into the neck with the tape for the gloss finish. Then go a bit into the gloss with the satin finish and just sand the seam flat once it dries. I never spray poly's, I always cut them 50\50 with mineral spirits and wipe them on. The applicator pads are about a buck at any home improvement store (same pads for applying oil finishes) and it saves you from sticking your feet to the floor after you've sprayed poly and the overspray went everywhere... Since you're cutting the poly 50\50 for the 4-6 coats you're only achieving the equivalent of 2-3 coats of actual finish. The mineral spirits allows the poly to level better and makes wiping the finish as easy as oil. Using oil on the body isn't as critical. You will still need to re-apply the oil finish periodically if this is your main axe, or it sees a lot of playing time. Fact of life. And remember, oil is almost impossible to strip off. If you get a wild hair and want to paint said guitar later you're probably going to be SOL. There, well at least I feel better now. Carry on. Happy Trails Cynical One |
|
|
|
Post by 4real on Mar 23, 2011 16:49:43 GMT -5
OK... Hmmm....someone with longer denser posts than me, I have a rival...but I win on paragraph counts...hahaha The LSR is designed for a straight string pull across the nut, in fact the pointy hocky stick head only really worked with trems because of the trend for floyd rose locking nuts. I love the LSR on my tele but it only just fitted and has a straight string pull and generally are designed to work without string trees, it is kind of the point. There is a tiny black rubber pad behind each roller set that dampens the strings behind the nut. Such a nut was not suitable for my Kahler LP project (see the gallery) so I went with a graphtech graphite tusq XL nut for a more traditional look and no mods, but then still needed to do something about the side pull from the splayed strings on the LP's head shape. Here's what I dreamed up... 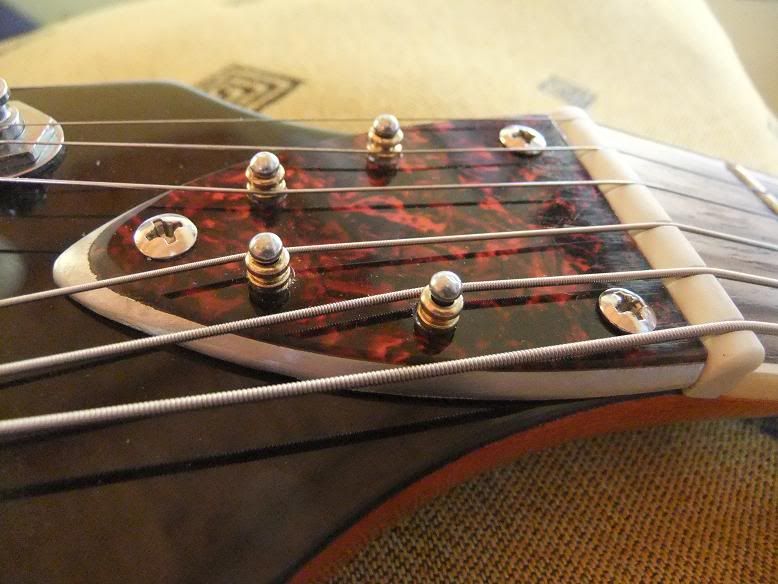 It's made from a plate of 3mm aluminium, the axels are the shaft of some rivets with a good push fit into the softer aluminium plate (drill smaller holes) and the 'rollers' are made from the ball end of some old strings. The result is a straight string pull, more mass and stiffness at the nut (improving tone and sustain) and reinforcing the vulnerable neck join and a dampening effect on the strings behind the nut. A bit of vaseline occasionally keeps them rolling well. ... I had a similar disappointment with the wilkinsons. I only considered them because I was expecting that I might need to use a locking nut till I came up with this solution. They are cheap tuners, they work for the price...but calling them 'locking' is a sales gimmick...i fact, I always used to 'lock' the strings on my guitars by stringing them in that kind of way with just one hole in the tuner and better too...but not anything like a real locking tuner. I went for sperzels... 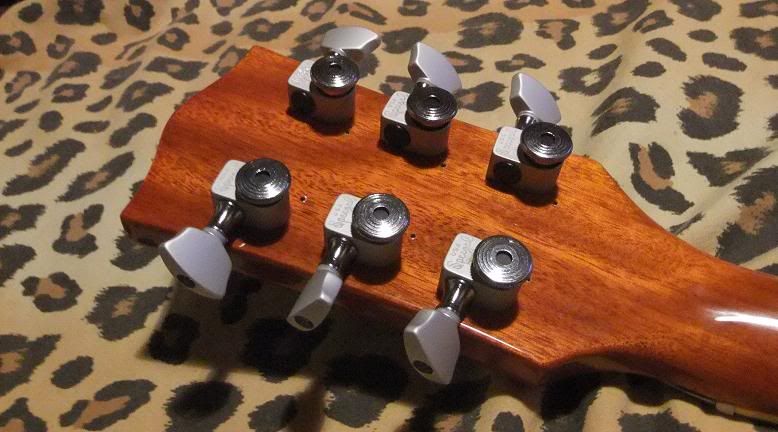 You can see the holes from the wilkinsons that were on it very briefly...bugger, made me drill pointless holes in a new finish...grrr. These things are very 'light weight' and made from some kind of alloy I imagine. Not entirely convinced but the do work and look great on this guitar with that matt chrome finish. I prefer the schallers on my fender types, but then, you pay more again for that. These are full size and non staggered for a gibson style guitar, so can't speak to the smaller 6-in-line tuners but they are quite decent and cheaper than most locking tuners. The light weight is not a bad thing either, they are decently made and strong...keeps the 'head light'... ... The finish thing...well the oil is a look, but many people choose that route because of some 'mojo' ideas about the finish ruining vibrations (though a wood socked in oil, absorbing sweat and moisture and dirt has not effect?)...and because it is cheap and easy to do without the need for expensive spray equipment and a lot of work and generally works and has a 'look'... I'm not entirely sure I'm as strong an opponent as C1 to the idea, oil is a finish and have used it on decking and fences and it works in those applications...but there are better ways to get something of that 'look' and feel and many woods don't take to oil (a hard rock maple neck for instance will absorb hardly anything, a soft body wood will become a sponge)...and there are better and easier ways... My strat has a bit of that 'natural' look and matt in finish... I didn't finish it, but basically a conventional hard finish, a bit matt, and quite thin. But I have made similar kind of feel and look by a bit of light wet and dry or steel wool to take off all the shine from the back of a neck. This gives you the look of 'oil' but protection, stays clean, requires no maintenance and the 'feel' without the stickiness that many oils have. The other thing is that you can use a thin coat, even wipe on the finish, thinned down with a lint free cloth and have no 'streaks' and use a conventional cheap 'paint/varnish' that will take over what ever finish that is likely to be in the timber from before. Perhaps though, with a fender style, the finish is already there and taking off then 'shine' is all that is required...always a better option if you don't take it all off. Sanding is near impossible tio get the finish that has soaked into wood and the new finish, and even oils, reveal all kinds of odd patches and shades that you cant see no matter how good your prep. ... Otherwise, a good thing to practice on a guitar like this try out a few things...and to have something to tweak on while saving your main guitar so you have something to play. When ever I have tried to think of things as a total project I have found that I've made some bad choices or ideas change and it can be good to sit with a guitar in a basically playable form and let things evolve piece by piece. Generally mine have evolved over months if not years...all have had some 'failed' ideas tried and replaced along the way. You learn to be a bit skeptical about some of these 'products' and the hype and think more mechanically and practically to get a better result. Good work on the block modification, this is common on such guitars...I suspect my strat's block is shallower than a 'real one'..but that bent metal 'block' is a bit 'cheap' LOL. EMG's are interesting...I used to covert them when they first came out and a guitar made here by Noyce called a "shark" LOL...they have their own sound and work well for certain styles. But an interesting thing to consider is that Mark Knophler's 'main guitar' is an EMG HSS strat-ish guitar with a locked nut fixed floyd...still a great sound and very identifiable as him regardless...and he has and can afford anything! So much is in the players hands and a lot is just practicality for reliability and such. Interesting to get some details on the Freeway, maybe there is more that could be got from it...I was thinking of using it on a future 2Hb guitar myself...possibly a piezo system...but as I say things change a lot! That is a very shiny black guitar there...like a mirror I can see your lounge in it...LOL. Maybe having the 'black look' will get it out of your system hahaha...tends to show the fingerprints and dings. I had considered something like your active electronics...tell me, is it hissy at all? |
|
~Maxx
Meter Reader 1st Class
Posts: 67
Likes: 0
|
Post by ~Maxx on Mar 23, 2011 22:09:58 GMT -5
Well gentlemen... I didn't expect to be discussing my other guitar in this thread, but what the heck! Cynical1 - you and your soapbox are welcome to preach in my threads anytime. I really appreciate the heads-up! I thought I had researched the matter thoroughly, but now that you mention it I don't remember reading anything about using oils on the neck. Just the body. And to be perfectly honest I really wasn't looking forward to doing the work. Or maintaining it for that matter. I originally went for the tung oil because my uncle has a table in his breakfast nook that's finished with it. It was exactly the natural feel I was going for on my Strat. Honestly I'd just leave the wood bare if I thought I could get away with it. But it's been without finish for nearly two years now while I've tweaked the hardware and electronics, so at this point I really need to get something done with it. I'll try your method on some scrap first just to make sure it's not a drastic departure from what I was going for. But it sounds like this will be an excellent alternative to the tung oil. There's a bit of an odd circumstance surrounding the neck, which will likely prompt a few questions before I get started. But I'll start a new thread for that project when the time comes. Your advice is very much appreciated Cynical1. Thanks! Hmmm....someone with longer denser posts than me, I have a rival... Perhaps not a rival so much as a partner in crime! Seriously though 4real - your pics and projects always seem to be a good window into the direction I'm going. I actually have the Sperzel tuners on my Strat. It came stock with them, and I really got to like them for convenience. I should have just stuck with what I knew was good! Oh well. Lesson learned. FYI - GuitarFetish has some decently-priced Sperzel style tuners that have the one screw hole. If you're interested in covering the booboo on that headstock (and if you have another use for the Sperzel's you already have) you might check them out ( link). As far as the LSR nut, I'm hoping that if I get a replacement Strat style neck (like a Mighty Might or the like) and use the staggered Sperzel tuners I'll be good to go. It'll be at least a few months before I replace the neck and body though, so I'm just going to have to deal with what I've got for now. I suppose I could email one of the companies and find out for sure. We'll see... I still intend to start a thread dedicated to the Free-Way switch. When I get the time and ambition I'll disassemble the second one that I ordered and get some good pics of the inner mechanical workings. I'm curious to see if there's a way to replace the bat, as it is quite long (and doesn't come in black! ). You make an excellent observation about Mark Knopfler's guitar. I never got into him too much, but I always loved the sounds and tones he got. I do remember reading at some point that he had an EMG in one of his main guitars. I remember thinking "Hmm... He must use position 2 alot"... ;D I was pretty focused on resonation and "primary tone" when I did my last Strat project. I'm actually trying to step away from that a bit this time around and find a good, diverse balance of electronics. I think I'm headed in the right direction. The active circuit does have a slight hiss to it depending on how much it's boosted and what distortion or overdrive you're using. From what I've read though this is a fairly low power circuit (website says you can run at least 3 of these off of one 9v battery). Maybe that has something to do with it? Part of me honestly wishes that that were possible. Unfortunately I've been obsessed with it for so many years now that I'm afraid it's just hopeless. |
|
~Maxx
Meter Reader 1st Class
Posts: 67
Likes: 0
|
Post by ~Maxx on Mar 23, 2011 22:12:02 GMT -5
On a side note the Silver Lace arrived today. Unfortunately I completely forgot to order the new 500k push/pull pots. So it's going to have to sit in the box untill after the weekend at least. Baby steps...
|
|
|
|
Post by newey on Mar 24, 2011 12:00:14 GMT -5
I have an oil finish on my deck, and it needs to be redone on a yearly basis- which I thick was Cyn's point!  |
|
|
|
Post by sumgai on Mar 25, 2011 18:48:38 GMT -5
Ark! Snorf! He said "mission statement" in The NutzHouse! What a bizarre pairing of concepts! Hork! +1, no doubt about it. |
|
~Maxx
Meter Reader 1st Class
Posts: 67
Likes: 0
|
Post by ~Maxx on Mar 31, 2011 15:56:32 GMT -5
Ark! Snorf! He said "mission statement" in The NutzHouse! What a bizarre pairing of concepts! Hork! +1, no doubt about it. I'm not sure what to think of that sentiment. You did, after all, use the word "snorf". Bizarre indeed... ;D I've been wondering, by the way... Are you, by chance, related to Buddygai? I'm a big fan! |
|
~Maxx
Meter Reader 1st Class
Posts: 67
Likes: 0
|
Post by ~Maxx on Mar 31, 2011 16:07:23 GMT -5
OK... The 500k pots arrived yesterday, followed by the Sperzel-style locking tuners today. I stopped by the Shack and picked up an assortment of capacitors, and a set of alligator clips. We'll see what kind of magic we can work over the weekend. And just for the sake of "completeness", I've been discussing the tuning problems I've been having in a thread at the whammy bar forum here. Eventually I'm going to be faced with an important decision: to Floyd or not to Floyd. I've never used a FR before, so perhaps - in keeping with the experimental spirit of this project - I should try one out. That'll be down the road though... |
|
|
|
Post by sumgai on Apr 1, 2011 12:42:41 GMT -5
I've been wondering, by the way... Are you, by chance, related to Buddygai? I'm a big fan! As a matter of fact, yes, I am. In fact, I taught him everything I know about how to play a guitar. Little so-and-so actually had the gall to tell me that he thought it should take more than 10 minutes!  There ain't no pleasin' sum people! |
|
|
|
Post by sbgodofmetal on Apr 2, 2011 10:37:56 GMT -5
as far as oil on necks i wouldn't recommend it. But..... i'm looking at page 85, in ''The New Wood Finishing Book'' by Michael Dresdner. On that page is a full page section called ''Popping The Grain''. In that section he describes the process as applying a very liberal amount of boiled linseed or danish oil, over bare sanded wood. let it set for at least 20 minutes, and then wipe off the excess with a clean dry rag or papertowel. let dry overnight before adding a trans color finish and clearcoat.
|
|
|
|
Post by sbgodofmetal on Apr 2, 2011 14:37:56 GMT -5
so with this info from a nationally known finish expert... i'd say yes its possible to paint over oil finishes as long as you sand the suface first to give it something to adhere to. now once you oil finish the wood the use of dye's is near impossible as these oils seal the pores in the wood. but the use of a ''transparent'' paint such as a polyurithane or a nitrocellulose finish should and will overcome this problem. many customshop luthiers and major manufacturers use this process on highly figured woods
|
|
|
|
Post by sbgodofmetal on Apr 2, 2011 14:45:34 GMT -5
also on that section is a pic of the auther using this process on a warmoth tele body with a curly flamed maple top... i'd also suggest the use of an evaoporative finish as to avoid sanding between coats. it works by the chemicals in the finish itself dissolving the previous coat for an overall even coat and since its self adhering theres no need for sanding between coats saving you both time and effort but once allowed to complete the curing time it will no longer dissolve anymore so time it right.
|
|
|
|
Post by sbgodofmetal on Apr 2, 2011 14:48:32 GMT -5
it good to finally see the freeway switch in use its got me highly interested now. i think i'll try one on my old jackson that i'm rebuilding from the floor up. ;D
|
|
~Maxx
Meter Reader 1st Class
Posts: 67
Likes: 0
|
Post by ~Maxx on Apr 2, 2011 21:40:32 GMT -5
as far as oil on necks i wouldn't recommend it. But..... i'm looking at page 85, in ''The New Wood Finishing Book'' by Michael Dresdner. On that page is a full page section called ''Popping The Grain''. In that section he describes the process as applying a very liberal amount of boiled linseed or danish oil, over bare sanded wood. let it set for at least 20 minutes, and then wipe off the excess with a clean dry rag or papertowel. let dry overnight before adding a trans color finish and clearcoat. That's some great info sb! One of the problems I'm wrestling with is how to get a protective finish on the wood while maintaining that "bare wood" feel as much as possible. This process seems to be a step in the right direction. Am I correct in assuming that I could still perform this technique even though the body has already been colored with a water-based stain? |
|
|
|
Post by cynical1 on Apr 2, 2011 22:32:05 GMT -5
Real quick on the poly over oil suggestion.
Tung, linseed, etc will penetrate based on grain, thinning and temperature. They will eventually cure to the point where you could apply a poly over them. But there is a caveat.
There are two types of poly out there. Oil and water based. Poly is basically a varnish, and traditional varnishes and oil have been mixed for wiping finishes for years.
If you are going to put poly over oil then the oil must be COMPLETELY CURED and sanded with a 320 grit sandpaper to allow some bite. And you need to use an oil based poly. Do not use a water based poly over oil.
Now, the only reason you would ever put yourself though this misery is if you happen to have a really nice piece of wood that you want the grain to really pop out on. IMHO, maple, alder and ash do not qualify...and most mahogany will not see an appreciable enhancement with this technique either.
Happy Trails
Cynical One
|
|
|
|
Post by cynical1 on Apr 2, 2011 22:37:56 GMT -5
Am I correct in assuming that I could still perform this technique even though the body has already been colored with a water-based stain? What kind of stain did you use? Some stains can re-animated when oiled over. Not sure about waterbased. You might lose a bit of penetration with the stain in place. The pigment will seal the pores to some extent. You might want to try a test piece of wood to see what happens. HTC1 |
|
|
|
Post by sbgodofmetal on Apr 4, 2011 0:45:28 GMT -5
i'm still an ameture at best on the subject but i'd agree with cynical, on the oil to oil on the poly finish that justs seems to make sense to me.. but if your wood is prestained theres a chance it will be to dark to show through the author informs that doing this method ''adds'' a deep but subtle color change to the wood its applied to!!! so fair warning has been given. i'd suggest running to your local library(as i did) and checking this book out i'd highly recomend it to anyone who's inexperienced in it
|
|
~Maxx
Meter Reader 1st Class
Posts: 67
Likes: 0
|
Post by ~Maxx on Jan 9, 2012 18:40:27 GMT -5
I've been meaning to get back to this thread for months...  I apologize for abandoning things. My wife tore her Achilles Tendon back in May (almost a complete tear playing softball  ), so I became the only able-bodied driver in our house for a while. Not to mention the only person who could lift and bathe our two year old. Once she was well enough to drive and lift I had to go in for a gallbladder surgery that I'd been putting off for a couple of years. And now the wife's employer is relocating us back to our home town (Lincoln Nebraska) at the end of the month. So we're preparing to move. Life just got crazy for a while, forcing me to put projects on the back-burner. Happens to the best of us! As it stands the partscaster is still in pieces. I've installed all five Lace Sensor pups (Neck - Gold/Gold Dually, Mid - Gold single, and Bridge - Red/Silver Dually), situated the new 500k push/pull pots, and drawn up a new schematic for the wiring. I just need to get around to soldering it up and testing capacitor values to attempt to get the capacitance of the 500k pots to match a 250k value when the Dually pups are in single-coil mode. In addition, I've got the ball rolling on having a new body cut out. Apparently one of the guys in my fathers cabinet shop has info for Strat and Les Paul bodies saved in their fancy computerized wood-cutting thingamajig. Just need to check up on the particulars (namely what type of trem he has it set to cut for), and what sort of wood I wand to use. More on that when the time comes though. If I get a chance I'll post my new tentative wiring schematic sometime this week. It's been so long since I drew it up that I'm going to have to stare at it a while to remember exactly what I changed and if it's what I want  . As far as my other Strat - the one that we'd been discussing the finish-work on... I decided that it needs a new neck before I do anything else with it. The 11th fret buzzes badly for seemingly no reason, and I can't seem to get the intonation right on it - so I'm thinking it's a tad warped. Serves me right for not having it protected all this time. Anyway... You can be sure that I'll pick this thread up again when things start moving forward. It will likely be late Spring by the time we get moved, settled in, and I get comfy at a new job (NOT looking forward to job hunting again ). I've still got the bug, and I'm itching to get this thing done! 'Till then... ~Maxx |
|
~Maxx
Meter Reader 1st Class
Posts: 67
Likes: 0
|
Post by ~Maxx on Jan 9, 2012 19:33:32 GMT -5
On a side note - I'm looking ahead at what to do once I get this thing in its new body. I'm leaning toward a "practice" axe - incorporating an onboard headphone amp, multi-distortion preamp, and 3-band eq. That could wind up being a LOT of knobs, but I'll have to think on it some more and see how I can scale back. All in good time... ;D
|
|
|
|
Post by newey on Jan 9, 2012 23:26:06 GMT -5
Yeah, a lot of knobs, a battery onboard, and way more complexity than needed . . .
My temptation would be to put all of this stuff in a dedicated stompbox, specifically for this guitar, and have the preamp, etc, outboard from the guitar.
Putting it all in the guitar just becomes a practical problem- it can certainly be done but how useable will it be?
|
|
~Maxx
Meter Reader 1st Class
Posts: 67
Likes: 0
|
Post by ~Maxx on Jan 10, 2012 9:08:24 GMT -5
Putting it all in the guitar just becomes a practical problem- it can certainly be done but how useable will it be? That's the challenge Newey! That's the challenge! |
|
|
|
Post by cynical1 on Jan 10, 2012 9:59:40 GMT -5
Putting it all in the guitar just becomes a practical problem- it can certainly be done but how useable will it be? That's the challenge Newey! That's the challenge!  HTC1 |
|
~Maxx
Meter Reader 1st Class
Posts: 67
Likes: 0
|
Post by ~Maxx on Jan 12, 2012 21:37:02 GMT -5
That's the challenge Newey! That's the challenge! HTC1 Heh heh... Point taken gentlemen. The stomp-box is a decent idea, actually. Then I wouldn't be tied to a particular guitar. We'll see what happens when the time comes though... Anyway... Here's the new schematic for the partscaster. Pardon my crude hybrid artwork...  And here's a modified version of the switching diagram I posted before. Added the mid pup, and flipped the bridge pups for positions 5 and 6 to show the Silver Lace Sensor rather than the Red... 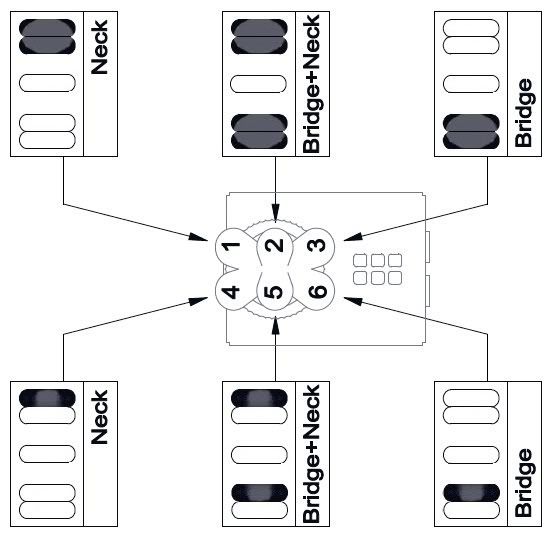 This should get me all the options I need. The Free-Way switch handles the Gold/Gold and Red/Silver Dually humbuckers, giving me coil-splitting options for a single Gold at the neck position and/or the Silver (bridge) - while the push/pull pots work as dedicated on/off switches for the mid Gold and Red (bridge) pups. A couple of things have crossed my mind concerning this schematic. For starters, I'd like a way to bypass the active preamp and run the whole thing in passive mode. But I've used both possible push/pull pots, and I don't want to add a toggle. So I brain-stormed a bit, and got the idea to install a small recessed slider switch to the back of the body near the battery compartment. I think this will do nicely. Also, I notice that position 4 on the Free-Way switch (which should activate only the Silver Lace Sensor at the bridge) seems to be sending both the + and - leads from the Red Lace Sensor out to the amp (along with the + from the Silver). I'm no guru with this stuff, but this seems like it could be a problem. I gave myself a headache trying to sort it out, and decided that trial and error would be the easier route. So we'll see what happens when I get it wired up. If one of the resident experts would have the ambition to have a look for me I'd certainly appreciate it. ;D I know it's a bit of a rat's nest, and the Free-Way switch makes it extra complicated (at least for me). But it's really not as bad as you'd think once you get your head into it. I might get around to soldering this up over the weekend. If so I'll post my thoughts and findings. All the best! |
|
~Maxx
Meter Reader 1st Class
Posts: 67
Likes: 0
|
Post by ~Maxx on Jan 23, 2012 0:26:55 GMT -5
Okay... Rev. 2 of the above schematic/diagram. I'm not sure what I was drinking when I drew that one up, but it must've been pretty good stuff! I corrected the issues with the bridge pickup (let's hope so anyway), and added in an "Active Bypass" DPDT switch. This will be a small recessed slider switch coming through at the back of the body from within the jack-plate cavity for the purpose of running the guitar in passive mode... 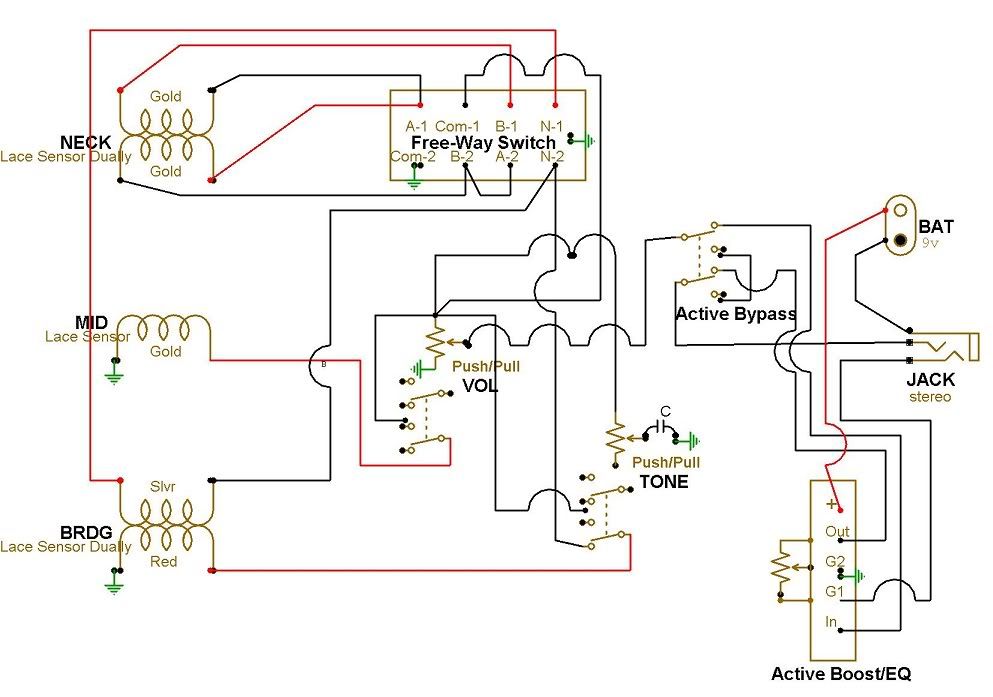 As before we have the Vol. push/pull pot. as an on/off for the mid pup, and the Tone push/pull as a dedicated on/off for the Red half of the bridge Dually. Other than that, both the neck and bridge pups are controlled entirely by the Free-Way switch as follows... In other news - our move has been postponed another month, which puts me ahead of the curve as far as preparations (for once), and leaves me some time to actually work on this thing. At this point I'm thinking that the extra caps for the single-coil positions might not be necessary. With the right cap on the tone pot I can roll back the highs when I need to, and having them open might be handy when using the single-coils in conjunction with the humbuckers. As always it's an ongoing experiment. I've also been researching woods a bit in anticipation of the new body. I'm really on the fence between Mahogany and Ash. Part of me knows that the Mahogany is just going to be too dense. But I'm still curious about how it would fair with this set of pups and the oddball configuration I have going. I'll probably wind up with the Ash. It's a proven staple. I noticed that GFS has both Ash and Mahogany pre-cut Strat bodies for a very tempting price. I'm sure they're not the greatest quality - but I'm toying with the idea of getting one of each just so I can see for sure what I like best. In the end I think I want to scrap the pick guard and lay some sort of veneer over the top (either something simple that I can paint over, or something exotic that will show through a nice black stain). Getting ahead of myself again though. None of that will matter much unless I get off my butt and get this beast soldered up! 'Till next time... |
|
|
|
Post by newey on Jan 23, 2012 6:31:34 GMT -5
maxx-
The new diagram, with the new software, looks good. But why don't the connections to the DPDT switches match up to the lugs? For example, on the "Bridge dually on/off" switch, the wire sits halfway between two lugs, making it tough to tell what its connected to.
It's pretty obvious from your description where the wires need to be, but still makes it tough to read.
|
|
~Maxx
Meter Reader 1st Class
Posts: 67
Likes: 0
|
Post by ~Maxx on Jan 23, 2012 11:57:37 GMT -5
maxx- The new diagram, with the new software, looks good. But why don't the connections to the DPDT switches match up to the lugs? For example, on the "Bridge dually on/off" switch, the wire sits halfway between two lugs, making it tough to tell what its connected to. It's pretty obvious from your description where the wires need to be, but still makes it tough to read. Ahh - that's something of a software quirk Newey. The whole thing works on a grid, which has a "snap to" feature. I either need to fine-tune it or turn it off, because it's obviously causing problems. The joys of using new software... |
|


 ). Since that Strat is the only decently playable guitar I have available at the time, I figured I'd better put something together that would get me by until the body work is done. Originally the idea was to just slap something together - quick and dirty. But then I decided that this might be a good opportunity to experiment a bit - learn some more about some different wiring concepts, and try some things that I wouldn't dare attempt on a guitar I cared about. I had a Strat-style body from a super cheap Harmony guitar I owned in the early 1990's, and an old 22 fret Kramer neck from God-knows-where. I had no qualms about drilling, routing, filing, or gouging these parts to whatever end was necessary. Ultimately I'd like to think that I can get all the wiring and hardware sorted out so that it works well for me and my needs, after which I can transfer this whole setup to a new body and neck. Maybe even keep the old wood around as a frankenstrat so I can toy with new things without having to sacrifice a guitar. We shall see...
 , and the Free-Way switch. Dig the masterful patch job I did to cover the old 5-way slot?
  It took a bit of doing with a borrowed hand grinder, but I managed to shave nearly 1/4" off the block so that the springs will sit just below the surface and allow for a cavity cover. A couple of other things I went ahead and did included sanding down the back of the neck and the headstock and repainting them to match the body. I finished with a satin clear-coat for a bit less "sticky" factor. I also dyed the rosewood fretboard black. As you'll soon see I have an almost disturbing obsession with the absence of color (especially for a blues/rock 'n roll guy). I also installed a set of Wilkinson-style "physical lock" tuners. I have to say that I've rarely felt as if I've so hopelessly and stupidly wasted my money. They are a complete pain, and I'll be replacing them with some Sperzel type tuners in the very near future. After stringing up for an initial trial I wound up putting in a set of string trees. Apparently the staggered posts on the tuners aren't enough to get the last 3 strings to lay over the nut properly. Unfortunately this has made the LSR nut much less effective. But I'm considering it a temporary situation. Lastly I noticed a couple of the frets were starting to lift just a tad on the high E side, so I wound up shimming the LSR nut when I set the action. At least it wasn't an issue with the filing I did.


 ), so I became the only able-bodied driver in our house for a while. Not to mention the only person who could lift and bathe our two year old. Once she was well enough to drive and lift I had to go in for a gallbladder surgery that I'd been putting off for a couple of years. And now the wife's employer is relocating us back to our home town (Lincoln Nebraska) at the end of the month. So we're preparing to move. Life just got crazy for a while, forcing me to put projects on the back-burner. Happens to the best of us!
 .
.