Deleted
Deleted Member
Posts: 0
Likes:
|
Post by Deleted on May 11, 2013 11:32:20 GMT -5
phewwww!! it seems i passed the lesson! (with E)  (but not the semester yet) It's hard to tell from the pictures, but does the dowel pin stick out above the hole? As long as the majority of the hole is filled with real wood, and the new screws will contact this wood, aesthetics are not that important. The new nut will cover all of this anyway. No its not out of the hole, i measured 0.4mm less than the hole's depth. I also hammered it in, as much as i could. New screw is definitely going to meet the new wood. Checked. Roughly, i calculate the new screw will pass through : - 1mm shim - 9 mm of the new beech wood - 4 mm of the original alder wood underneath You can use this time to determine how flat and square the exiting nut shelf is prior to installing the wood shims. The nut shelf has to be as square and flat as possible before you start gluing in the shims. Trying to use the shims as a means of making it square and flat is an effort in futility. Take Sunday off. Your blood pressure will thank you. Happy Trails Cynical One Ok, i got it that the shims are useless in shaping the area square and flat. I will try to assess the current situation in the mean time. Have a nice Sunday too boss! |
|
|
|
Post by cynical1 on May 11, 2013 12:07:35 GMT -5
Hey, this is not something you pick up watching the Discovery Channel. There's a reason why they don't have a show called Ice Road Luthiers...
As you've found out, fixing guitars can rack up the expenses in the tool department. My apologies to your wife.
It's also a study in creative problem solving and patience. Taking 3 hours to setup a 3 minute job is still better than taking 16 hours to fix a 3 minute mistake.
Before you attack the nut shelf, keep in mind that in Germany a machinist apprentice is schooled for years in precision hand filing. Assessing and maintaining proper angle, pressure and length of travel does take years to master. You're not building atomic bomb parts, so you have a more generous tolerance to work within, but my point is that the next part of the job takes patience and a light touch. Devastation mode needs to be put in the upright and locked position.
While I know this has been an exercise in frustration, look at what you've learned. You now know that toothpaste and sawdust makes a bad wood filler, buying cheap costs more in the long run, you know you need to address the nut shelf and you've done a respectable job of fixing the screw situation.
This agony will pass and you will rescue the Carvin and make it playable for years to come.
I don't know if you ever followed the exploits of Double Yoi on the forum. The first neck pocket he tried to fix qualifies and a genuine abortion. I know it bothered him and he genuinely wanted to learn how to do this type of work. In several PMs we discussed apprenticing for a luthier to learn the basics and a few intricacies. While this is not the road most people will take, he did. He was like a sponge and if you check out his posting on the Telecaster with the cypress top his quality of work improved exponentially. That was a very cool guitar, with body reliefs and some first class workmanship.
I have faith in you, Greek. Work on the patience and forethought and you'll surprise yourself.
Happy Trails
Cynical One
|
|
Deleted
Deleted Member
Posts: 0
Likes:
|
Post by Deleted on May 12, 2013 1:56:36 GMT -5
Good morning Cyn1! 1st, if i have understood correctly, any filing i might have done to the nut shelf might have proven detrimental to the surface's flatness, right ? To be frank, if yes, i dont quite understand why, since the file was flat in the first place, and most of the material removed, was the substance made of wood dust, on top of the area covering the truss rod. I fully get what you wrote about training of machinist apprentices in Germany. I never realized it was that hard. But also, i cant understand why i might have damaged this more than it most probably was in the first place. In every dry-run fitting i have made, the Gotoh seems to seat flatter than the original Schaller. Maybe some previous owner had done some serious "devastation" work? I bought the guitar from a second-hand shop years ago, now this shop is long closed, so i have lost all chances to contact any previous (left-hand) owners. One thing that maybe will prove a problem, and would definitely be a problem if the new nut i bought was the schaller R1, with no bottom central space for the truss rod, is this "triangular" shape of metal shown here : 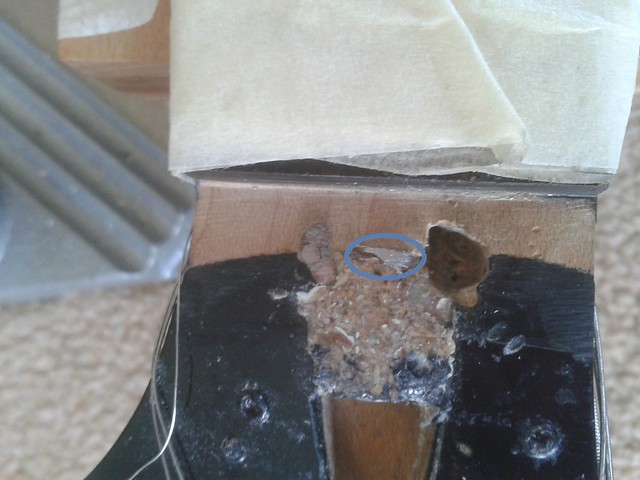 I cannot determine what this might be. Could be some metal cover for the truss rod? This metal object was not much exposed before the whole initial operation but it was still there from the very start. I am inclined to consider that if anything, flattening this specific area might have contributed to the shelf's flatness and not vice versa. Maybe the original left-handed Schaller L1 (L1 is the left hand equivalent of R1) *never* seated properly on the shelf. Problem is, i never took the time to consider all those measurements *before* *any* actual work, so now its all a wild guess. Now, as you have spotted, the Gotoh has this arced area on the bottom, aimed mostly at strat type of guitars with bullet-type truss rod access. 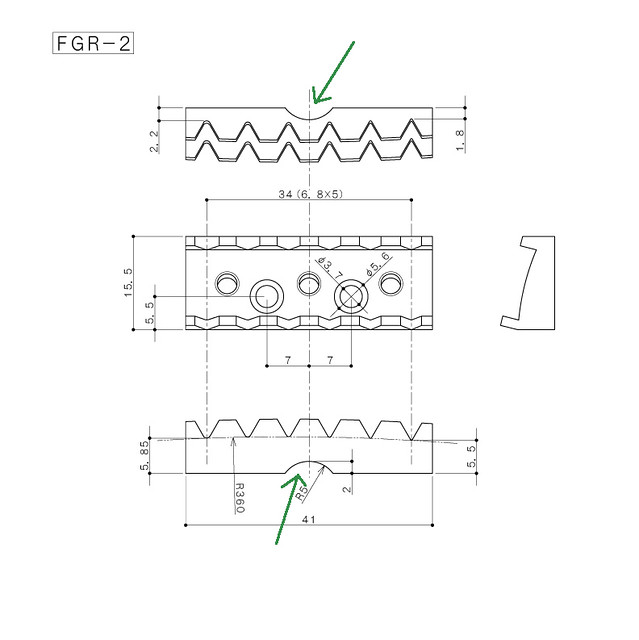 Maybe this can be a way to get away with this? |
|
|
|
Post by cynical1 on May 12, 2013 8:58:17 GMT -5
I can't say if the filing already done has been bad, good or indifferent. Hand filing is always tricky as it allows for an almost infinite number of variables in angle, speed and pressure. The average person will never file anything as flat as a machine can do it. The only image I could find of the adjustment end of a Carvin neck was this one of a broken one: 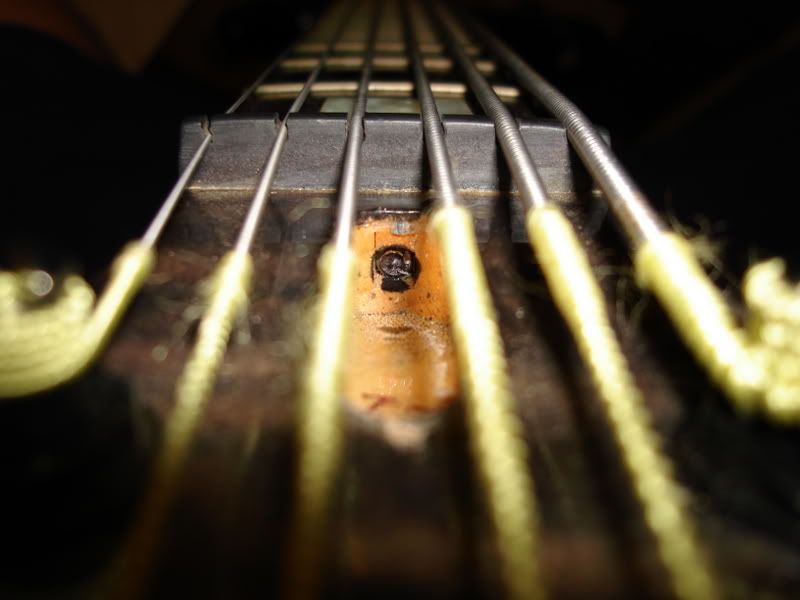 This is probably your mystery piece of metal. It doesn't appear to me that the filing done to it will cause you any problems if left as is. I say this having never paid much attention to Carvin guitar truss rods aside from the occasional adjustment. As far as the nut shelf potentially being worked out of flat for the new nut, how does the new nut seat on the shelf with the screws out? Any wobble or slop fore, aft, port or starboard? HTC1 |
|
Deleted
Deleted Member
Posts: 0
Likes:
|
Post by Deleted on May 12, 2013 9:32:43 GMT -5
As far as the nut shelf potentially being worked out of flat for the new nut, how does the new nut seat on the shelf with the screws out? Any wobble or slop fore, aft, port or starboard? Yes, it has some, but nothing serious. Just be seeing this sideways, it seems to me, that the area was never large enough to accommodate a schaller or gotoh locking nut's bottom. Maybe the previous owner fitted the locking nut afretwards, or just it was a defective execution at the factory, or a late change of an order from normal nut to locking nut. The area is just small for the whole thing to seat properly. Also, i think that after the shimming things are going to be more complex, since we add the parameter which has to do with potentially difference in height in high E and low E. If we think that stewmac sell half brass locking nut shims specifically to address those very situations, this gets me more relaxed about the whole issue of the absolute geometry of the nut's shelf. (lets hope this is true). Now, i spent most of the day, building and fine tuning the height of the shim. I used this veneer i showed you. Here is the shim : 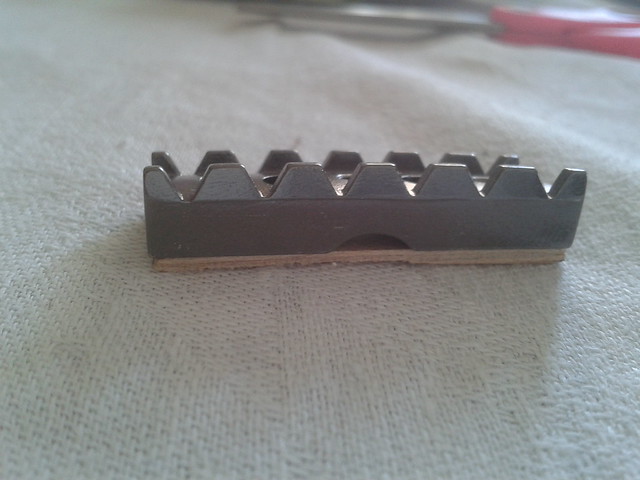 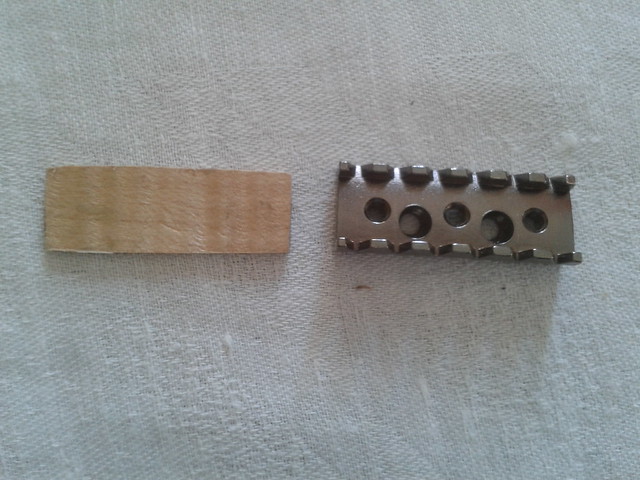 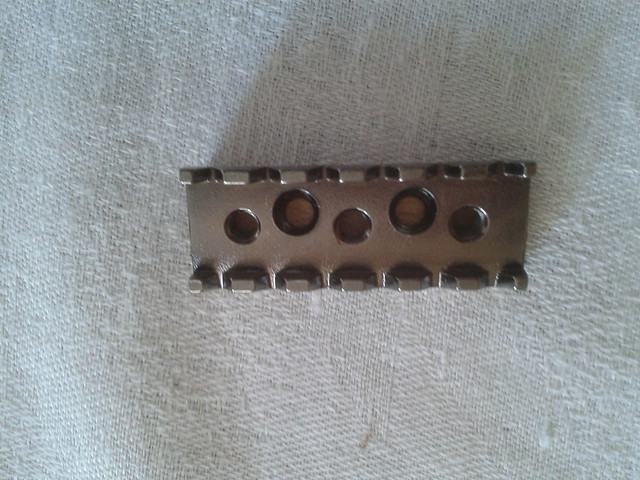 I begun with two layers forming the initial shim, I put it on with the nut in place, and tuned the guitar in pitch, and measured nut action several times today, then added one layer of the veneer in the bottom of the right half of the shim, then tuned, measured, then added another in the half of this half (close to high E), then tuned, then measured and then sanded it down, till i got the desired result. Also, i locked the string pads to hear the real tone of the nut : great sounds. Tried some artificial harmonics on G, and had awesome sustain. Good signs. Maybe this time i will get lucky and lift the curse of the sitar-syndrome. Cyn1, on thursday we start serious repairs in the house. Wife gave me till tuesday to sort this out. (cause frankly, all i do is spending time with the guitar, cant blame her) This means that tomorrow i will have to glue (  ) down the shim, and then maybe right after or tuesday to actually drill and get the thing finished. Now the guitar seats idle as in the last photo. It was used today to make adjustments to the shim, but nothing happened to the guitar today. (devastation-free day ;D ) What do you say? My guts say this is doable. If not i gotta pack the guitar and the tools and resume after 1.5->2 months. |
|
Deleted
Deleted Member
Posts: 0
Likes:
|
Post by Deleted on May 12, 2013 9:52:34 GMT -5
Also, i thought that instead of clamps, i could just use ... the guitar to glue down the shim in place, meaning, just tune the guitar in pitch and let the force of the strings put pressure on the nut, and in turn, the nut transfer this pressure to shim and nut shelf. Any potential objection to that? (that will save me the trip to the store to buy either clamps or vice grip, etc...)
|
|
Deleted
Deleted Member
Posts: 0
Likes:
|
Post by Deleted on May 12, 2013 10:40:51 GMT -5
Also, an additional idea is to glue down the shim not by wood glue, but with ordinary glue. (non-super glue, no wood glue) kind of benzin-based generic glue. I saw this advised in Dan Erlewine's book about nuts. He wrote that using simple generic glues makes the job of any future repair much easier. Considering that the brass shims they sell in the market are not even glued down anywhere, i think this is a good idea.
I think i could go that way for now, glue down the shim with generic glue, then go through the drill process, install the nut, play the guitar for a while. If i find out this is good, i might leave it as is, or either glue the shim with wood glue. In the opposite scenario, i would easily detach the old shim, sand it down, or make a new one etc... as easily, without much trouble.
I think the +'s are more for this route.
|
|
|
|
Post by cynical1 on May 12, 2013 10:45:50 GMT -5
Also, i thought that instead of clamps, i could just use ... the guitar to glue down the shim in place, meaning, just tune the guitar in pitch and let the force of the strings put pressure on the nut, and in turn, the nut transfer this pressure to shim and nut shelf. Any potential objection to that? (that will save me the trip to the store to buy either clamps or vice grip, etc...) Well, that's outside of the box... Let me ask you, what can you do faster and more accurately: 1.) Apply glue to shims, align and apply clamp. or 2.) Apply glue to shims, align, set 6 string in the nut, hoping it doesn't move on you, and tighten all six string to pitch...hoping the strings don't pull it out of alignment as you tighten each one? While I understand money is tight, and you're trying to brainstorm the problem, there's an easy way and a hard way to do any job. Adding additional steps and introducing more points of failure isn't going to make you a happy guy. This thread is already 36 posts long...do you really want to add another 15 posts to it? If you need to hold off buying a clamp, then hold off. You've got too much work in this already to hose it up now. Cowboy Mode is just as bad as Devastation Mode. Happy Trails Cynical One |
|
|
|
Post by cynical1 on May 12, 2013 10:55:43 GMT -5
Also, an additional idea is to glue down the shim not by wood glue, but with ordinary glue. (non-super glue, no wood glue) kind of benzin-based generic glue. I saw this advised in Dan Erlewine's book about nuts. He wrote that using simple generic glues makes the job of any future repair much easier. Considering that the brass shims they sell in the market are not even glued down anywhere, i think this is a good idea. I think i could go that way for now, glue down the shim with generic glue, then go through the drill process, install the nut, play the guitar for a while. If i find out this is good, i might leave it as is, or either glue the shim with wood glue. In the opposite scenario, i would easily detach the old shim, sand it down, or make a new one etc... as easily, without much trouble. I think the +'s are more for this route. The call is always yours, and the screws through the new nut will hold them in place. My take on adding wood to anything is to glue it as permanently as possible into place. Gluing a nut is one thing, as it will probably need to be replaced down the road eventually. Your metal shims are just spacers and temporary by design. Your wood shims are there to make a structural change to the nut shelf. Unless you're planning on joining the "Nut of the Month Club", gluing them in permanently would be my recommendation. Again, your guitar, your call. I've got to run and take care of horses and won't be back until late tonight. Just measure twice and cut once...and don't lose an eye or a finger... Happy Trails Cynical One |
|
Deleted
Deleted Member
Posts: 0
Likes:
|
Post by Deleted on May 12, 2013 11:31:15 GMT -5
Thanx Cyn1 for all your ultra helpful recommendations here. If you say STOP, i gotta stop. If you say something more moderate i can reassess, etc... Being brutally severe judge is the greatest help. Now, unfortunately i packed the guitar. lately, at job i was acting as a junkie, not paying so much attention, same thing at the house. Wife told me, schedule is short, monday we have to start looking for things to buy in the bathroom, kitchen, its gonna be a major overhaul. I will unpack the guitar after 2-3 weeks best case. I fully agree about the metal vs wooden shim. Most probably i will first install with generic glue, see how it goes, and then come back and glue it down permanently. Well, thanx a lot, till the project is resumed. I could say from an initial assessment that the sounds to come out of this axe are gonna be killer sounds. I consider it a success already! PS Cyn1, watch this... My intuition says that i better do the final permanent gluing my way, the strings-nut way... Why? Because something tells me that if i do the clamp way, the thing is going to have a different effect on the nut action-height than when i tried to assess it with the strings tuned in pitch without any glue. So i sanded the shim *specifically* under those very conditions, and it would be good any future setup to be compatible to those conditions. What if i glue them down with strong wood glue and clamps at various locations, only to find out, later , that e.g. the high E buzzes at the first fret? That's gonna be fatally "devastating"  . How more posts would this thread need then? I am afraid of changing the exact parameters of the set up. Whatcha think? |
|
|
|
Post by cynical1 on May 12, 2013 20:06:03 GMT -5
How many pieces of veneer did you use for the final thickness?
I ask this as anytime I've got to build something up I pre-glue everything prior to the final assembly. The advantage is that you can oversize it, let it set a few days and do the final shaping and sanding so when it comes time to glue and clamp it in it's only one piece that I can easily align and clamp.
Clamping this piece is easier than you think it's going to be. Take your sanding block with something to protect the finish on the radiused side and put it under neck. From all the pictures I've seen of this guitar the back neck radius extends just past the nut...correct me if I'm wrong.
Next, find a square piece of wood slightly longer and wider than your shim piece. After that find something to act as a barrier between this piece of wood and your shim. I use a piece of old plastic milk carton, but anything that the wood glue will not adhere to works.
Once you have this stuff assembled, brush a thin layer of your glue on the bottom on the shim and the top of the nut shelf and lay it in place. Put the barrier piece on top of the shim, then your square piece of wood. Take your bar clamp and set on jaw on the sanding block underneath and the other jaw on your piece of wood. Tighten until you see the glue begin to leech out and your done.
I think I mentioned putting blue masking tape around the area you're working on to catch the glue overruns somewhere else here. A damp cloth can be wiped on the overrun as well to eliminate dealing with the mess later.
Pull the clamp the next day, give it another 24 hours to setup and you can drill and mount the new nut.
Happy Trails
Cynical One
|
|
Deleted
Deleted Member
Posts: 0
Likes:
|
Post by Deleted on May 13, 2013 0:17:25 GMT -5
How many pieces of veneer did you use for the final thickness? I ask this as anytime I've got to build something up I pre-glue everything prior to the final assembly. The advantage is that you can oversize it, let it set a few days and do the final shaping and sanding so when it comes time to glue and clamp it in it's only one piece that I can easily align and clamp. It went like this. At first, i used two layers of the veneer. (0.6mm * 2 = 1.2mm). However, this resulted in buzzing of the 3 high strings. So i added another layer in the G-B-E side of the shim, in such a way that it kind of faded away in its "north" end, to give for maximal contact, (as much as i could). So now i had 1.2mm in the E-A-D side, and (0.6mm * 3=1.8mm) on the G-B-E side. Unfortunately this also resulted in slight buzz on B-E strings, so i added another layer in the half south of the previous half, so the new layer covered the 1/4 bottom of the whole shim. This resulted in excessive height in B-E strings, so i sanded it down to about 2.1mm. It still is marginally high, but better be safe than sorry right? So, now i have like this : 1.2mm - in north half (applies to 1/2 of the shim) 1.8 mm - in north half of the south half (applies to 1/4 of the shim) 2.1 mm - in south half of the south half (applies to 1/4 of the shim) In every stage of the above process i had the pieces glued down together, so they formed one solid body. Clamping this piece is easier than you think it's going to be. Take your sanding block with something to protect the finish on the radiused side and put it under neck. From all the pictures I've seen of this guitar the back neck radius extends just past the nut...correct me if I'm wrong. Well, unfortunately no, the back neck profile radius stops just a touch before the nut. Next, find a square piece of wood slightly longer and wider than your shim piece. After that find something to act as a barrier between this piece of wood and your shim. I use a piece of old plastic milk carton, but anything that the wood glue will not adhere to works. Once you have this stuff assembled, brush a thin layer of your glue on the bottom on the shim and the top of the nut shelf and lay it in place. Put the barrier piece on top of the shim, then your square piece of wood. Take your bar clamp and set on jaw on the sanding block underneath and the other jaw on your piece of wood. Tighten until you see the glue begin to leech out and your done. I think I mentioned putting blue masking tape around the area you're working on to catch the glue overruns somewhere else here. A damp cloth can be wiped on the overrun as well to eliminate dealing with the mess later. Pull the clamp the next day, give it another 24 hours to setup and you can drill and mount the new nut. Happy Trails Cynical One Since using the sanding block might be a problem, how about putting a big rubber eraser underneath the point of the neck just under the nut? Also, talking about clamps, how about two of these for each side ?  That could prove to be a good alternative to the sanding block/bar-type clamp solution, as the neck shape does not go beyond the start of the nut. |
|
|
|
Post by cynical1 on May 13, 2013 5:05:21 GMT -5
So, now i have like this : 1.2mm - in north half (applies to 1/2 of the shim) 1.8 mm - in north half of the south half (applies to 1/4 of the shim) 2.1 mm - in south half of the south half (applies to 1/4 of the shim) That's about a light 3/64" from end to end. That's not surprising. I'm assuming North End is the low E and South End is the high E. Not knowing where the nut ledge was when you started, or how much material you filed off it could have been a lot worse. Good. Pictures on the Internet can be deceiving. That's actually not a bad idea. You're not putting 900 foot pounds of torque on this bad boy, so that should work. We're talking the firm erasers and not the gum art erasers, right? Well, there went a half a point from the score you got for the eraser idea... Greek...buddy...I know I've mentioned bar clamps...probably several times... Spring clamps are great for a temporary hold to check fit or alignment...Hell, I use them all the time to hold shop lights...but for gluing they're the wrong tool. Re-read the part I wrote about the wood block and the barrier piece again. Feel free to ask for a clarification if I didn't completely explain it. I really am trying to help you out here...but you gotta meet me half way... Happy Trails Cynical One |
|
Deleted
Deleted Member
Posts: 0
Likes:
|
Post by Deleted on May 13, 2013 5:24:27 GMT -5
That's about a light 3/64" from end to end. That's not surprising. I'm assuming North End is the low E and South End is the high E. Not knowing where the nut ledge was when you started, or how much material you filed off it could have been a lot worse. I guess its a little bit under 5/128 inches to be precise, And yes north is low E, south is high E. I guess we are kinda safe. We're talking the firm erasers and not the gum art erasers, right? Can you please clarify the differences between the two? I googled for pics, and to be frank when i search for gumart erasers i get what i initially had in mind. So, what is "firm erasers" and where could i possibly find them? update : maybe i sorted this out, look at the bottom of this post. Well, there went a half a point from the score you got for the eraser idea... Greek...buddy...I know I've mentioned bar clamps...probably several times... Spring clamps are great for a temporary hold to check fit or alignment...Hell, I use them all the time to hold shop lights...but for gluing they're the wrong tool. Re-read the part I wrote about the wood block and the barrier piece again. Feel free to ask for a clarification if I didn't completely explain it. I really am trying to help you out here...but you gotta meet me half way... Happy Trails Cynical One I understood perfectly the wood block procedure, otherwise i would have asked. And in any case the wood block/(the milk carton ) barrier would be part of any method i'd choose. No problem there. This morning i prepared the wood block, that will seat on top of the barrier which will seat on top of the shim. So, now I am going for - bar-type clamp. - firm erasers. update : Finally i got 2 "pentel hi-polymer super-hard" erasers. They are about 1.5 x 8cm, hope they will fit ok under the neck. I guess this was what you meant with "firm erasers". I guess i still have to buy one bar clamp and i am ready to go. |
|
|
|
Post by cynical1 on May 13, 2013 7:25:37 GMT -5
Yeah, those erasers should work. What I was thinking about was an eraserr like this:  As long as the eraser doesn't compress, or squish, when you press on it you should be fine. I actually like that idea. Remember to use the glue sparingly. All you want is a very thin layer on the nut shelf and on the bottom of your shim. Yellow wood glue, or the Bison glue you used, is strong stuff and doesn't require much to do the job. Using it sparingly also reduces the mess to clean up later. As far as clamping pressure, the wood block will distribute the force from the clamp evenly, so you'll want to tighten it until you begin to see the glue push out and quit. You don't need serious pressure, just consistent pressure. Double check that your shim didn't move during the clamping process. If the shim stayed put, just wipe the excess glue with a damp cloth and go. I'd leave the clamp on overnight, pull it in the morning and give it a couple of days to set before you move on to mount the new nut. There may still be some tweaking needed for the final setup, but the worst part will be behind you. Sounds like you got it. Good luck. Happy Trails Cynical One |
|
Deleted
Deleted Member
Posts: 0
Likes:
|
Post by Deleted on May 13, 2013 7:51:55 GMT -5
Thanx a lot Cyn1, your persistence to perfection has been the best help. I will post in here after 2-3 weeks, to update with any progress with the project. (i have to freeze it for 2-3 weeks).
Generally speaking, I gotta start planning and be patient. I gotta stop making many things happening all at once. That's a definite recipe for failure. THANX for this lesson.
Heck, i am only 44, if i modify all the guitars at once what will i do in the rest of my life?
|
|
|
|
Post by lunaalta on May 13, 2013 9:21:56 GMT -5
He, he, he, now, that's a scary thought........LOL. |
|
Deleted
Deleted Member
Posts: 0
Likes:
|
Post by Deleted on May 18, 2013 1:33:14 GMT -5
Had some progress today. Unfortunately due to the profile of the back of the neck on this specific nut shelf's surface, there was no way to use the new clamp i got for this specific use : 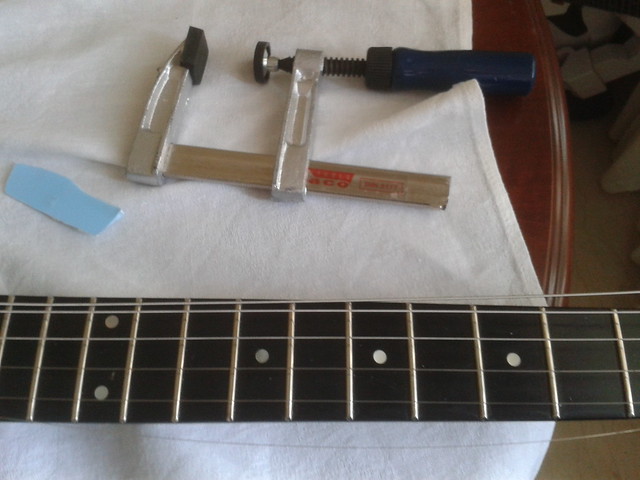 So, i tried to use the strings tension to make for some adequate force for the glue to work. Glue's box writes 2kgr/cm 2. My surface is about 4cm 2, so that would mean about 8kgr. Using the tuners i stretched the 4 central strings to give for approximately 40 Kgr (i know by watching the level of the floyd rose bridge plate relative to the body). I am not sure i achieved those needed 8 Kgr, If the angle (shown further below) was about 30 deg, then roughly, the force applied was (30deg/180deg) * 40 Kgr = 7 Kgr. The setup was as follows : 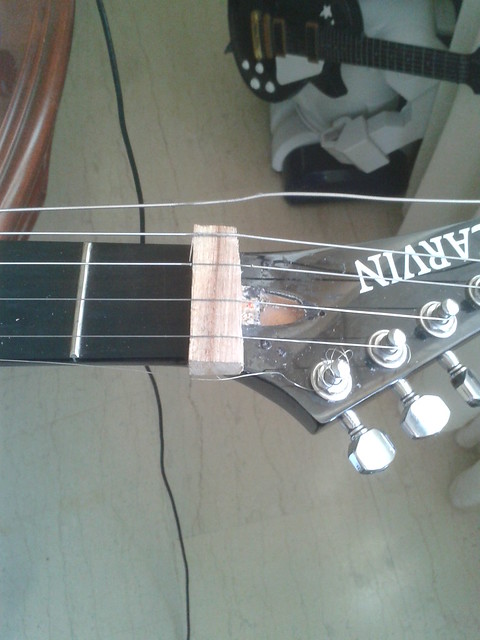 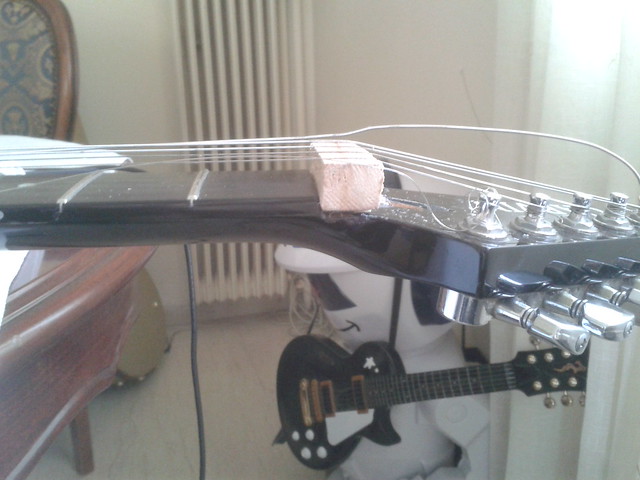 After 12 hrs, 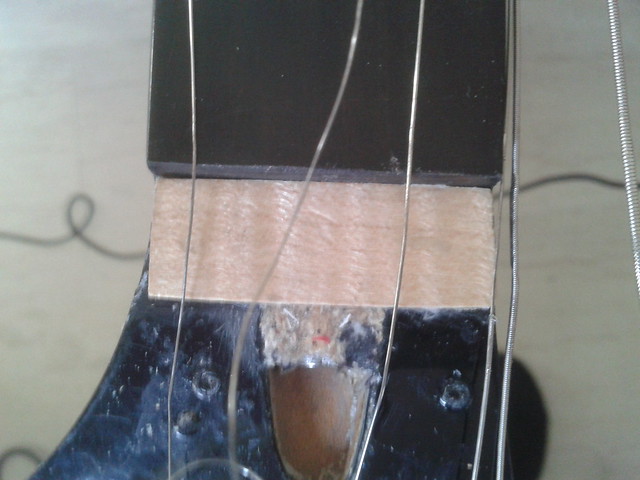 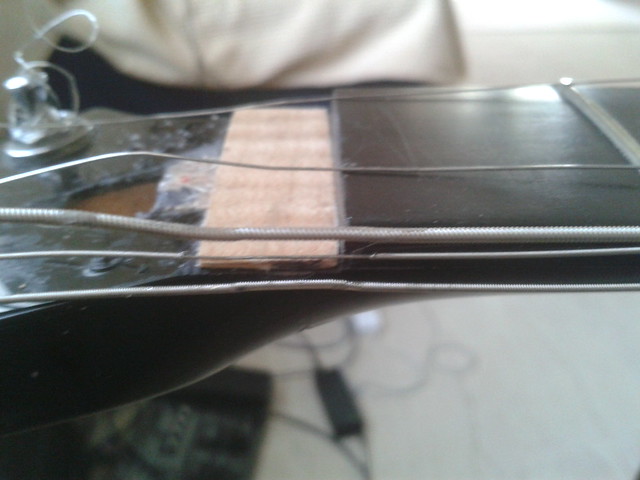 And by fitting the nut (without drilling, no time for that as of yet) 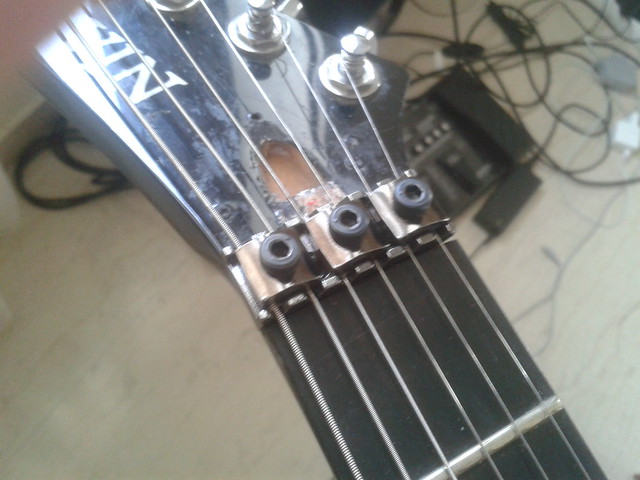 The guitar plays good. I had some suspicion about "sitar" on the 2nd string (B), but it went away, after 1-2 minutes, besides, the nut has to seat on the guitar in full tension to be able to make initial assessments. The guitar stays in tune, and sounds good even with the nut unscrewed. However, there is a small additional gotcha here. Despited the angled shape of the headstock of the carvin, i will definitely need to use the Gotoh supplied string tension bar. I always had the question, why do locking nut guitars need a tension bar in the first place. Now i know  (btw, the carvin originally had *no* tension bar. |
|
|
|
Post by lunaalta on May 18, 2013 9:11:29 GMT -5
Just a question, out of interest, here.
Is the wood veneer likely/liable to compress a small amount due to the pressure of the nut, or is it dense enough not to?
Just wondering.....
|
|
Deleted
Deleted Member
Posts: 0
Likes:
|
Post by Deleted on May 18, 2013 10:06:03 GMT -5
Just a question, out of interest, here. Is the wood veneer likely/liable to compress a small amount due to the pressure of the nut, or is it dense enough not to? Just wondering..... good question... time will show... presumably this was a thin layer of hardwood, so its supposed to persist... Also, the glue tends to make the glued parts hard enough (advertised as harder than wood). Looks hard enough and stable for now. |
|
|
|
Post by cynical1 on May 18, 2013 12:17:10 GMT -5
I have to give you a +1 for persistence, and doing the math on using the strings as your clamp. I admit to having had my doubts about doing that way, but it appears you made it work. Once the holes are drilled and the nut is firmly screwed in place it'll be as stable as you'll ever need it to be and should last for the life of the guitar...or until you get a wild hair and decide to put a different nut on there...  You may notice that when you install the mounting screws you may have to go back and drop a small shim in place. Not a big deal and I wouldn't feel anything was deficient in the job you did because of it. And double check the pilot hole specification for those mounting screws and use the correct size for hardwoods. 5 minutes doing that on the front end will save you hours of aggravation. And don't forget the soap or wax on the mounting screws this time. The tension bar behind the locking nut is really part of the design package and needs to be there. It's a 30 second install and you don't even need to pull the strings to do it. Locate your holes, drill two holes, slack the strings, screw it in and retune. You should notice a difference once it's installed. I would suggest having the nut screwed in place prior to putting the tension bar in. As to the potential compression of the wood over time, the veneer Greek used sure looked like fiddleback maple (Acer saccharum) This wood specs to a crushing strength of over 7500 lb f/in 2. Long and short of it is that unless you plan on parking an Abrams tank over this nut it isn't going anywhere. All in all, ya done good on this little project and did a nice job detailing how you solved the problem. Now, screw the nut down, install the tension bar, finish the setup and play the damn thing before the wife has you sleeping out in the garage. Happy Trails Cynical One |
|
Deleted
Deleted Member
Posts: 0
Likes:
|
Post by Deleted on May 18, 2013 14:16:35 GMT -5
Good evening Cyn1!,
last week was supposed to be spent on market research on bathrooms, kitchens, marbles, granites, materials, designs, colors, etc.... So, i stole one night to glue down the nut, but the guitar went back to its case. Next week will be total "demolition-devastation" as the kitchen-bathroom, hydraulics, electrics, all are gonna be removed and replaced with new. Loads of heavy workmanship is about to happen here. And it will last quite a long, about 4 weeks. We are moving to another little house in the meantime. I will re-open this thread when i will have something new done on the guitar.
|
|
Deleted
Deleted Member
Posts: 0
Likes:
|
Post by Deleted on Jul 26, 2013 15:15:46 GMT -5
Hi again Gotoh locking nut audience! I think thy time hath come for the final installation. This is GD calling Cyn1, is Cyn1 hearing? So i gotta size the screws first. The screws measure about 3.5mm from outer thread to outer thread. So 3.5mm is the max diameter of the screw. According to the chart posted by the boss here in the other thread i should use drill bit of size 2.9 mm, correct? |
|
|
|
Post by 4real on Jul 26, 2013 15:41:15 GMT -5
Hold the screw and drill against each other and by eye, see that the drill is smaller than the thread so it can bite. Do a test drill and screw into some similar wood perhaps if unsure. Mark the drill bit with some tape to the correct depth, perhaps even tape down the nut in the correct position to free up your hands and will not move....Ideally use a hand drill, ensure that everything is straight... 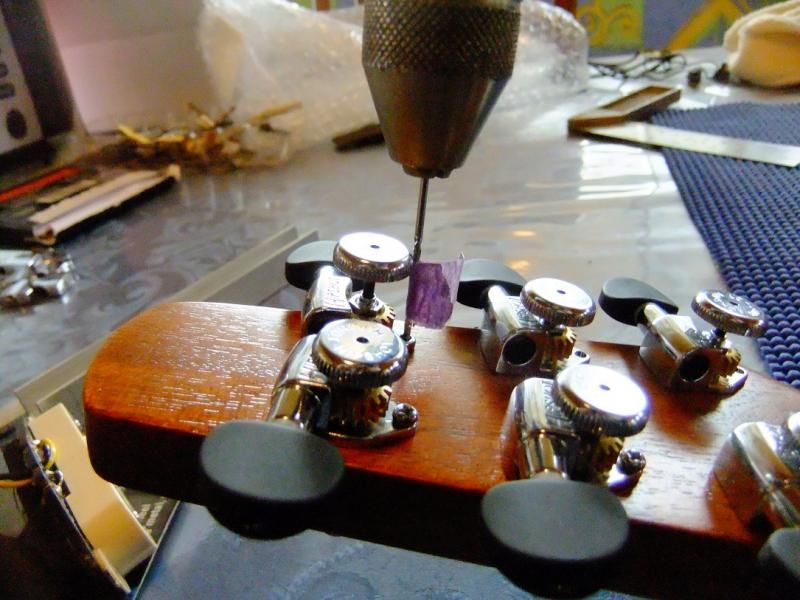 Notice, hand drill and tape to mark depth on bit...if the would is 'tough' you might need to open up the hole a little...it is often a good idea to rub the screws with a bar of soap to give it some lubrication as well...if you feel like you are forcing the screw, it is too tight and could break so beware and take it slow. Always use a hand screw driver and only tighten to firm, any more and you will strip the hole or break the screw as has happened before. Avoiding electric drills for such things allows you to feel and aviod accients and generally much better than a powered drill... |
|
Deleted
Deleted Member
Posts: 0
Likes:
|
Post by Deleted on Jul 26, 2013 23:54:39 GMT -5
Thanx, great tips, especially the one about testing on scrap hardwood first. I am puzzled a little bit about the hand-drill thing tho. I have no hand-drill. Only power drill. I also have a drill press, drill press vice, and fastener bolts. I am thinking of stringing the guitar, just the 4 middle strings. This would be as affective as tape. And then tap it hard with the Gotoh provided prong, to give for some starting pilot point.
|
|
Deleted
Deleted Member
Posts: 0
Likes:
|
Post by Deleted on Jul 27, 2013 10:03:00 GMT -5
The long time PITA is finally ready! It took me all day. here are the pics : 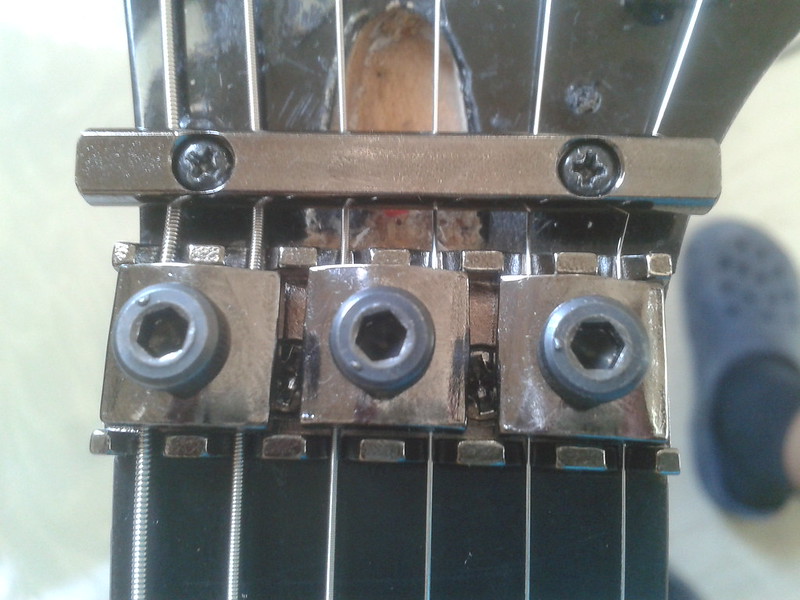 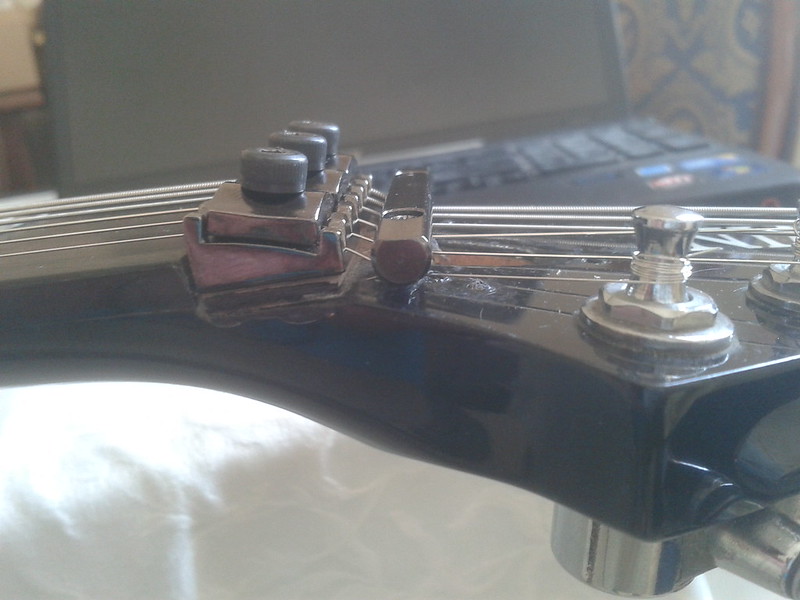 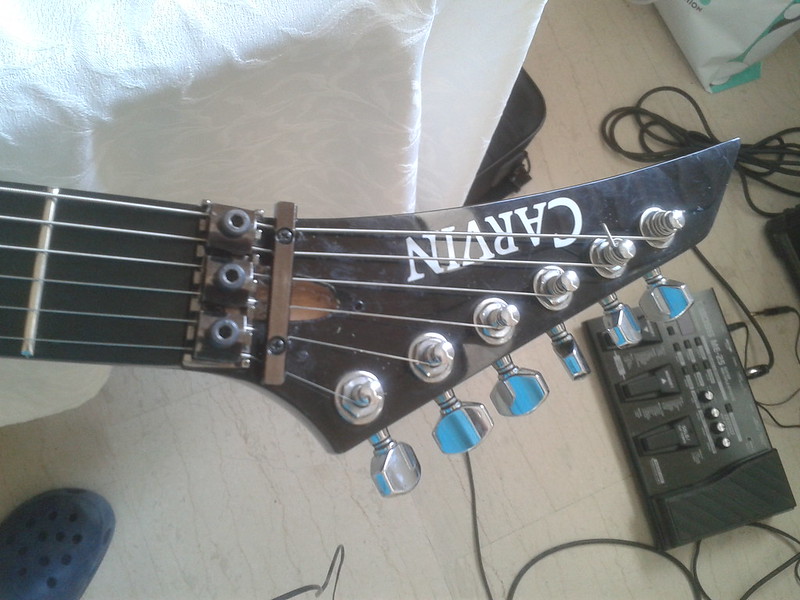 and a little bit of ebony beauty here: 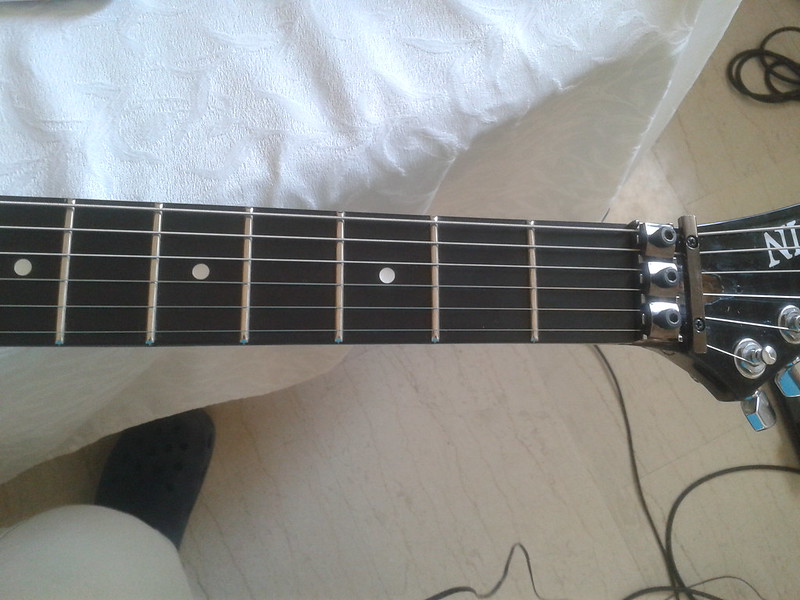 The guitar looks, and most importantly plays great. Great harmonics, dive bombs, pulls, all good. Stays in tune better than before for some reason. Still a consideration tho : (arghh there is always one) : B string, although not officially what could be called as sitar, its definitely dumper, kind of numb in relation to high E and G. Not a problem. Nothing intensively audible in the amp, but i can definitely feel this. My theory, since the string seems to be seating just fine in the nut slot, i guess its some kind of synchronization with some part of the saddle/floyd rose. Hard to tell. Might be the nut, i just cannot see why. What matters mostly is the G, where most natural harmonics are played. But i am curious about the numbness of B. |
|
Deleted
Deleted Member
Posts: 0
Likes:
|
Post by Deleted on Jul 27, 2013 14:19:39 GMT -5
Just re-strung B the opposite (reverse) wound. It sounds better. Almost very good.
Cyn1, just looking at this guitar, how it stays in tune like nothing i had before, the sustain, the crazy harmonics, etc... all i can say is : thank you man.
This guitar was almost one step from dead, courtesy of my stupidity to trust chinese nuts 5 euro a piece. Now this nut was another story. Everything about it is superb.
I gotta tell you, some time during the day, i got mad with sanding the veneer shim and ,..... i ended up needing one of the supplied Gotoh metal brass shims (the thinest one) as you had predicted. Needless to say how much cold sweat i had when i realized i sanded too much. Without the metal shim the fatigue on the screws would be even less. No big deal. Now this guitar will have many years of performance.
|
|
|
|
Post by cynical1 on Jul 29, 2013 0:02:13 GMT -5
Congratulations for sticking with it. Whether you remember or use what you learned doing this isn't as important as the fact you now have a very playable guitar that meets or exceeds your expectations.
So, tell me, now that you've played it and like it, was the extra work and time worth it?
If we had a +1 around here I'd toss one at you. Good work.
BTW, it looks damned nice, too.
Happy Trails -
Cynical One
|
|
Deleted
Deleted Member
Posts: 0
Likes:
|
Post by Deleted on Jul 29, 2013 1:23:08 GMT -5
So, tell me, now that you've played it and like it, was the extra work and time worth it? Definitely worth it. BTW, it looks damned nice, too. It is some kind of finish they call "cosmo-black". |
|


 (but not the semester yet)

 ) down the shim, and then maybe right after or tuesday to actually drill and get the thing finished.
 . How more posts would this thread need then? I am afraid of changing the exact parameters of the set up. Whatcha think?
 (btw, the carvin originally had *no* tension bar.

