Post by JohnH on Aug 1, 2019 21:11:18 GMT -5
Four-conductor Wiring
Converting open-coil humbuckers
In order to be able to install switching for the various wiring options which are possible with humbuckers, it is important to have connections to each end of each coil, and have a separate screen connection. Most after-market pickups have these features, but often those installed as original equipment do not. In these cases, there is often just a single hot connection and grounded screen. Unless you can make a change, there is nothing you can do with these other than to enjoy the sound of conventional series-wired humbuckers.
Fortunately it is often not too hard too convert a two-wire humbucking pickup to four wires plus screen.
Before describing my experience with this, please note the following:
- Some humbuckers are fully sealed and encapsulated in epoxy — there is nothing you can change on these
- There is a risk in opening up a pickup — be prepared for failure
- Don’t try this on your dad’s priceless vintage PAF
The most accessible humbucker design is the open-coil type, in which each bobbin is exposed to view. The following describes how I converted a set of these that came fitted to a Cort LP style guitar.
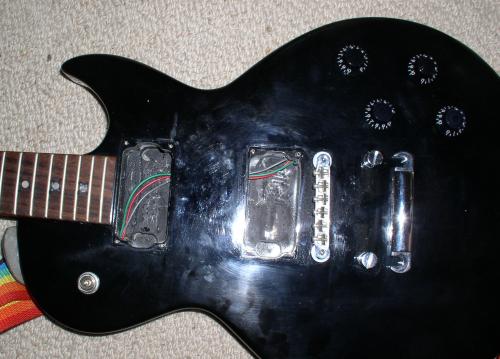
Here is the guitar with pickups removed - the wires for the 3-way toggle can be seen through the pickup cavity routsThe two pickups, with original wiring, mounted in collars. The coils and screen were wax-potted.Rear metal screen with mounting lugsPeeling off the outer tape which wraps around both coilsOuter tape removed. End view showing each coil individually taped, pole pieces and central flat bar magnetOther end, showing wired connections between coils. Each coil has a black and a white wire. Connections are within insulated sleeves.Teasing out the existing wires and removing the sleeves.The white to white is the central connection between coils. The white to black is the output hot wire (white) to coil wire (black).
The other black wire was originally soldered to the screen plate, together with the output cable screen. Hence as originally connected, the ground and output connections from the coils were the two black wires.
Be careful not to pull on the wires. They connect to very delicate winding wire behind the tape wrapping, thinner than a hair. If you break that connection it is very hard to fix it.
Separating the wires. The existing output wire has been removed and the existing connections to the screen plate are cut.The four separate wires were brought over the back of the screen plate, and fixed to a small piece of Veroboard to form a tag strip, screwed to the back of the screen. The tape around the outside of both coils was replaced. Wire to the switches will be soldered to the Veroboard, with no more intervention necessary to the coils.
In the background is a blue wire, to give a new separate screen connection, not connected to any of the four coil wires.
Here are the two pickups, ready to be reinstalled and new leads added.The pickups are wired in.I used some screened nine-conductor cable to connect up the two pickups, and also the pickup rear screen and cavity conductive-paint screening.
Conclusion
With these particular pickups, the conversion worked better than I expected. I did not have to make connections to the very fine wires of the coil itself, which remained protected by the tape around each coil.
I would not hesitate to attempt this again with suitable pickups, particularly with this open coil type.
It should be noted that the details of different pickup designs will vary. The above description relates only to my particular experience.


