Post by gn2staff on Mar 8, 2020 13:50:55 GMT -5
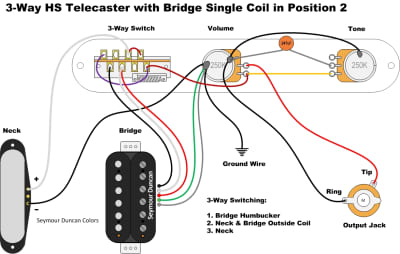
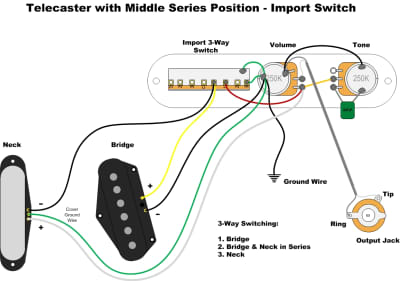
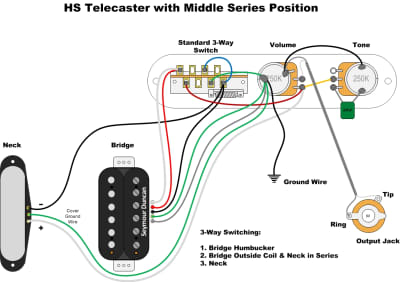
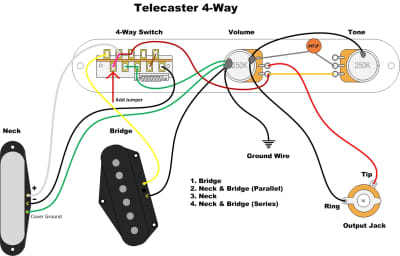
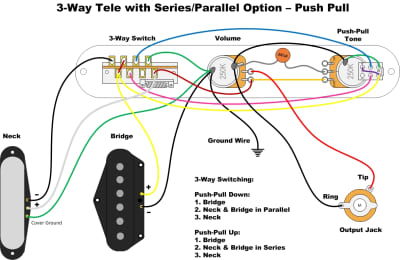
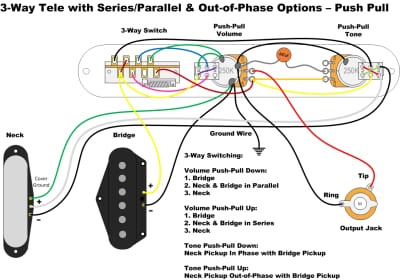
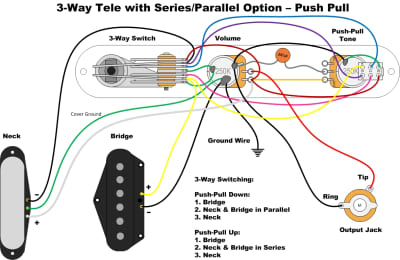
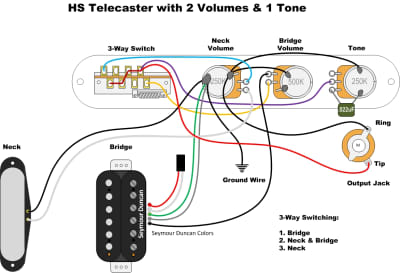
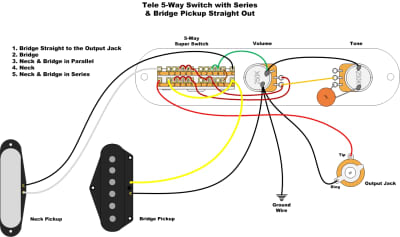
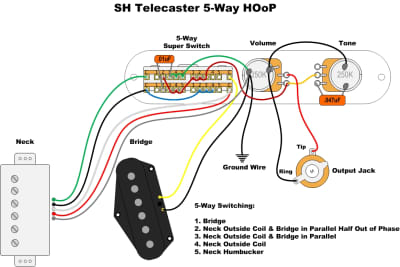
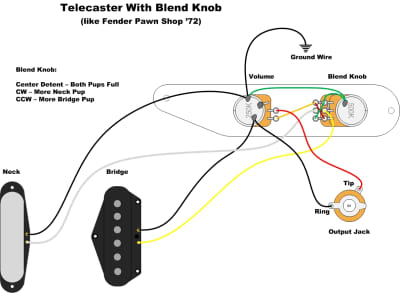
Phostenix' Guitar Wiring Diagram Library Modified TBX Tone Control 5-Way SHOop 5-Way SSOop Strat-O-Teles The Splender Strats Strat-X Strat-X2 Strat-X2 Plus Strat-X3 Teles 2 Pickup Teles 3 Pickup Teles Esquire Teles HH Guitars HSS Guitars HSH Guitars Custom Wiring Setups Recent Additions Other Guitar Wiring Sites Comments Thread | 2 Pickup Teles Here are some wiring options for 2 pickup Tele style guitars. Standard Tele Wiring 3-Way Switching: 1. Bridge 2. Neck & Bridge 3. Neck Standard Tele Wiring with an "Import" Switch 3-Way Switching: 1. Bridge 2. Neck & Bridge 3. Neck 3-Way Tele with Half Out-of-Phase Option Here's a simple mod for the standard 3-way Tele setup that changes the middle position from being the pickups in parallel (in-phase) to being the pickups in what is commonly call Half Out-of-Phase (or HOoP). The pickups are out-of-phase with each other (in parallel), but the Neck pickup has a cap in series with it to reduce some of its lows. That reduces the amount of cancellation of low frequencies from the Bridge pickup and has a sound like a Strat "in-between" tone. Optionally, you can add a resistor in series with one or both pickups when they are half out-of-phase to give the sound a little more of that Strat quack. If you don't use the optional resistor, it would be replaced in the drawing by a wire. 3-Way Switching: Push-Pull Down: 1. Bridge 2. Neck & Bridge in Parallel 3. Neck Push-Pull Up: 1. Bridge 2. Neck & Bridge Half Out-of-Phase 3. Neck Standard Tele Wiring with Bridge Humbucker 3-Way Switching: 1. Bridge Humbucker 2. Neck & Bridge Humbucker 3. Neck Standard Tele Wiring with Neck Humbucker 3-Way Switching: 1. Bridge 2. Neck Humbucker & Bridge 3. Neck Humbucker 3-Way SH Tele with Neck Single Coil in Position 2 Autosplit of the humbucker in Position 2. 3-Way Switching: 1. Bridge 2. Neck Outside Coil & Bridge 3. Neck Humbucker 3-Way HS Tele with Bridge Single Coil in Position 2 Autosplit of the humbucker in Position 2 - Outside Coil. 3-Way Switching: 1. Bridge Humbucker 2. Neck & Bridge Outside Coil 3. Neck 3-Way HS Tele with Bridge Single Coil in Position 2 Autosplit of the humbucker in Position 2 - Inside Coil. Because the normal Tele 3-way switch only has 2 sets of switching contacts, there's no way to connect the coil splits/series link wires to ground to get a single coil of a humbucker in the middle position like you typically would. Most humbuckers, when wired as they typically are, will give you in inside coil when you tie the splits to ground and the outside coil when you tie the splits to the output. So, how do you get the inside coil when you can't tie the splits to ground? You wire the humbucker differently. This wiring setup will give you the inside coil of the humbucker in Position 2 while still keeping the 2 pickups in phase with each other. 3-Way Switching: 1. Bridge Humbucker 2. Neck & Bridge Inside Coil 3. Neck 3-Way HS Tele with Bridge Single Coil in Position 2 Same as above, but with different pickup brand wire colors. 3-Way Switching: 1. Bridge Humbucker 2. Neck & Bridge Inside Coil 3. Neck 3-Way HS Tele with Bridge Single Coil in Position 2 - Super Switch There is one potential downside to connecting the coil splits/series link wires to the output to get the inside coil: the normal hot lead of the pickup is not connected to anything and has the potential to be an antenna that picks up noise. The solution is to use a 3-Way Super Switch, which can be purchased from a seller on ebay (search for 3-way super switch). Now we can ground the splits to get the inside coil & not leave any wires disconnected to pick up noise. 3-Way Switching: 1. Bridge Humbucker 2. Neck & Bridge Inside Coil 3. Neck 3-Way HS Tele with Bridge Single Coil in Position 2 - Super Switch Same as above, but with different pickup brand wire colors. 3-Way Switching: 1. Bridge Humbucker 2. Neck & Bridge Inside Coil 3. Neck Standard Tele Wiring with P-Rail Neck Here's a wiring setup for a Tele with a Seymour Duncan P-Rail neck pickup. The pickup switching is standard Tele, but a 3 position DPDT On-On-On mini toggle has been added to select how the coils of the P-Rail pickup are wired. The 3 choices are 1) the Rail pickup by itself, 2) both coils in parallel (not series), and 3) the P-90 by itself. 3-Way Pickup Switching: 1. Bridge 2. Neck & Bridge 3. Neck 3-Way Toggle P-Rail Switching: 1. Rail 2. Both Coils in Parallel 3. P-90 Telecaster with Push-Pull for Volume Pot Bypass This wiring setup was created for players who plug their guitar straight into a passive volume pedal in front of their amp. Since that volume pedal is loading the guitar with another volume pot, I thought it might be useful to have a way to bypass the guitar's internal volume pot when they are using the volume pedal. This is not a pickups straight out to the jack setup - the tone pot is still in the circuit. I've drawn it up two ways - with a push-pull (or push-push) volume pot or with a DPDT toggle switch. 3-Way Switching: 1. Bridge 2. Middle & Bridge - Parallel 3. Neck Push-Pull Down: Normal Volume Control Push-Pull Up: Volume Control Bypassed Telecaster with Toggle Switch for Volume Pot Bypass Here's a wiring setup for volume pot bypass using a DPDT toggle switch instead of a push-pull volume pot. 3-Way Switching: 1. Bridge 2. Middle & Bridge - Parallel 3. Neck Toggle Switch Down: Normal Volume Control Toggle Switch Up: Volume Control Bypassed Telecaster with Middle Series Position 3-Way Switching: 1. Bridge 2. Neck & Bridge in Series 3. Neck Telecaster with Middle Series Position - Import Switch 3-Way Switching: 1. Bridge 2. Neck & Bridge in Series 3. Neck HS Telecaster with Middle Series Position 3-Way Switching: 1. Bridge Humbucker 2. Neck & Bridge Outside Coil in Series 3. Neck Jerry Donahue Peavey Omniac 5-Way Tele This is my wiring diagram of the Peavey Omniac. It uses a standard 5-Way Super Switch (as opposed to the non-standard one that Peavey uses). This drawing matches the functionality of the Peavey wiring diagram of the Omniac (found here - i498.photobucket.com/albums/rr343/bsnyder45036/JD_Omniac.jpg) - GN2 note: link not available but the same drawing was found elsewhere , but I've moved some wires around in a way that I think makes it easier to wire. 5-Way Switching: 1. Bridge 2. Neck & Bridge in Parallel Half Out of Phase 3. Neck & Bridge in Parallel with .0022uF Cap to Ground 4. Neck with .0033uF Cap to Ground 5. Neck Jerry Donahue Fender 5-Way Tele Based on information from Seymour Duncan here about the switching of the Fender Jerry Donahue Tele, this is my wiring diagram. There are some differences between the Peavey version and the Fender version of the Jerry Donahue Tele. I don't know if the Fender version has the treble bleed mod on it, but I left it on the drawing. Once I see the wiring of a Fender JD, I will update anything that needs to be updated. 5-Way Switching: 1. Bridge 2. Neck & Bridge in Parallel Half Out of Phase - No Tone Control 3. Neck & Bridge in Parallel 4. Neck 5. Neck – No Tone Control Jerry Donahue Fender 5-Way Tele Version 2 Based on this drawing: This drawing is based on a drawing that looks like a Fender drawing of the Made in Japan Jerry Donahue Tele. The switching is a little different than the others. 5-Way Switching: 1. Bridge 2. Neck & Bridge in Parallel Half Out of Phase 3. Neck & Bridge in Parallel 4. Neck 5. Neck with .01uF Cap in Series – No Tone Control 2 Humbucker Tele with Coil Split Toggle Switch This is a 2 humbucker Tele with an added 3-way On-Off-On toggle switch to switch between humbucker and single coil modes. With the toggle switch in the center position, both pickups are full humbuckers. Flip the toggle up and the pickups are the outside single coils. Flip the toggle down and the pickups are the inside single coils. 3-Way Switching: 1. Bridge 2. Neck & Bridge 3. Neck Coil Split 3-Way Toggle: Up – Outside Coils Center – Humbuckers Down – Inside Coils 2 Humbucker Tele with Coil Split Toggle Switch Because typical Seymour Duncan pickups have the coil with the North magnet on the inside and the coil with the South magnet on the outside, the wiring diagram above will give you pickups with matching magnetic polarity when choosing either of the single coil modes. If you want the combined single coils in Position 2 to be hum cancelling, you can flip the magnet that's inside one of the pickups and modify the wiring a bit. When you flip the magnet, current flows the opposite direction through the pickup, so the Green wire becomes the hot lead and the Black wire becomes the ground lead. White & Red remain the series link leads. I've drawn this up with the Neck pickup as the one that has had its magnet flipped. 3-Way Switching: 1. Bridge 2. Neck & Bridge 3. Neck Coil Split 3-Way Toggle: Up – Outside Coils Center – Humbuckers Down – Inside Coils Tele with P-Rails and Coil Split Toggle Switch Seymour Duncan P-Rails wire up a little different than typical Seymour Duncan pickups, so here's what the above setup would look like with P-Rails. With P-Rails, the Black & White wires are always the P-90s and the Green & Red wires are always the mini rails. Position 2 is always hum cancelling, as well. 3-Way Switching: 1. Bridge 2. Neck & Bridge 3. Neck Coil Split 3-Way Toggle: Up – Rails Center – Humbuckers Down – P-90s 2 Humbucker Tele with a 3-Way Toggle and Modified TBX Tone Control This drawing uses Seymour Duncan pickup wire colors. 3-Way Switching: 1. Bridge 2. Neck & Bridge 3. Neck 2 Humbucker Tele with a 3-Way Toggle and Modified TBX Tone Control This drawing uses GFS pickup wire colors. 3-Way Switching: 1. Bridge 2. Neck & Bridge 3. Neck Standard 4-Way Tele This is the typical wirng of a Tele with a 4-way switch. 4-Way Switching: 1. Bridge 2. Neck & Bridge in Parallel 3. Neck 4. Neck & Bridge in Series 4-Way Tele with Modification to Reduce Noise Potential One possible drawback of the standard 4-way Tele wiring is that in Position 1 (Bridge pickup only), the Neck pickup's hot lead is still connected to the output while its ground lead is not connected to anything. This has the potential of making the Neck pickup act as an antenna that picks up noise. A simple solution is to add one small jumper to the 4-way switch (red arrow in the drawing) that also connects the Neck pickup's ground lead to the output in Position 1 - effectively shorting out the Neck pickup and eliminating the noise potential. 4-Way Switching: 1. Bridge 2. Neck & Bridge in Parallel 3. Neck 4. Neck & Bridge in Series 4-Way Tele with Neck Pickup Grounded What if you have a Neck pickup where it's not possible to separate the negative lead from the cover? Well, as long as you can separate the negative lead of the Bridge pickup from its frame, you can use this wiring setup for a 4-Way Tele. 4-Way Switching: 1. Bridge 2. Neck & Bridge in Parallel 3. Neck 4. Neck & Bridge in Series 4-Way Tele with Out-of-Phase Option & TBX Tone Control Here's a 4-way Tele wiring setup that adds a push-pull volume pot to give you the option of having the pickups out-of-phase in Positions 2 & 4. This wiring also uses the Fender TBX tone control wired like Fender wires it (not my modified TBX wiring). The tone cap is the .047uF cap that is more typical with Teles than the .022uF typically used in Strats. 4-Way Switching: 1. Bridge 2. Neck & Bridge in Parallel 3. Neck 4. Neck & Bridge in Series Push-Pull Up reverses the phase of the Neck pickup SH 4-Way Tele Here's a wiring setup for a Tele with a Neck humbucker. 1. Bridge 2. Neck Outside Coil & Bridge (Parallel) 3. Neck Outside Coil 4. Neck Humbucker HS 4-Way Tele 4-Way Switching: 1. Bridge Humbucker 2. Bridge Humbucker & Neck in Parallel 3. Bridge Humbucker & Neck in Series 4. Neck HS 4-Way Tele with AutoSplit 4-Way Switching: 1. Bridge Humbucker 2. Bridge Single Coil & Neck in Parallel 3. Bridge Single Coil & Neck in Series 4. Neck 4-Way Tele with 2 Volumes & 1 Tone A 4-Way Tele with independent volumes and a master tone control. 4-Way Switching: 1. Bridge 2. Neck & Bridge in Parallel 3. Neck 4. Neck & Bridge in Series Telecaster With Independent Volumes – No Tone 3-Way Switching: 1. Bridge 2. Neck & Bridge 3. Neck Telecaster With Independent Volumes – No Tone - Neck Out of Phase Switch 3-Way Switching: 1. Bridge 2. Neck & Bridge 3. Neck 3-Way Tele with Series/Parallel Option - Push-Pull Tone Pot If you want the option to have both pickups in series, but don't want to use a 4-way switch, you can add a push-pull (or push-push) pot to the standard 3-way setup so that the middle position changes from being both pickups in parallel to being both pickups in series. 3-Way Switching: Push-Pull Down: 1. Bridge 2. Neck & Bridge in Parallel 3. Neck Push-Pull Up: 1. Bridge 2. Neck & Bridge in Series 3. Neck 3-Way Tele with Series/Parallel Option - Toggle Switch This is the same as above, but using a DPDT toggle switch instead of a push-pull pot. 3-Way Switching: Toggle Down: 1. Bridge 2. Neck & Bridge in Parallel 3. Neck Toggle Up: 1. Bridge 2. Neck & Bridge in Series 3. Neck 3-Way Tele with Series/Parallel & Out-of-Phase Options - Push-Pull Pots If you want the option to have both pickups in series, but don't want to use a 4-way switch, you can add a push-pull (or push-push) pot to the standard 3-way setup so that the middle position changes from being both pickups in parallel to being both pickups in series. This wiring setup also gives you the option of having the pickups out-of-phase with each other using a second push-pull (or push-push) pot. 3-Way Switching: Volume Push-Pull Down: 1. Bridge 2. Neck & Bridge in Parallel 3. Neck Volume Push-Pull Up: 1. Bridge 2. Neck & Bridge in Series 3. Neck Tone Push-Pull Down: Neck Pickup In Phase with Bridge Pickup Tone Push-Pull Up: Neck Pickup Out-of-Phase with Bridge Pickup 3-Way Tele with Series/Parallel Option - Push-Pull Tone Pot Similar to the above wiring setups, but this version uses the Gibson style right-angle 3-Way pickup selector switch. This is not the standard Les Paul 3-Way switch, but the one usually referred to as the 3 pickup switch (for 3 pickup SGs). It is equivalent to a DPDT On-On-On switch. This setup gives you the option to change the middle position from being both pickups in parallel to being both pickups in series. Here's a link to the Stewart-MacDonald switch: (Note fromGN2 - the switch referred to is not a standard toggle and appears to be not currently available from StewMac) 3-Way Switching: Push-Pull Down: 1. Bridge 2. Neck & Bridge in Parallel 3. Neck Push-Pull Up: 1. Bridge 2. Neck & Bridge in Series 3. Neck 3-Way Tele with Series/Parallel Option - Push-Pull Tone Pot Similar to the above wiring setups, but this version uses a DPDT On-On-On 3 position switch for the pickup selector switch. This setup gives you the option to change the middle position from being both pickups in parallel to being both pickups in series. 3-Way Switching: Push-Pull Down: 1. Bridge 2. Neck & Bridge in Parallel 3. Neck Push-Pull Up: 1. Bridge 2. Neck & Bridge in Series 3. Neck Fender's Baja Tele 4-Way with S-1 Here's my drawing of the Fender Baja Tele wiring. It's just a re-creation of the Fender diagram, but in color to make it a little easier to clearly see all of the wires and connections. 4-Way Switching: S-1 Up: 1. Bridge 2. Neck & Bridge - Parallel 3. Neck 4. Neck & Bridge – Series S-1 Down: 1. Bridge 2. Neck & Bridge – Parallel Half Out of Phase 3. Neck 4. Neck & Bridge – Series – Out of Phase Simple Mod for Fender's Baja Tele 4-Way with S-1 This is a simple mod to add another choice to the Baja Tele. By moving one wire, Position 3 with the S-1 down changes to put a .01uF cap in series the Neck pickup (by itself), which thins out the sound of the Neck pickup. 4-Way Switching: S-1 Up: 1. Bridge 2. Neck & Bridge - Parallel 3. Neck 4. Neck & Bridge – Series S-1 Down: 1. Bridge 2. Neck & Bridge – Parallel Half Out of Phase 3. Neck with .01uF Cap in Series 4. Neck & Bridge – Series – Out of Phase 3-Way Tele with Tone Control only in Position 1 This wiring setup switches like a standard 3-way Tele, but has no tone control in Positions 2 & 3. Only Position 1 (Bridge pickup only) is affected by the tone control. 3-Way Switching: 1. Bridge with Tone Control 2. Neck & Bridge - No Tone Control 3. Neck - No Tone Control 3-Way Tele with Bridge Pickup No Tone Control Option This wiring setup will not give you the Neck & Bridge pickups together. 3-Way Switching: 1. Bridge - No Tone Control 2. Bridge - Tone Control 3. Neck - Tone Control 4-Way Tele with Cocked Wah Position This 4-Way Tele adds the simulated cocked wah sound in Position 2. 4-Way Switching: 1. Bridge 2. Bridge with Cocked Wah Sound 3. Neck & Bridge 4. Neck 4-Way Tele with Dual Independent Volumes & Tones This is the typical 4-way Tele wiring, but with dual concentric pots for separate Neck & Bridge volume controls and separate Neck & Bridge tone controls. The volumes are together on the forward pot and the tones are together on the rear pot. 4-Way Switching: 1. Bridge 2. Neck & Bridge in Parallel 3. Neck 4. Neck & Bridge in Series 4-Way Tele with Dual Independent Volumes & Tones - Alternate This is the typical 4-way Tele wiring, but with dual concentric pots for separate Neck & Bridge volume controls and separate Neck & Bridge tone controls. The Neck volume& tone are together on the forward pot and the Bridge volume & tone are together on the rear pot. 4-Way Switching: 1. Bridge 2. Neck & Bridge in Parallel 3. Neck 4. Neck & Bridge in Series 3-Way HS Tele with 2 Volumes & 2 Tones This is the typical 3-way Tele wiring, but with separate Neck & Bridge volume controls and separate Neck & Bridge tone controls. The volumes are wired like a modern Les Paul, so if you turn one volume all the way down, the center position will also have no output. 3-Way Switching: 1. Bridge 2. Neck & Bridge in Parallel 3. Neck 3-Way HS Tele with 2 Volumes & 1 Tone This is the typical 3-way Tele wiring, but with separate Neck & Bridge volume controls and a master tone control. The volumes are wired like a modern Les Paul, so if you turn one volume all the way down, the center position will also have no output. 3-Way Switching: 1. Bridge 2. Neck & Bridge in Parallel 3. Neck 5-Way Tele - No Bridge Tone Choice This wiring setup has the 4-way Tele choices (in a slightly different order) with an added position for the Bridge pickup with no tone control. The Neck & Bridge in series is in Position 4. 5-Way Switching: 1. Bridge - No Tone 2. Bridge 3. Neck & Bridge in Parallel 4. Neck & Bridge in Series 5. Neck 5-Way Tele - No Bridge Tone & Fixed Neck Tone Choices This wiring setup has the 3-way Tele choices with an added position for the Bridge pickup with no tone control and an added position for the Neck pickup with a fixed tone cap. 5-Way Switching: 1. Bridge - No Tone 2. Bridge 3. Neck & Bridge in Parallel 4. Neck 5. Neck with Fixed Tone Cap 5-Way Tele with Bridge Pickup Straight Out Choice This wiring setup has the typical 4-way Tele choices in positions 2-5 with Position1 being the Bridge pickup connected straight to the output jack (no volume or tone controls). 5-Way Switching: 1. Bridge - Straight Out to the Jack 2. Bridge 3. Neck & Bridge in Parallel 4. Neck 5. Neck & Bridge in Series 5-Way Tele with Bridge Pickup Straight Out Choice This wiring setup has the same choices as the one above, but with the Neck pickup by itself in Position 5 (Positions 4 & 5 are reversed). 5-Way Switching: 1. Bridge - Straight Out to the Jack 2. Bridge 3. Neck & Bridge in Parallel 4. Neck & Bridge in Series 5. Neck 5-Way Tele with Cocked Wah & Bridge Pickup Straight Out This wiring setup has the typical 3-way Tele choices plus a simple cocked wah sound and the Bridge pickup straight to the output jack. 1. Bridge Straight to the Output Jack 2. Bridge - Cocked Wah (No Tone Control) 3. Bridge 4. Neck & Bridge in Parallel 5. Neck 5-Way Tele - Arlo Cocked Wah Choice This wiring setup has the 4-way Tele choices (in a slightly different order) with an added position for the Bridge pickup with what is commonly called the Arlo Cocked Wah sound. The Neck & Bridge in series is in Position 4. 5-Way Switching: 1. Bridge 2. Bridge with Cocked Wah Sound (No Tone Control) 3. Neck & Bridge in Parallel 4. Neck & Bridge in Series 5. Neck 5-Way Tele - Arlo Cocked Wah Choice This is the same wiring setup as above, but wired using the Schaller Megaswitch M 5-way switch. This setup has the 4-way Tele choices (in a slightly different order) with an added position for the Bridge pickup with what is commonly called the Arlo Cocked Wah sound. The Neck & Bridge in series is in Position 4. 5-Way Switching: 1. Bridge 2. Bridge with Cocked Wah Sound (No Tone Control) 3. Neck & Bridge in Parallel 4. Neck & Bridge in Series 5. Neck 5-Way SH Tele with HOoP 1. Bridge 2. Neck Outside Coil & Bridge in Parallel - Half Out-of-Phase 3. Neck Outside Coil & Bridge in Parallel 4. Neck Outside Coil 5. Neck Humbucker Fender Pawn Shop '72 Here's the wiring for a Fender Pawn Shop '72. There's no pickup selector switch or tone control. Just a volume control and a blend control to pan between pickups or have them both in parallel in the center position. Tele with Blend Knob - No Pickup Selector Switch It's the same idea as the Pawn Shop '72, but with a tone control and with a standard sized Tele control plate in mind. The 3-way pickup selector switch is replaced by a blend pot. Standard volume and tone controls. Tele with 3-Way and Blend Knob This one seems a little redundant to me, but someone asked for it. Position 2 gives you the ability to pan back & forth between the Neck pickup and the Bridge pickup using the Blend pot (center detent of the pot is both pickups). The Blend pot replaces the Tone pot, so there is no tone control. 3-Way Switching: 1. Bridge 2. Neck & Bridge with Blend Pot 3. Neck Tele with 3-Way, Blend Knob, and Tone Control This wiring setup gives you the normal Tele Positions 1 & 3, but Position 2 is the Bridge pickup full with the ability to control how much of the Neck pickup is added using the Neck Blend knob. The Neck Blend knob fully clockwise gives you both pickups. I've made 2 versions, one with the Tone pot always connected and second one with the Tone pot connected only in Positions 1 & 3. 3-Way Switching: 1. Bridge 2. Neck & Bridge with Blend Pot 3. Neck Telecaster With No Tone – Blend in Position 2 3-Way Switching: 1. Bridge 2. Bridge with Neck Blend 3. Neck Turn Blend Knob Clockwise for More Neck in Position 2 Telecaster With Volume/Blend Control & Tone 3-Way Switching: 1. Bridge with Tone 2. Bridge with Neck Blend – No Tone 3. Neck with Tone Turn Volume Knob Clockwise for More Neck in Position 2 – Bridge Always On Full Here's a slightly different version with no tone pot on the Neck pickup in Position 3. 3-Way Switching: 1. Bridge with Tone 2. Bridge with Neck Blend – No Tone 3. Neck - No Tone Turn Volume Knob Clockwise for More Neck in Position 2 – Bridge Always On Full Telecaster With Volume/Blend Control - No Tone Control 3-Way Switching: 1. Bridge 2. Bridge with Neck Blend 3. Neck Turn Volume Knob Clockwise for More Neck in Position 2 – Bridge Always On Full 2-Way Tele A very simple Tele setup. 2 Choices - Neck only or Bridge only. Period. 2-Way Switching: 1. Bridge 2. Neck |


