Noob modding an old japanese guitar with the wrong tools
Jan 16, 2021 13:54:53 GMT -5
frets likes this
Post by lamed on Jan 16, 2021 13:54:53 GMT -5
Hi,
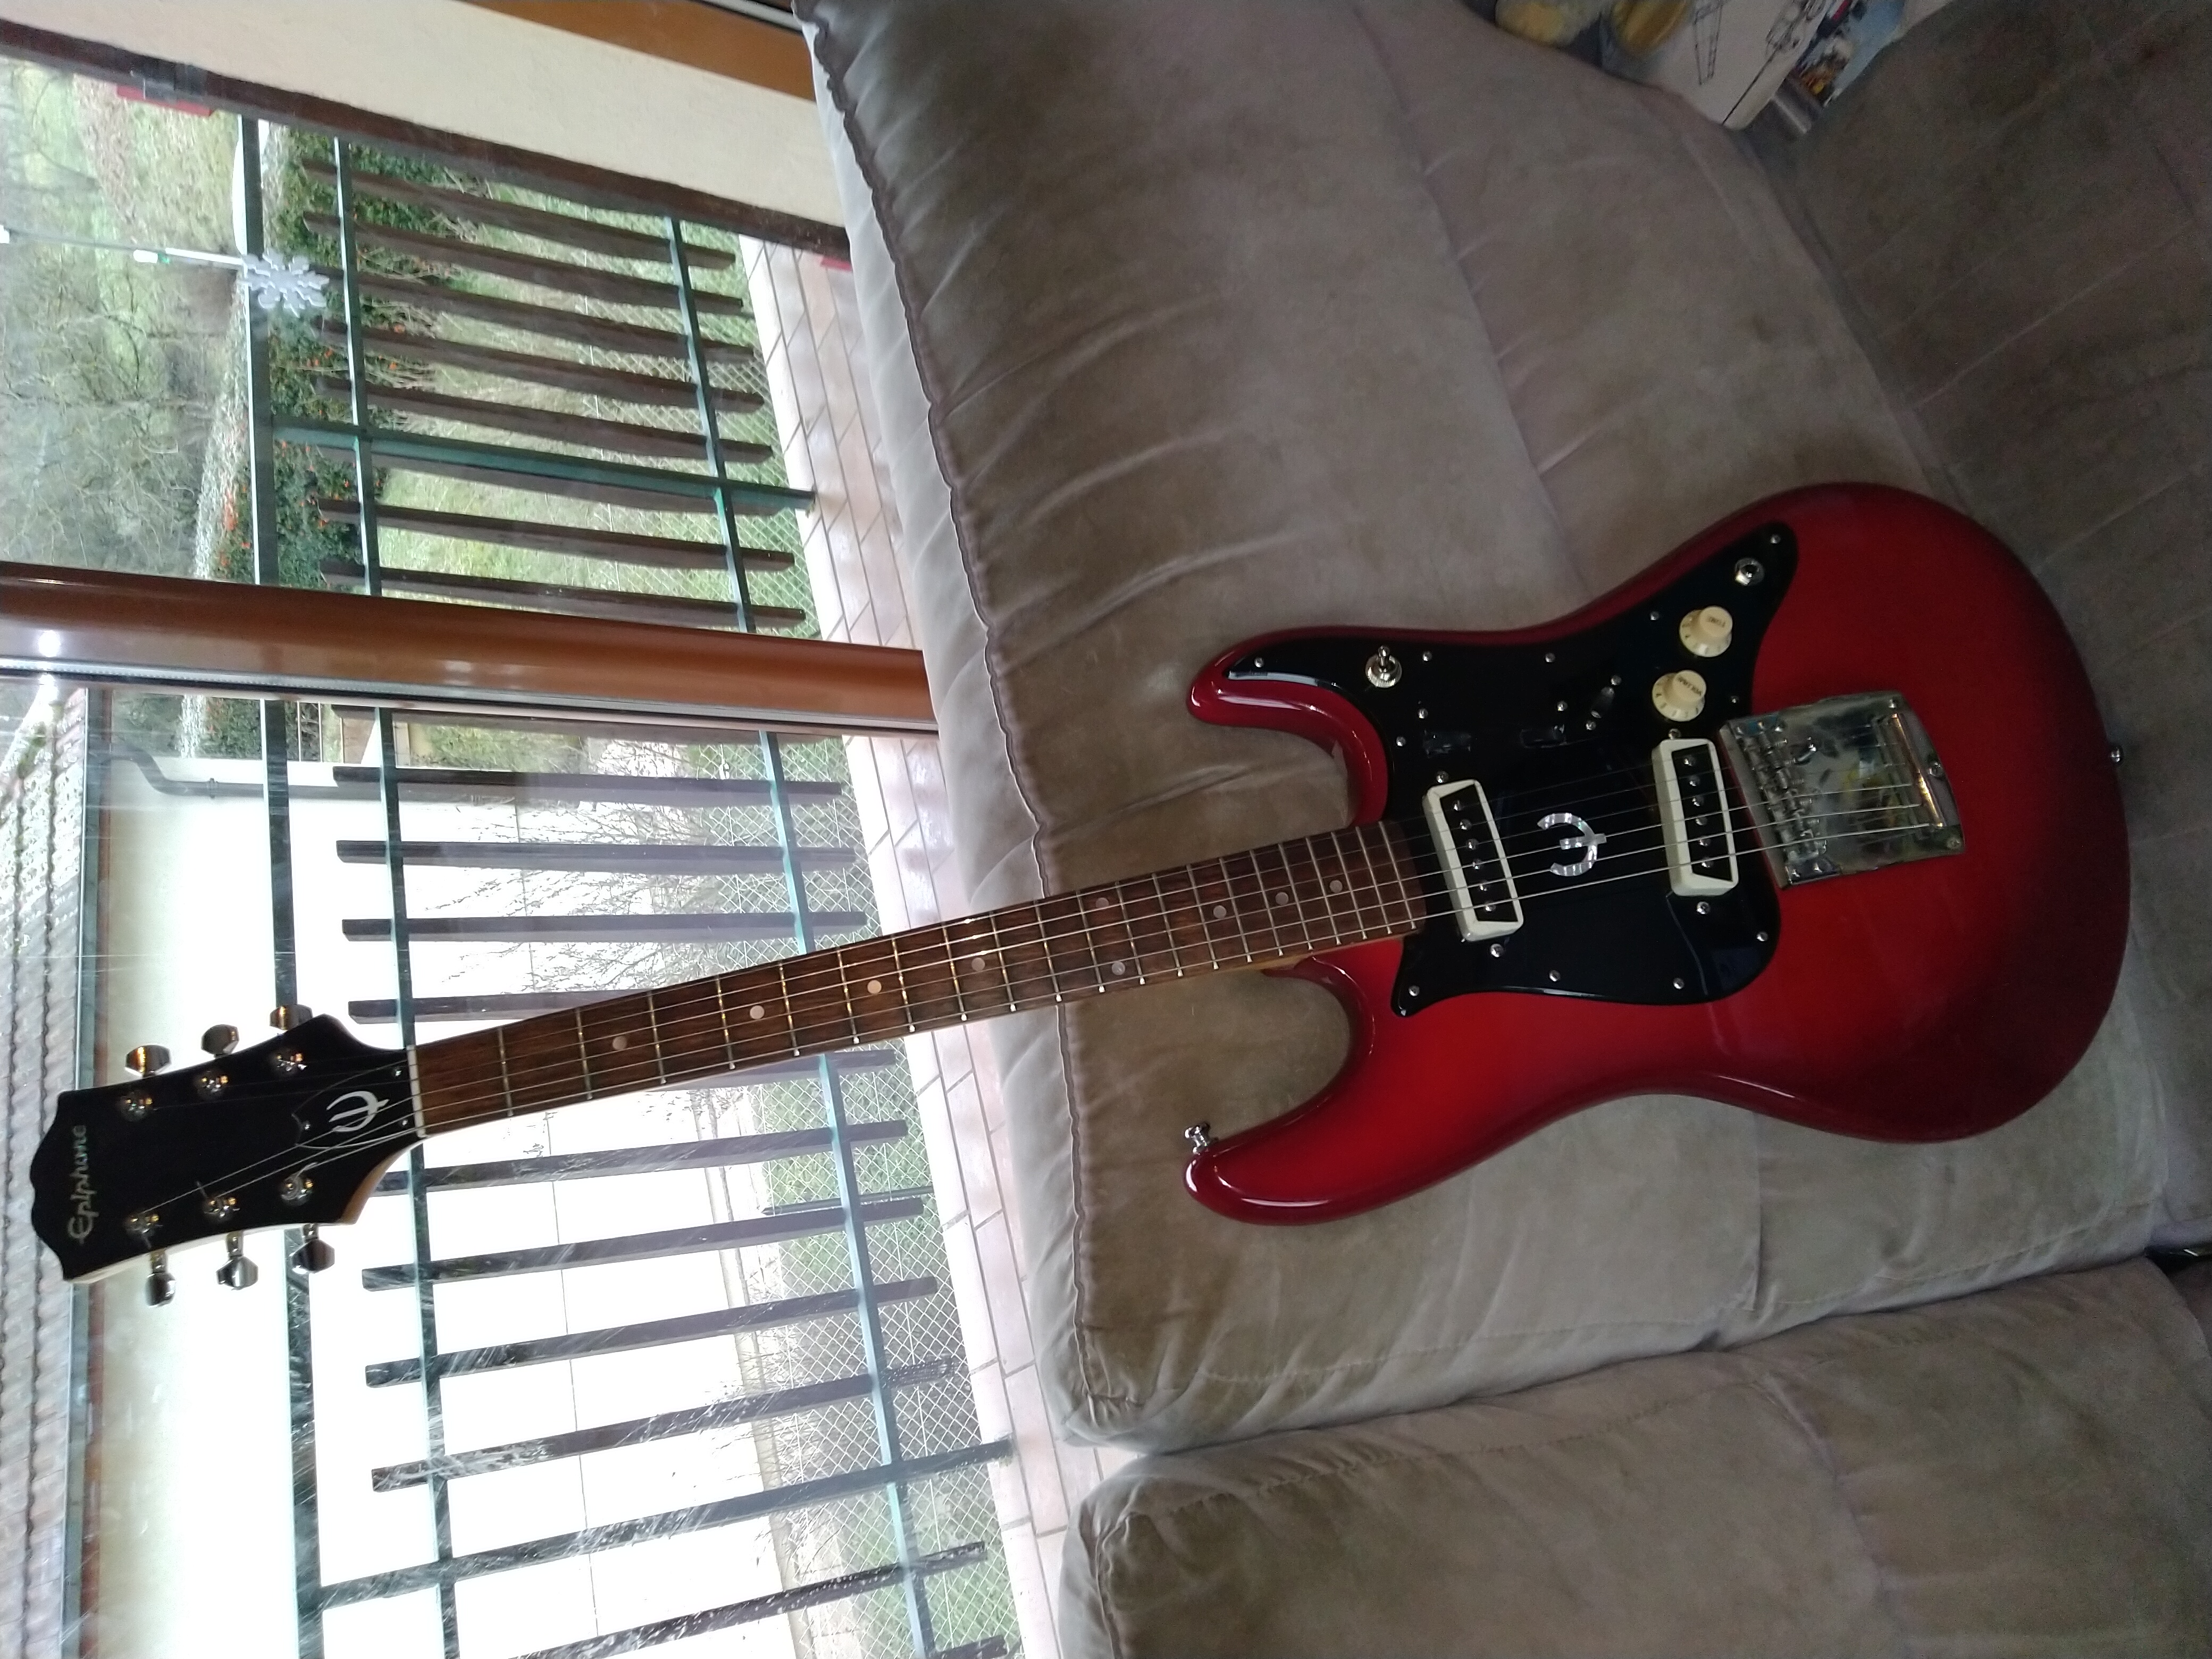
Here are some pics of my first real guitar mod. I got this Epiphone ET-270 a long time ago at a deposit sale for nearly nothing (it has since become rather overpriced after a pic of Kurt Cobain holding one of these has surfaced on the web). For those who don't know, it's a Matsumoku made guitar that was sold under various brands in the first half of the seventies, the most common ones being Epiphone and Aria. It sounds and plays ok, but I admit than I'm not too picky with my guitars quality. They're all pretty cheap models.
The electronics needed to be changed, and there were a few other things I didn't like that much. So, after reading la lot on this forum, I decided it was time to try modding it a bit. I can't thank enough everyone here for everything I've learned, as well as for the kind answers every time I post a question, by the way.
The challenge was to make everything myself, using only tools that I own, so expect to see some rather rough work here...
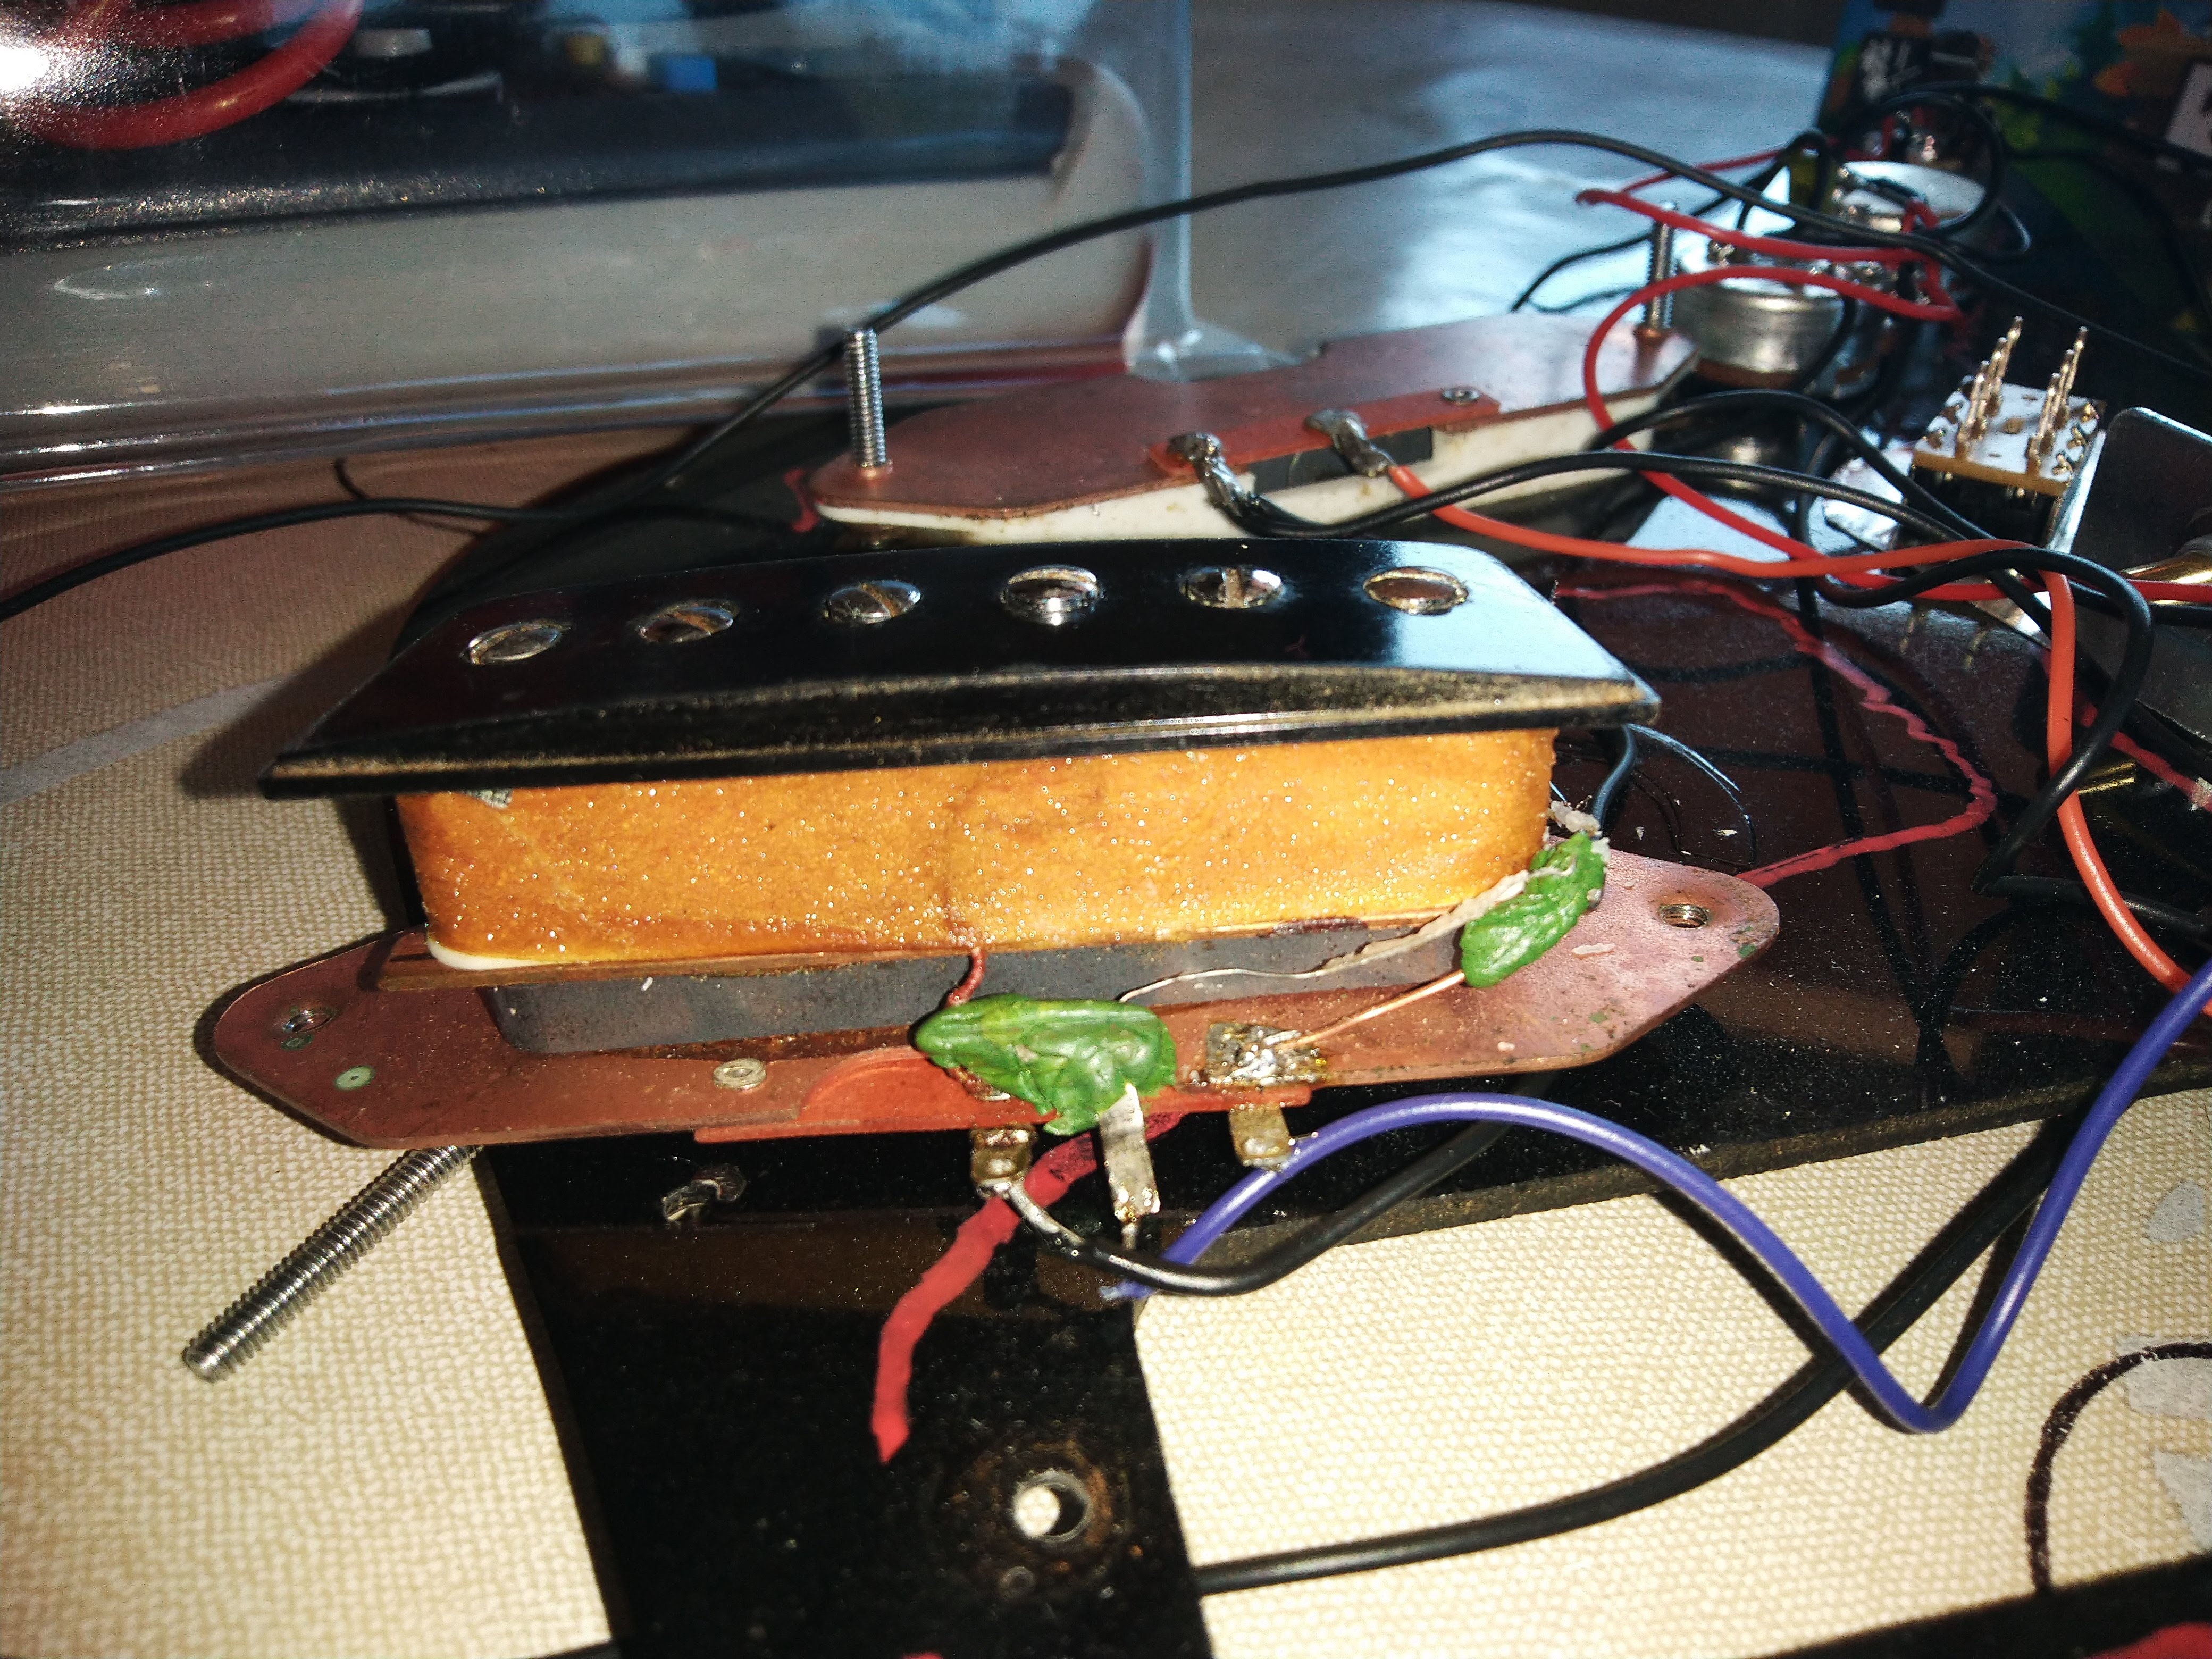
First thing I wanted to change : the pickups were not wired for hum cancelling. So I opened one of them to flip the magnet and reverse the poles. This was a bit scary because one end of the coil was directly grounded on the metal base of the pickup. So I had to unsolder it and create a real second pole for the pickup. This was necessary for the serial mod anyway. The new pole comes from an old wireless phone, and I threw in a bunch of green stuff (epoxy two components putty used in model making) to make sure everything stays in place. It's ugly, but it works.
Next, I had to make some room in that body in order to had a pair of Jazzmaster roller pots. This was done using a small saw and some wood scissors.
Only the pickups were kept. Everything else is brand new. The DPDT is now a serial switch (I used the wiring described here). It used to be a (too drastic) bass cut marketed has a “bass boost” (as if something as a passive boost could exist). The hot wire then go through a bass cut made with a 1nF capacitor and a 1M roller pot, then to the usual volume and tone pots. The second roller pot is not used for now.
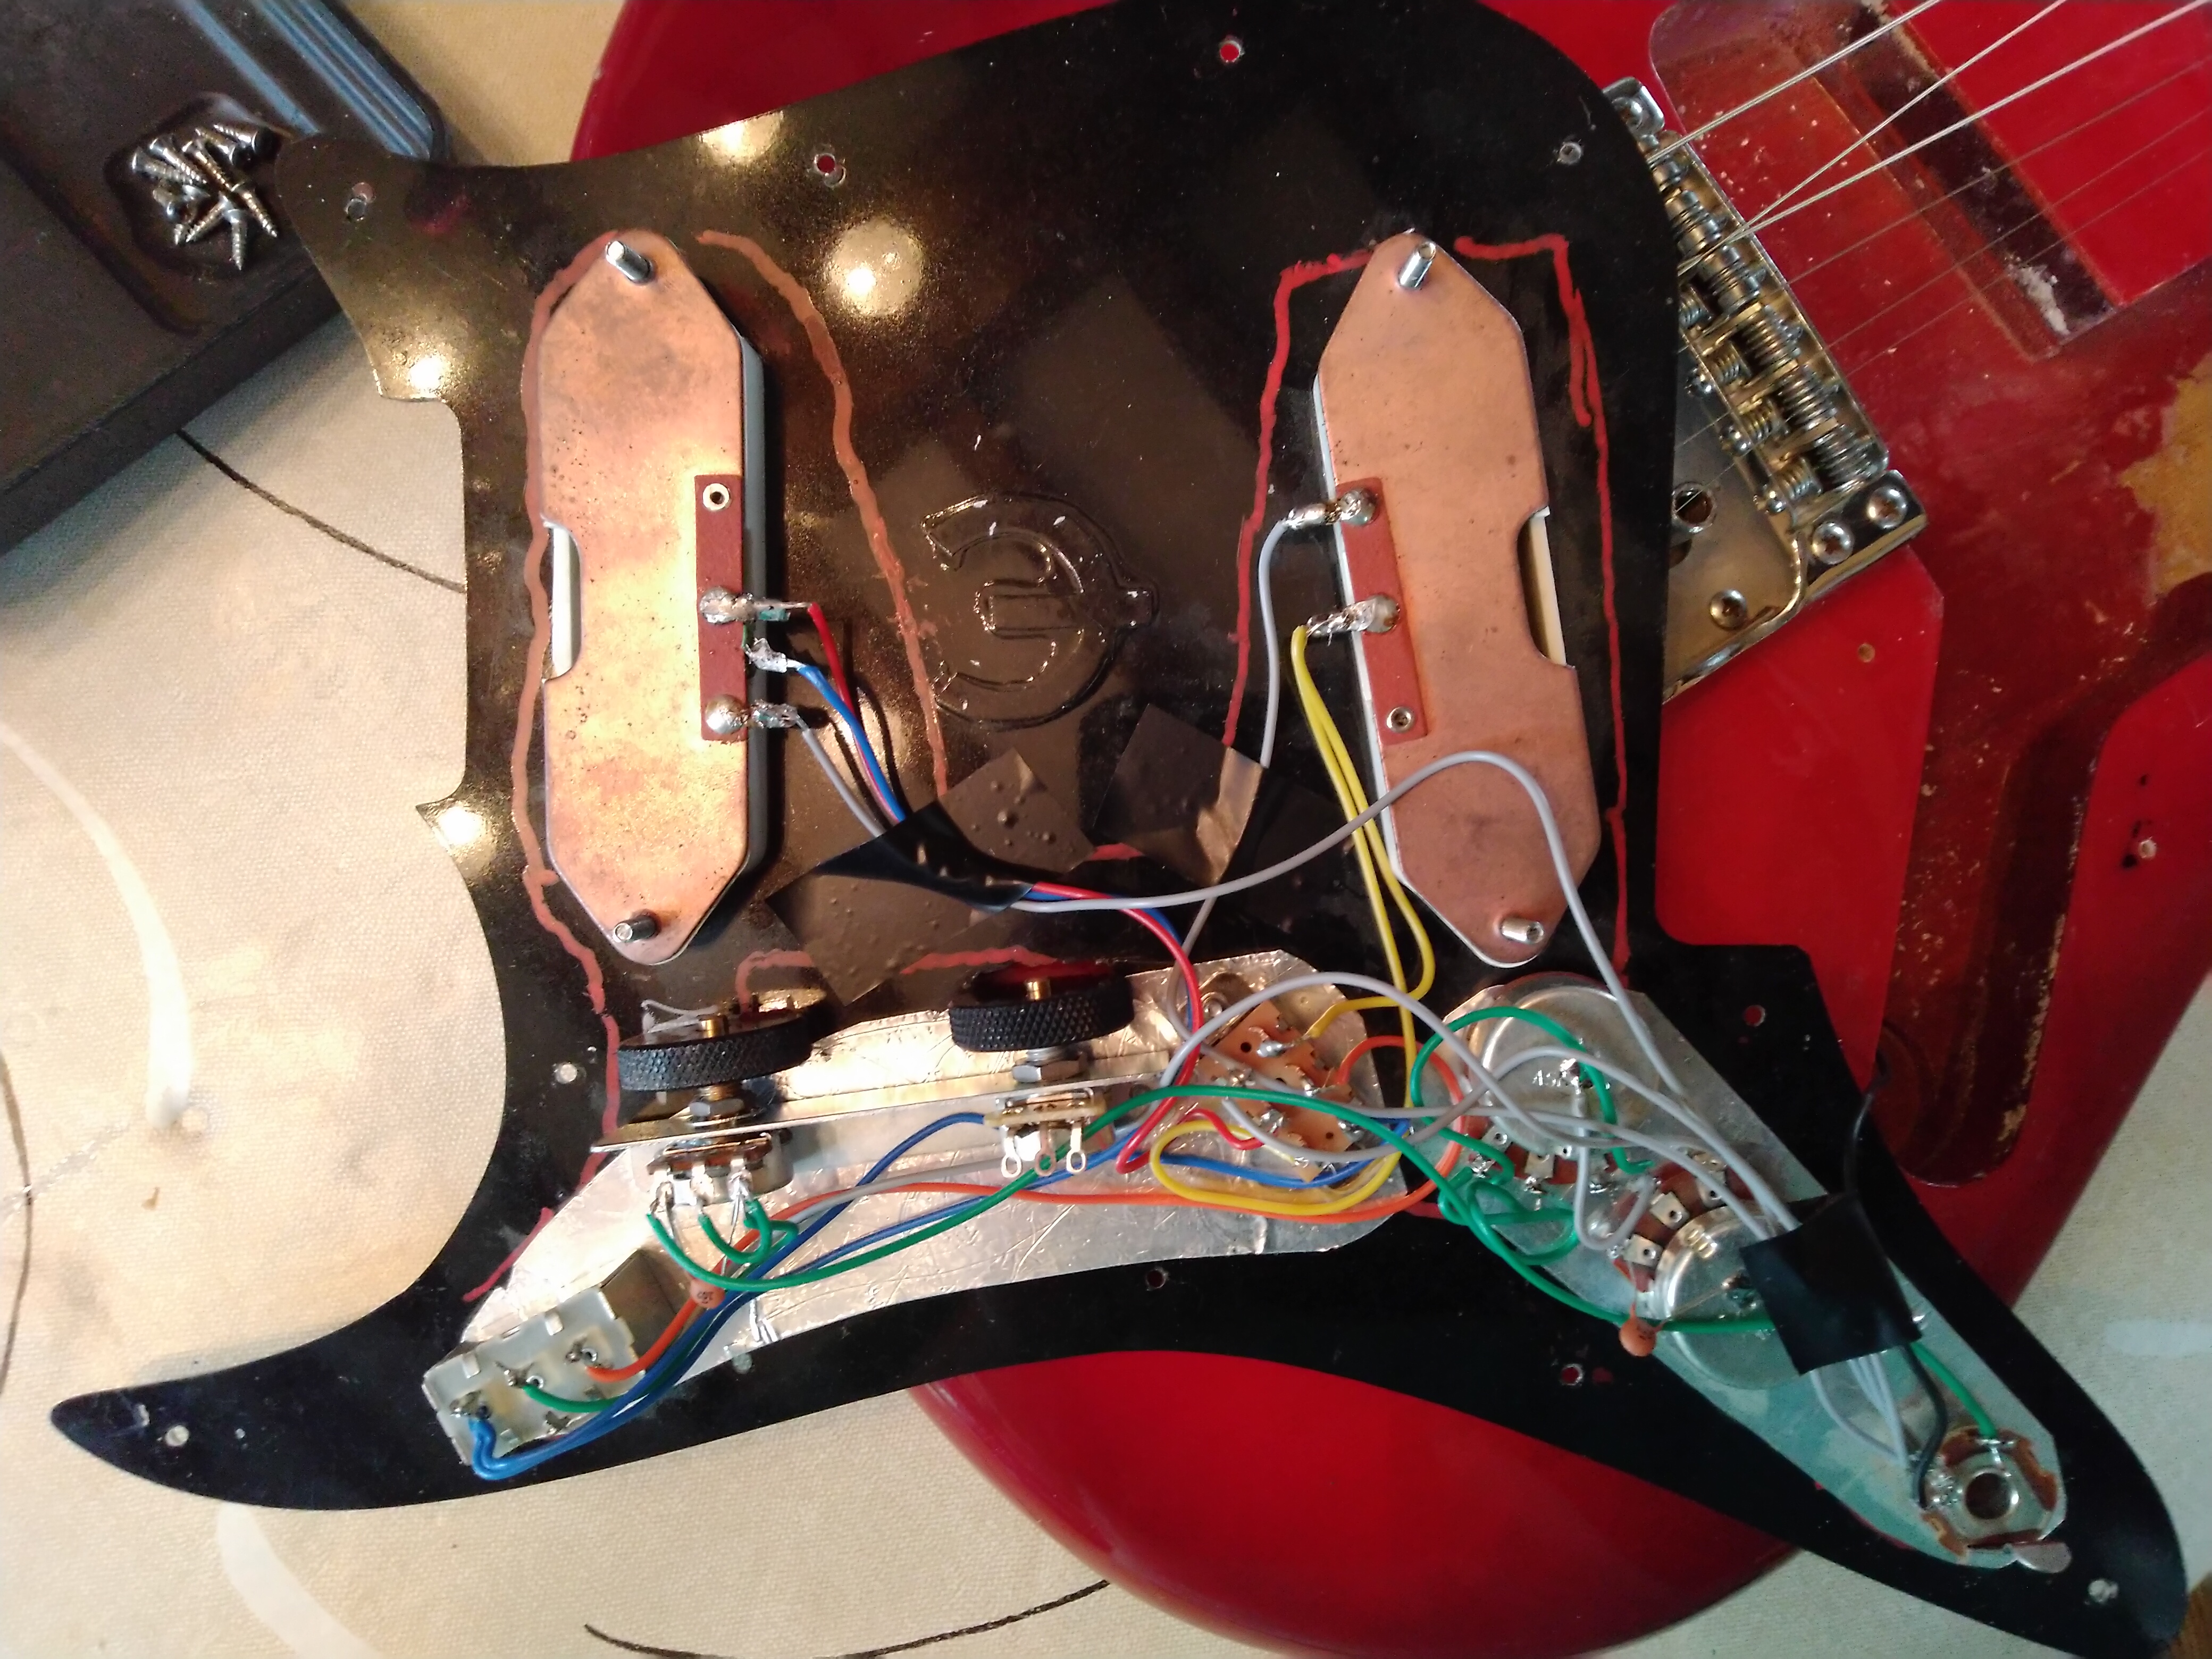
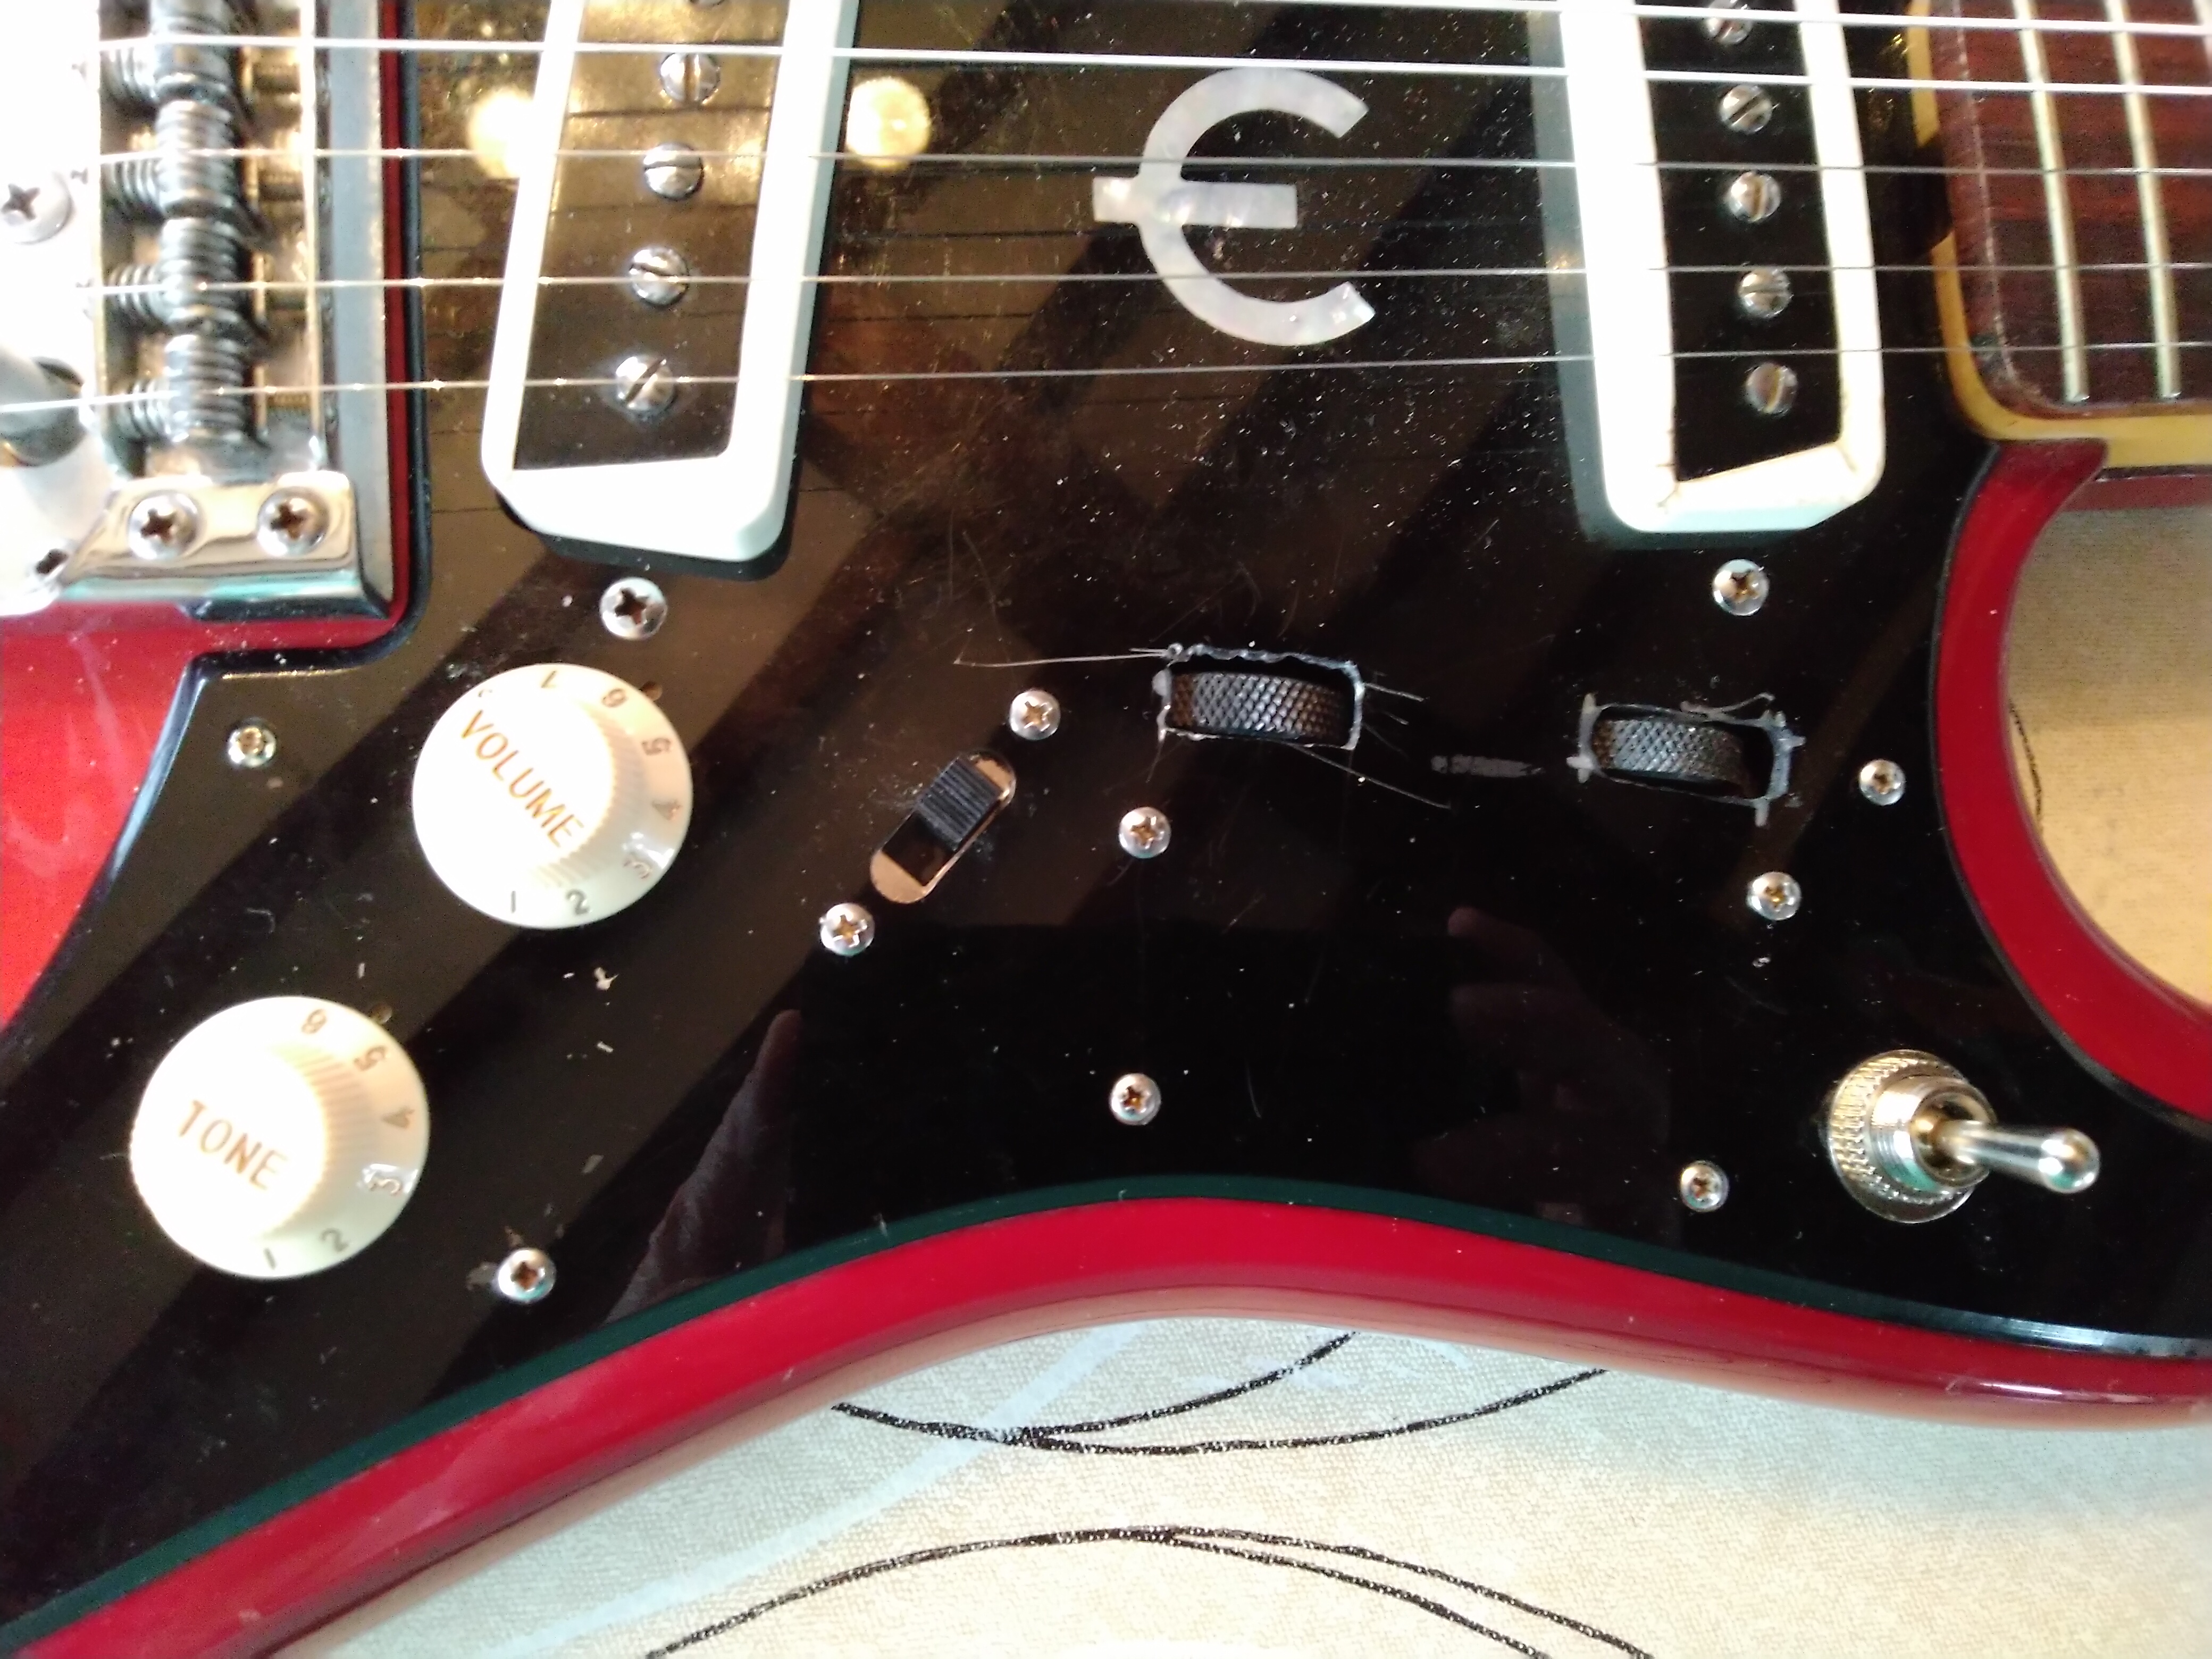
Making holes in the pick-guard was annoyingly hard. I don't know what it's made of, but it's at the same time damn hard to cut or pierce and easy to break. I tried with some model making tools, but had to borrow a Dremel for this one (must buy one of those). It does not look nice. I'll have to make some sort of cover someday.
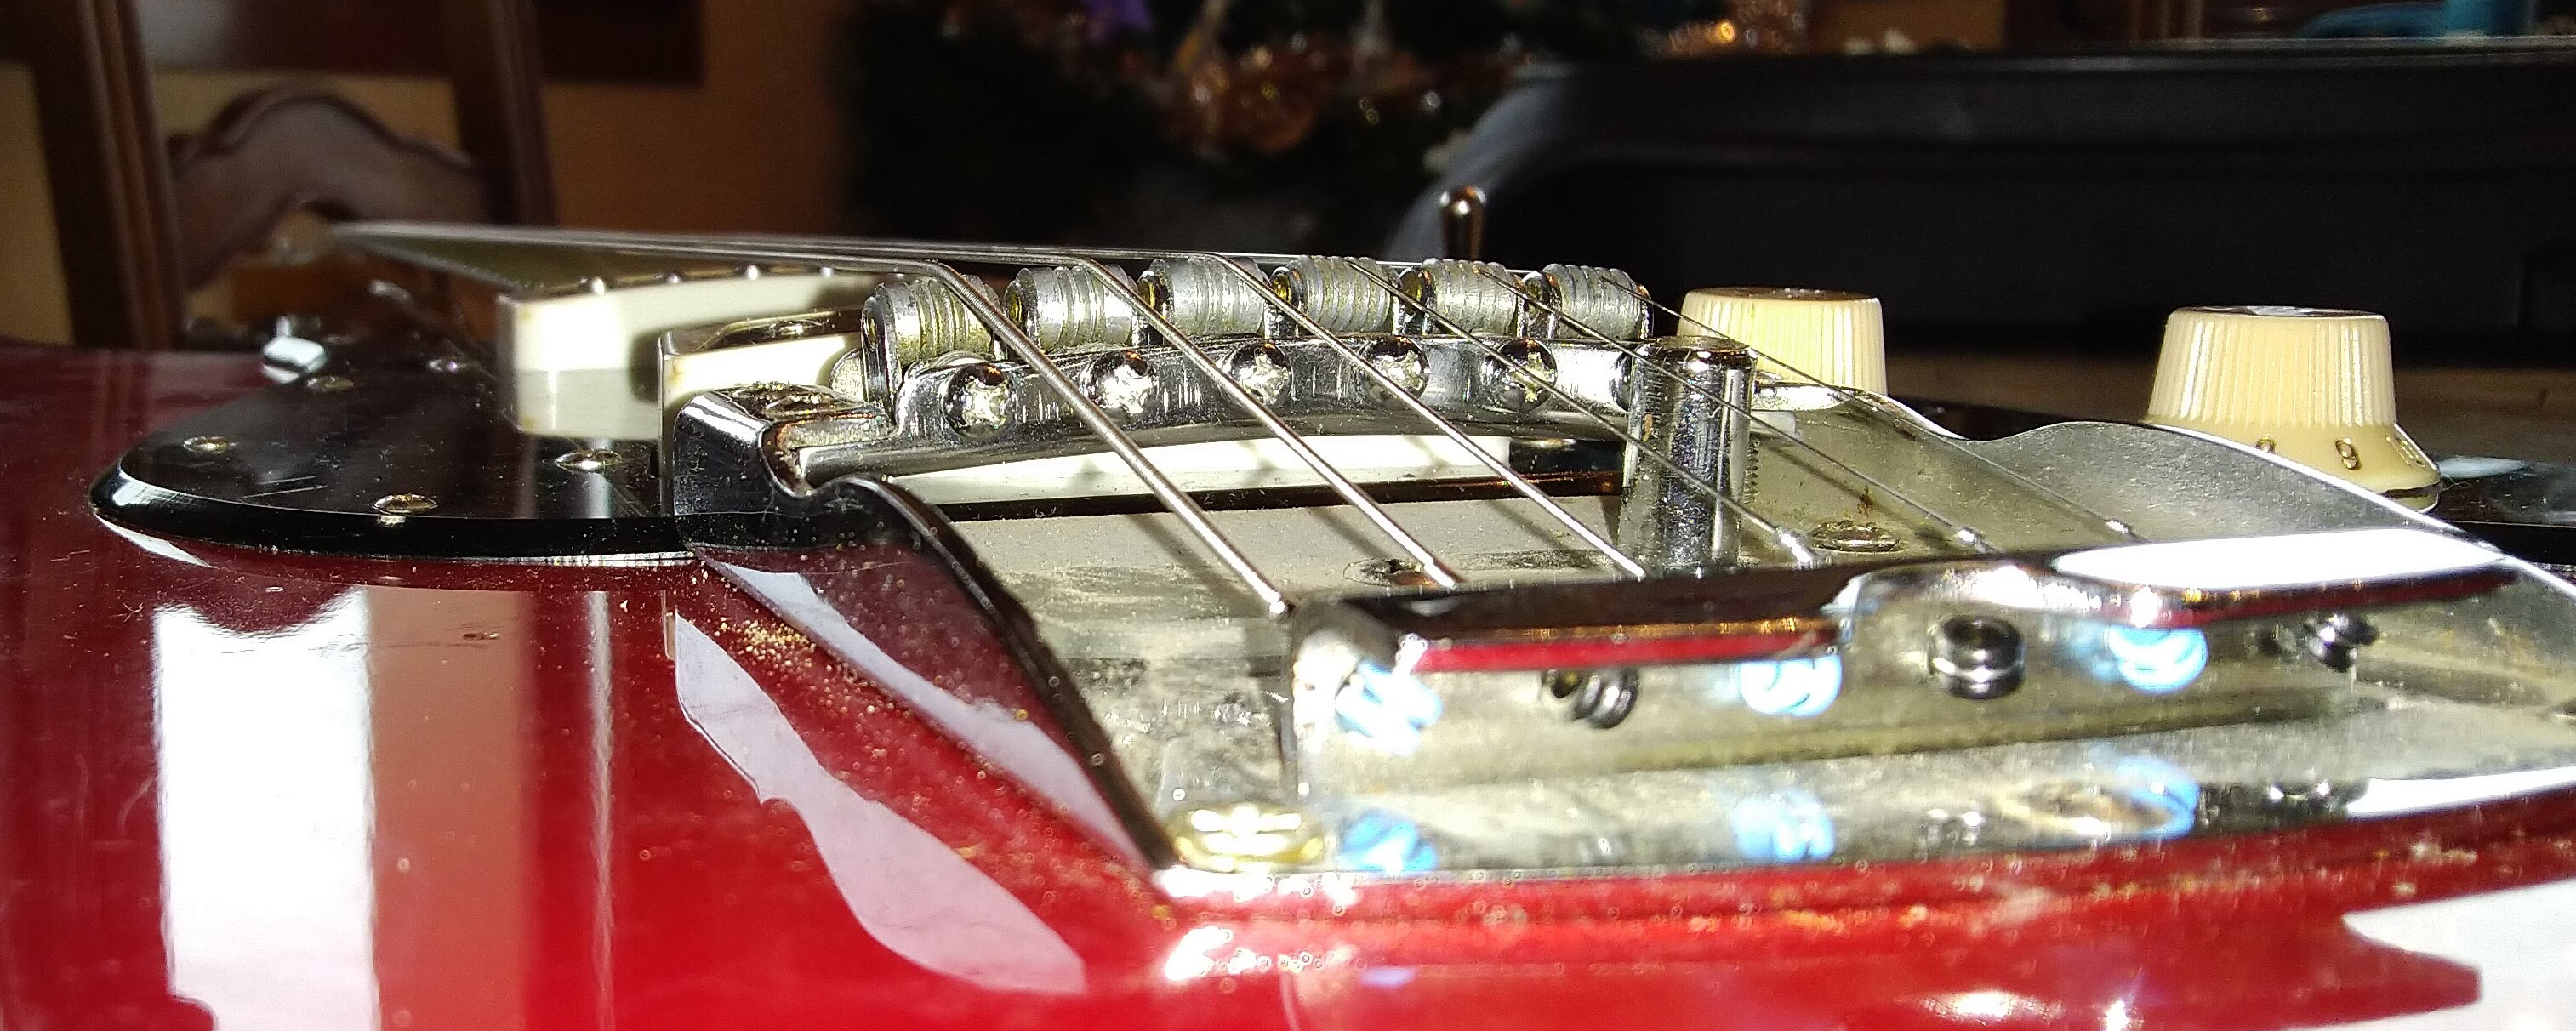
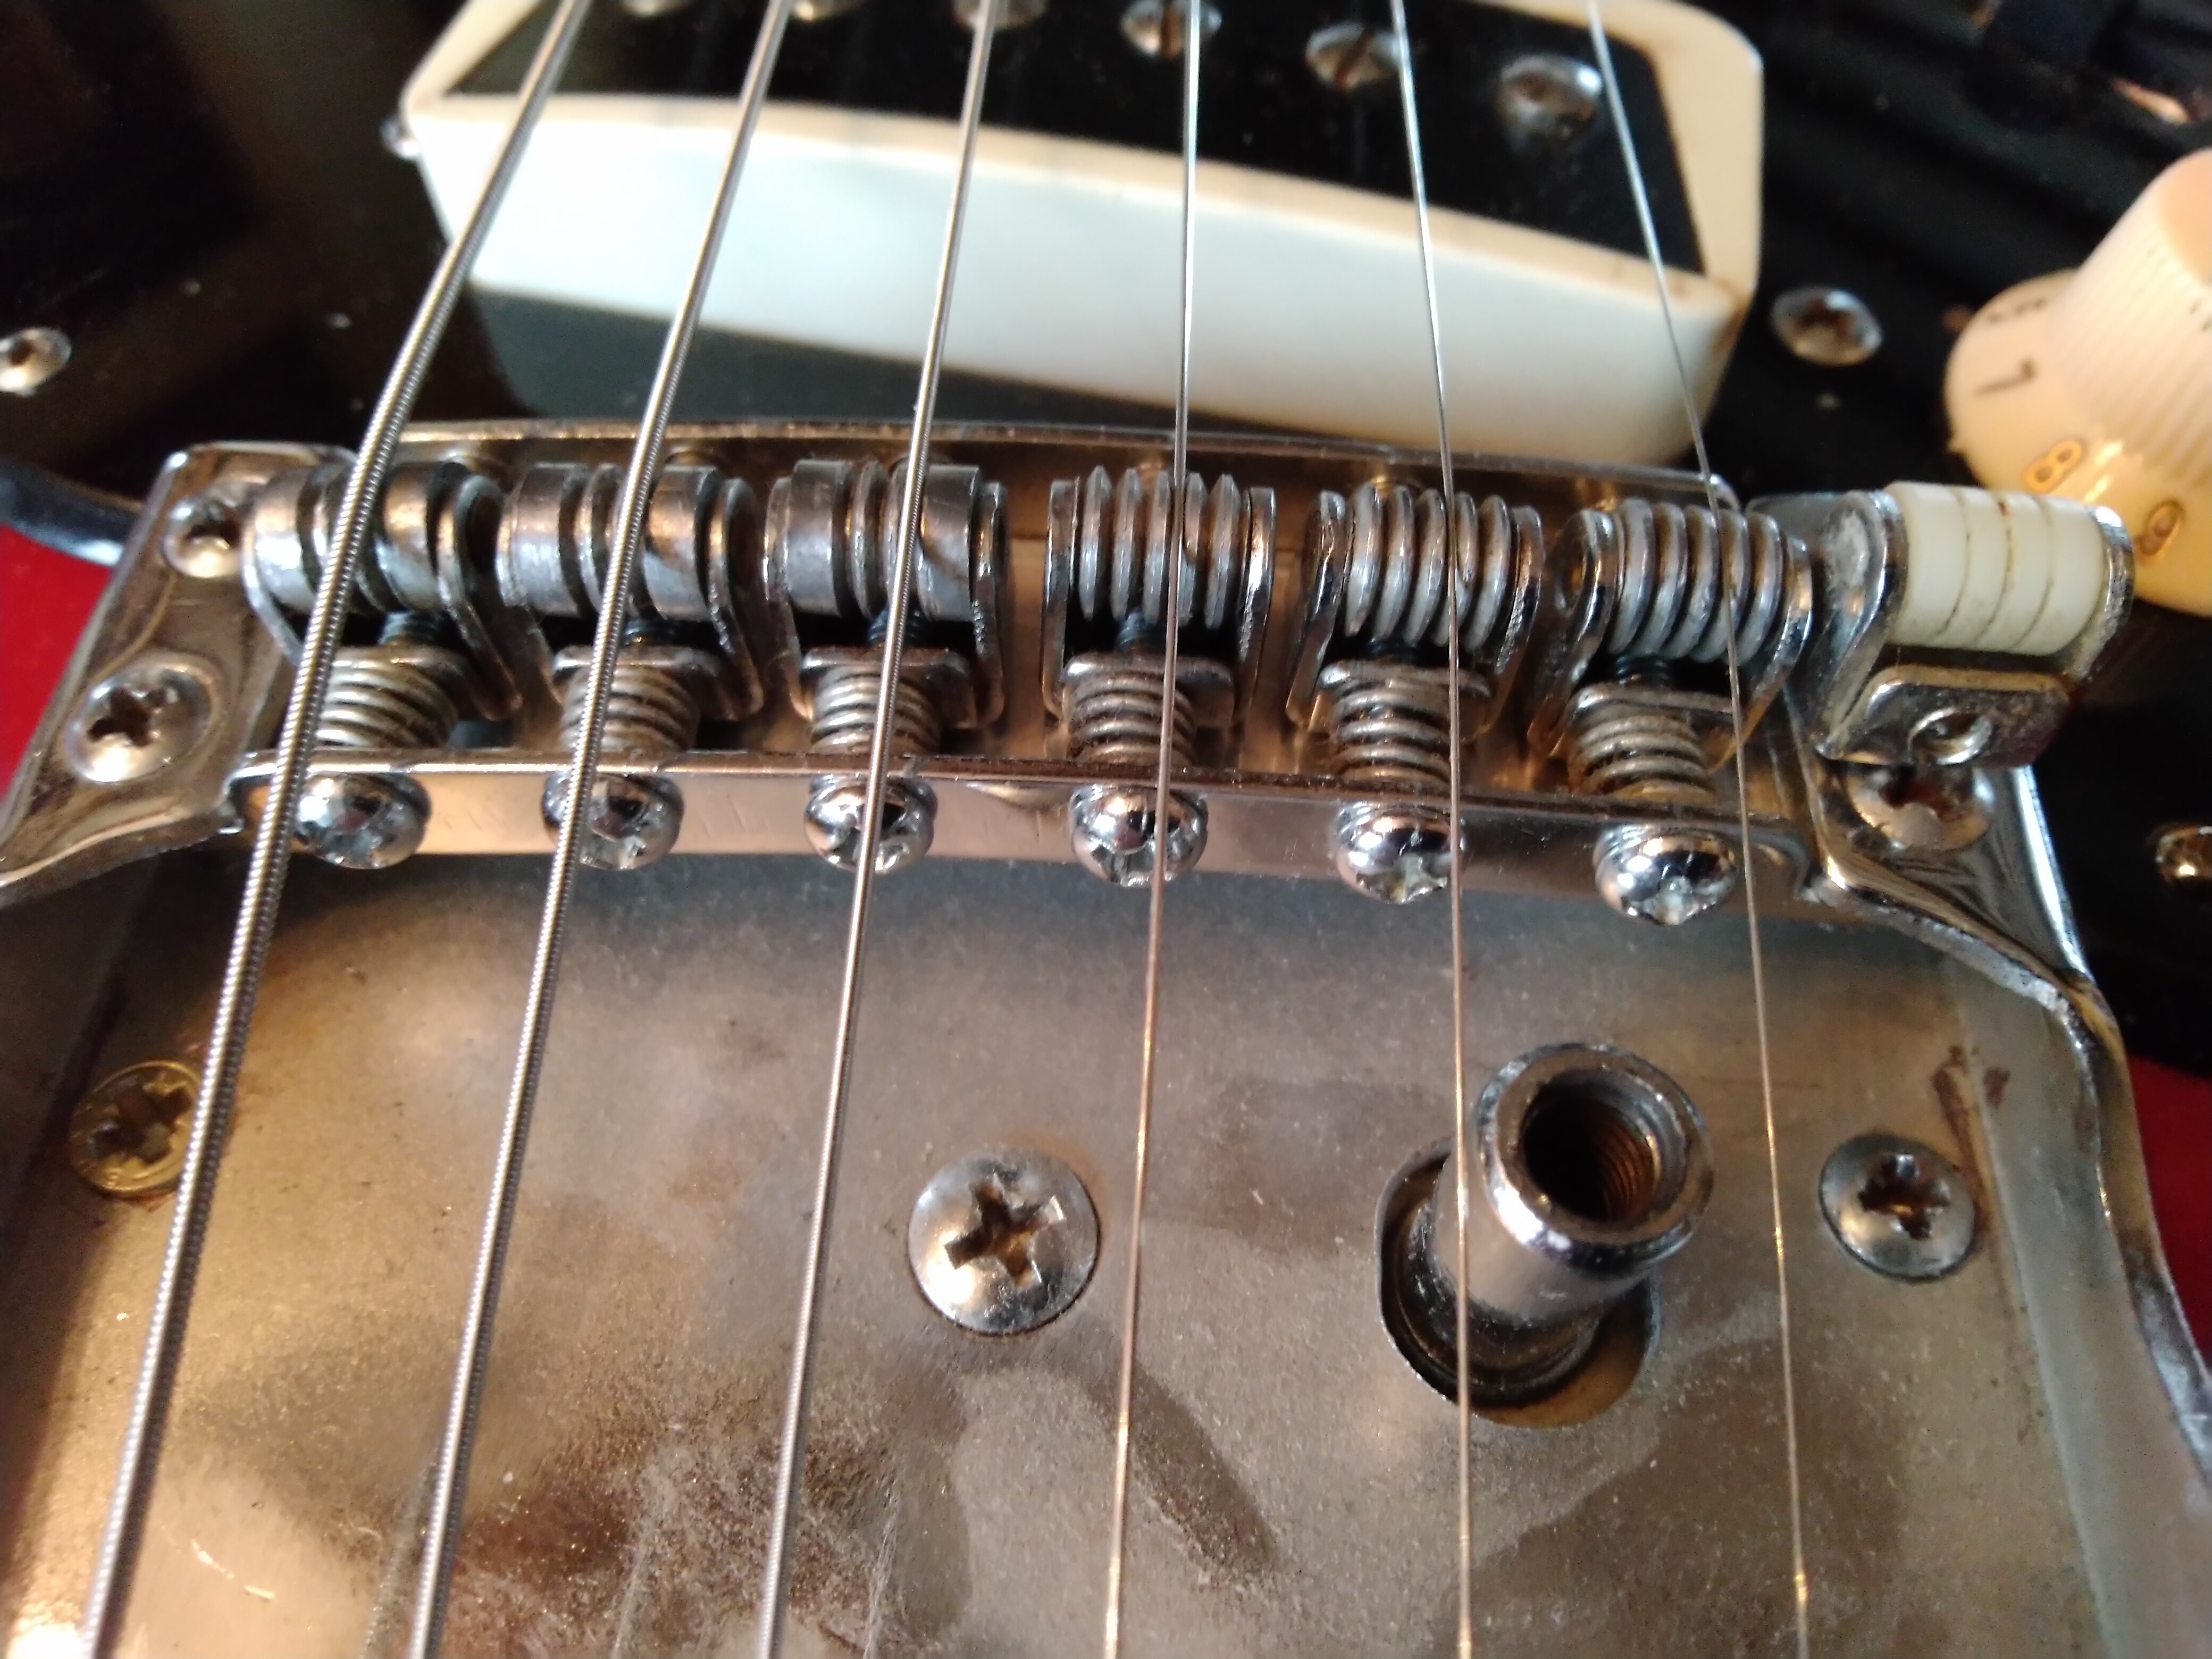
I wasn't very fond of the plastic roller saddles. I thought they made the guitar sound a bit dull. I replaced them with metal saddles from an old Teisko bridge. I really would have liked to replace the bridge for some kind of hardtail, but the neck radius was not right for any of those I found.
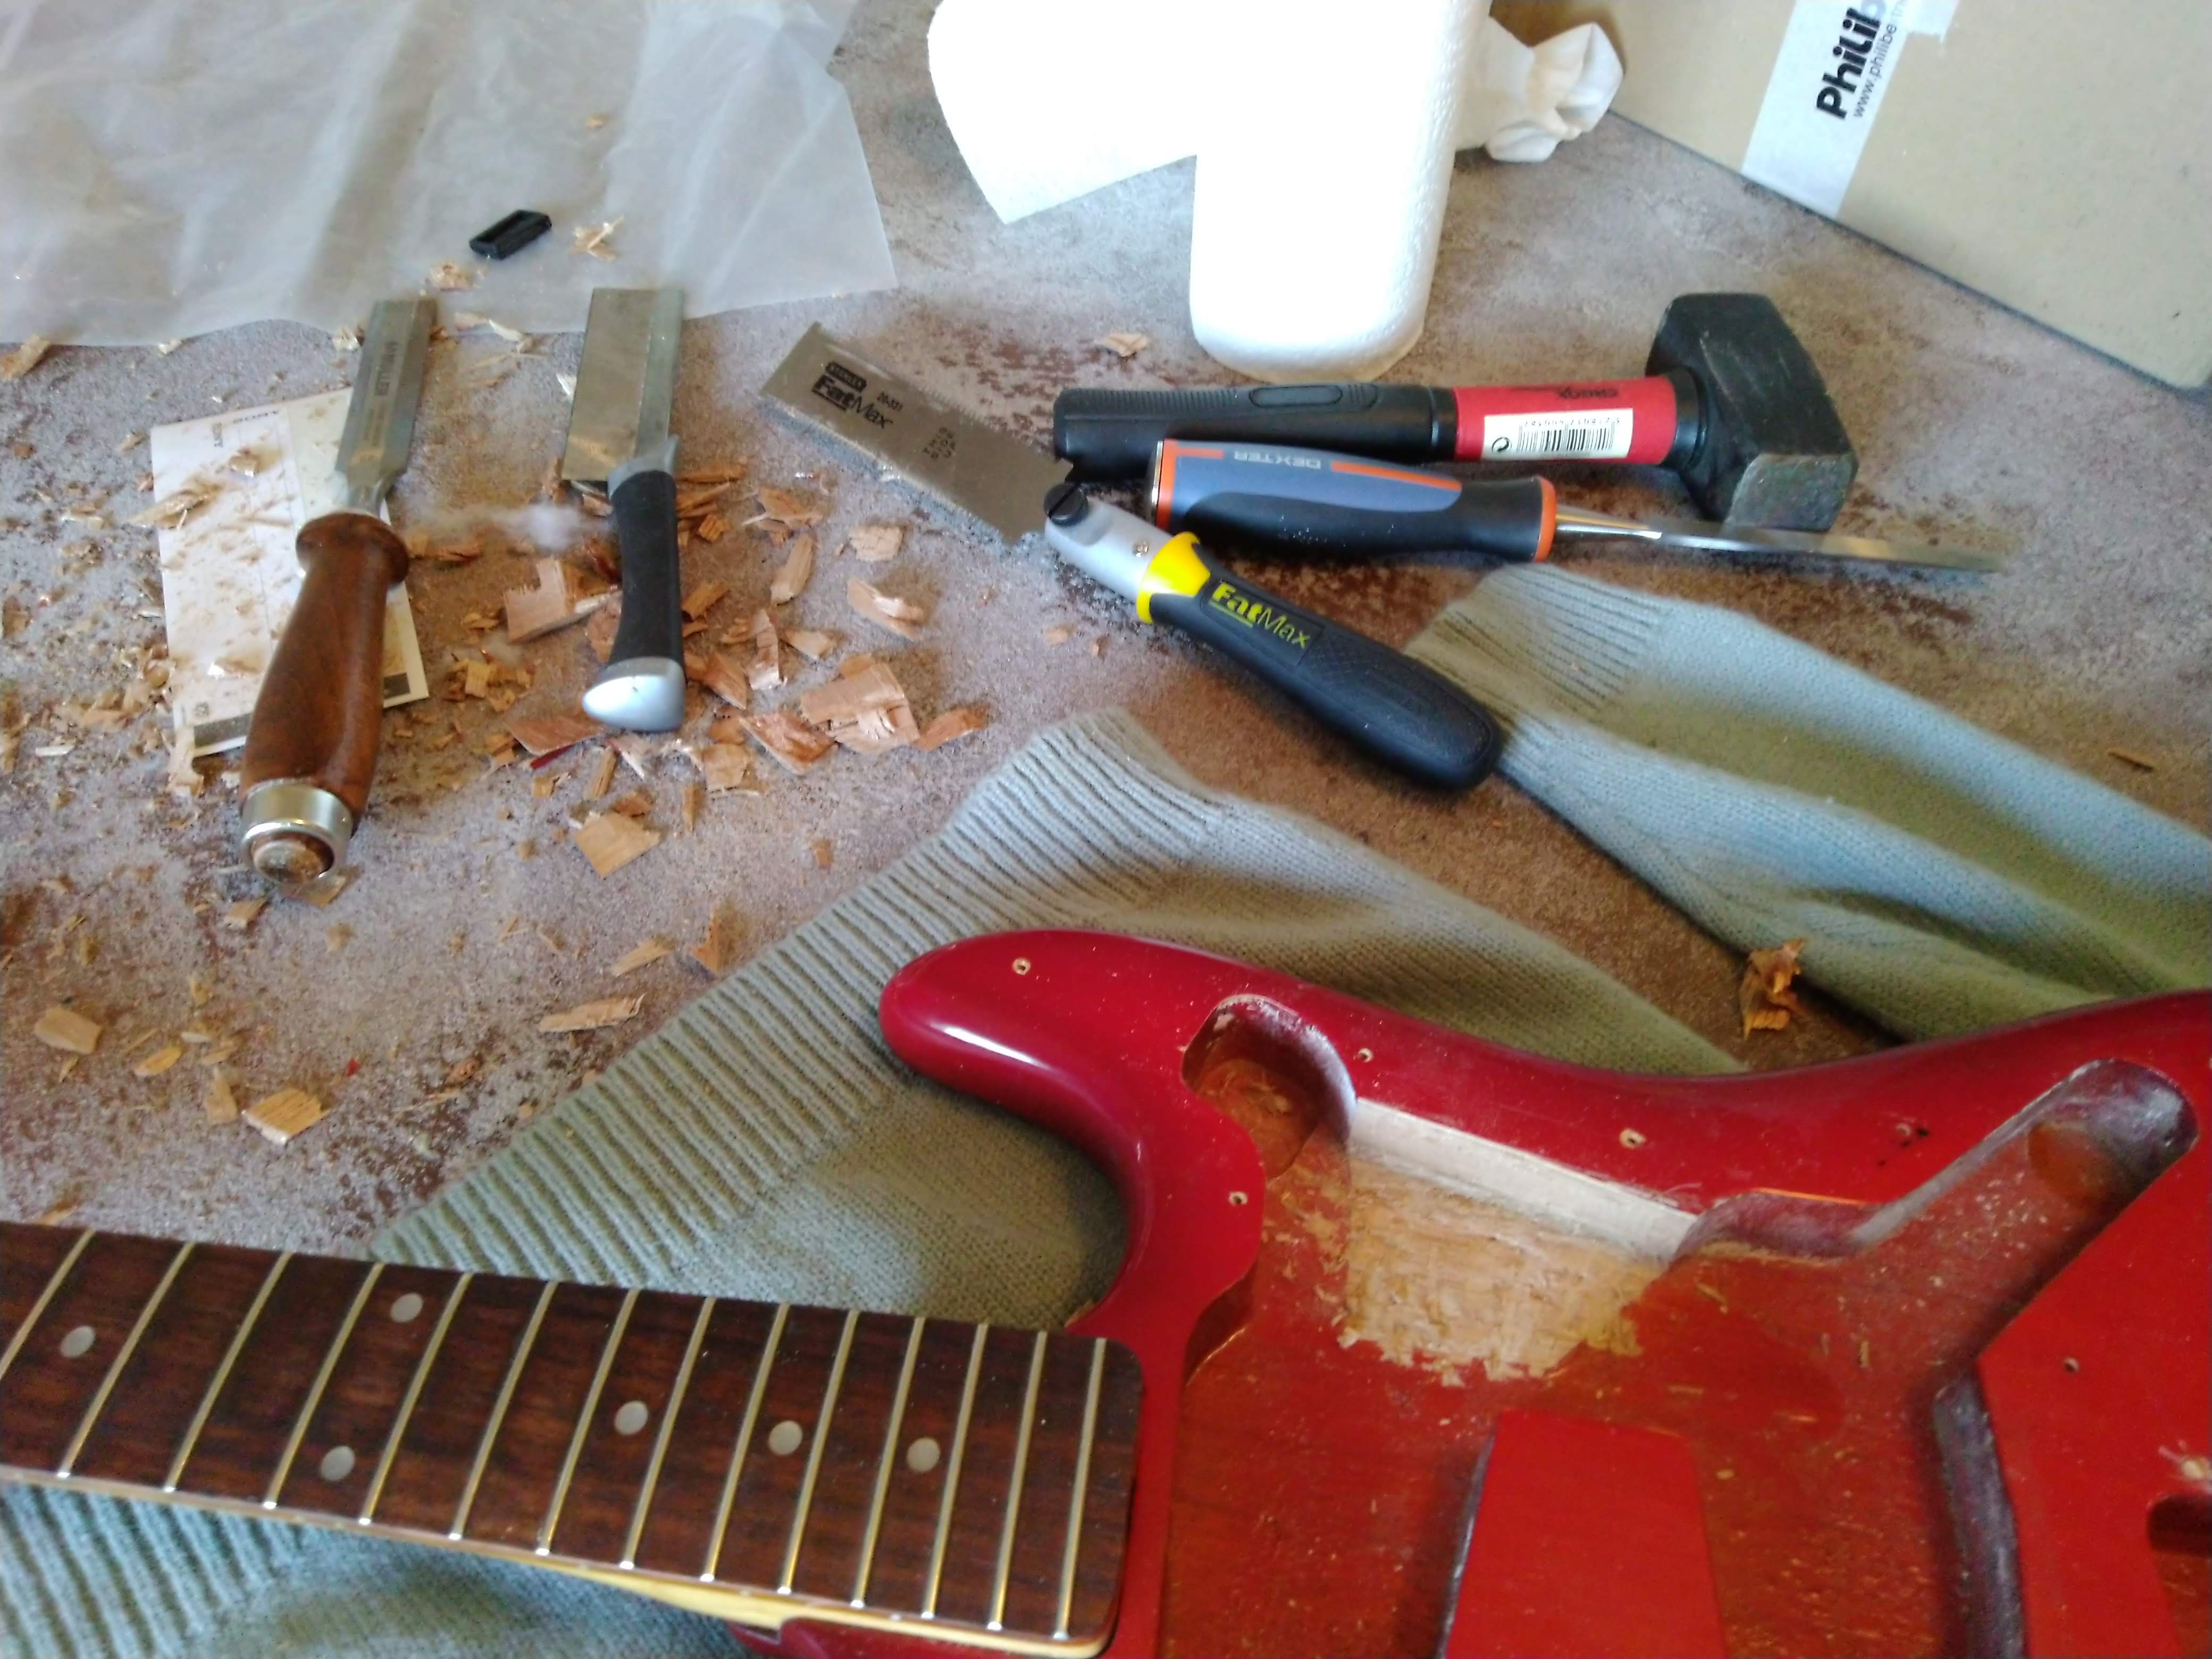
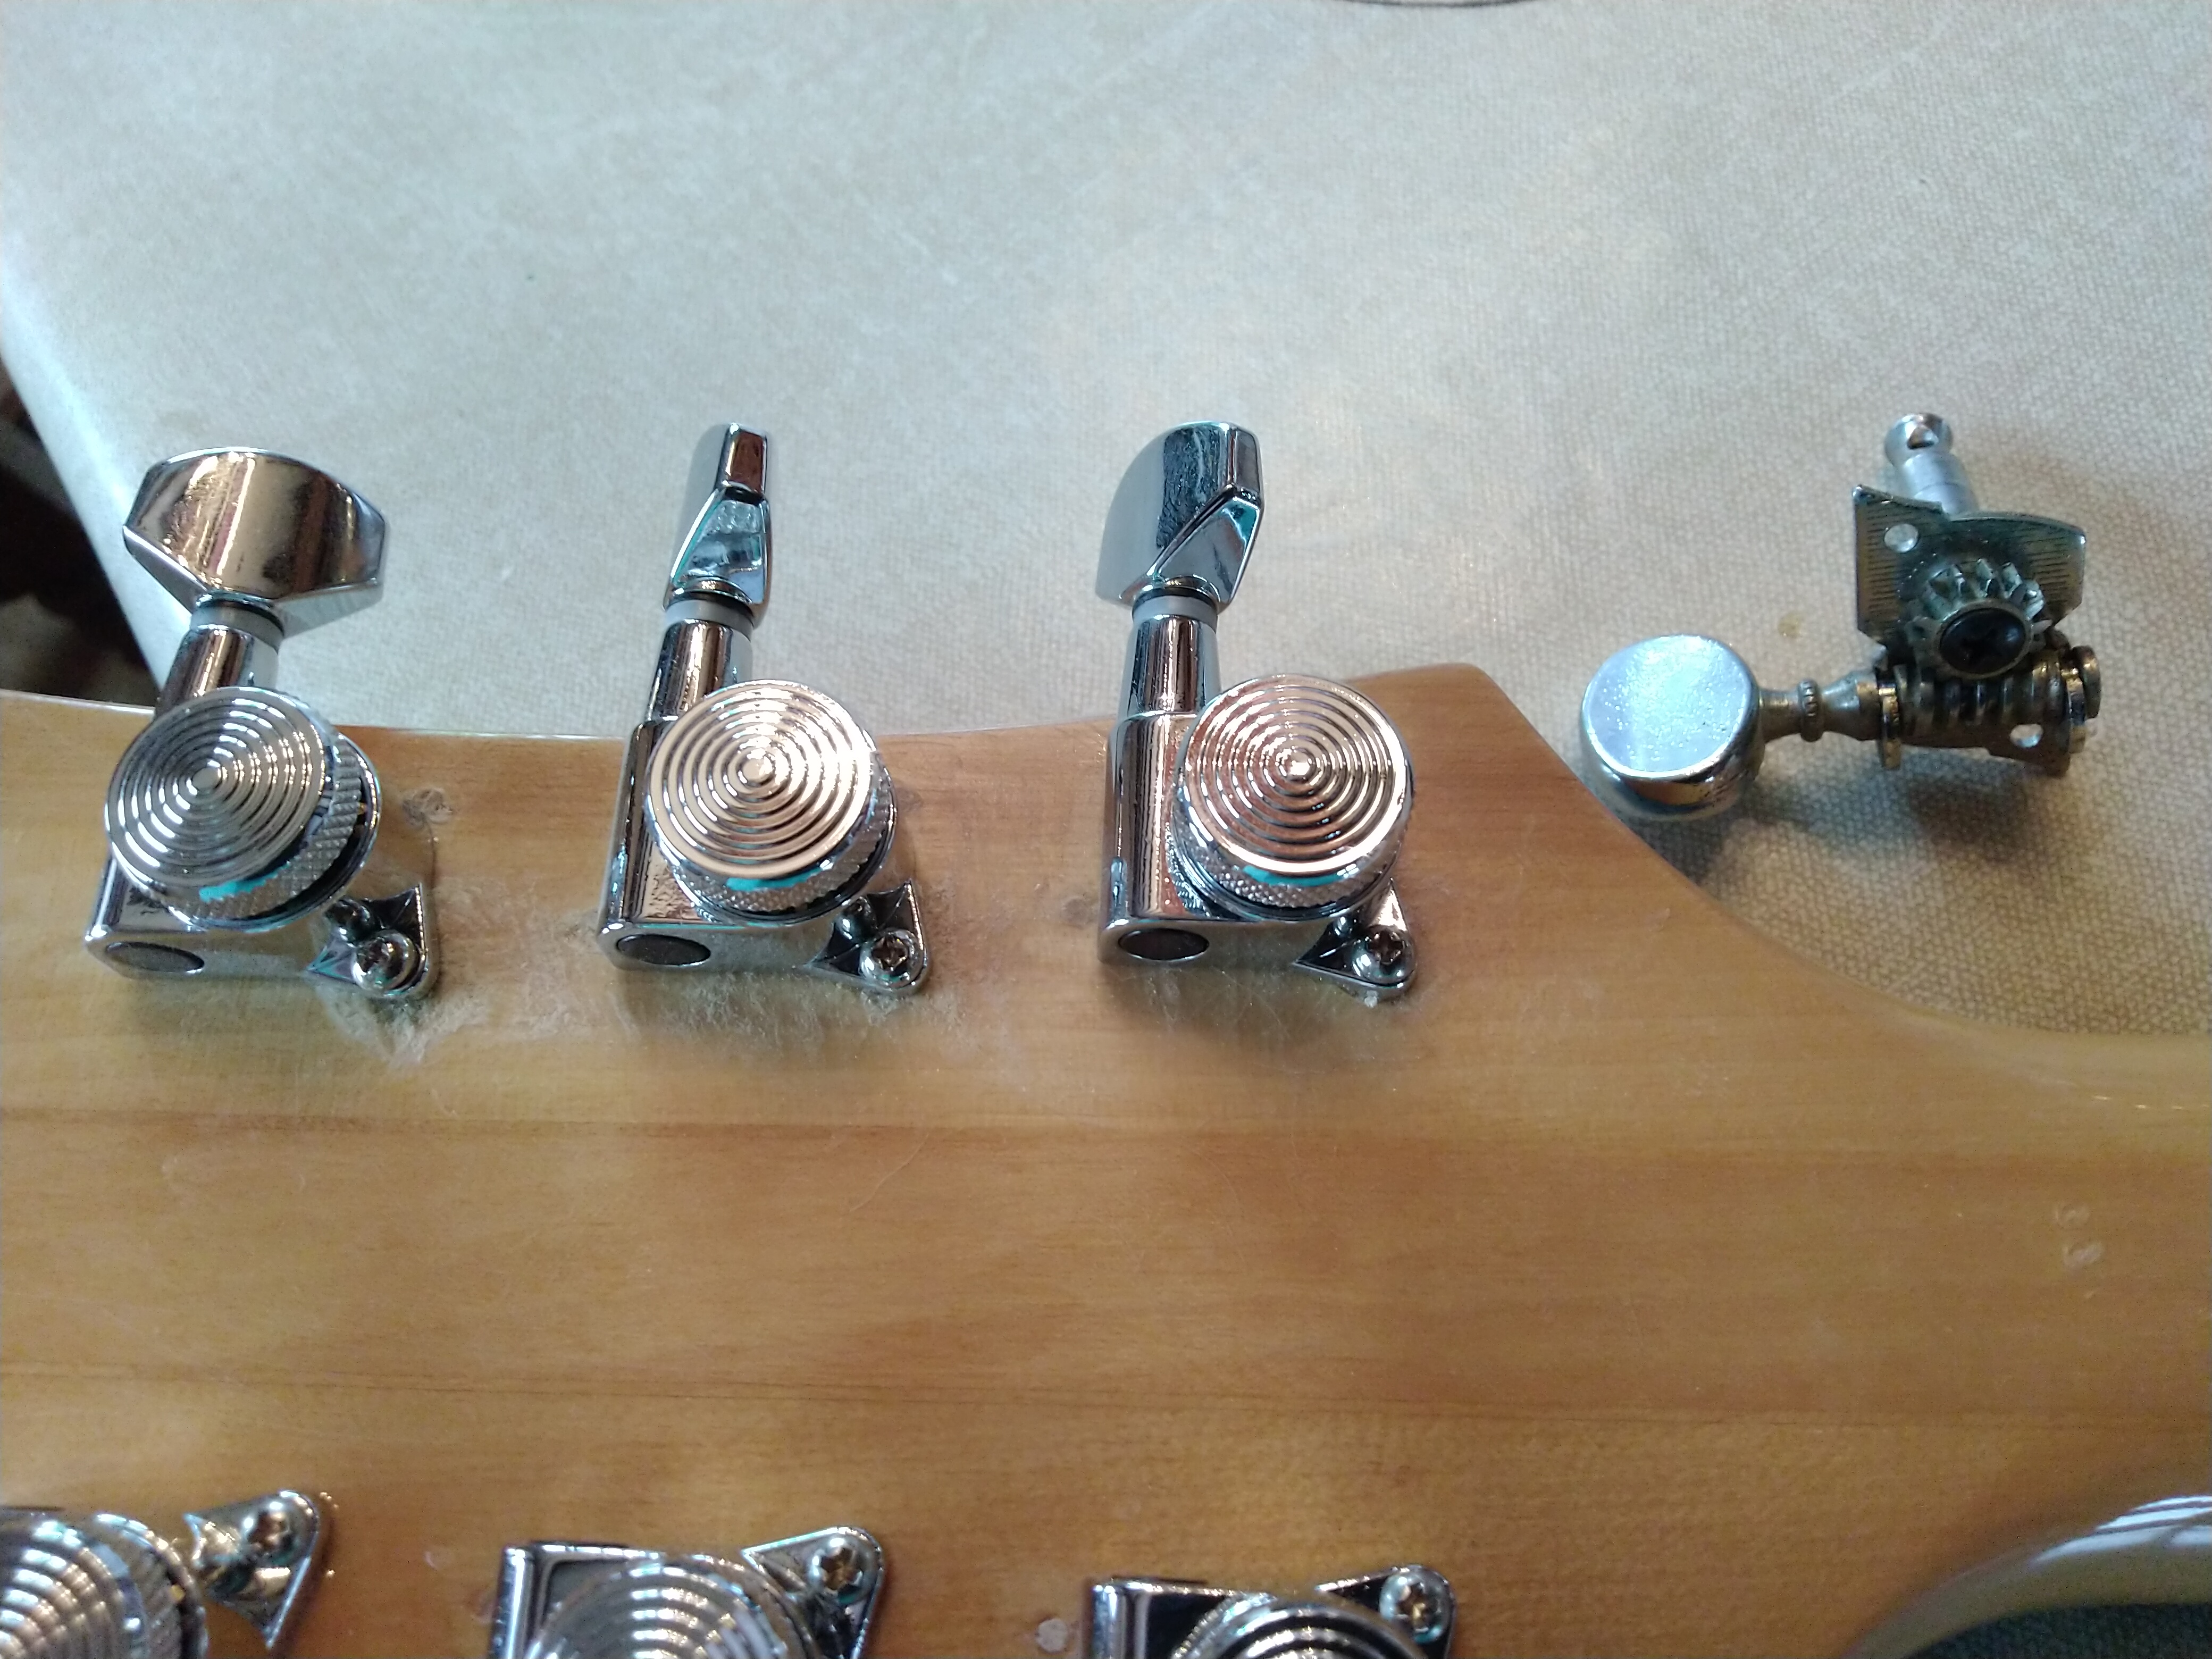
I'm not a fan of the look of vintage mechanics, and those were crap, so I changed them for modern ones. I didn't know this would involve enlarging the holes... The only tool I had for this was a round file. This was a rather long (and a bit scary) operation. I also broke two screws in the head because of not drilling well enough before screwing... Had to dig to retrieve them and fill with epoxy. I was not very proud of myself on this one. Anyway, the new mechanics are in place and the guitar stays in tune, so it seems I did not totally screw this up.
I finally got to finish this some days ago (it took me a loooong time, sometimes I paused for weeks because I was too scared to do something). Everything seems to work as intended. The series switch does it's job. I was worried about the capacitor/pot value choice for the bass cut but it does a good job of clearing the mud of the neck pickup, which makes the parallel/series positions much more usable. It’s way better than the original off/on bass cut which made the sound much too thin to my taste. Switching between bridge and series positions works very well to go from a bright clean to to a warm crunch.
Here are a few things on which I should work in the future:
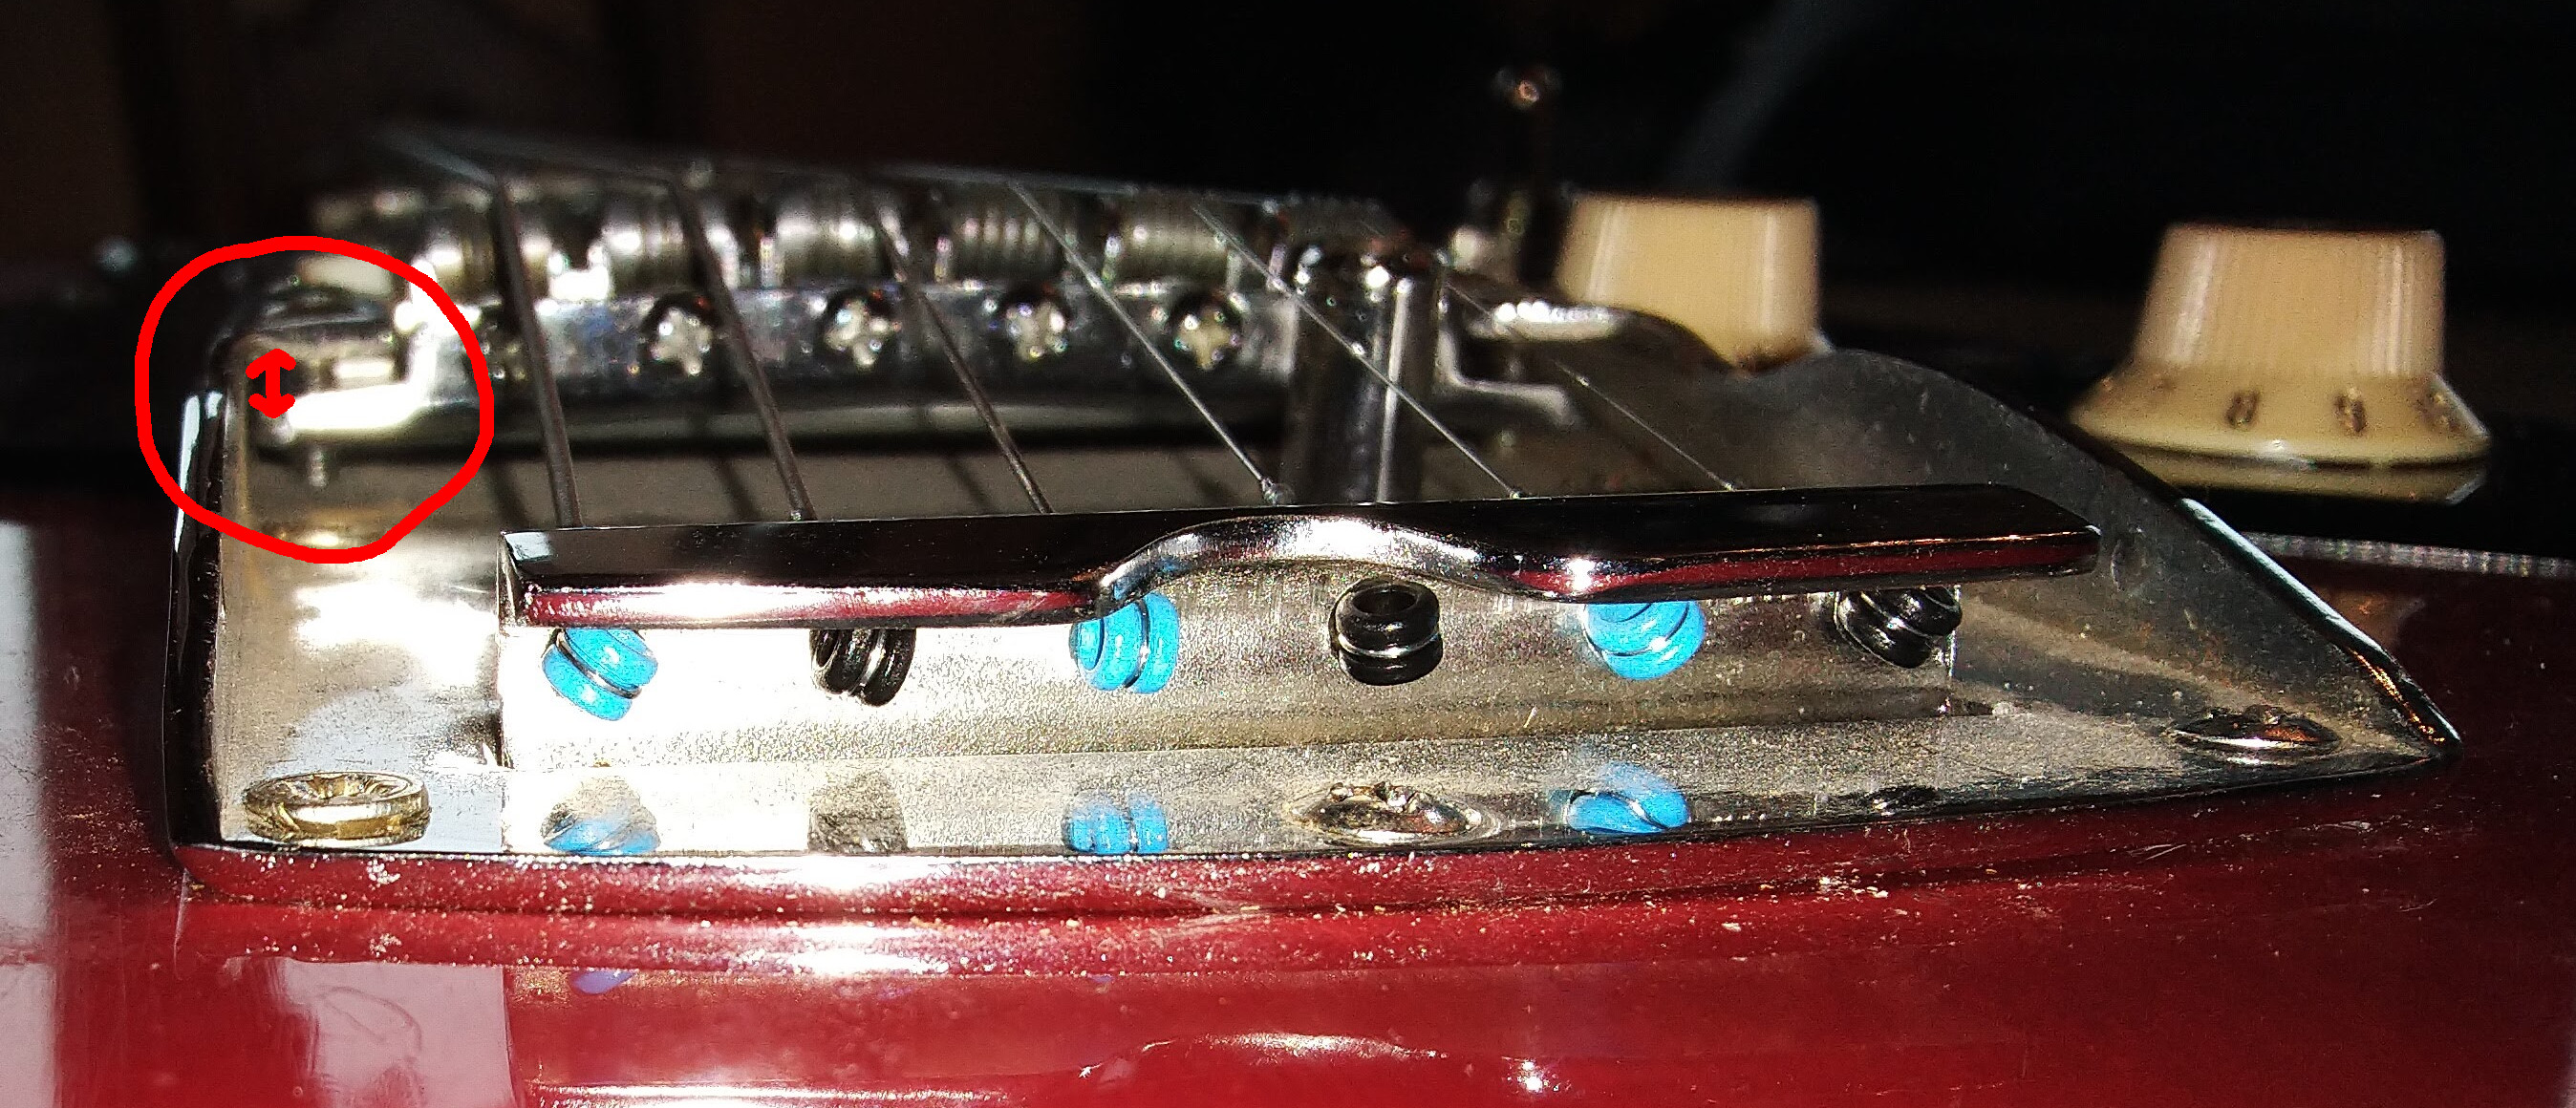
- the action if a bit high, but the bridge as it is does not provide any way to fix this. This may not be to hard to do by adding nuts on the screws that fix the bridge to the metal plate.
- the tone pot does not have a lot of effect. Maybe .022mfd/500kOhm was not a good choice? Maybe the wiring is wrong? I’ll have to check that.
- The guitar is very noisy when I don't touch the strings. When I first tested the hum cancelling of the modified pickups with a minimalistic wiring, the 2 pickups positions were notably less noisy. Now, I seem to get a lot of ground noise anyway... But that may be because the first test was done with a properly grounded amp (that was sold since then, I can only play with headphones or at very low volume these days) and the recent ones with a USB interface and two amps that operate on battery... I'll check this someday and will definitely ask for help here if necessary.
For now, I'm very pleased to play with this. It feels like having a new guitar, and I'm rather proud of what I've done. It may not look too impressive and often badly done, but it was a huge step for me in guitar modding. My soldering skills, also still poor, have somewhat improved in the process too.
I didn't know I was able to achieve that. I would like to thank you all again for the help and inspiration.
Here are some pics of my first real guitar mod. I got this Epiphone ET-270 a long time ago at a deposit sale for nearly nothing (it has since become rather overpriced after a pic of Kurt Cobain holding one of these has surfaced on the web). For those who don't know, it's a Matsumoku made guitar that was sold under various brands in the first half of the seventies, the most common ones being Epiphone and Aria. It sounds and plays ok, but I admit than I'm not too picky with my guitars quality. They're all pretty cheap models.
The electronics needed to be changed, and there were a few other things I didn't like that much. So, after reading la lot on this forum, I decided it was time to try modding it a bit. I can't thank enough everyone here for everything I've learned, as well as for the kind answers every time I post a question, by the way.
The challenge was to make everything myself, using only tools that I own, so expect to see some rather rough work here...
First thing I wanted to change : the pickups were not wired for hum cancelling. So I opened one of them to flip the magnet and reverse the poles. This was a bit scary because one end of the coil was directly grounded on the metal base of the pickup. So I had to unsolder it and create a real second pole for the pickup. This was necessary for the serial mod anyway. The new pole comes from an old wireless phone, and I threw in a bunch of green stuff (epoxy two components putty used in model making) to make sure everything stays in place. It's ugly, but it works.
Next, I had to make some room in that body in order to had a pair of Jazzmaster roller pots. This was done using a small saw and some wood scissors.
Only the pickups were kept. Everything else is brand new. The DPDT is now a serial switch (I used the wiring described here). It used to be a (too drastic) bass cut marketed has a “bass boost” (as if something as a passive boost could exist). The hot wire then go through a bass cut made with a 1nF capacitor and a 1M roller pot, then to the usual volume and tone pots. The second roller pot is not used for now.
Making holes in the pick-guard was annoyingly hard. I don't know what it's made of, but it's at the same time damn hard to cut or pierce and easy to break. I tried with some model making tools, but had to borrow a Dremel for this one (must buy one of those). It does not look nice. I'll have to make some sort of cover someday.
I wasn't very fond of the plastic roller saddles. I thought they made the guitar sound a bit dull. I replaced them with metal saddles from an old Teisko bridge. I really would have liked to replace the bridge for some kind of hardtail, but the neck radius was not right for any of those I found.
I'm not a fan of the look of vintage mechanics, and those were crap, so I changed them for modern ones. I didn't know this would involve enlarging the holes... The only tool I had for this was a round file. This was a rather long (and a bit scary) operation. I also broke two screws in the head because of not drilling well enough before screwing... Had to dig to retrieve them and fill with epoxy. I was not very proud of myself on this one. Anyway, the new mechanics are in place and the guitar stays in tune, so it seems I did not totally screw this up.
I finally got to finish this some days ago (it took me a loooong time, sometimes I paused for weeks because I was too scared to do something). Everything seems to work as intended. The series switch does it's job. I was worried about the capacitor/pot value choice for the bass cut but it does a good job of clearing the mud of the neck pickup, which makes the parallel/series positions much more usable. It’s way better than the original off/on bass cut which made the sound much too thin to my taste. Switching between bridge and series positions works very well to go from a bright clean to to a warm crunch.
Here are a few things on which I should work in the future:
- the action if a bit high, but the bridge as it is does not provide any way to fix this. This may not be to hard to do by adding nuts on the screws that fix the bridge to the metal plate.
- the tone pot does not have a lot of effect. Maybe .022mfd/500kOhm was not a good choice? Maybe the wiring is wrong? I’ll have to check that.
- The guitar is very noisy when I don't touch the strings. When I first tested the hum cancelling of the modified pickups with a minimalistic wiring, the 2 pickups positions were notably less noisy. Now, I seem to get a lot of ground noise anyway... But that may be because the first test was done with a properly grounded amp (that was sold since then, I can only play with headphones or at very low volume these days) and the recent ones with a USB interface and two amps that operate on battery... I'll check this someday and will definitely ask for help here if necessary.
For now, I'm very pleased to play with this. It feels like having a new guitar, and I'm rather proud of what I've done. It may not look too impressive and often badly done, but it was a huge step for me in guitar modding. My soldering skills, also still poor, have somewhat improved in the process too.
I didn't know I was able to achieve that. I would like to thank you all again for the help and inspiration.