echocanyon
Rookie Solder Flinger

Posts: 6
Likes: 0
|
Post by echocanyon on May 11, 2021 16:20:43 GMT -5
Hello! I'm new to this forum and am hoping someone might be able to help with some wiring advice? I've been scouring through the posts but haven't found this particular set up. I've got what I believe is a Teisco Arbiter which is in a bit of a state so I'm trying to get it into some kind of working order. It has 2 single coil pickups, with 2 two position slide switches, 2 volume pots and 1 tone pot. My assumption is that the switches are simple on/off switches for the pickups? Here's how it looks inside: drive.google.com/file/d/1tL3-j40mFZNH3c3w93ddc6RZpTEuRkqi/view?usp=drivesdkWould really appreciate any advice on the best way to re-wire this up? Thanks in advance! |
|
|
|
Post by newey on May 11, 2021 18:55:05 GMT -5
I wouldn't want to guess at the type of slide switches being used. I am not familiar with this particular guitar, but several of the Teisco 2-pickup guitars had the pickups wired in series. SO, before we can get into the specifics of how to rewire this, we'll need you to test the switches..
To do so, you will need a multimeter, or at least a simple continuity tester. Check for continuity (or no/minimal resistance) from one pin to each of the others, first with the switch in one position, then with the switch in the other position. Chart your results.
The reason is, these could be On-Off switches or On-On.
It also looks as if all the pickup wires are yellow? That's going to make phase a bit of guesswork, unless there's a marking on one of the wires I'm not seeing.
|
|
|
|
Post by frets on May 11, 2021 20:16:15 GMT -5
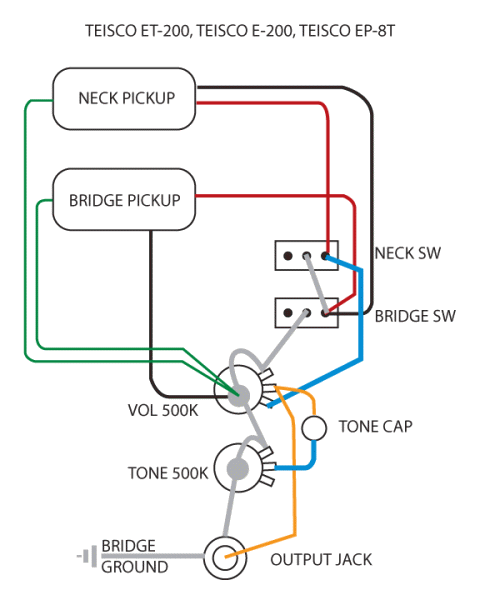
Hi Echo😺, Newey is correct in terms of checking the continuity. Here is a diagram that may help if it’s on/off.  The two pickup models were all very similar. |
|
|
|
Post by newey on May 12, 2021 5:01:06 GMT -5
The dual volume controls are one difference here, compared with the diagram for the E-200. Presumably these were wired right after the pickups, then the Master tone after the switches, like on an Explorer.
|
|
echocanyon
Rookie Solder Flinger

Posts: 6
Likes: 0
|
Post by echocanyon on May 12, 2021 7:08:41 GMT -5
Thanks for the replies - much appreciated!
To answer the questions:
Switches - I'm pretty sure from memory that they were on/off switches for the pickups. They were completely knackered (the switch element had been snapped off), so I've bought replacements, which are Standard Double Pole Slide Switches.
The diagram is really useful, I've seen that one online. I have 2 questions on it, firstly with the switches, the diagram shows 3 spots on each switch to attach the wires to, whereas the switches on the guitar (both old and the replacements) have 2 rows of 3 hoops to attach the wires to, some I'm unsure of exactly where the wires would attach. Also, as newey points out - the diagram has 1 vol pot, whereas I have 2, so again, I'm unsure of exactly how this would be wired.
On the pickups, both wires are yellow, but I can see that each pickup has one wire with black marking on it at the end near the exposed wire.
Sorry for all the newbie questions - I really appreciate your help!
Thanks
|
|
|
|
Post by newey on May 13, 2021 5:46:10 GMT -5
I'm pretty sure from memory that they were on/off switches for the pickups. They were completely knackered (the switch element had been snapped off), so I've bought replacements, which are Standard Double Pole Slide Switches. They may have been wired as On-Off switches whether they were (electrically speaking)On-Off switches or On-On. The switches shown on the diagram above are only single pole switches; yours are double pole, that's why there's an extra set of lugs. You could use your new switches to do this wiring, you would just use one half of each switch. The real question is- Is this the wiring you want? We don't have an original diagram for this particular guitar, it may have been wired similar to the E-200 or maybe not. The fact that it had double-pole switches is odd if this were the wiring scheme used, since it doesn't require a double-pole switch and manufacturers try to save a few cents wherever they can. The wiring diagram is a bit odd for the E-200. Using their labelling of "neck switch" and "bridge switch", here's what this wiring does: Both switches slid to the left gives both pickups in series (most guitars wire their pickups together in parallel) Both switches slid to the right gives both pickups shorted to themselves, and thus both are off. Neck switch slid to the right, bridge switch slid to the left gives bridge pickup alone, neck pickup shorted. Neck switch slid to the left, bridge switch slid to the right gives you neck pickup alone, brdge pickup shorted. But since you bought double pole switches, you actually have more options, if you don't care about replicating the stock wiring (which, as stated, we don't really know what it was anyway). With DPDT swithces, you could wire this in "binary tree" fashion such that, instead of having one setting where both pickups are off, you could instead have both pickups in parallel with both switches to the right, giving you the choice of either series or parallel, plus each coil by itself. As for the pots, unlike the diagram, you would wire each pickup's volume pot directly after that pickup and before the switches- pickup "hot" lead (we'll use the one without the black marking to be the "hot" *) goes to its volume pot CCW lug, center lug is wired to the "hot" of the switches as shown on the diagram, CW lug is grounded. The tone pot then gets wired after both the switches and before the output jack, wired in the same fashion as shown in the diagram ***This is assuming these pickups do not have metal covers over the coils. If there are metal covers, you will need to see if you can tell which wire is wired to the cover, that wire then has to be the "ground" wire for both pickups. If there is a cover and you can't tell which wire is attached to it, we'll need to do some testing first. If there are no metal covers, then it doesn't matter which wire is which, so long as you wire both pickups the same way. **Note that this diagram shows the pots as if one were looking down through the pickguard. We typically draw diagrams the opposite way, as if one is looking from the bottom up, since that's the way one will be doing the wiring. So, wiring the pots from the rear, you would need to mirror the lugs right to left (unless you are a lefty). |
|
echocanyon
Rookie Solder Flinger

Posts: 6
Likes: 0
|
Post by echocanyon on May 13, 2021 7:54:15 GMT -5
Thanks so much for the detailed reply.
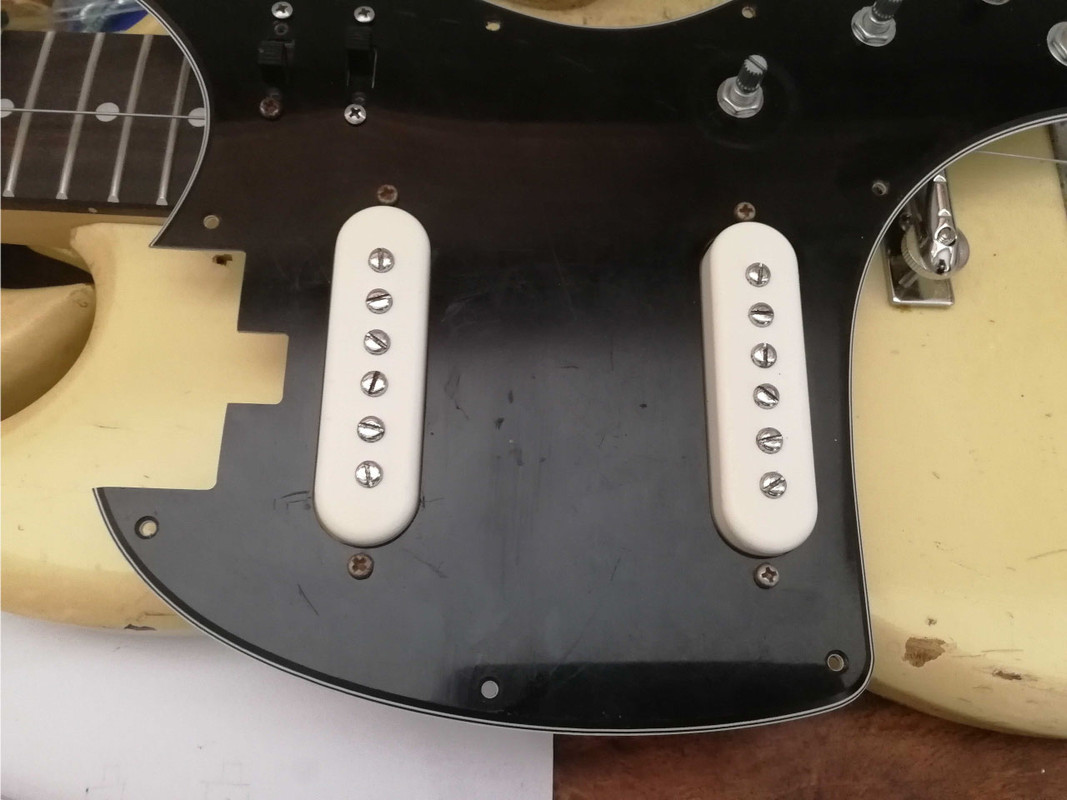
With regards to the pickups, they don't appear to be metal covered (please see pic attached for ref).
With regards to the wiring - I'm not too fussed about this being a 'faithful' replica, obviously I like the idea of being able to quickly mute one or other pickup. I'm not too sure on what you mean by the series or parallel option you mention. What benefit / effect would this give?
Is there a particular name for this type of set up I could search for and try to get a wiring diagram to show me how to do this?
As mentioned (and as you can probably tell!) I'm a complete novice at the inner workings of guitars, so I really appreciate you taking the time to help me out here!
Thanks!
 |
|
|
|
Post by newey on May 13, 2021 9:27:29 GMT -5
OK, no metal covers so no worries there. Let's just agree to call the wires with the black bits the "ground" wires for each pickup, it only matters that we wire both pickups the same way so that they are in phase with each other.
Most two (or more) pickup guitars have their pickups wired in parallel with each other. Teisco and Danelectro were the two oddball manufacturers who often (but not always) wired their pickups in series. Series wiring has a bit more output but will also be a bit darker-sounding, less treble than parallel wiring. In later years, the Brian May "Red Special" guitars were also series-wired.
Having the option to choose between series and parallel gives you a fourth tonal option, but you would lose the "both off" setting. The only real use for a "both off" setting is either to be able to keep the guitar plugged in onstage without noise/feedback, like if you wanted to have a backup guitar ready to play in case you bust a string or whatever. Or, you might want to use the "both off" setting as a kill switch- if you had one pickup on by itself, you could use the switch as a kill switch. But slide switches are kind of tough to manipulate, most people would want a toggle or a pushbutton for a kill switch as it's easier to manipulate.
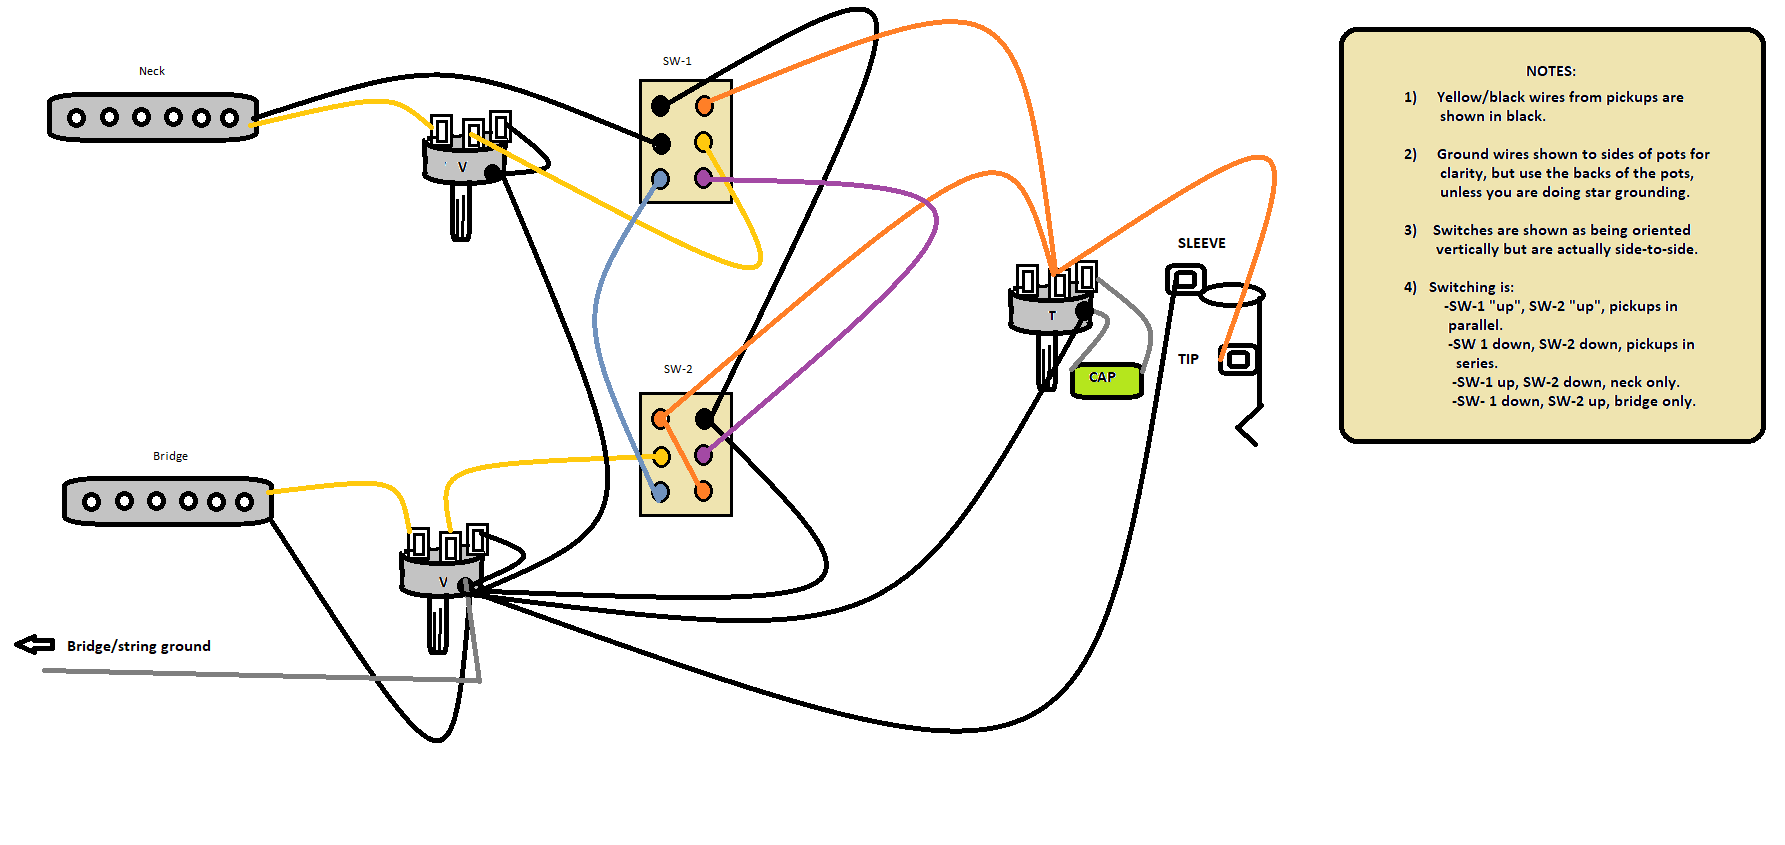
Which "this" do you want? If you want to do the series/parallel wiring (what we call "binary tree" wiring), we have diagrams to do that. Adding in the wiring to the pots would be easily done. An exact wiring diagram with your 3 pots and that switching would probably require a custom diagram, but we can certainly do that if needed.
|
|
echocanyon
Rookie Solder Flinger

Posts: 6
Likes: 0
|
Post by echocanyon on May 13, 2021 10:24:49 GMT -5
Thanks again for your helpful reply newey! The series/parallel wiring sounds like an interesting setup, so I'd certainly like to give that a try. I know it's cheeky but if I could take you up on your offer of a diagram of that setup with the 3 pots I have that would be amazing! Really appreciate your help. |
|
|
|
Post by newey on May 13, 2021 11:12:56 GMT -5
I know it's cheeky but if I could take you up on your offer of a diagram Maybe a few days before I can get to it. But we'll get you taken care of. |
|
echocanyon
Rookie Solder Flinger

Posts: 6
Likes: 0
|
Post by echocanyon on May 13, 2021 11:59:40 GMT -5
Amazing - thank you newey! |
|
|
|
Post by newey on May 13, 2021 12:10:08 GMT -5
I lied . . .  Got a chance to do this on my lunch hour at work. We aim to please!  |
|
echocanyon
Rookie Solder Flinger

Posts: 6
Likes: 0
|
Post by echocanyon on May 13, 2021 14:41:05 GMT -5
Ah man, that's brilliant! Really kind of you to put that together for me. I'll get the soldering iron out this weekend and let you know how it goes.
Thanks again, you're a gent.
|
|