|
|
Post by kaustinwright on Dec 21, 2023 21:13:12 GMT -5
Thanks so much for the responses. I'll give this a shot and let you know what I find!
|
|
|
|
Post by kaustinwright on Dec 12, 2023 18:20:55 GMT -5
Thanks for the response! It Seems great as a starting point. Of course there are a couple positions that would need to be swapped. I'm a bit of a newbie, so not sure exactly how to read the diagram with the split humbuckers but will sit down to see if I can work it out.
|
|
|
|
Post by kaustinwright on Dec 6, 2023 9:15:08 GMT -5
|
|
|
|
Post by kaustinwright on Dec 5, 2023 14:58:33 GMT -5
|
|
|
|
Post by kaustinwright on Dec 5, 2023 14:56:55 GMT -5
Hello again all!
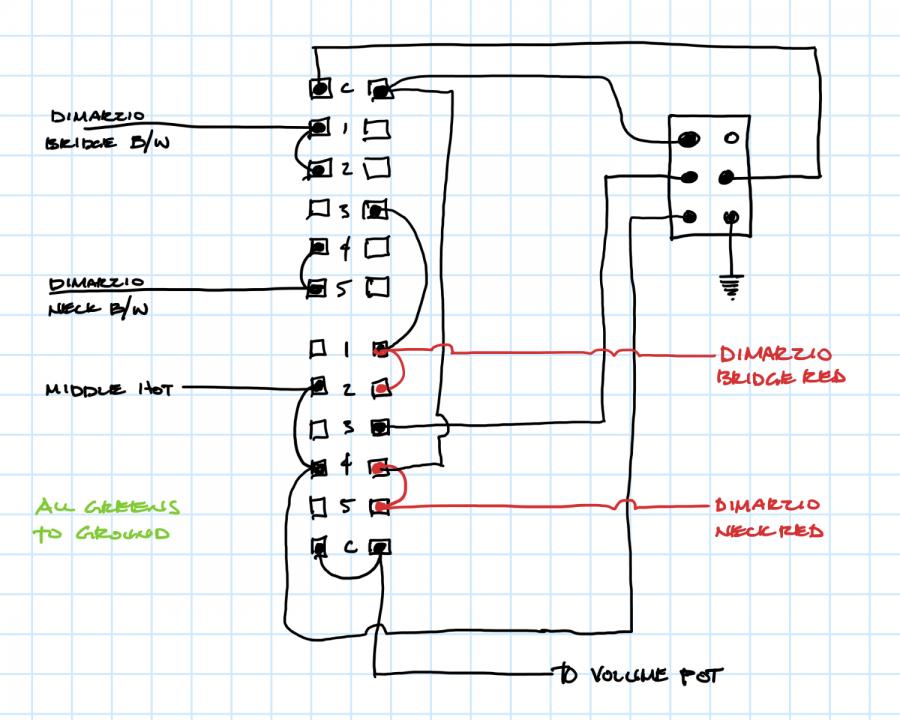
I have what seems to be a simple idea which is proving to be a bit more complicated than I expected. I have a Keisel HH guitar with the below switching:
Position 1: Bridge Humbucker
Position 2: Bridge inside coil split
Position 3: Bridge inside and Neck inside coil split
Position 4: Neck inside coil split
Position 5: Neck Humbucker
I never use Position 2, so would like to have both Humbuckers in series in this position instead. It has a standard Strat 5 way switch, (with which I don't believe my desired wiring is possible) so I purchased a fender 5 way Super Switch.
Can anyone point me in the direction of a wiring diagram with something like this made possible? I am a novice, so have included a quick drawing of the current wiring for reference as it seems Kiesel has used the inside coils rather than screw coils, which is also throwing me off a bit.
|
|
|
|
Post by kaustinwright on Sept 9, 2021 17:40:30 GMT -5
Just got done wiring it and I love the tones, however when the 4pdt is in the strat position, it is selecting the wrong (inside) neck coil on positions 4 and 5. On the 4pdt down position in position 4 it is selecting the outside coil. It could have been a mistake on my part, but could you guys take a look? I did flip the neck pickup as instructed
|
|
|
|
Post by kaustinwright on Sept 7, 2021 15:17:20 GMT -5
Jack TriPpEr I think you hit the nail on the head! I see exactly what I did wrong in my diagram after comparing it with yours. I have created an updated one to try and wire up tonight. In the updated diagram I went ahead and used the Seymour Duncan color code for the bridge. In my previous iterations I kept it all Gibson just in case someone with a stock nighthawk tries to follow the diagram in the future. I Also implemented a few of your suggestions to make the diagram easier to follow Yogi B.  Can't thank everyone enough, and if this works I think every Nighthawk owner would benefit from the "corrected" scheme. I'll keep everyone posted!
|
|
|
|
Post by kaustinwright on Sept 2, 2021 11:48:32 GMT -5
OK, I drew my best attempt at Yogi B's schematic. After wiring it up I am finding phase issues in the tele position and the position 4 of the strat side. I believe it must be something with the neck, but it very well could be an error on my part.  |
|
|
|
Post by kaustinwright on Aug 31, 2021 7:16:13 GMT -5
No problem at all! And yes, DIY LC. It was just a quick diagram to help me solder along and I figured I'd post it just in case anyone else wants to implement it in the future
|
|
|
|
Post by kaustinwright on Aug 30, 2021 16:52:08 GMT -5
Thanks so much Yogi B ! I also got a response on another forum with a 4PDT which omits the middle alone position, which I rarely use due to the noise. I would've preferred to keep it but he couldn't find a way. I also wanted to have the tele tone on the 4pdt down, but he also wasn't able to work it out. I Really like your layout and just wanted to post this so you guys could see another route. Take a look and let me know what you guys think! Credit to Jack_TriPpEr forum.seymourduncan.com/forum/the-pickup-lounge/6105163-gibson-nighthawk-wiring-with-modern-superswitch/page3 |
|
|
|
Post by kaustinwright on Aug 26, 2021 10:00:34 GMT -5
kaustinwright: a truly "floating coil" would imply that neither end was connected to anything (except maybe the other end of the same coil). Ah! Apologies for using the incorrect terminology, but it makes much more sense now. Gotcha, well I believe that would still be an improvement. I use the split bridge position all the time so if I have to choose between the lesser of evils I think that's the ticket. With a HSH guitar such as your Nighthawk, you have a third option: compromise on position. If it helps, I would also not be opposed to the "compromise 4" Switching as I rarely use position 4 with the p/p up (middle + neck split) and honestly am not in love with that tone at the moment |
|
|
|
Post by kaustinwright on Aug 26, 2021 7:06:19 GMT -5
Just confirmed the SD and Gibson bridge pickup have the same polarity, south being the outside coil. My last post was more geared toward the position, as the tele sound I love from the Nighthawk has the south coil of the bridge engaged. This is my most commonly used position other than the full bridge so I would love to retain that tone if at all possible (like Yogi B 's compromise #3) |
|
|
|
Post by kaustinwright on Aug 25, 2021 19:25:36 GMT -5
did find a diagram that claims to solve the floating coil issue. Not sure what you mean by "floating coil issue". If you mean a coil "hanging from hot", as we term it around here, none of the diagrams we have been discussing in this thread have any hanging coils. If you mean a coil connected to ground but disconnected on the hot side, that's not an issue to be concerned about. Yes, YogiB's diagram solves that. I see now, sorry I was misunderstanding a bit earlier with my head spinning from it all. Just to confirm though, is there no way to have position 4 in Yogi B 's diagram the bridge and Nick's outside coils? |
|
|
|
Post by kaustinwright on Aug 25, 2021 7:43:15 GMT -5
Thanks for the info unregWith assistance from the Seymour Duncan forums, did find a diagram that claims to solve the floating coil issue. Credit to MikeS and Jack_TriPpEr over there. forum.seymourduncan.com/forum/the-pickup-lounge/338027-wiring-suggestions-help#post5747470Based on this diagram it looks like the only thing missing is the position 4 (switch down), and swapping which coil is split on the bridge. If I'm not mistaken it looks like it's the inside coil that's active rather than the preferred outside. |
|
|
|
Post by kaustinwright on Aug 24, 2021 15:49:05 GMT -5
They may well be the same, but this is something that probably should be checked I will have to check on this later on this evening with a compass. After spending some time with Yogi B 's schematic I see how it works a bit better now and it blows my mind how you guys can figure this stuff out! I had to sit there for a couple hours tracing the leads in each position to even visualize it. I am still pondering ideas on how to eliminate the floating coils with the below configuration (which I believe is the full diagram with the "compromise #3" that Yogi B suggested).  |
|
|
|
Post by kaustinwright on Aug 24, 2021 10:21:27 GMT -5
The connections check out fine by me too, but since you did ask for improvements: technically there's disparity between the table's labels of up & down and the way we usually think about those directions with a physical toggle switch, from perspective of the toggle lever. i.e. The lever pointing upwards, towards the top of the page, connects the commons of the DPDT to the lower terminals and thus corresponds to down in the table. Awesome! Thanks so much, Ill correct that on the install and just spin the switch around. I would love to see that option with the "compromise 3" layout if anyone has some time to lay them out in a quick schematic/diagram (also if possible, avoiding the coils hanging from hot). I think compromise #3 would require a 4PDT if I'm not mistaken so I'll go ahead and get one ordered! I wish I could be more help, but I'm still having trouble really understanding your original schematic, although I have no doubts it will work like a champ! You're exactly right, I do prefer to keep the bridge outer coil as much as possible as it adds an extra twang and brightness I really enjoy. The neck is less important to me which is why compromise #3 looks to be the most appealing, but I am still unclear on if this would require rotating the neck or if it would be fine as-is. I wish I could repay you guys for the amount of time and effort you put in to helping me, and just wanted to say thanks again  . I am trying to wrap my head around this all and it is definitely making my head spin a bit so I apologize in advance for any ignorance I may have toward the subject. I've read everyone's posts about 10 times each and picking up new info each time. Just so many things happening at once in the diagrams not to mention polarity, winding direction, phase etc.  |
|
|
|
Post by kaustinwright on Aug 23, 2021 14:31:53 GMT -5
Yogi B Thanks for taking the time to put that together! Unfortunately I am a bit of a wiring novice so trying to work out where everything is in that diagram is throwing me for a loop! I sat down and translated it to one of my "diagrams for dummies"  I went over it twice and it seems to be making all of the right connections but would love if someone could double check and offer any improvements. Apologies in advance for the rat nest! 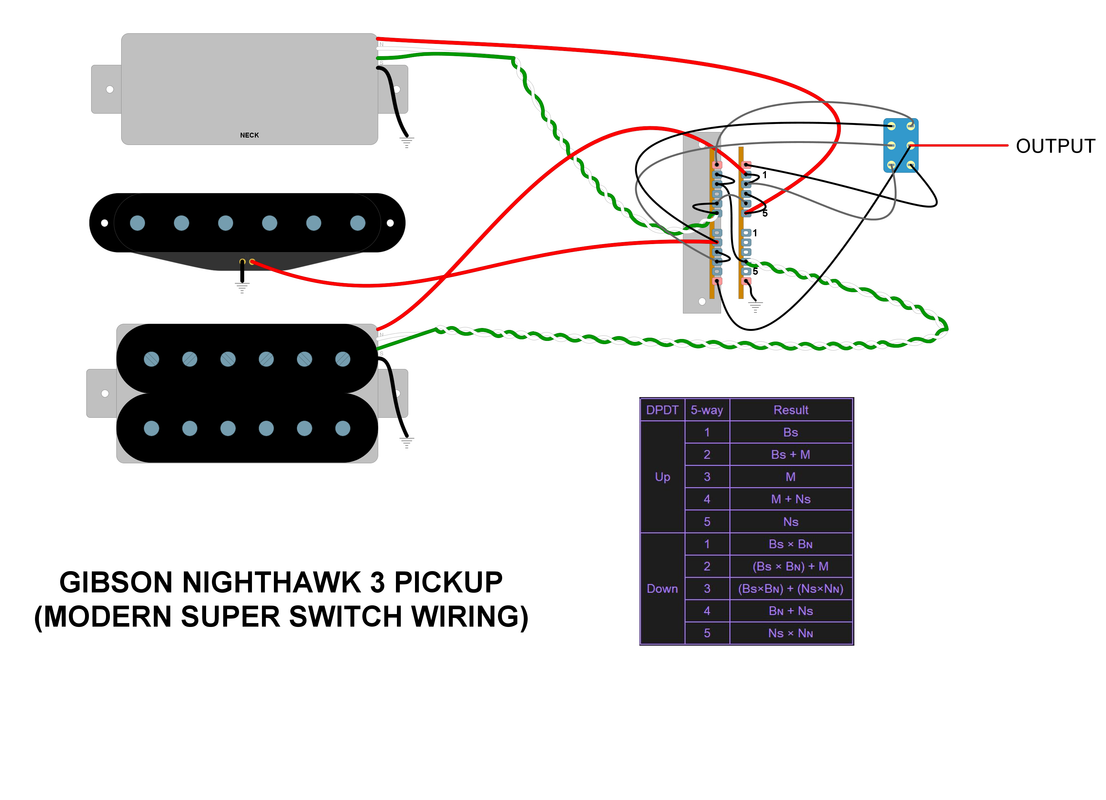 newey newey I actually use a standard DPDT mini switch where a the tone pot was, so I would not be opposed to putting in a 4PDT switch if it will make it hum cancelling (or any other switch for that matter). I have no idea how that would be wired though, I would love to see your thoughts and whether or not this would also require Yogi B 's suggestion of flipping the mini neck humbucker around. 
Thanks again
|
|
|
|
Post by kaustinwright on Aug 20, 2021 15:51:01 GMT -5
Will do! I can update them shortly.
I did want to make sure it was clear, on the vintage switch lug 5 is moved I'm between lugs 1 and 2. It is not just a matter of spacing. Any info on the humbucking properties and the issue of the floating coil not shorting to ground would be much appreciated
|
|
|
|
Post by kaustinwright on Aug 20, 2021 9:31:05 GMT -5
Here is a couple diagrams I made showing what I believe is the correct wiring for a modern and vintage superswitch using Gibson color codes. Can you guys review and make sure I didnt make any mistakes? 
 While I was at it, I decided to try my "Ideal Wiring" Configuration with the modern switch. If you guys could also double check this one for me that would be great. The only thing I think might be an issue is the hum cancelling in the tele position.  |
|
|
|
Post by kaustinwright on Aug 20, 2021 6:52:16 GMT -5
Newey, you are correct, in the higher res images it is clear the middle pickup is not touching lug 5 and turning to 4. I dont see where you're seeing the 4th position (switch down) as N HB + Mid on the schematic. I have highlighted the connections and they lead to the B HB (labeled treble) and the Mid in that position.  And Yogi B, I really appreciate your input and locating that rogue switch! Unfortunately, I feel your proposed layout is is less intuitive than the original, as when I'm on stage I would love to just slam the switch in either direction to get neck and bridge. The Tele tone just feels right as an "In between" tone on pos# 4. Same with the B HB+Mid on pos #2. I can't wait to see if newey or anyone has any other ideas to swap the lugs to fit the "ideal layout" as (like you mentioned) everything I've tried doesn't work on paper. I think as a resource for Nighthawk owners I will create a master diagram translating the Dimarzio EP1112 to a modern superswitch, in the nighthawk cavity, while also correcting the pickup labels on the gibson schematic. I'll work on it today and will post for review. Thanks again to everyone for the help! |
|
|
|
Post by kaustinwright on Aug 19, 2021 17:36:37 GMT -5
I went ahead and layed out the switch based on what I got from the multimeter. There seemed to be a few loose connections but I got it labeled. It looks like the issue is they ran out of space on the last lug and decided to pop #5 right next to the common. Here are the photos and quick diagrams I made.  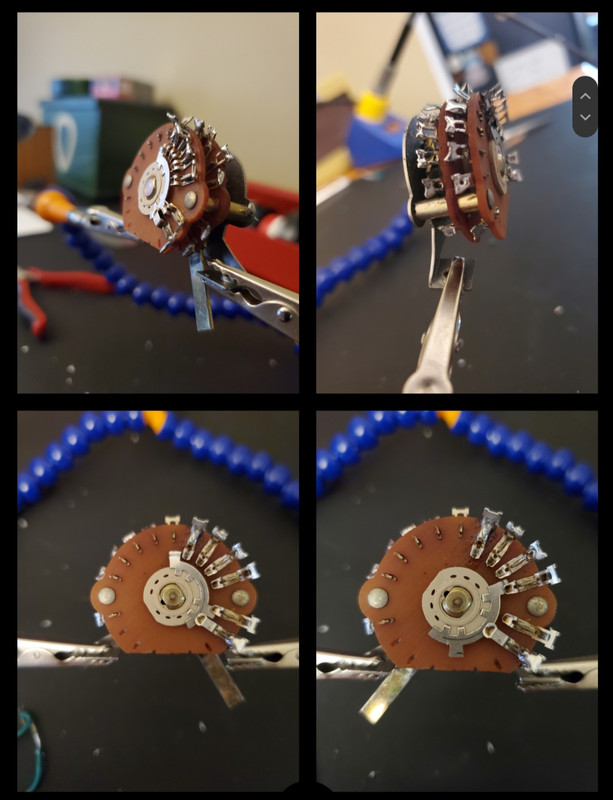 |
|
|
|
Post by kaustinwright on Aug 19, 2021 16:29:48 GMT -5
Thanks so much for the quick response! Sorry, I should have been more clear. It had sound in all positions except the middle, but regardless was all over the place with the wrong pickups selected in most positions as well as the coil split not working on the bridge at all. I started from scratch and sure enough it still didnt work. There were too many issues to take note so I just scrapped that diagram. I then decided to translate the below schematic to modern superswitch as well as I could, and this was successful in the "tone knob up" position but when it was down, I must have messed something up in translation. This may help you: 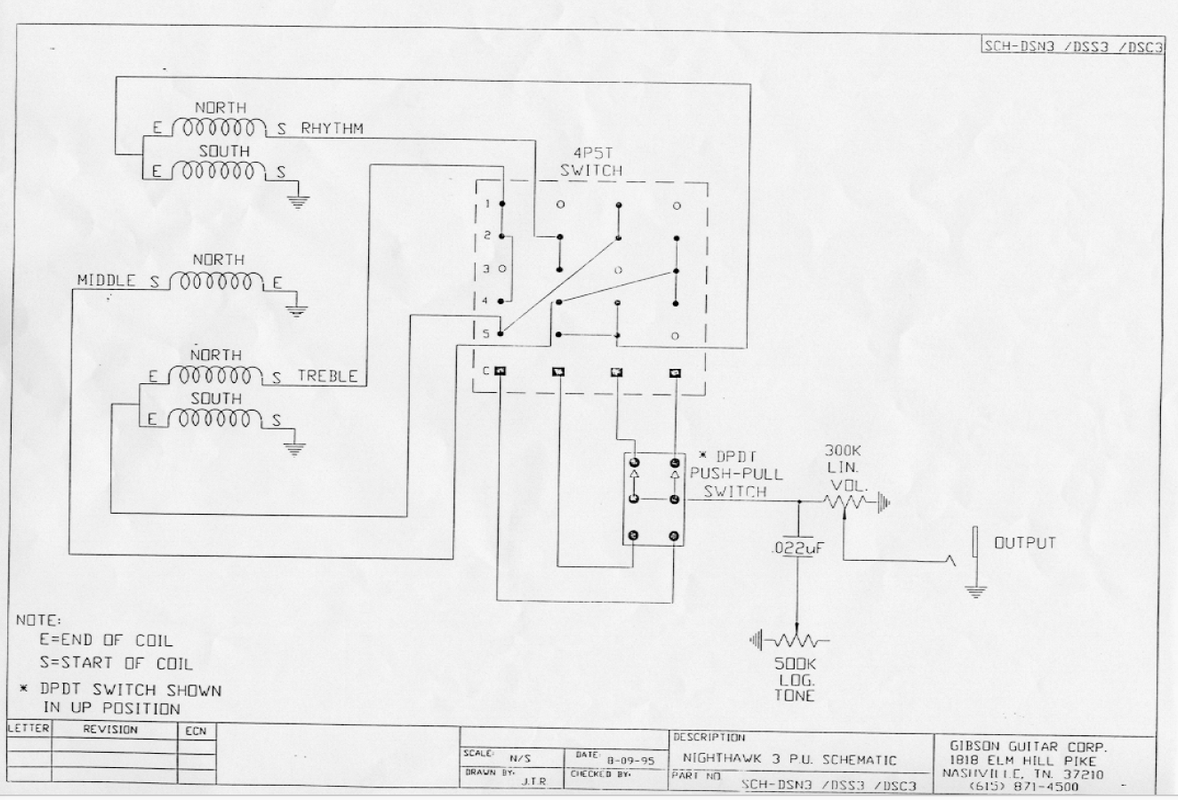 I did translate the wiring to the correct colors (white/green series link and red hot for Gibson & white/red series link with black hot for the new SD pickup- other wires tied to ground) I would be happy to measure continuity and show photos, but I fear my original issue was caused by a faulty switch, but I will do my best. Thanks again for all of your help! |
|
|
|
Post by kaustinwright on Aug 19, 2021 14:48:45 GMT -5
Hey guys! Been a long time since I've posted and remembered this was the spot to come to for wiring help. I noticed my '96 Gibson Nighthawk didn't sound quite right, and after a quick screwdriver tap test I found the neck pickup was shorting and activating in the bridge position (position 1 tone knob down) causing a muddy tone. I ordered a new fender SuperSwitch which feels 10x better than the 25 year old switch (along with a new Seymour Duncan bridge pup), but unfortunately I have gone through 4 attempts at wiring it with no success. At this point I am tempted to just go with a standard 5 way switch with basic coil splits, but I really love the "tele" position of the nighthawk in position 5 (tone knob down). 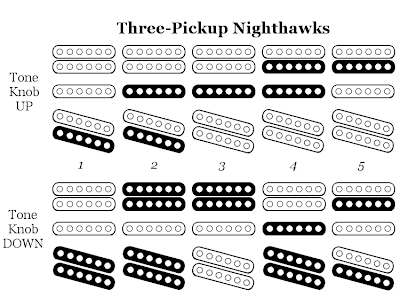 My question is can anyone translate the vintage superswitch wiring shown here from Gibson to a standard superswitch? Based on some other forums, I have also realized this diagram has the bridge and neck labels backwards. 
Here is an image I found online which has a modern switch, but it did not work at all after wiring it up twice. I noticed this also causes a floating coil rather than shorting it to ground so any other wiring suggestions are welcomed. 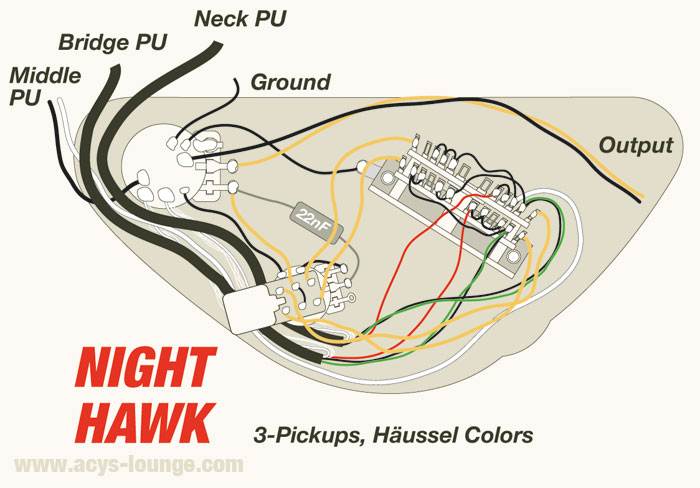 I can post photos of the Gibson switch later to show the connections, but for some reason I cannot find any info on this switch anywhere! As you can see in the Gibson wiring, it also has 2 lugs paired together at the top rather than the 1 common on the modern one. I cant thank you guys enough, I am about to go bald from pulling my hair out on this one. Also, on a side note I have always found "the tone knob down" layout to be quite confusing and was curious if anyone could work their magic to swap the pickup layout to the below configuration leaving the "tone knob up" position as-is. This is more intuitive in my opinion with positions 1, 3 and 5 being the full humbuckers and the 2 and 4 positions being the "in between" sounds. I would be perfectly fine with the original Nighthawk configuration, but figured I would throw it out there as my ideal situation. Thanks again for the help!  |
|
|
|
Post by kaustinwright on Feb 14, 2017 8:56:30 GMT -5
Haha!
Nice to know my ears aren't failing me.
One thing I did want to mention was the tone control. It wirked in the opposite direction and was acting strange the first time I wired it all up.
I ended up changing the to have the grounded cap on the right lug, signal to the center with the left lug open. Not sure if I read the Schematic wrong, but it seems my diagram is incorrect.
|
|
|
|
Post by kaustinwright on Feb 13, 2017 21:27:27 GMT -5
Finally got all of the components in today, wired it all up, and everything works perfectly!
The series/parallel switch completely turns it into a different guitar. It opens up a ton of sounds I wouldn't have had with just the 2 stock pickups.
The only thing I can hear that's a little odd is the volume control in parallel mode. There seems to be a mid boost when the volume is just slightly rolled off then rounds off when it's maxed out. A tolerable caveat seeing I have all of the extra tone capabilities.
Thank you guys so much for the help in this project, and I hope I helped some future Nuts in the process! I'll post pics soon
|
|
|
|
Post by kaustinwright on Feb 3, 2017 14:11:58 GMT -5
Does this look right to everyone? Attachments:
|
|
|
|
Post by kaustinwright on Feb 3, 2017 12:21:33 GMT -5
SG,
Totally not your fault, I definally should be more specific next time about when certain switches are active.
It's all a learning experience.
What is the alternative to tone after volume? I'm assuming it's tone before vol, and that has a better tone you say? I'm interested
Doc,
I'm not sure what issues this "hanging from hot" will cause (not entirely sure I know what it even means), but I'd rather be able to blend one pickup out for another with the volume controls (in series or parallel mode) than have the neck volume control both pickups together, just adds more versatility on my end.
|
|
|
|
Post by kaustinwright on Feb 3, 2017 10:04:52 GMT -5
So I will be wiring reTrEaD's schematic up today, I will post another diagram so you can confirm the translation was done correctly.
Thank all of you so much for the help, I could never have spotted these issues by myself. 🎸
|
|
|
|
Post by kaustinwright on Feb 2, 2017 23:04:39 GMT -5
Thank you!
Unfortunately I don't have the room to fit a push pull pot on my tone control in the thin Ibanez S body, I wish I did. I hardly have room for the pot itself!
I'm having a little trouble understanding your schematic though, there seems to be a few components that I wasn't aware were in the circuit like the caps etc. And I'm not sure where the coil split is happening.
This very well cloud be due to my lack of expertise in electronics
|
|
|
|
Post by kaustinwright on Feb 2, 2017 22:30:21 GMT -5
Sorry, it's a bit cluttered. Please check my work, not sure if the switch is done correctly Thank you! Attachments:
|
|


 . I am trying to wrap my head around this all and it is definitely making my head spin a bit so I apologize in advance for any ignorance I may have toward the subject. I've read everyone's posts about 10 times each and picking up new info each time. Just so many things happening at once in the diagrams not to mention polarity, winding direction, phase etc.
 I went over it twice and it seems to be making all of the right connections but would love if someone could double check and offer any improvements. Apologies in advance for the rat nest!
