|
|
Post by cynical1 on May 13, 2013 5:05:21 GMT -5
So, now i have like this : 1.2mm - in north half (applies to 1/2 of the shim) 1.8 mm - in north half of the south half (applies to 1/4 of the shim) 2.1 mm - in south half of the south half (applies to 1/4 of the shim) That's about a light 3/64" from end to end. That's not surprising. I'm assuming North End is the low E and South End is the high E. Not knowing where the nut ledge was when you started, or how much material you filed off it could have been a lot worse. Good. Pictures on the Internet can be deceiving. That's actually not a bad idea. You're not putting 900 foot pounds of torque on this bad boy, so that should work. We're talking the firm erasers and not the gum art erasers, right? Well, there went a half a point from the score you got for the eraser idea... Greek...buddy...I know I've mentioned bar clamps...probably several times... Spring clamps are great for a temporary hold to check fit or alignment...Hell, I use them all the time to hold shop lights...but for gluing they're the wrong tool. Re-read the part I wrote about the wood block and the barrier piece again. Feel free to ask for a clarification if I didn't completely explain it. I really am trying to help you out here...but you gotta meet me half way... Happy Trails Cynical One |
|
|
|
Post by cynical1 on May 12, 2013 20:06:03 GMT -5
How many pieces of veneer did you use for the final thickness?
I ask this as anytime I've got to build something up I pre-glue everything prior to the final assembly. The advantage is that you can oversize it, let it set a few days and do the final shaping and sanding so when it comes time to glue and clamp it in it's only one piece that I can easily align and clamp.
Clamping this piece is easier than you think it's going to be. Take your sanding block with something to protect the finish on the radiused side and put it under neck. From all the pictures I've seen of this guitar the back neck radius extends just past the nut...correct me if I'm wrong.
Next, find a square piece of wood slightly longer and wider than your shim piece. After that find something to act as a barrier between this piece of wood and your shim. I use a piece of old plastic milk carton, but anything that the wood glue will not adhere to works.
Once you have this stuff assembled, brush a thin layer of your glue on the bottom on the shim and the top of the nut shelf and lay it in place. Put the barrier piece on top of the shim, then your square piece of wood. Take your bar clamp and set on jaw on the sanding block underneath and the other jaw on your piece of wood. Tighten until you see the glue begin to leech out and your done.
I think I mentioned putting blue masking tape around the area you're working on to catch the glue overruns somewhere else here. A damp cloth can be wiped on the overrun as well to eliminate dealing with the mess later.
Pull the clamp the next day, give it another 24 hours to setup and you can drill and mount the new nut.
Happy Trails
Cynical One
|
|
|
|
Post by cynical1 on May 12, 2013 10:55:43 GMT -5
Also, an additional idea is to glue down the shim not by wood glue, but with ordinary glue. (non-super glue, no wood glue) kind of benzin-based generic glue. I saw this advised in Dan Erlewine's book about nuts. He wrote that using simple generic glues makes the job of any future repair much easier. Considering that the brass shims they sell in the market are not even glued down anywhere, i think this is a good idea. I think i could go that way for now, glue down the shim with generic glue, then go through the drill process, install the nut, play the guitar for a while. If i find out this is good, i might leave it as is, or either glue the shim with wood glue. In the opposite scenario, i would easily detach the old shim, sand it down, or make a new one etc... as easily, without much trouble. I think the +'s are more for this route. The call is always yours, and the screws through the new nut will hold them in place. My take on adding wood to anything is to glue it as permanently as possible into place. Gluing a nut is one thing, as it will probably need to be replaced down the road eventually. Your metal shims are just spacers and temporary by design. Your wood shims are there to make a structural change to the nut shelf. Unless you're planning on joining the "Nut of the Month Club", gluing them in permanently would be my recommendation. Again, your guitar, your call. I've got to run and take care of horses and won't be back until late tonight. Just measure twice and cut once...and don't lose an eye or a finger... Happy Trails Cynical One |
|
|
|
Post by cynical1 on May 12, 2013 10:45:50 GMT -5
Also, i thought that instead of clamps, i could just use ... the guitar to glue down the shim in place, meaning, just tune the guitar in pitch and let the force of the strings put pressure on the nut, and in turn, the nut transfer this pressure to shim and nut shelf. Any potential objection to that? (that will save me the trip to the store to buy either clamps or vice grip, etc...) Well, that's outside of the box... Let me ask you, what can you do faster and more accurately: 1.) Apply glue to shims, align and apply clamp. or 2.) Apply glue to shims, align, set 6 string in the nut, hoping it doesn't move on you, and tighten all six string to pitch...hoping the strings don't pull it out of alignment as you tighten each one? While I understand money is tight, and you're trying to brainstorm the problem, there's an easy way and a hard way to do any job. Adding additional steps and introducing more points of failure isn't going to make you a happy guy. This thread is already 36 posts long...do you really want to add another 15 posts to it? If you need to hold off buying a clamp, then hold off. You've got too much work in this already to hose it up now. Cowboy Mode is just as bad as Devastation Mode. Happy Trails Cynical One |
|
|
|
Post by cynical1 on May 12, 2013 8:58:17 GMT -5
I can't say if the filing already done has been bad, good or indifferent. Hand filing is always tricky as it allows for an almost infinite number of variables in angle, speed and pressure. The average person will never file anything as flat as a machine can do it. The only image I could find of the adjustment end of a Carvin neck was this one of a broken one: 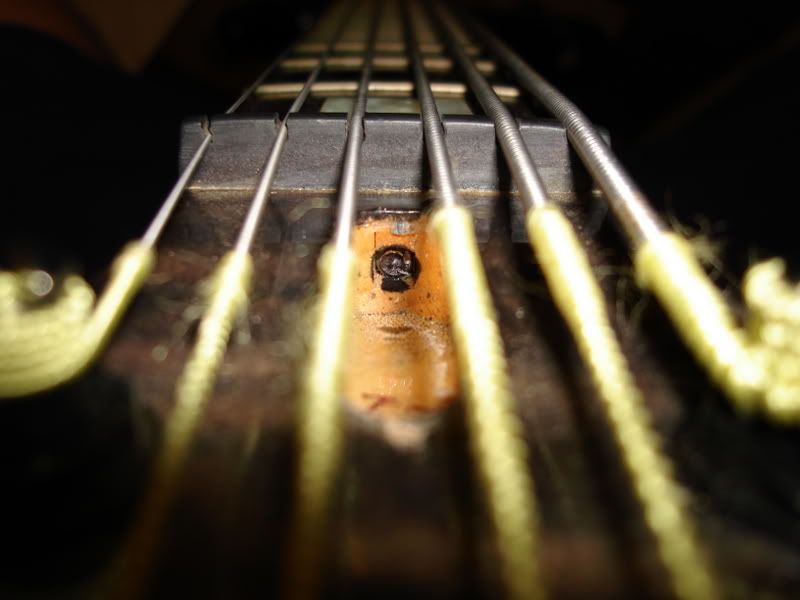 This is probably your mystery piece of metal. It doesn't appear to me that the filing done to it will cause you any problems if left as is. I say this having never paid much attention to Carvin guitar truss rods aside from the occasional adjustment. As far as the nut shelf potentially being worked out of flat for the new nut, how does the new nut seat on the shelf with the screws out? Any wobble or slop fore, aft, port or starboard? HTC1 |
|
|
|
Post by cynical1 on May 11, 2013 22:26:39 GMT -5
I understand your trepidation taking it to a tech, especially if the only tech you have are the ones at Guitar Center... But I have to ask you, how comfortable are you working on a guitar?
Have you done anything with the nut? If not, you might want to take the measurements on one of your guitars that "just feels right" and do a comparison. Filing a nut is not the mystical voodoo thing alot of people take it for, it's really just a study in patience and working methodically. You can invest in nut files, or the DIY feeler gauge nut file thing works pretty well. I've done the last two nuts that way and am impressed with how well it works.
Another thing to do is check the frets. Taking a 6" metal rule and just walking it down the neck will help you find high frets. A regular charge\debit card will work too. You're just walking it down the neck, narrow side down against the frets, and seeing if it rocks anywhere. This usually indicates high or improperly seated frets.
Leveling and recrowning frets is not an impossible job, just time consuming. A few special tools are in order, but nothing to break the bank.
Not to throw the usual ducking disclaimer out there, but without actually seeing the guitar it's a crap shoot on determining exactly what the problem is. We can throw simple Q & A things out to you, but this can just as easily take you down the wrong path as it can in assisting you in fixing the problem.
Tell us your comfort level and we'll go from there.
Happy Trails
Cynical One
|
|
|
|
Post by cynical1 on May 11, 2013 12:07:35 GMT -5
Hey, this is not something you pick up watching the Discovery Channel. There's a reason why they don't have a show called Ice Road Luthiers...
As you've found out, fixing guitars can rack up the expenses in the tool department. My apologies to your wife.
It's also a study in creative problem solving and patience. Taking 3 hours to setup a 3 minute job is still better than taking 16 hours to fix a 3 minute mistake.
Before you attack the nut shelf, keep in mind that in Germany a machinist apprentice is schooled for years in precision hand filing. Assessing and maintaining proper angle, pressure and length of travel does take years to master. You're not building atomic bomb parts, so you have a more generous tolerance to work within, but my point is that the next part of the job takes patience and a light touch. Devastation mode needs to be put in the upright and locked position.
While I know this has been an exercise in frustration, look at what you've learned. You now know that toothpaste and sawdust makes a bad wood filler, buying cheap costs more in the long run, you know you need to address the nut shelf and you've done a respectable job of fixing the screw situation.
This agony will pass and you will rescue the Carvin and make it playable for years to come.
I don't know if you ever followed the exploits of Double Yoi on the forum. The first neck pocket he tried to fix qualifies and a genuine abortion. I know it bothered him and he genuinely wanted to learn how to do this type of work. In several PMs we discussed apprenticing for a luthier to learn the basics and a few intricacies. While this is not the road most people will take, he did. He was like a sponge and if you check out his posting on the Telecaster with the cypress top his quality of work improved exponentially. That was a very cool guitar, with body reliefs and some first class workmanship.
I have faith in you, Greek. Work on the patience and forethought and you'll surprise yourself.
Happy Trails
Cynical One
|
|
|
|
Post by cynical1 on May 11, 2013 11:10:48 GMT -5
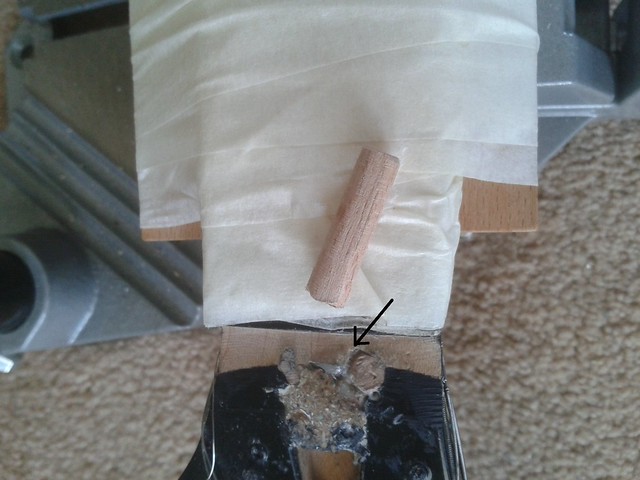
Greek, don't take this the wrong way, but whatever you do, never consider a career as a bomb technician or nuclear power plant engineer...   ;D Remember that conversation we had about "devastation mode"? But hey, you got the screw out. I can only imagine what said "tool women (and some men recently : Ronaldo of Real Madrid) use to pull out eye brows" looks like, but you have to use what you got. Beech, depending on species, is close enough to maple to work fine. I know using real wood versus some filler makes more work, but the results justify doing that way. It's hard to tell from the pictures, but does the dowel pin stick out above the hole? As long as the majority of the hole is filled with real wood, and the new screws will contact this wood, aesthetics are not that important. The new nut will cover all of this anyway. I'd give it 24-48 hours to set up before you started working on it. You can use this time to determine how flat and square the exiting nut shelf is prior to installing the wood shims. The nut shelf has to be as square and flat as possible before you start gluing in the shims. Trying to use the shims as a means of making it square and flat is an effort in futility. Take Sunday off. Your blood pressure will thank you. Happy Trails Cynical One |
|
|
|
Post by cynical1 on May 11, 2013 1:28:35 GMT -5
OK, first off, the radius is in the nut, not the shelf. I believe this is the nut you have:  The nut shelf needs to be flat and square. This operation is traditionally performed with a router and a special jig or fixture. More than likely this was done with CNC equipment at Carvin, but you get the point. Let's get the screw situation dealt with first and then we'll deal with the nut shelf when you get to it. Anything else...? Happy Trails Cynical One |
|
|
|
Post by cynical1 on May 10, 2013 15:51:56 GMT -5
Well, going by what you see and without actually being there I see two options for you. Neither are terrible, so don't start reaching for the Xanax yet...
Depending on how good the metal is in these screws it might just be easier to drill a pilot hole through the sheared screws with the small bit, then re-drill for your dowel hole, again, right through what's left of the sheared screws. If the screws are as cheap as they sound, you should be able to just swap bits without breaking the setup. You'll still have to slow the speed down on the drill and be careful you don't build up too much heat as you don't want to scorch the wood, but that might be the easiest way to go.
Make sure you measure the depth of the hole you need to drill based on the other screws you mentioned and use some masking tape on the drill bit to mark your depth. I doubt you want to come through on the other side of the neck...
The other option is not as pretty, but just was effective. If you have a small sharp wood chisel or a strong very sharp knife you can carve around the sheared screws until you can grab them with a small pair of vice grip pliers. If the screws are really cheap this can be an agonizing chore as they'll keep shearing off constantly.
Then you just drill the carved mess to accommodate a dowel rod and your work is done.
One thing about the dowel rod pin. Once your new holes are drilled, which should be the same size as the dowel rod, (sand the dowel pin to adjust for a snug but not overly tight fit) make sure your height is about a hair under the depth of the hole. You don't have the tools to cleanly knock it flat, and working that nut shelf with a file and\or sandpaper can knock it out of square.
By leaving it a hair short you can just use a putty knife and some wood filler to make up the gap and not effect the current nut shelf routing. When you re-drill the holes for the new nut there will be more than enough wood for the screw to grab.
Make sense?
Happy Trails
Cynical One
|
|
|
|
Post by cynical1 on May 10, 2013 14:41:50 GMT -5
OK, reality check. While I'm not expertly versed in all things metric, I am familiar with standard wood screw sizes. From my experience most of these top mount nuts will use a #6 wood screw. The shank size on these measure at 9/64" (3.57mm).
If what you've measured is correct, then these screws correlate to a something smaller than a #2 wood screw, which has a shank size of 3/32" (2.38mm). For reference, the screws holding your pickguard in place are probably bigger than that.
Either you got a real POS setup with the old nut, or something is amiss in your measurements.
A #1 screw extractor is recommended on screws as small as 1/8" (3.17mm), or a common #5 wood screw.
If these sheared screws really are 2mm in diameter at the shank then you can pretty much disregard everything above on getting them out.
Double check your measurements on the actual screws in the neck and report back...and start looking for a very sharp knife and a small pair of vice grip pliers...
Happy Trails
Cynical One
|
|
|
|
Post by cynical1 on May 10, 2013 10:47:14 GMT -5
OK, so the neck doesn't come off...we can work with that. In fact, that may work in your favor keeping the neck stable during surgery. I used to have an old pipe floor stand I modified to hold a guitar in place for just such operations as yours. The only trick is to make sure the neck is level and square going into the drill press. Based on the neck angle out of the body laying the guitar perrfectly flat may work against you. Granted, the angle isn't much, but these aren't big screws you're trying to extract. You can use just about anything stable to align the guitar's nut shelf to the base of the drill press. You can use the drill vice to cheap if you have to. Using a bubble level, or an angle finder will help. Double check all angles to make sure you're level and square. This is where that softwood comes in handy. If you place small pieces of softwood between the teeth of the drill vice and the neck they will act as a cushion from the metal on the vice. Putting some rubber (I used to use old inner tube rubber) between the wood and the neck will further protect the finish. Something like this:  The maple will be harder than your softwood, IE: Pine, so if you over tighten the compression will go into the softwood versus the neck. If you hear the crack, you went too far... The whole purpose of this exercise is to make certain the neck doesn't move while you're drilling. That's it. Make sense? Happy Trails Cynical One |
|
|
|
Post by cynical1 on May 10, 2013 8:22:53 GMT -5
Just got a t-handle tap wrench looking exactly like :  That style works just as well. The other style is usually a little cheaper, but as long as you're careful and make sure you go in straight it'll work fine. That's what she said... (Sorry, couldn't resist the cheap shot)I'm just going to walk through your list and comment in red. 1) I tap with a hammer a sharp prong in the center of the broken screw center to make for some pilot for the drilling bit. They're normally referred to as a center punch. They look like this:

A good center punch shouldn't require too much force to make the dent. Normally one good wrap does it. the neck doesn't need to be in the vice for this step, but make sure the neck is well supported when you do this. You're just doing this step to make sure the bit doesn't walk on you when you start to drill.2) I try to fasten the neck as tight as i can without damaging, wrap it in a towel as suggested by Cyn1, (i am afraid the sanding block does not fit in the vice's max spacing), then try to center the drill bit exactly to the point marked above Well, that sucks that the sanding block doesn't fit in your vice. Adapt, Adjust and Improvise. Let me float this at you. A new sanding block costs around $15.00. A new neck for the Carvin will run you well over $100.00. If it were me I'd modify the sanding block to fit in the vice.
If you have a router, or router table, or a table saw with a dado blade...or access to any of these tools...I'd route the back non-radiused side of the sanding block to fit in the vice. If your sanding block looks like mine you should be able to make two square notches on either side. Like this:

Pardon the cheap graphics, but the point is to just narrow the back of the sanding block enough to allow it to fit squarely into the vice. The radius side of the block is still good. You'll need to determine just how narrow it needs to be to fit in the vice, but getting the depth on both notches identical is critical.
The prime objective here is to align and protect the neck.3) put the power drill in : a. clockwise b. minimum speed c. normal mode (not "devastation" mode) - i cannot describe this in english Sounds right to me. The minimum speed thing is important. Drilling metal always requires a slower speed than wood. And I would say "devastation" mode translates very well. Avoid devastation mode at all costs.4) try to drill a hole in the center of the screw very carefully (if i miss this, then i am screwed) As Yoda once said, "No try, do!" Double check all of your clampdowns, angles and operation of your drill press prior to starting the drill. You already know how small that drill bit is, so you also know that going slow and easy will keep it from breaking off.
I'd say those were probably some cheap screws to begin with, so they should drill relatively easy. In a pinch, you can always use some turpentine on the bit to act as a cutting agent. Use sparingly, as you don't want it all over the wood. Check how well your extractor goes into your holes before breaking the setup. This way, if you need to drill deeper you're not setting the whole thing up again.5) when (and if) the hole is drilled, then try to insert the extractor. There you go with those negative waves again...6) tap it in a little bit to gain more purchase in the hole Very lightly, if at all. Use something small to do the tapping. Remember the conversation we had about devastation mode...7) attach the t-handle and try slowly to turn it counter-clockwise Opinions vary, but I'd have the handle in place prior to doing any tapping in of the extractor. The last thing you want to happen is to have the extractor angle in to the screw, or God forbid, you break the extractor off in the hole putting on the tap handle. Normally, if the hole is drilled correctly you shouldn't need to do any tapping in the first place. Remember, these aren't hardened Grade 8 machine bolts we're talking about here...these are probably some low grade wood screws8) extract the screw Yes.9) fill a hardwood dowel (toothpick?) of same size and glue it in I'd shelve the idea of using a toothpick...unless you guys have some seriously huge toothpicks over there... I'd get warm and fuzzy with the dowel rod approach. The next steps have to do with the wood shims and are to be followed after i am lucky enough to get the above through. OK, I hate to keep harping on this, but if you're going to do the job, then get comfortable with the steps, know them inside and out, and just do it. There's no luck involved.Here's the deal. You already know what you don't want to do. You've already repented in leisure enough with this guitar. You have taken a very serious approach to it this time. You have invested in tools and equipment. You've also displayed a good amount of patience...which I know was not easy for you. That being said, you're going to be fine with this. If you have to set this up and stare at it for hours to feel comfortable, then that's fine. If, at any time during this process, you feel uncomfortable or uncertain then just stop. Ask more questions. One day waiting for an answer is better than 3 days fixing a mistake. Anyone who has worked on guitars for a while has been exactly where you are now. You've had enough"oh crap" moments, and you want to improve your skills. As you've seen, it ain't cheap doing it right, but if this nut repair goes right you'll never have to install a nut on this guitar again. 20 years down the road, if you still have the guitar, you'll be glad you took the time today and did it right. May the force be with you. Happy Trails Cynical One |
|
|
|
Post by cynical1 on May 9, 2013 23:18:17 GMT -5
You may still need a shim after building up the nut shelf, but nothing as severe as it is now. Bar clamps are relatively cheap. This type normally sells for less than $15.00 in the US:  The screws are obviously firmly in there, or they wouldn't have sheared off. You probably put the initial stress crack in it when you screwed it in...especially if you used a drill to do it. Hardwoods need a larger pilot hole than softwoods. Remember this and double check this when you drill the holes for the next nut. If you have to take a razor knife and cut the wood around the top of screw then so be it. Remember, anything done to the wood can be repaired, and it's going to be covered by the nut anyway. If you break off the extractor in the screw the job becomes exponentially more involved. Just make sure the hole in the screw is deep enough to allow the extractor to really sink in and grab it. Slow even pressure is what you need to focus on. No Son of Hercules stuff here. Let's see how it goes with the extractor before we broach the subject of what next. You don't want a wood screw to come into contact with the old metal screw. It will more than likely flatten the threads on the new screw as you torque it in and allow no purchase to hold the nut down. Focus on getting the screw out, not on trying to solve a problem you don't have yet. Happy Trails Cynical One |
|
|
|
Post by cynical1 on May 9, 2013 17:00:53 GMT -5
Sorry, that was supposed to be "yellow wood glue"...fingers must have stopped working on that word...
The piece of what looks like veneer should work. It does look like nice piece of fiddle back veneer, and as long as it's dry and flat it'll work fine.
A standard bar clamp should work. Remember to put a flat piece of wood across the strips to balance the pressure, and use your sanding block under the neck with a piece of rubber or a towel between it and the neck to prevent scarring or denting.
You don't need a ton of pressure, just about enough to start to squeeze the glue out. Go thin on the glue and it'll bond just fine. I prefer TiteBond II, but any high quality wood glue should work fine. It's going to have screws in it anyway, but you do want the surface to be as flat as possible.
Ain't this great fun?
Happy Trails
Cynical One
|
|
|
|
Post by cynical1 on May 9, 2013 16:20:30 GMT -5
Are you finding any unexpectedly interesting tones in amongst all the switching options? As you might guess, having only had in finished for a week it's very much still a learning process. I will say that the separate bridge volume, N\HUM\S split and the bridge on switch make for some very interesting and subtle tone variations. The guitar is very quiet and even the combinations that are not hum cancelling work well. I was very happy with the way the Seymour Duncan, Rio Grande and DiMarzio pickups all work together. I'm still tweaking the pickup heights, but they balance and blend quite nicely. I can say that this guitar can go from soft, bright and articulate to loud, dark and just plain evil in short order. I've found that flipping the series\parallel switch to series for the two single coils automatically turns both the neck and middle pickup on, regardless of the 5-way position. Makes sense, and is intuitive, but you've got to remember to switch it to parallel if you want to combine just the bridge and middle or neck. Another anomaly is the series\parallel switch to combine the bridge and middle or neck pickup. In the parallel position it works like it says on the box. With it in series you get the bridge and middle pickup in the loop regardless of where the 5-way is set. The middle drops out if the S\P switch for the two single coils is to set parallel, but you have to physically turn the volume down to zero to drop the bridge pickup out of the loop. It was a bit confusing starting out, as moving the 5 way seemed to have no effect. Again, these are no biggies. A little switch discipline and they're all non-issues. I would rather have the range of options available versus trying to fix these issues and potentially lose a combination. Either way, this thing really begins to show its versatility when you ramp the volume down. Playing with the ranges between 4-8 on the volume, dropping the tones to around 7 and mixing and varying the pickup selection and S\P settings allows for some of the finest tweaking of the tone I've ever played with. I'm still trying to come up with a simple format to put up some sound samples. I haven't found all 500+ tones you calculated out for this guitar, but I have found everything from slight twang to dark jazz...if I could only remember where I found them at... Happy Trails Cynical One |
|
|
|
Post by cynical1 on May 9, 2013 14:42:48 GMT -5
Thanx about T-handle, will do this first thing tomorrow morning, with the extractor in hand. No problem. I've broken my share of extractors over the years, so I'm just trying to spare you the thrill. And yes, Virginia, it looks like the old sheared screws need to come out. So much for crossing my fingers... As long as you center the hole in the old screws, drill it straight with the drill press and go slow and steady with the extractor you should be alright. Remember to take your time and measure twice, drill once... Use a bubble level to make sure you're square in the vice. Now, the subject of the holes once the old screws are out. Either way you place the new nut you've got way too much of a hole left to just leave it. The holes need to be filled. Before you start reaching for that magic potion of toothpaste and sawdust, let's review your options. If it was within the diameter of the new hole we wouldn't be having this conversation. If it were just a small tangential intersection I'd say epoxy wood filler would probably do the trick. Based on your pictures I'd say your looking at having to use real wood to fill those holes. I don't know what's available in Greece, but you need to find the smallest hardwood dowel rod you can, redrill the holes to accommodate said dowel rod and glue it in place. Once the glue has set just level it off with the nut shelf. This isn't terribly involved, but it does sort of slow down that instant gratification thing you may have been looking for. Next on the list is shimming up the nut shelf. In an ideal world you'd just glue a piece of hardwood to the existing shelf and reroute it to the proper depth. That takes more tooling than you probably want to invest in, so let me offer Option #2. First off, forget about the word softwood. This is a maple neck. If you're going to add to hardwood, you need hardwood to do it with. I'm pretty sure they have hardwood veneer strips over there somewhere. They usually come on a roll and look like this:  Most every home improvement and hardware store here sells them. You're looking for the 1" (25.4mm), or thereabouts, wide strips. They will most likely have some heat activated adhesive bonded to them so they can be ironed on to the substrate. You'll need to remove this adhesive. Acetone works pretty good, or old cheap nail polish remover (which is usually 99% acetone). Cut pieces larger than you will need off of the roll and just soak the strip in the acetone for 5 minutes. Any glass jar you can get your fingers in will work. After 5 minutes you should be able to remove the strips and just peel the adhesive off of the back. Lay them flat and let the acetone evaporate off. Take some 320 or 400 grit dry sandpaper and lightly sand the now glueless strips to make a clean surface for gluing. Next, lay the strips on the nut shelf and mark the length from underneath with a pencil. Measure out the width and mark that on the same strip. Now you have the final dimensions detailed so all you need to do is cut them to size. An Exacto or utility knife works fine for this job. Once you determine how many strips you'll need use standard old fashioned yellow wood and lightly coat the entire top and bottom of these pieces with a brush and clamp them into place on the nut shelf. Watch for the pieces to creep when applying pressure. Readjust as needed. Putting some masking tape around the area you will be gluing these strips will minimize the mess from the glue as it leeches up when you apply the pressure with the clamp. If all of that seems like too much work just pick up some brass shim stock and keep piling it on until you lose the buzzing. Make sense? Happy Trails Cynical One |
|
|
|
Post by cynical1 on May 9, 2013 11:38:03 GMT -5
Hey, if the drill bit came with the extractor, then by all means use that drill bit. That problem is solved. What you're using the drill stand and drill vice for is to drill the pilot hole for the extractor. Provided you have the neck square and level in the vice this will give you a nice clean straight hole to insert the extractor. Now about the t-handle, i lost you man. I was under the impression that the drill press stand + vice will help to remove the screw!!! Can't i use the stand for this? In a word, no. The potential for snapping the extractor goes up exponentially in any scenario using power tools. You want a steady and slow force exerted while the extractor digs into the screw and begins to turn it counterclockwise so it can be unscrewed and removed. The arrangement looks like this:  In your case, ignore the part about using vice-grip pliers. Your #1 extractor is way too small for that to end well. The drill press is to allow you to drill a straight hole into the screw to insert the extractor. It'll also allow you to drill the new holes for the new nut precisely and straight. Again, I'm with you on that one. If the location for the new nut mounting holes miss the old screws then you dodged a bullet. Based on experience, you'll be using the extractor somewhere else eventually...  Yes, by all means, put that Adriatic adrenalin in check... Exactly. No more carvin' on the Carvin this time. Happy Trails Cynical One |
|
|
|
Post by cynical1 on May 9, 2013 10:12:12 GMT -5
I'm really crossing my fingers that you don't have to remove the old sheared screws. A #1 screw extractor is very small and requires a very light and steady touch. It also requires a 9/64" drill bit. This converts to a 3.6mm drill bit, which I don't believe exists. You might be able to get away with a 4mm bit, but a 3mm bit may be too small to allow the extractor to gain purchase in the sheared screw. Either way, if you don't have a t-handle tap wrench you're going to want to score one of these to hold the extractor. Take the extractor with you to make sure the collet adjusts down to hold the extractor securely. They look like this:  I mention all of this as if you put too much force on this extractor, or attack the screw from an angle, and it snaps off you're f  d with a capital F. You cannot re-drill a broken extractor like a sheared screw. So, if you do have to remove the screws, do the meth after you do the job and you'll be good to go. Happy Trails Cynical One |
|
|
|
Post by cynical1 on May 8, 2013 16:36:06 GMT -5
well, from what I see it attaches like most drill vices. This is from their website:  You are correct in that if they gave you the wrong bolts it will be a challenge to make it work. HTC1 |
|
|
|
Post by cynical1 on May 8, 2013 16:30:47 GMT -5
Well, after dumping the ex-wife, losing the farm...and much other unrelated procrastination...I have finally finished Project #2, aka Blue Murder. Here she is:       Obligatory Headstock Decal Shot. Obligatory Headstock Decal Shot. The original plate from the GTX33 body. The original plate from the GTX33 body.The finish is just an indigo automotive lacquer with multiple clearcoats, then wet sanded and buffed out to give it the shine you see above. The neck is clear poly on the headstock, satin on the back of the neck and matte on the fingerboard. The neck was also sanded and buffed out. HISTORY: The body is an old GTX-33 basswood body I scored on eBay for $25.00. I never took any pictures of the actual body, but this is what it looked like when it showed up:   Pretty fugly, ain't it... I don't know what type of paint they used, but it was like sandblasting cast iron to get it off. It was originally routed for a Floyd Rose...but since I'm not much of a fan of either Mr. Floyd or Mr. Rose I decided to make it a hard tail. I routed out the body in a similar fashion to what I did on Project #1. I didn't have any alder left, so I just cheaped it out and used red oak. It was tougher to sand and re-route for the slanted pickup routings, but it was all I had laying around. Again, I didn't take any pictures of the actual work, but thanks to Google I found some sample shots to illustrate how the body was rerouted, filled and re-routed for the single coils: TOP:  Both of these large routings were filled with a 1" piece of white oak. The straight routings for the single coils were cut at an angle that escapes me at the moments, but it matched what I found in an old Fender blueprint, then reversed to put the high end closer to the neck. BACK:  This was routed down about 3/16" and filled with a 1/4" piece of white oak. This leaves a small chamber in the back where the springs used to live. It was designed for a 24.75" scale and and the Tele neck is set for a 25.5" scale. I toyed with the idea of moving the bridge pickup routing down, but the more I looked at it the more I wanted to see how it'd sound with the bridge pickup so far up from the bridge. I've never been a great fan of the bridge pickup tone "so shrill it makes dolphins cry" anyway. This meant the neck and middle pickup would be squeezed, but the angled routings helped with the pole alignments. This is a very ballsy full sounding guitar. Using only one pickup is sort of like keeping the Ferrari in second gear...you really lose its main design advantage in doing so. The neck was a $35.00 partially CNC'd one piece maple neck I scored on eBay. I left it thick like a baseball bat as I intended on using the heaviest flatwound strings I could find on it. It's strung with a 13-56 ga. set from Webstrings. The fingerboard markers were in, but there were no side markers. I couldn't find my bag full of marker stock, so I went out to the barn and cut some 10 ga. solid copper wire pieces, drilled the side and used them as side markers. They have the unique property of looking dark when in ambient lighting, but they also shine when a light is aimed at them, making them quite effective in low light conditions.  |  |  | | No direct light | Slight direct light | Direct light |
[/td] [/tr] [/table] The frets are profile 6105, leveled, crowned then buffed with a little rubbing compound on a Dremel polishing wheel. The nut is a standard Tusq Fender style. The tuners are a set of Wilkinson vintage tuners. The neck was predrilled for a vintage set and the Wilkinsons are nice tuners for the money...especially on eBay, and the extra weight helps balance out the guitar. I think they look better on a Tele headstock than the sealed tuners anyway. The bridge is a Schaller 475, pretty much my "goto" hardtail bridge. It's gold because that's what came up on eBay that day. Plus, it came out of New York City, which seemed to go with that whole Blue Murder theme... Even though this is a basswood body, by the time you add up the oak filler pieces, all of the electronics, the Schaller bridge, the thick neck and the vintage tuners I tossed on to counterbalance the body, it weighs in at a respectable 7-3/4 pounds. (3.4kg) Slightly more than a JEM, about equal to an alder Strat...but still several pounds less than a Les Paul. You can read all about the trials and tribulations of working out the switching on this beast here at OK, somebody look over my shoulder here......only for those with a strong constitution... Here's the details on the pickups:  | SCREW | POLE | COIL (S) | SLUG | COIL | POLE(N) | | Winding/Polarity | Start | Finish | Polarity | Start | Finish | Polarity | | Seymour Duncan SSL-1 | N/A | [N/A | N/A | White | Black - | North | | Rio Grande Halfbreed RW/RP | N/A | [N/A | N/A | Gray | Black - | South | | DiMarzio DP197 Virtual PAF (Bridge) | Green - | White + | South | Red + | Black - | North |
For reference, here's the wiring diagram:  So, what's it sound like, you may ask... Well, JohnH calculated that this guitar has a potential of 544 tonal options. I'm still playing with the original 40... This is what they look like:  This is what they do: Point and Click tone Options: 1) Neck * 2) Neck & Middle + 3) Neck & Middle * 4) Middle * 5) Middle & BridgeN + 6) Middle & BridgeN * 7) Middle & Bridge Humbucker + (Humbucker in local +) 8) Middle & Bridge-Humbucker+ (Humbucker in local *) 9) Middle & Bridge-Humbucker* (Humbucker in local +) 10) Middle & Bridge-Humbucker* (Humbucker in local *) 11) Middle & BridgeS + 12) Middle & BridgeS * 13) BridgeN * 14) Bridge Humbucker + (Local) 15) Bridge Humbucker * (Local) 16) BridgeS* 17) Neck & Bridge-N + 18) Neck & Bridge-N* 19) Neck & Bridge-Humbucker+ (Humbucker in local +) 20) Neck & Bridge-Humbucker+ (Humbucker in local *) 21) Neck & Bridge-Humbucker* (Humbucker in local +) 22) Neck & Bridge-Humbucker* (Humbucker in local *) 23) Neck & Bridge-S+ 24) Neck & Bridge-S* 25) Neck, Middle + & Bridge-N + 26) Neck, Middle * & Bridge-N+ 27) Neck, Middle + & Bridge-N * 28) Neck, Middle * & Bridge-N* 29) Neck, Middle + & Bridge Humbucker+ (Humbucker in local +) 30) Neck, Middle +& Bridge Humbucker + (Humbucker in local *) 31) Neck, Middle +& Bridge Humbucker * (Humbucker in local +) 32) Neck, Middle +& Bridge Humbucker * (Humbucker in local *) 33) Neck, Middle * & Bridge Humbucker+ (Humbucker in local +) 34) Neck, Middle *& Bridge Humbucker + (Humbucker in local *) 35) Neck, Middle *& Bridge Humbucker * (Humbucker in local +) 36) Neck, Middle *& Bridge Humbucker * (Humbucker in local *) 37) Neck, Middle + & Bridge-S + 38) Neck, Middle + & Bridge-S* 39) Neck, Middle * & Bridge-S + 40) Neck, Middle * & Bridge-S* Sound samples are in the works. I'm working on putting it together in the same format that JFP uses combining sound clips with a video so you can actually follow what the switching is doing. This may take a while... If you made it this far, I applaud your determination. Hope is was worth the 20 minutes you invested. Finally, I want to give thanks and credit to where it's due. This guitar was in the back of my mind for years, but without the patient assistance of ChrisK, JohnH and Asmith I never would have been able to pull this off. I 'm sure Chrisk was looking over my shoulder while I was doing this one...smiling to himself and thinking, "wait 'til he finds out he wired that switch backwards..." Happy Trails - Cynical One EDIT: Edited picture of controls to make it clear exactly what the Hell they are.
|
|
|
|
Post by cynical1 on May 4, 2013 21:36:17 GMT -5
Hey guys, thanks for your replies and your patience thus far. I appreciate the help, really! No problem...besides, we haven't helped you yet... OK, that's good. You can be .010 to .012 before you start to sacrifice action to lose the buzz. This measurement is fine. From this point forward don't do any more with the truss rod. 2.) Without changing anything on this setup, remove the capo, fret nothing and measure the gap of each string at the first fret. Write these down. E: .028 A: .028 D: .028 G: .028 B: .026 E: .026 OK, that's a bit high. Not outrageous, but the nut could be cut lower. For reference, I cut my nuts like this on my guitars, but remember, it fits my touch...which is still a bit heavy, but not necessarily yours: 11-48 Set: E: .022 A: .020 D: .018 G: .016 B: .014 E: .012 13-56 Set: E: .023 A: .021 D: .019 G: .017 B: .015 E: .013 With a lighter touch you can knock this down even lower. Standard preferences run from .020-.010, but for me that's too low. YMMV 3.) From the 12th, with the capo still off the guitar and fretting nothing, repeat the same measurements on each string again. Write these down, too. lol ... it was so tall I didn't have a gauge for it on my new one. So +.032. I'm guessing the next one would've hit it. .034 (?) It sucks. I'm using Ernie Ball Skinny Top heavy bottom strings (10-52s). Well, you're going to have to stack the feeler gauges to read this one. Again, here's where I have mine set, based on the same touch and disclaimer: 11-48 Set: E: .078 A: .075 D: .072 G: .069 B: .066 E: .063 13-56 Set E: .079 A: .076 D: .073 G: .070 B: .067 E: .064 This is really easier to pull off on a Strat type bridge. The Tune-O-Matic really only gets you close on the two E's. For some reason Gibson made a boatload of guitars with a 10" neck radius and a 12" bridge radius. Not sure if you suffer from that or not. What it really comes down to is you have to do some trial and error. I use the specs above as a benchmark for jumping off. Some players with a very light touch can go considerably lower. If you're a rhythm player with a heavy touch you're going to need to raise the action accordingly. There is no one "standard" Holy Grail setup. It varies by player and guitar. For example, when I started player bass, back when Harrison was in office, I had a very heavy touch, so my action was very high. As I progressed and consciously worked on nuance and touch I found I could lower my action significantly, thereby also improving my speed. Granted, this took decades... Yeah, it's not too bad. I'm enjoying the learning experience. : ) You never stop learning. I would hazard a guess that if you were to take the same measurements on all of your guitars you'd find that they were all over the place. If there is one guitar you find your go-to instrument, focus in on that and see how it spec out. Note the scale, string gauges and fretwire size. Most guitars we consider unplayable really are just not ergonomically setup for us, so we write it off as a bad instrument versus just not the right instrument or setup for our style. So, what do you want to try next? Happy Trails Cynical One |
|
|
|
Post by cynical1 on May 2, 2013 8:26:40 GMT -5
...then maybe one single strat could be the *universal* guitar... More like a universal instrument. Same goes for any MIDI enabled guitar. While Roland has had the market on these devices for years, I think Axon is going to eat their lunch... HTC1 |
|
|
|
Post by cynical1 on May 1, 2013 23:20:04 GMT -5
...So an investment of a Callaham (and they surely make some very nice 52.5mm tremolos) cannot make sense until i see an improvement of something cheaper than that. Buy it right, buy it once. Buy it wrong, buy it again...and again...and again... If you want to go to the moon, don't buy a Cessna. From my experience, buying several cheap parts in the hopes of finding a "gem in the rough" usually totals up to what a quality unit would cost in the end. Hang on to a few coins now and settle, or do it full bore and never have to buy another one. There is always a trade-off somewhere. HTC1 |
|
|
|
Post by cynical1 on May 1, 2013 19:14:16 GMT -5
So, has Ace left the States?
HTC1
|
|
|
|
Post by cynical1 on May 1, 2013 17:08:58 GMT -5
...Gonna have to buy a new feeler gauge too...mine went missing.  That kept happening to me when I was married. After finally recovering all of my tools and putting them back in one place I now have 4 sets of feeler gauges...and more files and screwdrivers than I know what to do with... Keep us posted. HTC1 |
|
|
|
Post by cynical1 on May 1, 2013 12:28:10 GMT -5
If you pull the trigger let us know how it went. And remember, measure twice, cut once.
HTC1
|
|
|
|
Post by cynical1 on May 1, 2013 9:13:37 GMT -5
First off, let me make it clear I have no direct experience with anything you've mentioned below. Any opinions will be based on whatever pertinent marketing copy the seller in question chose to include. Based on the prices of the units you asked about, I assume your budget puts you below anything I would recommend...such as Babicz, Callaham or Super-Vee to name just a few... Callaham offers two different narrow models, but they're in the 125 Euro neighborhood. Based on that, the Axesrus Steel trem 52.5mm would be the first one I would experiment with. Again, I have never installed, played or seen this unit. Best guess. If possible, you might want to scour the Net and look for any reviews or comments on these units. You may not find much favorable copy, but a high volume of negative commentary would be enough of a red flag to stay away. HTC1 |
|
|
|
Post by cynical1 on Apr 29, 2013 11:24:08 GMT -5
Guitar necks can require a seasonal adjustment. Age, neck wood, profile configuration, string gauge\tension, etc...can all be factors. Just changing string gauge can require a truss rod adjustment. For now I'd just like to know where the neck is at before I toss out opinions\conjecture.
HTC1
|
|
|
|
Post by cynical1 on Apr 29, 2013 9:05:49 GMT -5
Well, if you're buzzing from the octave to the heel this normally indicates you need more relief...but you mention that this gives you unacceptably high action. The heavier strings will buzz more as your DOT is only a 24.75" scale, which develops less tension than a Fender 25.5" scale at standard tuning. Heavy strings, say .013-.056, generally require slightly higher action than lighter strings. Ever wonder why shredders play such light gauges?
Greek has the routine down for checking relief. For your guitar, the capo on the first fret and then fretting at the 19th fret would give you an accurate read on how much relief you have on this neck. For reference, in our metrically challenged country, the feeler gauge you need is .010" to measure the relief at the 8th fret. You can go as high as .012" on a set neck as still have a playable action for most people.
I assume you have lowered the saddles as far as they can go, right?
If it were me, I'd like a few accurate benchmarks before I decide to chuck it in the wood stove. I'm going to ask you for three measurements. All measurements are taken from the top of the fretwire. You will need a set of feeler gauges for these, so if you don't have a decent set take 8 bucks to your local auto parts store and score one.
1.) Once you get the guitar playable with no buzz, regardless of action, take the accurate measurement of the neck relief you have at that point, as described by Greek. Write it down.
2.) Without changing anything on this setup, remove the capo, fret nothing and measure the gap of each string at the first fret. Write these down.
3.) From the 12th, with the capo still off the guitar and fretting nothing, repeat the same measurements on each string again. Write these down, too.
After you have all of this information, please post it here.
On a bolt-on neck you can always cheat and shim the neck. Set necks, obviously, do not allow this. I'm asking for the measurements to determine if the problem lies in the nut, neck relief or bridge. On a guitar like this you really need to take a cold hard look, as sometimes the repair costs may well exceed the actual value of the guitar.
And, depending on the gauge string you use, having the truss rod completely loose may not be an issue. It's not the best practice, but for years guitars never had truss rods at all.
One thing to remember when adjusting a truss rod is that you need to allow a few days to accurately determine if your adjustment was correct. The neck will take 2-4 days to fully respond to your truss rod adjustment. This is not a point and click operation. Ever notice most good techs will tell you to come back in a few days so they can recheck their adjustment?
Ain't this fun?
Happy Trails
Cynical One
|
|


 ;D
;D