|
|
Post by cynical1 on Jun 7, 2013 11:28:28 GMT -5
Useful data Cyn1. I have this question myself. Why not go for a Ebony fingerboard in the first place? Uninstall the old maple one, and install just the new ebony one? Would not be more expensive than 50 USD? It's not the expense, it's the labor. Stripping the finish off that neck will give allmektig a whole new appreciation for natural finish necks, but swapping out the maple to an ebony fingerboard, provided it even has a separate fingerboard, will more than likely increase the homicide rate over there. I'd think long and hard about what's involved to "Paint It Black"...before it leads to your "Nineteenth Nervous Breakdown" HTC1 |
|
|
|
Post by cynical1 on Jun 7, 2013 0:48:46 GMT -5
I'm wondering about painting the fingerboard too, since I'm more of a "EVERYTHING MUST BE BLACK!!!" kinda guy. Would that be a horribly bad idea? For the back of the neck and headstock it's doable, but avoid the hardware store cheap spray cans. And spray a clearcoat over the black and headstock to seal it. For spraying the fingerboard...is it bad? In a word...yes. If the fingerboard absolutely positively has to be black, sand all of the finish off of the maple...and I do mean all of it rght down to the bare wood. Which will mean pulling the frets and re-installing them later. Rub the fingerboard with denatured alcohol and acetone, let it sit, and use black leather dye once the solvents evaporate. Use it carefully, as that stuff is wicked to get out of anything. Might take a couple of coats. Let it stand for a week, hit it with some steel wool and you have a black fingerboard. This is the oldest cheapest trick in the world to simulate ebony. You have noticed that painting and dying everything black wipes out your side and fretboard markers? Just thought I'd point that out. If that's no big deal, then never mind. HTC1 |
|
|
|
Post by cynical1 on Jun 6, 2013 10:09:07 GMT -5
Cyn, I think you missed the part where Strat8Ohm said the body and neck were a pair. Guess I did...CRS... HTC1 |
|
|
|
Post by cynical1 on Jun 5, 2013 21:54:37 GMT -5
Definitely Basswood then. This does make things easier, as basswood is like butter to route OK, here's my concern expressed in a bit more detail. I'm assuming the original neck was 21 frets, typical Fender configuration. This gives you 17.919" from the nut to the 21st fret. Add a ballpark of .375" to the end of the heel and you're at roughly 18.294" The neck you want to use is 24 frets with the same scale. This would put the 24th fret at 19.125" without adding anything more down to the end of the heel. This will probably work out to a length difference in necks of right around and inch, or just south of it. You don't have an inch to fudge the neck pocket, or in the maple side of the heel of the neck...so this will more than likely be made up at the bridge. So, this is beginning to look more and more like a fill and re-route for the LR Baggs trem unit. Make sense? It does. And get a sample of the routing template, or a real routing template from them if they have one. Best $10.00-$20.00 you'll spend. You're not going to be routing around the existing back trem routings. Anytime I've done something like this I'm looking for real estate elsewhere on the guitar. Either behind the bridge, expanding the existing cavity or on the chin side of the guitar. With the body reliefs on this style of guitar there isn't much there, so you're probably going to working in a big "L" off the existing cavity. This is why I like the back routing...more room to fudge without the front looking like one big obscene pickguard. And don't plan on burying the sustainer board in a swimming pool route. the two switches are integral and would be a bit more than awkward sticking out that close to the strings. You may be able to squeeze a preamp in there if the board isn't too thick because deepening the cavity could pop you right through to the back trem cavity. Something else to consider, you've got the sustainer, preamp and additional switches to squeeze in there. Running wires back and forth between the pickups and under the pickguard and strings is a maintenance nightmare down the road. Back routes smartly put allow complete access with the guitar strung. Interesting option yup. I not tall (5'7") and the idea of a slightly smaller-scale guitar has always been in the back of my head. What you re saying here is: Go for it, make it your dream guitar for real! :-D . I d have to consider that direction. Lately i was more into: let s just fit the beast with my dream specs (neck, pickup, vibrato), but true, that ll be interesting to go full-blast and address the size, roundup the angles, choose the color... this being said, i wanted to bring this guitar on tour this Summer on the West Coast and in Europe, so time-constraint is in my mind as well... As said, i never embarked in such a project, will i have the patience? Thanks for re-opening the idea Cynical1, still debating here... By all means, go for it. This is a guitar you don't have to settle with. Change the body, paint it chartreuse... I would seriously re-evaluate having all of this work, including the paint and setup, finished for a tour this summer. I'm not a betting man, but I'd call that a long shot. There is a lot of rework to the body, there's lead time on components, working out the final switching and controls...depending on the paint used it's a 7-30 day curing time before you can buff it out...and you will be learning and doing things on a guitar for the first time to boot. Maybe by Halloween if you're persistent... But hey, I've been wrong before Happy Trails Cynical One |
|
|
|
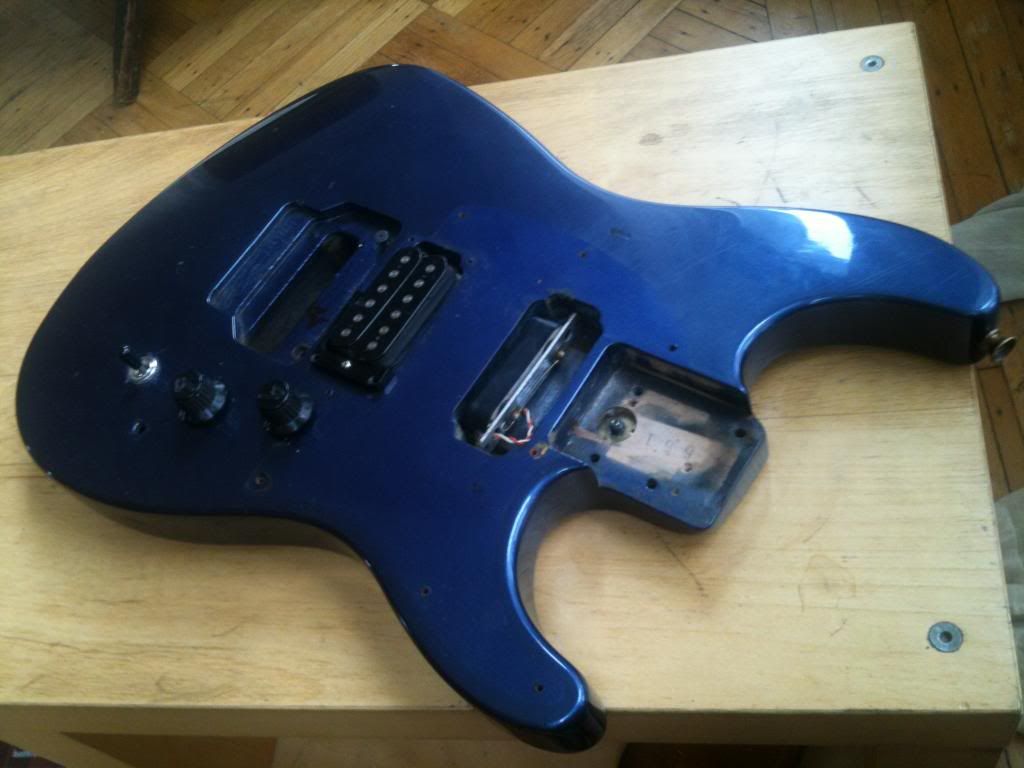
Post by cynical1 on Jun 4, 2013 22:51:22 GMT -5
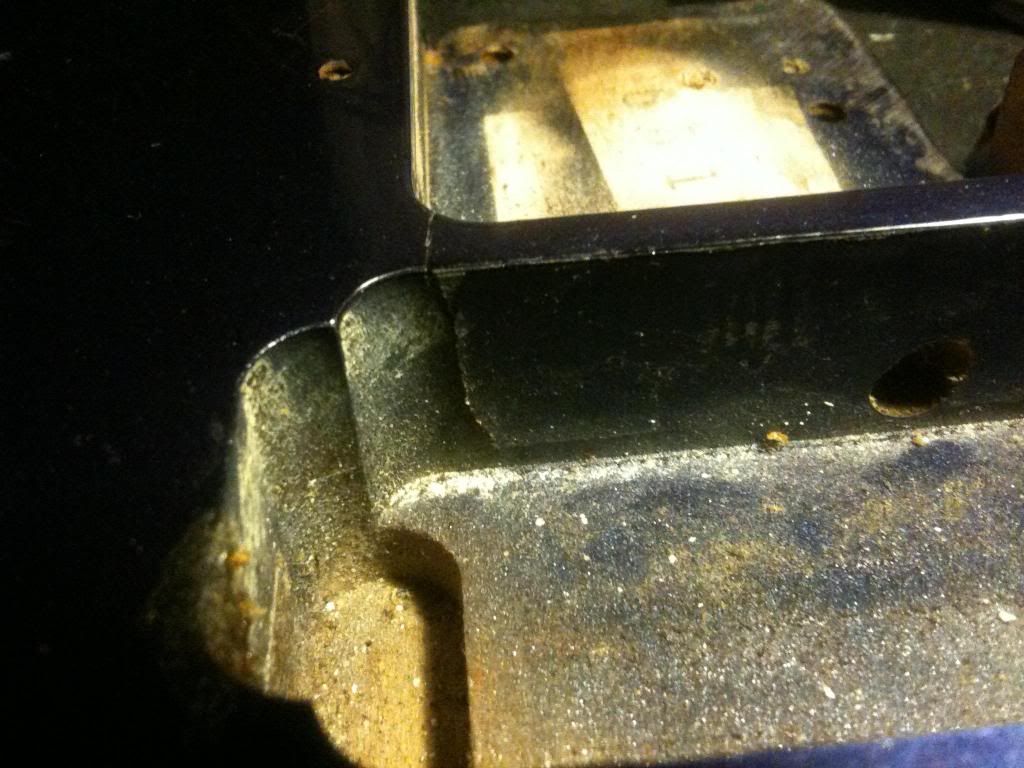
On my quest for assembling my dream guitar, next after the neck comes the body. All well within the realm of possibility. I'll leave the wiring for that part of the forum and address the less erudite parts of the project. As far as fitting all of this business into the guitar, you're going to need to make some space. There are many places selling control cavity templates. The good ones are two piece to allow you to route the cavity, as well as the recess for the cover. This also doubles as the template to make said cover. I looks like this was a two humbucker guitar someone added a pickguard to in order to mount a single coil...but I've been wrong before. You can use this to your advantage and do your pickup swimming pool routing to allow for the single coils sustainer driver and a single coil, or noiseless single coil passive pickup. Making a new pickguard isn't hard if you have a good template and a router table with a top bearing bit. You can even use an angle router bit with a bearing to cut the shape and make a bevel. The routing for the LR Baggs system is still something I'd have to see to give you an honest appraisal of what's involved. I don't know what the neck was on that body to begin with. Your neck looks like one off of the old HM Strats, but those were usually an HSS configuration, which indicates to me a mismatch body and neck. So there may be some calculations in determining if the 24 fret neck you have will even work with the existing location of the trem routings. If you need some help with the scale and hashing that out just ask. Many of the non-traditional Strats built in the 80's were either basswood or alder. I'm guessing by the crack in the neck pocket and the gouge in the pickup\trem routings that this is basswood. The color will give it away. Alder is usually a light red or pink hued wood, where basswood is very pale, almost an off white. Both woods will give you what you're after in light weight. Again, double check the scale length coincides with the trem routings. On a 25.5" scale guitar, it's 25.5" to the high E or B as a rule, measures from the front of the nut to the saddle. If this guitar had a 21 or 22 fret neck this may skew that distance and it'll need to be moved. This may also effect your pickup routings. Do you know the scale of this neck? You may need to route and fill this area to allow you to make the correct routings for the LR Baggs trem. Not difficult, but it does add time to the project. You should be able to salvage the trem back routing provided you don't have to make drastic changes on the top routing locations. My preference has always been back routing as it keeps the front looking cleaner and eliminates the need for a custom pickguard. Your call here. Right now it's looking like a refinish is a good possibility. If so, you can be as creative as you like. Again, with the high probability of a refinish, you might just want to have at it and make the body reshapes. You might even want to rasp the body reliefs to fit your exact human shape to make it more comfortable. The finish on these things is hard, but brittle. If you're going to do a solid color refinish using a heat gun will work faster than sandpaper to strip it. This stuff laughs at chemical strippers. I think we broached this subject in another thread. Working from a completely blank body will require some accurate tools and templates. Right now a lot of your reference points are already there. As long as there's no hurry you could go either way. It really is a 6 to 1, half a dozen question. A new body is just as much work, and more money. The old body may require some tweaking, but there is no additional expense to acquire it. Your call. Happy Trails Cynical One |
|
|
|
Post by cynical1 on Jun 4, 2013 14:15:05 GMT -5
- I tried that Ebanol nut (below)  But i m not convinced: - it needs at least 1 string-retainer - the height doesnt match right away so you have to remove the included chim and make one yourself (i made mine with 1.05mm picks) - it s really ugly That Ebanol nut is about the easiest nut to replace a locking nut with. Ebanol is just a hard phenolic resin and paper laminate. You can also find fingerboards made out of the stuff. It's some pretty hard stuff. As to the string retainer, most guitars would benefit from a string retainer or string tree. They're left off to save the OEM a step and an additional cost. Unless it's an esthetic deal breaker, I wouldn't sweat the string retainer. The height on virtually all new nuts is never a glue and go thing. Shimming the nut shelf can be permanent or temporary\removable. Since you've got screws holding down the ebanol nut, a removable shim is nothing terrible. You might want to find a different material than old guitar picks...but once you fret a string it's academic. Greekdude just went through a similar exercise with a nut shelf on a Carvin. Gotoh lock nut installation on Carvin DC135 '88 It does run long, but towards the end he's got some good pictures and did a very respectable job documenting his work. Cutting the slots on this nut will also allow you to fine tune your setup, but the ebanol is some pretty hard stuff so the DIY route will be time consuming. Depending on your style, how light or heavy your touch is and your string gauge, the depth of these slots will vary accordingly. My point is, these factors all contribute in making an out-of-the-box scenario highly improbable. You can invest in nut files. They get expensive quick and unless you're going to be doing a lot of nuts getting your money back on the investment is a non-starter. You can make a fairly respectable set of nut files with a Dremel tool and a good set of feeler gauges. With either route, there is a learning curves, but not an impossible task to accomplish. The easiest pat is to just go to your trusted guitar tech and have him do the nut cutting. As far as it being ugly...well, that is a pretty big piece of real estate to cover once that locking nut comes out. The average nut width runs from 1/8" to 1/4", which leaves a big ugly spot behind it. You could work in a filler wood or brass piece to install behind a more common sized nut. I've made rosewood filler pieces in the past that did the trick. Just a side note, you might want to find different screws that fit the countersink on the ebanol nut, or just enlarge the countersink so the mounting screws don't stick up. That does contribute to the "ugly" part. Not wanting to "attack" the fingerboard is the most common objection to roller nuts. This can be done without a router, if you're patient, or just cringe at using power tools on a guitar neck. I double checked the dimension, and the recommended depth is .105" from the highest point of the fingerboard radius. The scary part is the .094" you'll need to work into the fingerboard towards the bridge. I did find a very good walk through on this method: Fender LSR roller nut installationAnd yes, Virginia, there will be some woodworking involved no matter what direction you intend to go. That neck was built for a locking nut. Once you remove said nut you have to rework it to accommodate the nut of your choice. I plan to install Fender locking tuners, probably chrome so it looks more trad. If you have the coin, look into the Schaller locking tuners. Dead horse beating time again, but if you do it right, you do it once. Good call. That's a bit too 80's... Is the "Strat" script logo under the clearcoat, or just silk screened over it? Makes a difference on whether you can just "erase" it or not. Finding an "original" decal might get involved. You can make one, haunt eBay or the more established older music shops to scare one up. These decals will require a clearcoat...or many clearcoats if you want a flush "buried" look versus the "bump" once its buffed out. Stripping the headstock would get you back to a more traditional look for a strat. Odds are this is some hard catalyst finish that will just sneer at chemical strippers. If you go this route be prepared for a lot of sanding, especially if you don't have an electric palm sander... Refinish could range from lacquer up to a hard automotive clearcoat. Just tape off everything else and go. This is another thread on it's own, so I'll abandon my normally verbose tendency and leave it here. And they told the Wright Brothers it'd never get off the ground... You are already planning on making several other mods to this guitar. Any "collectible" value this guitar may have had went right out the window once original part #1 left the building. This is a customized guitar you are building to your spec. Honestly, putting a decal of your own design on there along with whatever other Fender decal is not a sacrilegious act. Let's be honest, how much did you pay for it? Do you really think this think is going to finance a retirement down the road? They are correct that a modified guitar will never fetch the money invested in the short run...perhaps never. However, if your motivation is to make this a versatile "perfect" guitar to your specs, you probably aren't planning on selling it anyway. We always have interesting things to say. Whether they are pertinent or not is always a crap shoot. Happy Trails Cynical One |
|
|
|
Post by cynical1 on Jun 3, 2013 15:03:50 GMT -5
Am I the only one getting "No data received" sometimes when I click around the site? Ball-ache. That's because your laptop says Fischer-Price on it... HTC1 |
|
|
|
Post by cynical1 on Jun 3, 2013 15:02:44 GMT -5
A much better shade, thanks, though I did like the colours of the old site.  No, I don't think you wanna go with white text on a dark background......  sorry, should have been more clear...I was suggesting we change the bilious blue with one of the two RGB colors RGB:FFD9B3 or RGB:FFE3C7. I'd have to redo the logo is we changed the background...and I don't know if I still have the old .psd file HTC1 |
|
|
|
Post by cynical1 on Jun 3, 2013 13:31:31 GMT -5
Yeah, AdBlockPlus and NoScript (another good way to block unwanted scripting) work best in Firefox. Firefox can be slow on Netbooks, but a little tweak here and there can speed it up significantly. Six to one - half a dozen.
I didn't have any real issues with the switch. The request for logon and confirmation e-mail came as advertised. The only thing I had to do was allow a few more exceptions in NoScript.
I've got to go with Lunaalta on the blue...it does make me feel like I'm in a bad gas station men's room... Our background is RGB:FFCC9A to keep the black lettering, changing it to either RGB:FFD9B3 or RGB:FFE3C7 should do the trick and be a little easier on the eyes.
I was happy to see all of my PMs still there. I haven't tried it, but hopefully the Search routine works better.
Progress...what are you gonna do.
Happy Trails
Cynical One
|
|
|
|
Post by cynical1 on Jun 3, 2013 13:03:54 GMT -5
You hit on another reason for this design. The Fernandes neck pickup just sounds less than stellar when in simulated "passive" mode. I just have it in there as a driver for the sustainer function. The diagram is just a basic "proof of concept" which either makes it a passive guitar, or a guitar with a sustainer driver in the neck and magnetic passive pickup in the bridge feeding the sustainer circuitry. You probably could work out some type of blending circuitry, but IMHO is easier to just drop the sustainer into the loop in a binary way.
But the real consideration you need to make on any sustainer mod is the wood butchery that needs to take place in order to make it happen. You can make these fit in a lot of different guitars. You just need room for the sustainer board and a battery compartment. There are templates available for both of these type of cavities. so it's just getting over whether or not to perform the actual procedure.
This brings it back to the discussion we've had here many times in the past...to modify or not to modify. Everyone has an opinion, and an argument to support same. I guess the only question you need to ask is are you planning on selling it and want to preserve resale value.
I never feel flattered. This would entail that I actually knew something.
Happy Trails
Cynical One
|
|
|
|
Post by cynical1 on Jun 2, 2013 11:13:04 GMT -5
Mix Mode seems to be a mix of the 2 other modes actually: normal+harmonic. Here are some (almost) better pictures of the Sustainer board that were sent to me today (..) - any way i can connect a pot to this so that i end up with that needed Intensity post? - do the toggle-switches seem easy to replace with push-pull knobs? OK, now I gotcha on Mix Mode...I saw it as "Either\Or". I put a circle around the spot on the board there the Intensity Pot connects into the circuit. A while ago SG and I had a PM conversation about the best way to add a pot to this board...but his preferred method escapes me at the moment. With luck he'll drift back here and add that in.  As to your question of pulling the existing switches soldered to the board and replacing them with push\pulls...hmmm. You might get away with it on the Sustainer On\Off switch, provided you could unsolder the existing switch and resolder your wire connections back into the board without damaging said board. Personally, I wouldn't try it, but your skills at desoldering and soldering on boards may far exceed mine. For the Mode Switch, you're looking at the problem of not enough poles on a push\pull to make it happen...so unless someone knows something I don't about exotic push\pulls, I don't see that as doable. If your board ever fails, Fernandes will replace it for a charge. When I sent mine in a couple of years ago it was on $60.00. I would personally not want to ditch this warranty option to add push\pulls...but then again, I don't like push pulls anyway... Does that help? Happy Trails Cynical One |
|
|
|
Post by cynical1 on May 30, 2013 15:54:18 GMT -5
It's been a while since I looked at this, but the intensity pot is either already on the board in the form of a receptacle connector, the three points of connection are etched, but the connector is not soldered in, or, in the case of the Rev 1 boards, it just ain't there.
As far as mix mode...well, unless you know something I don't know, the sustainer board is in the circuit or out of it. There is no happy middle ground I could find. By design, even when the sustainer function is not engaged, the controller board needs to be powered up to get any output.
My intent with this mod was to be able to take the sustainer completely out of the circuit, or add it in at will. I had plan on powering this via a phantom power scheme...which is still in the works. I wanted to be able to play the guitar without the sustainer circuitry in a strictly passive mode. By design, you can't do that with the Fernandes sustainer.
The toggles on these tend to be soldered right to the board. Some of the older designs had a separate toggle connected to a second board.
I discovered during my research on this project that the configuration of these boards varies quite a bit. If you can put up a picture of the front and back I might be able to help you out.
Happy Trails
Cynical One
|
|
|
|
Post by cynical1 on May 30, 2013 12:14:49 GMT -5
Hey Cynical1, i checked your Blue Murder: really crazy thing  good to see you re into salvation too! Salvation...never thought of it that way before... I just like working with older used guitars because after 20+ years the wood has stabilized...and they're usually pretty cheap to pickup. And I guess there is a certain "rescue" motivation in there somewhere...Project #1 was a real "back from the dead" thing... First off, is the current nut shelf routed for a locking nut? It's going to involve a little wood working to fit either a roller nut or a TUSQ nut...probably more for the TUSQ nut as you may need to build up behind it. IMHO, if you're not afraid of doing the work, a roller nut is always my first preference in a trem system. Especially in your case where behind the nut bends are a regular part of your style. I personally like the LSR nut, which has the small adapter extension to cover more of the existing nut shelf, but the slotted Wilkerson is a good one too. Steer clear of the one single roller styles...they really are garbage. Be aware that with any of these nuts you will have to route into the fingerboard slightly to keep the overall scale accurate.  LSR roller nut kit LSR roller nut kit Wilkinson roller nut Wilkinson roller nut Garbage. Garbage.The crack is really pretty typical for basswood. Basswood is prone to cracking and splitting. Ever see pictures of Vai's Evo from the back? Serious crack there...welcome to the wonderful world of basswood... It is pretty easy to fix. Just open the crack enough to inject the glue, lay a small hardwood board over the top of the section and use a bar clamp to clamp it down. Let it sit overnight and just clean up the excess glue with a razor knife blade. One thing about using toothpicks... toothpicks are made from the softest wood available to ensure long life of the toothpick machine tooling. This means when you glue it in it has the holding strength of the glue and a soft wood. For a pickguard or truss rod cover they're great. For a strap lock or button they're not the best solution. You're better off just taking a sharp knife and whittling a piece off of an oak or other hardwood board and using that. No problem. heating the glue does allow it flow through the syringe a lot easier...but you need to work fast as once it starts to cool you can blow the needle right off and leave quite a mess to clean up for yourself... Depending on your trem options, if you change pickup routings and your final choice on the nut, this may get involved. It's nothing you need Norm Arbrams for, but it will require you to use power tools, build small fixtures and measure twice, cut once. Above all, it requires patience, time, and a place to work free of obstructions to place a secure table or bench you can clamp to that will see a lot of sawdust. Workshops are great, but a basement, garage, or even a porch off the back of an apartment works. I would caution against doing this in an apartment...unless you just love to vacuum... I love Dremel tools, but for what you're doing you probably won't be using it much. You will need a router, possibly a router table, so buy your friend with the workshop a beverage or two of their choice and ask them how they feel about letting you sneak in periodically to work on a guitar. Very little of what you will be doing will involve hand tools, aside from the router. Any fill pieces will be cut on a table or jig saw. You're also going to need a good drill press...never trust your hands and eyes to drill a straight hole... A drum sander is great, but you can double task the router table for this job. Any jigs or fixtures you build will involve the same tools. Again, none of this is difficult. Slowing yourself down and working accurately is usually the hardest part to master. You can always fix mistakes, but not making them is easier. From my experience, you're going to need the piece in hand to make an accurate evaluation of how much rework is necessary. You may not have to do much if anything, or you may have to fill and completely re-route. Another point to consider is where the saddles fit on the old bridge versus the new one in regards to the guitar's scale. A difference of only 3/32" may make intonation a problem on either the high or low end later. Anything you want to start a separate thread on please feel free. This project will have a number of stages and keeping them all in one spot tends to make eyes glaze over. Breaking the stages down also allows for a better reference down the road for other forum members. So, still game to butcher some wood? Happy Trails Cynical One |
|
|
|
Post by cynical1 on May 30, 2013 11:01:35 GMT -5
If you feel like shelving that project for a couple years, the BEST system WILL be available: www.evertune.com/Trem/I don't know if you're an investor in this project, or just an interested bystander, but this system, while apparently engineered to death, still suffers from the same inherent weakness as a 2 point...it has a mechanical wear point at the center of the arc of rotation. In fact, if I read the documentation correctly, each saddle has a mechanical point... I would call this a step up from the original 6 screw trems, but I would have to say they have over-complicated the design past the point where I would call it the "BEST" system. Introducing more points of function or points of failure seems counter-intuitive to me. I've seen enough animated CAD models turn into paperweights over the years to reserve judgement until I see it work in the real world. Not intending to channel the spirit of ChrisK here, however, I'd really have to see one in action to judge fairly...but since it's still parked in the R & D phase, that'd be tricky. Happy Trails Cynical One |
|
|
|
Post by cynical1 on May 28, 2013 1:57:26 GMT -5
Hey, happy birthday guitar luthier guy. Even if it is a Tele, go ahead and crank it to 11...gotta keep the goats on their toes...
Have a great Birthday and wish you many more, buddy.
Happy Trails
Cynical One
|
|
|
|
Post by cynical1 on May 22, 2013 18:01:37 GMT -5
Thanks again for your suggestions and links, i love broadening my knowledge about what s out there. Come here often enough and you'll find your mental faculties moving in the other direction... Well, I can relate to that. Lately all I've been doing is recusing guitars. You can see the latest patient, Blue Murder, here. The routing and filling I did there will more than likely apply to any routing you will need to do to lose the current trem and go with a vintage Strat style. [/img] And most likely this light body here, perfectly retro-fitted for this 24 frets neck.[/quote] Then so be it. It appears this neck was routed for a locking nut. Was the plan to go with a roller nut or an oil impregnated TUSQ nut? Makes a difference in what you do with the nut shelf. If you're going to lose the routings for the FR style trem you can address the gouge then. The crack in the neck pocket will need to be addressed. Most times you see this it's because of a fall or drop. Either that or someone attempted to install a different neck on said guitar without matching the heel profiles. When they locked it down the wood split. The other common occasion is when someone tried the old urban legend of loosening the neck screw at full string tension and then re-tightnening them. The theory behind this is that it'll pull the neck tighter into the cavity to increase sustain, improve tone, feed the homeless and bring gas prices back to 1960's levels. Generally, none of the aforementioned occurs, but the wood at the base of the neck pockets usually splits... If it's a non-structural crack it's easy to fix. Worse case scenario is if it cracks into the body, but that's rare. Based on the pictures, it looks like the crack is contained withing the depth of the neck pocket. Without seeing it I'm gonna have to toss a few questions at you: Does it go deeper than the neck pocket and into the pickup routings? Does it have any slop in it? By that I mean can you lift it enough to get a syringe into the crack? How far across the neck pocket does the crack traverse? And yes, a syringe will work fine to shoot the glue into the crack. I have horses, so I have no small shortage of hypodermic syringes around the place. You can buy them at any equine supply house on the Internet, or if you live in the sticks, pretty much any feed or farm supply store will have them. The trick is to find the smallest needles around. I prefer the 20 ga or 22 ga. 1" or 3/4" ones. Thinning TiteBond, or any wood glue more than 5% will reduce its holding strength, but it you put the glue loaded syringe in a zip-lock bag and drop it in a pan of water on the stove and just keep the water warm, not boiling for about 15 minutes. It'll flow out of there pretty good for a few minutes after you take it out of the bag to use it. As far as the X-Bridge, if that works for you than go with it. I don't have a routing template for it, but I would assume LR Baggs can steer you in the right direction. It's probably too much to expect it to drop back into your existing routings... If I was to choose between the 6 screws or the 2 pivot posts I'd probably go with the posts. No need for flattery...we show up here anyways... I think you're probably onto something with breaking this project down into sections and running a thread on each one. What you're doing does cross into several different sections of the forum and it would make it easier for future visitors to catch the topics down the road. One last question. Ever rehabbed a guitar to this level before? OK, two questions... What's the state of your tool inventory? Happy Trails Cynical One |
|
|
|
Post by cynical1 on May 22, 2013 15:19:53 GMT -5
So...it's gonna be like that, huh...
I suppose I could just continue to yank this thread off topic by asking "How many guitar players does it take to cover a Stevie Ray Vaughan tune?" But then I'd have to explain it to you guy's by saying "Evidently all of them."
But we don't want to go there, do we?
HTC1
|
|
|
|
Post by cynical1 on May 22, 2013 0:32:46 GMT -5
Hey, it's a bass. All it does is go "thump thump" anyway . . . ;D I'll just make like I didn't hear that one, counselor... |
|
|
|
Post by cynical1 on May 21, 2013 11:47:45 GMT -5
As long as Carvin came up, they do offer kits. www.carvinguitars.com/kits/You can order on-line and do a fair amount of customization in the stock order form. I don't know if they could be tweaked more to your liking ordering over the phone, but this option would save you quite a bit of personal agony in the rework and get you out the door for about half of the cost of a finished Carvin. HTC1 |
|
|
|
Post by cynical1 on May 20, 2013 18:11:26 GMT -5
Yeah, I've gotta go with newey on this...PRS was definitely the inspiration for this one. No worries, there are PRS templates out there to allow you to cut your own.  Just go to www.guitarbuildingtemplates.com/Shop-now.html and scroll down to the two PRS kits. That's for the 22 fret PRS. They also have a 24 fret kit. They'll run you $65.00 for the laser cut set. You can just set up a quick jig to do the neck pocket routing for the bolt on neck. One consideration is that PRS uses a 25" scale, where Fender is 25.5" and Gibson hovers around 24.75". I don't know what the Warmouth VIP is, but before you route for the bridge verify your scale dimensions. Probably your best option, as I'll grow hair before Warmouth comes off of that template. That help? Happy Trails Cynical One |
|
|
|
Post by cynical1 on May 20, 2013 12:11:08 GMT -5
To paraphrase Davis Guggenheim, This Might Get Long. Don't worry about the lag in getting back here. It's always nice to see someone still making a living playing these things. Well, there's a lot to cover, but I think the 800 pound gorilla in the room needs to be addressed first. As you said, this is how you make your living. Two thoughts spring to mind almost immediately. First, unless you have another guitar that can sub the one going in for surgery, than working under the assumption that you can fix and make right everything you need to in time to make the next gig is just setting yourself up for disaster. Even if the guitar in question isn't everything you want, it does keep food on the table and the home fires burning. If this is a primary guitar in the arsenal then I would counsel you to scrap the idea of modifying this one and start from scratch. If not, carve away. Either way, plan on whatever way you go the said "dream guitar" will be on the bench for a while. Staging it with no time constraints on completion allows you to span the costs out over a period of time that prevents you from sleeping in your car eating beans out of a can. Secondly, and something you're going to have to answer, is how much you're willing to spend. Years ago I did regular work for the infamous Mr A. Rush. He had an old school shop (as in, no longer able to survive against the big box titans) with working musicians coming through all day. When said working musician came in looking for a guitar he had a stock line. "You gonna make a living off this guitar\bass? OK, take whatever you want to spend and double it." I always used to smile at that, until the logic dawned on me one day. If this is how you represent yourself professionally, and you don't take it seriously, no one else will. You don't need the $30,000.00 Jesselli, but a sturdy tool with dependable action, function and performance is, I assume, what you're after. To get that will generally always cost more than your brain and wallet intended to spend. Before you take another step down the "perfect guitar" path I would strongly suggest reconciling this point in your mind first. OK, on to the rest of the list... - light weight (basswood helps) easy on the shoulder Basswood is about as light a functional wood as you're likely to find. For some reason everyone loves to bash this wood. Ibanez has made it into a standard in the industry...what do they know... For comparison, if your primary concern with the body is weight, you have a few options: BASSWOOD: Average Dried Weight: 27 lbs/ft3 POPLAR: Average Dried Weight: 29 lbs/ft3 RED ALDER: Average Dried Weight: 30 lbs/ft3 I personally like poplar in basses. Makes them just sound "pretty"...whatever that means... Long and short of it is that either of these three choices will work in keeping the weight down and off of your shoulders. There's two ways you go here. Have a custom neck made, or haunt the music stores and play every guitar in the shop to find who makes the contour and radius you like and try and score one used. Option 1 can get pricey, but avoiding the snakewood fingerboards and exotic woods will keep the cost within acceptable limits. This option will require some work at setup, but all in all everything will be made to your hands and specification. Option 2 normally means buying used, and this can be a crap shoot. Over the years I've had more success than failure on this road, but it may require some work on your part. You may want different frets, there may be finish issues, you may need to modify the neck pocket on your guitar body to make it work...and there's always the issue of mismatched headstock logo to body. You alluded to issues with producers sneering at custom guitars, so this option may be an issue for you. Well, I hope you're comfortable with a router. Everything you want is well within the range of realistic possibilities...all you need to do is make it all fit. If the guitar body you start with doesn't have this kind of real estate in the control cavity you'll need to route new ones. There are plenty of control cavity routing templates to allow you to do a clean professional job, so no real worries there. The rest of the nuts here will help you put everything in there you'd ever want. This is one of the more critical components in the type of guitar you're after. There are many flavors, some good, some not so good. As you said, it needs to be functional, sturdy and easy to live with. While the Bladerunner does come with some sticker shock, it is a professional grade piece of equipment that will be consistent and last the life of the instrument. It also drops into a standard Strat trem route, so if your body already has this type of routing all you need to do is put in 4 screws to install it...no power tools required. It also accepts the Ghost piezo saddles. Nothing custom or "one off" involved to get the piezo output you're after, plus you can also integrate MIDI into these saddles with a simple plug-in board. I hate to sound like a broken record on this option, but having supported working musicians over the years I've come to appreciate solutions that work and keep working. No one likes those panicked calls to the tech 4 hours before a gig... I've always liked the roller nuts. The LSR is pretty much the standard, but the one from Wilkerson (not the full roller one) isn't too bad. On either one you're limited to string gauge...no Stevie Ray gauges here...but anything up to 11s will work fine. One caveat, they do require a permanent modification to the neck. The nut shelf requires additional routing to fit it correctly to maintain intonation accuracy. It's not a big deal, but a few hours building a jig is time well spent. Another option is the oil impregnated TUSQ nuts. These are a direct retrofit to standard nut slots\shelves. Granted, these will need replacing periodically depending on how much you whammy and bend behind the nut, but they'll last a lot longer and maintain tuning integrity much better than a standard nut. Based on what you've said so far, I'd guess the Fat Strat body in either alder is pretty close to what you're looking for. Most of the other HSS guitars out there will all be routed for a Floyd Rose...which runs counter to your "not needing a tool kit" criteria to use and it really needs the locking nut...which we've already covered and eliminated from the design. eBay will be your friend here. The only issue with the Fat Strat will be getting your 24 frets. Depending on how involved you want to be on the rework, any HSS body can be filled and re-routed to accommodate the LR Baggs, Bladerunner or other Strat type Trem-Leos. Many of these guitars were already scaled for 24 frets, normally in a 24.75" scale, but it will probably allow you to leave the pickup routings intact and only require a reroute for the trem unit. I've done more than a few of these and while it takes time, routing templates and building a few jigs the finished results are seamless once the paint goes on. Kahler made some very good units...but they were like Volvos in that they required a lot of work and patience to get the most out of them... They seem to elicit an immediate "love 'em or hate 'em" response from guitar players... The roller saddles were a standard in the Kahlers. They're just the little rollers the strings exit the unit on. Chris Rea also taps a wood block behind the trem block to restrict it... Honestly, if you looking for a functional and reliable way to add piezo output to the guitar the Kahler is going to have to go. This is going to involve a good amount of rework, but if the piezo is what you're after it's something you're just going to have to bite the bullet and do. See above...I got ahead of myself. The only question you have to ask is can you live with the shorter scale most of the existing HSS 24 fret guitars were designed for? You can still have a 25.5" scale 24 fret guitar, but it's going to take some clever reworking and customization. As long as you're comfortable with a router, understand, or want to learn the concepts of routing jigs, there isn't anything you can't do. I think we've all come to the conclusion that whether you rework this guitar, or another body, some amount of intricate surgery will be involved. I would be less concerned about "making something else fit" into the existing routings as I would in determining what components I was going to select for the build and working out how and where to rework to make it happen. Well, you bring up a good point. Should you rework a cracked body for a "dream guitar", or start from scratch? Like newey pointed out, it looks like you've got a few cracks in this body. While they are repairable (we can do another thread on that) they do indicate issues not commonly addressed on dream guitars. I revert back to my original suggestion of starting fresh with a different body. With the amount of rework you're looking at a refinish is an almost inevitability. Again, this is something best covered in another thread as well. Having it professionally finished after all the rework is done is the easiest, and newey can direct you to a good shop for that, but it ain't cheap. Doing it yourself ain't a lot cheaper if you have no equipment...and it's a helluva lot more work. A budget for this guitar is something you should work out before you pickup tool one. First, work out everything you want on it as if there were no limits. Next, pick yourself up off the floor and break it down to what's critical and what's a luxury. IMHO, the neck is the most critical piece in the puzzle. This should be one of the biggest expenses, but it also determines playability, so this is the last place you want to go cheap. This also covers tuners and whatever nut configuration you finally decide on. The neck you choose may also impact the body, so work this out first and find a body afterwards. Next on the list is your bridge\whammy device. You mentioned the piezo element being integral, so do your homework. If you can get your hands on these units to see if they play like it says on the box it will be time well spent. Moving on, it's electronics. What type of pickups were you looking at? Passive or active? High or low output? You'll potentially need an onboard preamp for the piezos and whatever switching and controls...etc... This will take some real estate and thought into ergonomic positioning and functionality. After those three are down it's time to locate a body. Alder, basswood or poplar in a traditional shape to keep the producers happy. See A. Rush quote detailed above... A final option is to have a custom builder make you a partial build. They do the neck, route the body for your trem, pickups and electronics and possibly put a finish on it. You then go in and assemble the rest and do your final setup. This can give you exactly what you want for a lot less then a full build. A common misconception a lot of people have it that they can do it cheaper by building it themselves. After everything, including tools, is totaled up at the end it's not uncommon to find you've spent the the same, or more for the build that if you've had it made custom. You have a lot of options open to you. There are ways to keep the overall costs down without doing across the board austerity. If you came to me and asked me to build it I could toss out even more options and ideas. I think what you should probably do is start narrowing down exactly what you want and then determining how to make it work. If you need to take an extra 6 months to justify an expense, view it in the light that this is a guitar you will be playing for decades...so is the additional 6 months that big a deal versus settling for something less than you wanted. Put it all on paper and work it out piece by piece. The closer it comes to a reality the better the odds are that it will get built. Well, it did get long. Sorry if your eyes glazed over. Happy Trails Cynical One |
|
|
|
Post by cynical1 on May 19, 2013 21:50:36 GMT -5
Naw, for him it would be "Hotel California" at 11.  That was cold. Happy Birthday...and play whatever the Hell you want to at 11. Happy Trails Cynical One |
|
|
|
Post by cynical1 on May 19, 2013 21:48:47 GMT -5
Just out of curiosity, what's the reason for using the EMG bass pickup in this guitar? Is it just to have the high gain ceramic magnets?
And what everyone said previously covers most of it. I assume you don't have this guitar in front of you at the moment. As stated, if GF won't give you the specs, it's going to be a question of getting the Xaviere guitar, the EMG pickup and working it out once all the money has been spent.
I'd count on some surgery to make this work. P-90s can range from surface mount to a shallow route to allow adjustment of the pole pieces, or a slightly deeper route if they have a single bar magnet running under the baseplate. I don't believe GFS has a single bar magnet, but who knows what's on this guitar. You'll have to work out the physical size of the route, but EMG pickups have a routing template available. The depth for the EMG pickup routing is going to be custom since the LP Jr. has a wraparound bridge\tailpiece.
I'd bet dollars to donuts that the shape of the existing routed pickup cavity, if any, will be a nonstarter for what you'll need for the EMG. At least the odds are in your favor that you won't need to fill and re-route. So, if you're billing this out you'd better do it time and material and get a deposit on the rework labor.
Have fun.
HTC1
|
|
|
|
Post by cynical1 on May 18, 2013 12:17:10 GMT -5
I have to give you a +1 for persistence, and doing the math on using the strings as your clamp. I admit to having had my doubts about doing that way, but it appears you made it work. Once the holes are drilled and the nut is firmly screwed in place it'll be as stable as you'll ever need it to be and should last for the life of the guitar...or until you get a wild hair and decide to put a different nut on there...  You may notice that when you install the mounting screws you may have to go back and drop a small shim in place. Not a big deal and I wouldn't feel anything was deficient in the job you did because of it. And double check the pilot hole specification for those mounting screws and use the correct size for hardwoods. 5 minutes doing that on the front end will save you hours of aggravation. And don't forget the soap or wax on the mounting screws this time. The tension bar behind the locking nut is really part of the design package and needs to be there. It's a 30 second install and you don't even need to pull the strings to do it. Locate your holes, drill two holes, slack the strings, screw it in and retune. You should notice a difference once it's installed. I would suggest having the nut screwed in place prior to putting the tension bar in. As to the potential compression of the wood over time, the veneer Greek used sure looked like fiddleback maple (Acer saccharum) This wood specs to a crushing strength of over 7500 lb f/in 2. Long and short of it is that unless you plan on parking an Abrams tank over this nut it isn't going anywhere. All in all, ya done good on this little project and did a nice job detailing how you solved the problem. Now, screw the nut down, install the tension bar, finish the setup and play the damn thing before the wife has you sleeping out in the garage. Happy Trails Cynical One |
|
|
|
Post by cynical1 on May 16, 2013 7:06:24 GMT -5
Cyn1, just a question about super-vee's tremolo arm. I saw it acts as a cylinder to house a special rod which is then tightened with a screw on the bottom of the tremolo block.  Since i use to bring a guitar out of its case, play for a while and then store it back immediately, is this possible to do with the super-vee? Can i attach and detach the trem arm (excluding the tightening of the bottom block screw) fast enough? Or do i have to work on the block screw every time i wanna play/store the guitar? What you're looking at is the tensioner adjusting screw for the bar. It does just what it says, it allows you to set the desired tension on the bar from floppy to firm. What you don't see in that picture is the tensioner ring lock screw  It's a 5/32" allen socket screw that keeps the tension adjusting screw from going out of adjustment if you take the arm out frequently. Once the tension is set and the lock ring is in place all you should have to do is screw the arm in and out. No need to open the back of the guitar to do it. Happy Trails Cynical One |
|
|
|
Post by cynical1 on May 16, 2013 1:05:44 GMT -5
There is another option we seldom speak of, and that is to eliminate those fulcrum screws altogether! Visit here to learn more about that concept, then cast around on that site for info on ordering. Funny, Leo comes up with it and everyone spends the next 5 decades fixing it. I read up on this idea. It does address the primary drawback of the Trem-Leo, but it looks like you still need to do some retro fitting and modifications to you're guitar to make it fit in a standard Strat. Nothing extensive, but probably just enough to scare the aftermarket crowd away. The problem of improving an OEM design within someone else's cost driven parameters... HTC1 |
|
|
|
Post by cynical1 on May 15, 2013 9:32:29 GMT -5
I do recall that GraphTech was more willing to do engineering samples than most companies. This probably accounts for the extensive collection of bridge saddles.
Another thing that always impressed me about GraphTech was everything they did was researched well, worked like it said on the box and held up to whatever the working musician could throw at it.
I would have reservations paying the upcharge for piezo saddles on a Kahler trem. Those things are are annoying enough to setup now...having six wires hanging off of it just seems like more trouble than it's worth. But, opinions vary.
Happy Trails
Cynical One
|
|
|
|
Post by cynical1 on May 14, 2013 19:19:01 GMT -5
I bet those cost a left leg and two car payments...
HTC1
|
|
|
|
Post by cynical1 on May 14, 2013 8:37:45 GMT -5
Greetings and Welcome to the Nutz House ;D While I'm with Greek, the GraphTech Ghost saddles are a great way to go, with the Kahler Spyder you're SOL since the Kahler uses roller saddles. To my knowledge no one makes a piezo aftermarket saddle for roller bridges. First off, when it comes the trem-leo units, everyone as a preference. I try not to proselytize. While not a big fan, back in the day I put one of the original Kahler units on a bass. While it was a PITA to setup and intonate due to their design, it was stable and solid once it was dialed in. That, however was a completely different design than any of the three in question here... I would be curious to know how you feel about the Kahler. Do you like the way it functions? Is the only reason for a change to have the piezo capability? To go the other way, have you played the other styles you mentioned in your original post enough to have a preference yourself? Remember, buying something like this without trying it is a lot like buying shoes over the internet...you never know they don't fit until you're out of the store... The next, and probably most important question, is what's the budget? Obviously, you've got the initial expense in whatever trem unit you purchase. There's also the rework costs involved in that what you want to do is going to require physical modifications to the guitar, which will rack up the tool budget unless you have a well equipped shop already. I'm not personally familiar with the LR Baggs unit you mention. I will circle around to what Greek tossed out with the Ghost system. The Ghost saddles are available for nearly every Fender type trem out there, and they also offer several expansion boards that essentially plug and play to give you the piezo output, as well as MIDI and Acoustic Simulation. Newey also tossed the JohnH post out there on his adventures with piezo. While it may not be the way you want to go, it is a good read and will give you more insight into what you're planning on getting in to. To finally get around to your question on which is better, the 2-point or 6 screw trem unit...it depends... They are both friction units with advantages and disadvantages. After working on both type for years, I wouldn't put either one on my guitar. I wouldn't put a FR on either. About the only system that impresses me is the one from Super-Vee as it uses spring steel to connect the mounting plate to the trem unit. I like this because it eliminates the inherent issues with wear and goes in the right direction to maintain tuning stability. The Bladerunner style can also be refitted with Ghost piezo saddles with little to no agony. They offer two flavors, as well as a locking nut, but they are far from cheap after you add in the Ghost saddles. You would probably double your cash outlay for the complete setup versus the LR Baggs without breaking a sweat. So, before we take your perfect guitar and turn it into a perfect nightmare, any thoughts or questions on what's been tossed out there so far? Happy Trails Cynical One |
|
|
|
Post by cynical1 on May 13, 2013 7:25:37 GMT -5
Yeah, those erasers should work. What I was thinking about was an eraserr like this:  As long as the eraser doesn't compress, or squish, when you press on it you should be fine. I actually like that idea. Remember to use the glue sparingly. All you want is a very thin layer on the nut shelf and on the bottom of your shim. Yellow wood glue, or the Bison glue you used, is strong stuff and doesn't require much to do the job. Using it sparingly also reduces the mess to clean up later. As far as clamping pressure, the wood block will distribute the force from the clamp evenly, so you'll want to tighten it until you begin to see the glue push out and quit. You don't need serious pressure, just consistent pressure. Double check that your shim didn't move during the clamping process. If the shim stayed put, just wipe the excess glue with a damp cloth and go. I'd leave the clamp on overnight, pull it in the morning and give it a couple of days to set before you move on to mount the new nut. There may still be some tweaking needed for the final setup, but the worst part will be behind you. Sounds like you got it. Good luck. Happy Trails Cynical One |
|