|
|
Post by dannyhill on May 8, 2014 11:50:26 GMT -5
Hi everyone, Last year the neck of my Dano had a close encounter with a soldering iron. After I sanded out the charred bits I left it but it then went grey with sweat/dirt etc and so I cleaned it with WD-40 which is mostly naptha. Thereafter I brushed on a layer of beeswax which left it sticky and I think then its when a larger area of a reddish/dark colour had formed around what was the grey area. After which I sanded down the beeswax and put a thin layer of superglue on and wet/dry sanded it the area. After which I rubbed down again and tried to clean with lemon oil and then acetone before adding nail laquer by brush followed by wet/dry sanding. But it still does not match the surrounding area: 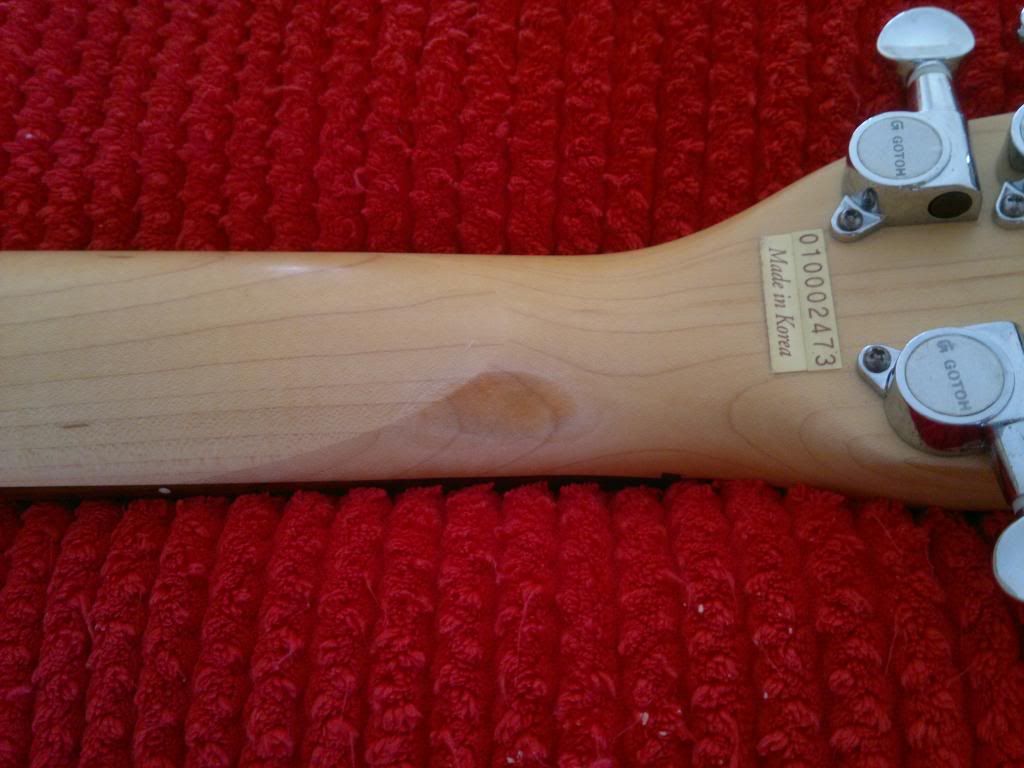 Similary I had a couple of scratches on the headstock which I tried the same approach with although I sanded the area down more as the depth of damage was a lot less and on a flat surface. But as above I have a whitish ring (almost down to the wood, a little laquer left?) centred around a darker area. In the photos below you can see an area to the left of the first A peg and a smaller area to the lower high E peg:  So what has caused the miscolouration? Chemical damage? Staining? Dried out maple? Damp maple? Or is this the natural colour of maple and the laquer layer had a slight tint to it? All help much appreciated. I've had no experience to date with dealing with natural finishes/necks etc. Cheers, Danny |
|
|
|
Post by dannyhill on Apr 24, 2014 8:49:30 GMT -5
Too true, its the same guitar that I had my, eh-hem,drilling mishap on before.
I'll change the nut first and see how it looks.
|
|
|
|
Post by dannyhill on Apr 24, 2014 4:00:28 GMT -5
Doh!  I checked the relief again and there was too much! Lowered it and I'm back down somewhere between 1.5 and 1.75mm at 12th fret for the high E. Weird thing is though the G is higher. Saddle or nut badly cut? Well I capoed he 4th and put my 0.15mm guage under the first fret for each of the 6 strings, looks like its a bit snug on the high strings, but the G was just virtually touching the fret. Its the original nut that I sanded across the bottom as it left the strings way too high off of the fretboard initially. So a new Tusq will be going in there. Yay! One final thing though, I noticed that the bushing on the high E side under the vibramate (where the stop tail would go in) is 2-3mm further out than the low E side (where bridge ground wire goes) where you can only see the lip of the top of the bushing, when I walloped it back down, all fine and good. But stringing up again and under tension, it had raised again. How do I keep the little sucker down? Superglue? Pull the bushing, dowl it and redrill the hole? That would seem a bit excessive. Any advice most gratefully received! D |
|
|
|
Post by dannyhill on Apr 23, 2014 6:51:43 GMT -5
Anyone?
How do I lower the treble side action if the bridge can't go any lower, its a set neck and the nut is the correct height?
Clean out the saddle and nut slots?
File the saddles down?
Make sure the bushing is fully into the body?
?
|
|
|
|
Post by dannyhill on Apr 21, 2014 8:05:26 GMT -5
OK, so I got the fella off last night and when I unscrewed the little grub screw, surprise surprise the bass side had an inner bushing/collar but the high side had nothing. Well I must have bought it like that, anyway we live and learn. So out came the hobby tool and I cut the end off of a felt tip pen lid and drilled the inner tube (which enclose the felt tip) wide enough to accommodate the retainer inner rod. Greased it all up, then sanded the edges of the outer tube ends down so on final assembly the outer retainer tube could spin freely (at least 360deg on one finger flick).
Added a washer under the bigsby so I can up or down one tone on the B string, although unfortunately of course the arm is now slightly higher.
Perfect! Plus intonates well! Last night (very late) I could swear I had the action at the 12th fret, 2.25mm on the low E and 1.75 on the high E. But today the high E seemed to be over 2mm.
I checked the relief (I look for 0.25mm at the 8th fret with the 1st and last frets held down) and it was slightly higher so I adjusted the truss accordingly to get it bang on. But now it seems I have 2.5mm and 2mm on the low and high E strings. WTF?
OK, ok. So now you say, well just crank the bridge down (I think its a stock ABR), thats ok on the low E side, but the high E side can't go any lower!!
What is going on? How can I get the action lower on the high E side? If I wind it down on the low E side will it drop down a little on the other side too?
I measured the nut height. Bang on 0.15mm at the first fret when fretting at the 4th.
Bizarre. Answers on a postcard to..... :-)
D
|
|
|
|
Post by dannyhill on Apr 19, 2014 15:38:35 GMT -5
Hi Mr '4Real',
No, I haven't actually. I trusted the 12" spec from Epiphone.
I did try to file down the D saddle but made a hash job of it, but what you say, if I was confident in being able to do it is the right way (or buy another bridge in case mine was just a 'bad one' - cheap guitars and all that).
Anyway, cut a long story short. I put the Wilkinson roller bridge on and:
(1) It stays in tune when I waggle gently.
(2) I can now intonate it properly due to it being wider than the ABR
(3) Possibly related to the intonation or just a bridge with an accurate curvature? The string heights now go 2.3, 2.2, 2.1, 2.0, 1.9, 1.8!
FYI My action at the 22nd fret (I don't have 24) is lower than at the 12th, which means I guess, that compared to Greekdude I have more neck relief than him.
It sounds ok unplugged, I will try to get time tomorrow to plug it in and play. TBH I believe the break angle with my washers/nuts on still makes it greater than on my teles, but I will check out the tone tomorrow and maybe lower the Bisgby by a nut or two accordingly.
BTW I now get some buzzing along most of the high E (8th fret on wards) - need more neck relief? The problem I had on the A string has gone. The ringing/fretting out at the D string around the 12th (and now 13th since I filed the 13th) fret? I found a lump/bump/kink on the underside of the string just around the 12th fret. So now more filing for now and see how we get on after the next string change.
Thanks all!
D
|
|
|
|
Post by dannyhill on Apr 19, 2014 15:21:22 GMT -5
Certainly does Mr '4Real'!
I will get the screw drivers and masking tape out tomorrow and let you know how I get on.
I'm guessing that these wont have teflon inner sleeves like that on my Wildkat but instead have bearings. Any heads up on what I should watch out for there?
Cheers,
D
|
|
|
|
Post by dannyhill on Apr 17, 2014 9:18:12 GMT -5
Greek dude:
This is copy pasted from your link:
"Silly Low - Some like the neck perfectly straight or with the slightest amount of relief, and the action right on the frets. Perfectly straight neck and extremely low action will give you playability that's unparalleled for some people, a very low resistance to fretting, but there are sacrifices. The lower the action the more the strings are being choked by the frets. It has a way of disguising fret buzz by smoothing it out. On a medium action you'll hear the buzz quite well as the string is usually just pinging off of one or possibly two frets. On silly low the string is pinging off of so many frets it's not as apparent as "buzz", but what all that contact with the frets is doing is robbing your notes of the full tone that string could offer if it was allowed to breath. Processed signals can virtually hide the choking, but if you ever plug into a clean channel you'll notice right away. You can get away with silly low if you've got an extremely light pick attack. Typically in a setup this would be a perfectly straight neck to .1-.3mm of neck relief, and action height at the last fret of 1.5mm or lower. Not good for playing big bends without impeccable fretwork and a flatter radius fretboard, and even then the lower you go the less you'll be able to bend without choking. At 2mm you can get a 3 step bend but 5 steps you will not. You will also have to be more precise in muting as it's much easier to "mute" a string into the frets and create noise. I love the playability of it when I get to set one up like this, but I loose a little feel of the string when it's that close and prefer just a little better grip I feel I get at just a little higher action. Your Mileage May Vary [YMMV].
Standard Low - Adding just a little more neck relief and raising the action will give a cleaner tone, longer sustain, and tolerable buzz with a medium/light pick attack. This is usually the typical setup for guitars I ship. Good clear tone on the majority of the neck with and a light fingering feel. Typical is .2-.3mm of neck relief and 1.6mm string height on the low E, and 1.5mm on the high E at the last fret. This gives me the effortless playing of silly low but just enough tension on the fingertips to get the feel of the string, especially for bending, and muting becomes a little easier. As I mature I have grown to like this setup better in the middle range. Tastes change, and you should set your guitar up to your taste.
Low - Continue raising the action will get still cleaner tone, and lighter buzz with a medium pick attack. The higher you go the more tension your fingers will feel, and this creates more control of the string for me. I typically keep the relief down in the .3mm range to reduce the amount of "boing" from the slightly higher action in the 4-12th fret range. Typical is .3-.5mm of neck relief and 2mm string height on the low E, and 1.8mm on the high E at the last fret.
Medium - You can still add a little neck relief but after a certain point more relief just isn't an advantage. Raising the action height is and will continue to clean and fatten up your tone and increase the feel of the strings under your fingers. Medium relief is .5-.6mm of neck relief action of 2.5mm on the low E and 2-2.5mm on the high E.
High - Lots of frontbow and high action will give you a very clean playing guitar with full tone, and lots of extra calluses. However much neck relief you want and action on the low E at 3mm or more, action on the high E over 2.2mm to as high as you want."
According to your measurements your guitars enter "Standard low".
I have no idea what mine is as I have never measured action at the 24th fret, but I set neck relief (measured at 8th fret) I set at approx 0.25mm on all my guitars.
|
|
|
|
Post by dannyhill on Apr 16, 2014 6:01:45 GMT -5
Anyone?
What's happened to my retainer bar?
|
|
|
|
Post by dannyhill on Apr 16, 2014 6:01:03 GMT -5
Your point is well made GreekDude, and when I'm a good enough guitarist I might invest in some good guitars, with the appropriate price tags.
In any case:
Higher action means that you get more sustain but poor intonation.
Lower action sacrifices sustain for playability and intonation accuracy.
|
|
|
|
Post by dannyhill on Apr 15, 2014 10:13:06 GMT -5
Fender and Gibson reguarly recommend approx 2mm and 1.5mm, so its no far off. I don't do tapping by the way.
|
|
|
|
Post by dannyhill on Apr 15, 2014 7:42:24 GMT -5
|
|
|
|
Post by dannyhill on Apr 15, 2014 7:35:21 GMT -5
|
|
|
|
Post by dannyhill on Apr 13, 2014 16:02:10 GMT -5
Hi everyone,
On my LP Deluxe immitation guitar I installed a B5 Bigsby on a vibramate plate and everything has seemed to be fine. The other day I noticed however that the part of the retainer bar on the side of the high strings has seemed to have lifted up under tension from the strings. Now I took the bigsby on my Wildkat apart the other day and it has C or E clips on the end with teflon bushings within the outer roller tube and inside is a narrower rod which the outer tube spins around, well around the bushings. The bigsby on my LP Deluxe Imimitation however is put together differently. Its inner rod is fixed (or whole thing) by a couple of hex screws under the bigsby. So what's happened here? Are there teflon jackets inside that got crushed on one side? Or are there needle bearings that have got broken? Is it fixable?
Curious.....
My thanks to all who can shed some light on this...
Danny
|
|
|
|
Post by dannyhill on Apr 13, 2014 10:42:18 GMT -5
Hi everyone,
I bought and modded (of course) an Epi Wildkat a while back, got it playing well with the front of the bigsby jacked up and a set of 11s on it. It came with an ABR bridge but with the original nut and 10s, Tusq nut and 10s, or Tusq nut and 11s when I tried to stagger the action across the 12 fret I could never get below 2.25mm low E and 1.75m high E, and that's after some very rough and ready fret filing. Anyway, all well and good BUT the D and G are almost as high as the low E and certainly higher than the A. Is this just down to badly cut saddles from the factory? I had a go at slotting the D lower but ended up with a lot more fret buzz so re-filled it with some super glue and then cut a small groove in it so its sits half way in. But then I got strange ringing/buzzing at 12th fret and 13th on the A (out with the files again). Now I have read on the internet that matching bridge radius to the neck radius always makes the D and G higher (yeah I know, there's a lot of rubbish on the internet, but this guy seemed to be a proffesional luthier on his own site).
So, do I order a replacement one (I recently bought a gold Nashville one from Warmoth with the E rings for another project but the saddles and screws were so loose on 3 or 4 of it that I didn't use it eventually), probably better a Nashville type, as although I have a bigsby on it I probably could do with more 'intonation range' cause perhaps the bridge posts weren't set too too accurately? Or do I put on my Wilkinson 14" roller bridge that I had intended to use originally which also is great for intonnation range, BUT, it is a roller. Do I lose sustain? Will it transfer less/different (non-vintage tone)? For sure strings will last longer and the bigsby action might be smoother still? What do we feel about rollers? I saw on one video a guy did with his 3 p90 Riviera that there seemed to be less higher harmonic overtones with the roller compared to the original ABR (he hated the buzzy retainier wire)
Buy a Nashville TOM or stick the Wilkinson roller on?
All advice would be most welcome!
Hope you all had a good weekend,
Danny
|
|
|
|
Post by dannyhill on Feb 18, 2014 4:50:00 GMT -5
Thanks UX4484!
I'm fairly happy with it.
If it was a 1000 dollar guitar I would get someone to do it or could justify spending a lot more time and buying better materials to do it.
At the end of the day if at some point I want to improve on it I can just go back and remove it all and start over.
:-)
|
|
|
|
Post by dannyhill on Jan 27, 2014 5:17:36 GMT -5
I re-worked it a few days later and I think without higher skill and better materials it wont get any better unless I get lucky.  Well I think it looks less worse now at least ;-)  |
|
|
|
Post by dannyhill on Jan 16, 2014 13:31:02 GMT -5
OK, so this week I have been filling with wood filler and then I tried to tessellate the pieces back into place. They didn't seem to fit into place. Anyway I ended up breaking some pieces to fit and.... So not as neat. With the aid of red and brown felt tipped pens for the 'gaps' and a wet mesh sanding of a thin super glue layer after 3 attempts I got the below:  Not brilliant due to different colours, odd forms due to the tessellation and then colouring in in-between. It also looks darker under flash, here under lamp light it looks better, I guess daylight is the best test:  I think I need to go back and apply another coat of superglue as the previous one was rubbed so low it I removed it in areas and some areas are pitted, in an attempt to 'tattoo' the area with brown dye rather than strip, colour and then reapply the superglue. Its too large an area and with grained material to ever look remotely ok, but it would be nice to have a similar colour and be level.  What do you think? Probably going to just warm up some glue and apply an ultra thin layer of glue and then rub down tomorrow. Maybe touch up the light coloured area with the felt tip before. |
|
|
|
Post by dannyhill on Dec 17, 2013 4:51:55 GMT -5
We're through!
Gotta make sure the wires are not damaged and its on to the next job of filling that rogue hole and then feeding the wires through followed by the pickup wires.
Need to re-wire the pots first though and the final job will be to re-cover the rogue hole on the back.
|
|
|
|
Post by dannyhill on Dec 15, 2013 18:15:55 GMT -5
Filing, sawing and chiseling......
I think people got out of Alcatraz faster!
|
|
|
|
Post by dannyhill on Dec 11, 2013 7:10:33 GMT -5
Hi all, Well, my wire saw arrived, only the rings to attach the handles to are too big to fit through the hole. So I will replace one tonight with a smaller one. Then between that and the folded/platted 5o grade sandpaper hopefully we are good. Wrt to the hole on the back, well, maybe I can patch this. I found three pieces of the tinted laquer/poly coat which would seem to cover all or almot all the whole if glued down onto some filling. What do you think? Its just I'm not really enamoured with having a kill switch and it would look a bit out of place. I have put two photos where I have placed two different pieces in the same place, not sure where each should. You wouldn't think it was that difficult, 3 piece jigsaw puzzle which fit together in some places where they haven't lost edges.   Cheers, D |
|
|
|
Post by dannyhill on Dec 10, 2013 6:26:42 GMT -5
|
|
|
|
Post by dannyhill on Dec 9, 2013 15:36:58 GMT -5
What?
Momentaries only work whilst I hold the button, latching is permanent until pressed again or flicked back?
And there is no difference between SPST and SPDT according to our conversation wrt noise?
|
|
|
|
Post by dannyhill on Dec 9, 2013 4:39:20 GMT -5
Hi Newey, OK, that's great. Its clear you don't like the switches I linked to from Ebay. If I can find one in Europe all the better, otherwise I will have to wait and purchase ten from China. I thought of it as its diameter is approx 1cm which is the diameter of the hole I made.  |
|
|
|
Post by dannyhill on Dec 8, 2013 14:39:03 GMT -5
Hi Newey,
Thanks for the info!
I was thinking of running the hot to one lug and then onto the hot of the jack and on the other lug have the ground wired to the ground of the jack.
Would that not work, does nothing when open and when closed shorts the hot to ground?
Not sure what I can get here, but it needs either cream, gold/brass or wine red to match surrounding materials.
I will perserve with the widening. Thanks for extra ideas.
This w/end has been a nightmare. Drilled through the LP and then on my import Black Beauty dropped a heavy screw driver on the laquer and cracked it. Then all my attempts on that second guitar to cover up cracked or missing laquer have ended up with little or no change but exta micro scratches requiring more work (some from razor to scrape the superglue drop filling), luckily they are in unobtrusive places. Where I dropped the screwdriver I used ink to colour the centre and then drop filled superglue. Only I took took too much off with the razor as I then rubbed away with my mesh paper the laquer down and through the paint. Nightmare! Got some fountain pen ink and found I could colour the superglue in-situ! That's a shave and rub/polish job for tomorrow! 2 hours later I realised the pickguard I bought was going to cover it, doh!
I was going to strip a house lighting neutral wire as it had snapped off in the wall fitting....I think given how things have gone, it can wait until another day. :-)
|
|
|
|
Post by dannyhill on Dec 8, 2013 4:34:20 GMT -5
Nut-tastic!
|
|
|
|
Post by dannyhill on Dec 8, 2013 4:34:04 GMT -5
BTW Any ideas wrt routing the wiring cavity between pickups, I've been going to and fro with the rough sand paper in a narrow strip which works well, but seems to have little effects towards the centre of the cavity. Knott? Or need to pull strip tenser?
|
|
|
|
Post by dannyhill on Dec 8, 2013 4:32:15 GMT -5
|
|
|
|
Post by dannyhill on Dec 7, 2013 12:12:27 GMT -5
Sure, I have no clamp/bench though.
If there is ever a next time I sure will.
|
|
|
|
Post by dannyhill on Dec 7, 2013 9:23:42 GMT -5
Hi Sumgai,
Thanks for that. I didn't consider that, but then I already had to cut out two little holes in the backplate for tone cap switching, I would then have to get a sheet of pickguard material and as it probably wouldn't match the switch cavity, have to cut a new one for there with all the extra holes cut out in that plate for 3 micro switches.
So, I was thinking of covering it up. Then again, maybe I could fit a momentary switch in there? Perhaps a gold cap to match the screws? Not sure I would find a matching piece of pickguard material to add a separate 'dot' there. Otherwise how to fill and paint?
Ta
|
|


